
HEVC to MP4 conversion is not just about changing formats. With the wrong converter, the output may look softer, become much larger, lose audio sync, or fail to handle 4K, 8K, HDR, and 10-bit videos properly.
For this guide, we tried many desktop and online HEVC converters and checked how they handled real conversion tasks, including output quality, speed, file size, ease of use, batch conversion, and large HEVC files... Some of them were fine for short clips but struggled with large 4K files, 10-bit HEVC footage, or longer videos. The six options below are the ones that held up better in our tests.
Quick Picks: Best HEVC to MP4 Converters
| Tool | Best For | Quality & Control | Speed | Notes |
|---|---|---|---|---|
Large 4K/8K HEVC videos, batch conversion |
High quality; Easy control |
Very fast with GPU acceleration |
Converts videos under 5min for free |
|
Free and open source |
High quality if configured properly |
Moderate |
Supports 3 output formats only |
|
Advanced users and command-line workflows |
Excellent control with the right commands |
Depends on settings and hardware |
Powerful but not beginner-friendly |
|
Quick one-time conversion |
Basic control over output settings |
Moderate |
Useful if VLC is already installed |
|
Converting small HEVC files |
Basic to good for simple files |
It depends |
Free plan has a 100MB file size limit |
|
Basic format conversion |
Limited output control |
It depends |
500MB of size limit; poor quality |
Note: Remux or Transcode HEVC Files to MP4?
Before choosing an HEVC to MP4 converter, it helps to know whether you need to remux or transcode the video.
Remuxing only changes the container. For example, you can remux an HEVC MOV file into an HEVC MP4 file without re-encoding the video stream. This is very fast and keeps the original quality, but it may not solve compatibility problems if your device, media player, or video editor does not support HEVC.
Transcoding changes the video codec. For example, converting HEVC/H.265 to H.264 MP4 usually makes the video easier to play, edit, upload, and share. However, transcoding takes longer and may affect quality or file size, especially with large 4K, 8K, HDR, or 10-bit videos.
In most compatibility cases, MP4 with H.264 video and AAC audio is the safer choice. If you are converting large HEVC files, a converter with GPU acceleration can save a lot of time.
6 Best HEVC to MP4 Converters: Detailed Review
Not every HEVC converter is built for the same job. Some are better for large 4K files, some give you more control over quality and file size, and some are only practical for quick online conversions. Below, we break down what each HEVC converters does best, what to watch out for, and how to use it to convert HEVC to MP4.
#1. VideoProc Converter AI: Ultra-Fast HEVC Conversion (Best Quality)
VideoProc Converter AI is a practical choice for users who need to convert large HEVC/H.265 videos to MP4 without spending too much time on technical settings. It is especially useful for 4K, 8K, iPhone, GoPro, drone, and camera footage, where file size, conversion speed, and output quality all matter.
The software can convert HEVC to H.264 MP4 for better compatibility with media players, video editors, TVs, and online platforms. It also supports other output formats such as MOV, MKV, AVI, WebM, and more. If your HEVC video only needs to be placed into an MP4 container, the Auto Copy option can remux the file without re-encoding, which keeps the original quality and finishes much faster.
Compared with free tools like HandBrake or FFmpeg, VideoProc Converter AI is easier for beginners because it provides ready-made output profiles, hardware acceleration, batch conversion, and simple quality controls in one interface. It also includes extra tools for video compression, basic editing, AI video enhancement, and photo enhancement.
Download VideoProc to your computer and follow the steps below to convert HEVC to MP4 with ease!

How to Convert HEVC to MP4 with VideoProc Converter AI
Step 1. Free download and install VideoProc Converter AI on Windows or Mac. Run this HEVC to MP4 converter and click the "Video Converter". Click the "+Video" button to import the source HEVC file(s).
Step 2. Go to the bottom section and select MP4 H.264. This is supported by virtually all mainstream platforms, devices, and video editing software. Surely, you can also select MKV, MOV, WebM, AVI, or other formats listed in the "Target Format" section.

Tips:
- If you're converting a 4K HEVC file to MP4, then I suggest you pick 4K H.264 to keep the original.
- Formats marked as "HWAccel supported" can use Intel, NVIDIA, or AMD hardware acceleration, so HEVC files usually convert faster to these formats.
- If necessary, click on "Target Format" to get more output format options.
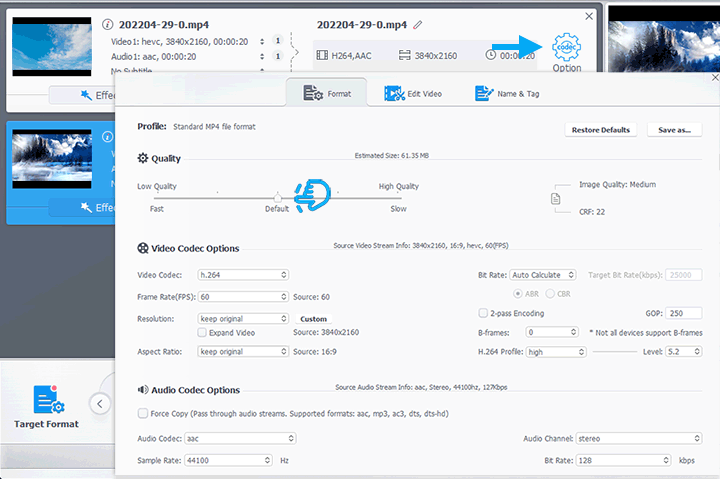
Step 3. (Optional) Some of you may want to adjust the properties of output for purposes like downgrading the resolution, getting a smaller file size, and optimizing the picture quality. To do so, click the "codec Option" button. On the pop-up Format settings panel, you can customize the output properties with ease. Once you're satisfied with your settings, hit "Done".
Tips:
- Move the quality slider left or right to get a smaller file size or better quality.
- Increase or decrease bite rate value to downgrade or enhance the quality.
- Pick the desired frame rate, resolution, aspect ratio, sample rate, and codec for the corresponding options.
- Check "2-pass Encoding" to enjoy better picture quality.
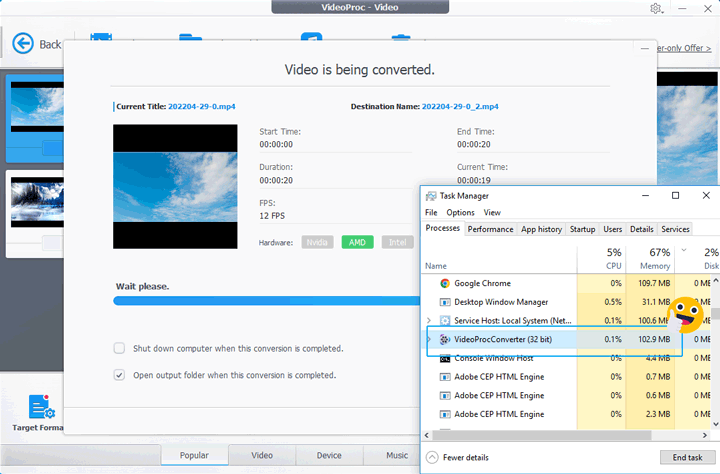
Step 4. Hit the "RUN" button to start converting HEVC to MP4 on Windows or Mac. You can check "Use High Quality Engine" for better quality. You can also check "Nvidia/Intel/AMD" to activate level-3 GPU acceleration tech for boosting the conversion speed and lowering the CPU usage.
Pros
- Fast HEVC to MP4 conversion with GPU acceleration
- Supports H.264 MP4, HEVC MP4, MOV, MKV, WebM, AVI, and more formats
- Useful for large 4K/8K HEVC files
- Batch conversion support
- Auto Copy option for remuxing without re-encoding
- Built-in tools for compression, editing, and AI enhancement
Cons
- Requires desktop installation
- Full features require a paid license
- Advanced users may still prefer FFmpeg for command-line control
Overall, VideoProc Converter AI is best suited for users who want a faster and simpler way to convert HEVC to MP4, especially when working with large files or high-resolution videos. It is not the only option, but it offers a good balance between speed, ease of use, output control, and extra media tools.
#2. HandBrake: Free, Open-Source HEVC Converter (Powerful and Custom)
HandBrake is a free and open-source video converter for Windows, Mac, and Linux. It can convert HEVC/H.265 videos to MP4 with H.264, H.265, VP8, VP9, MPEG-4, and other codecs. For users who understand video settings, it is a powerful free option with plenty of control over quality, bitrate, frame rate, audio tracks, and subtitles.
That said, HandBrake is not the easiest HEVC to MP4 converter for beginners. The interface feels a little dated, and terms like RF, encoder preset, constant frame rate, bitrate, and audio passthrough can be confusing if you just want to convert a video quickly. I also found that getting the right balance between quality, file size, and speed takes some trial and error, especially when converting large HEVC files.
This is why I would still recommend HandBrake to users who want a free tool and do not mind adjusting settings manually. But for beginners who want a faster, more guided way to convert HEVC to MP4, it may not be the most convenient choice.

How to Convert HEVC to MP4 with HandBrake
Step 1. Launch HandBrake on your Windows PC or Mac. Drag your HEVC/H.265 video into the program, or click File to select the source file manually.
Step 2. On the main interface, change the video container from MP4, MKV, and WebM if necessary. After that, click on "Video" to enter a new section. Unfold the drop-down box of "Video Codec", and you'll be given H.264, HEVC 8-bit/10bit, MPEG, and some other codec options.
Step 3. Keep the frame rate as default unless you have a specific requirement. Then adjust the quality slider to balance output quality and file size. A higher quality setting usually creates a larger file, while a lower quality setting reduces file size with more compression.
Step 4. Check the audio settings before encoding. If the output MP4 has no sound or audio sync issues, switch the audio codec to a more compatible option such as AAC.
Step 5. Go back to the Summary tab to review the output format and basic media properties. Then choose a save location and click Start Encode to convert HEVC to MP4 with HandBrake.
Pros
- Free and open-source
- Works on Windows, Mac, and Linux
- Good control over output quality and file size
- Supports MP4 and MKV output
- Useful for users who want custom encoding settings
Cons
- Settings may feel technical for beginners
- Not as fast as GPU-focused converters in some HEVC to MP4 tasks
- Limited output container choices compared with some paid converters
- Wrong settings may lead to large files, lower quality, or audio issues
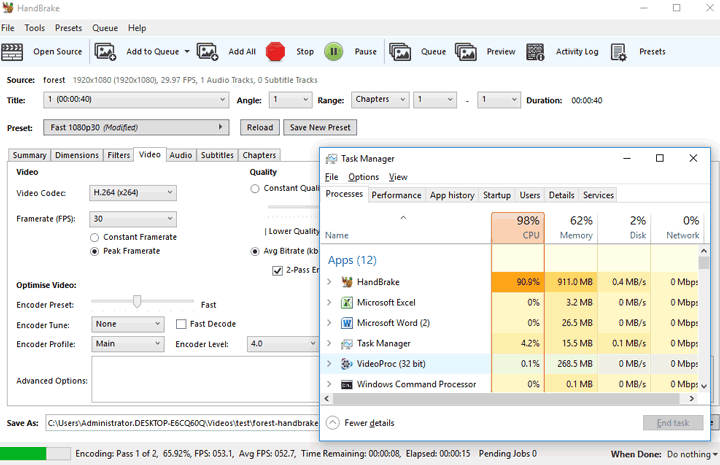
Many users wonder whether HandBrake is a fast HEVC to MP4 converter. Based on my test, I would say not really. I converted a 40-second 1080p HEVC video with a 4042 kbps bitrate to H.264 MP4 using the default settings in both HandBrake and VideoProc Converter AI. Here are the results:
- HandBrake took 43 seconds to convert the video, while VideoProc Converter AI finished it in 18 seconds.
- HandBrake also pushed CPU usage up to 90% during the encoding process.
#3. FFmpeg: Powerful Free HEVC Converter for Expert Users
FFmpeg is a free and open-source command-line tool for converting, remuxing, recording, and processing video files. It can convert HEVC/H.265 videos to H.264 MP4, remux HEVC files into an MP4 container, and encode videos to many other formats and codecs.
That said, FFmpeg is not built for casual users. Unlike normal video converters with buttons, presets, and a guided interface, FFmpeg works through commands. You need to type the right command for the codec, quality, audio, container, and output file. A small mistake can easily lead to a failed conversion, a very large file, no audio, or an output that still does not play properly.
This is why I would recommend FFmpeg mainly to advanced users who already feel comfortable with command lines. It is powerful, flexible, and completely free, but if you just want to convert HEVC to MP4 quickly, it may feel more complicated than necessary.
How to Convert HEVC to MP4 with FFmpeg
Step 1. Go to the FFmpeg official download site. There you are given many versions correspond to Windows, Mac, and Linux respectively. After you choose which operating system you want to install in, you'll be led to the FFmpeg Builds Page which displays the version, architecture, linking, and license information of the installation package that you are going to acquire.
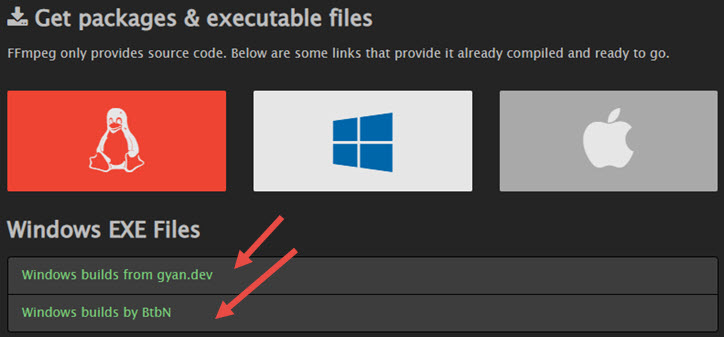
Step 2. Click on Download Build. In my case, I download Windows 64-bit static version.
For Mac and Linux computers, check the complete guide here to install FFmpeg.
Step 3. Once the installation package is successfully downloaded on your computer, you need to take 7zip to extract the ffpmeg.exe.
Step 4. Move over to your system directly (in most cases, the OS/C: folder), and create a new folder named FFmpeg.
Step 5. Paste the expanded files for the ffmpeg.exe to this newly created folder.
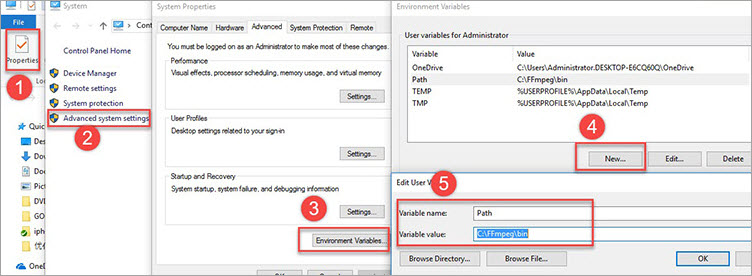
Step 6. Navigate to your computer, click on "System properties ", select "Advanced system settings", choose "Environment Variables", and tab New. There you set the variable name as Path, and set the "Variable value" as C:\FFmpeg\bin.
Step 7. Press Windows and R button on your keyboard, and input CMD to launch up the Command Prompt window in administrator mode.
Step 8. Copy the path of the source HEVC video.
Step 9. Press the blank button on your keyboard, input cd, and then press the space button again. There you paste the copied source video path and press Enter.
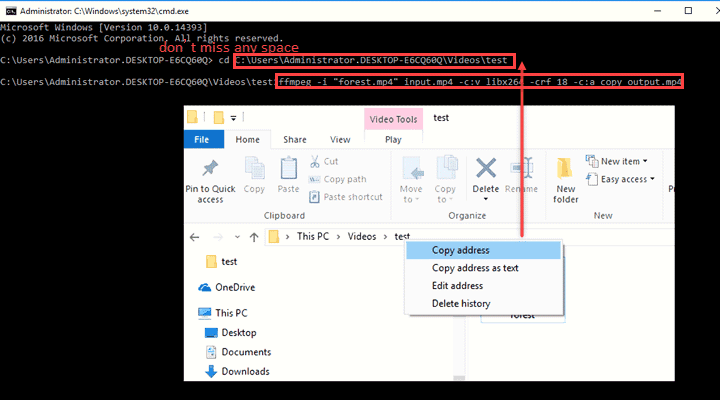
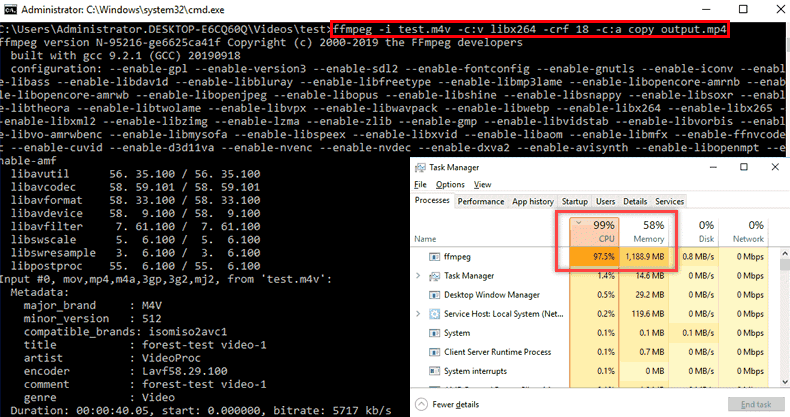
Step 10. Enter ffmpeg -i test.m4v -c:v libx264 -crf 18 -c:a copy output.mp4, and then press "Enter".
Pros
- Free and open-source
- Works on Windows, Mac, and Linux
- Supports almost every video format and codec
- Can remux HEVC to MP4 without re-encoding
- Good for advanced users, batch scripts, and custom encoding tasks
Cons
- Command-line only, with no visual interface
- Not beginner-friendly
- Installation and PATH setup can be confusing on Windows
- Wrong commands may lead to large files, poor quality, or audio issues
- CPU usage can be high unless you use optimized settings or hardware acceleration
FFmpeg is powerful, but I would not call it the easiest or fastest HEVC to MP4 converter for most users. In my test, I converted a 2-minute 30-second 4K HEVC video to H.264 MP4. FFmpeg took around 4 minutes and pushed CPU usage close to 99% with the command I used.
By comparison, VideoProc Converter AI finished the same conversion in 25 seconds and used much less CPU in my test. FFmpeg does support hardware acceleration and many advanced options, but setting them up properly takes extra command-line knowledge. For users who enjoy full control, FFmpeg is still an excellent free tool. For casual users who want a faster and more guided HEVC to MP4 conversion, it may feel too technical.
#4. VLC Media Player: Basic HEVC Converter (Limited Customization)
VLC Media Player is best known as a free and open-source media player, but it also includes a Convert/Save feature that can convert HEVC/H.265 videos to MP4. If you already have VLC installed and only need to convert a small HEVC file occasionally, it can be a convenient option.
That said, VLC is not a dedicated HEVC to MP4 converter. Its conversion interface feels less straightforward than a normal video converter, and the output settings are limited. You can choose basic profiles such as MP4 with H.264 video, but controlling quality, bitrate, frame rate, audio codec, and file size is not as beginner-friendly as it should be.
This is why I would only recommend VLC for simple one-off conversions. If you need batch conversion, better quality control, faster HEVC processing, or more reliable handling of large 4K/8K files, VLC may feel too limited.

How to Convert HEVC to MP4 with VLC
Step 1. Download and install the latest version of VLC Media Player from the official website. If you already have VLC installed, open it on your computer.
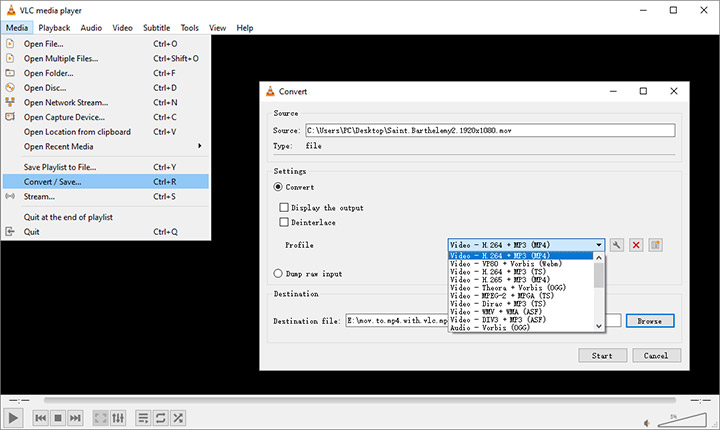
Step 2. Go to the top menu bar, click Media, and choose Convert/Save. This will open the Open Media window.
Step 3. Click Add and select the HEVC/H.265 video you want to convert to MP4.
Step 4. Click Convert/Save to open the Convert window. In the Profile section, choose an MP4 profile, such as Video - H.264 + MP3 (MP4). If you need better audio compatibility, click the tool icon next to the profile and adjust the audio codec settings if needed.
Note: VLC is not ideal if you need editing-friendly codecs or advanced export options. It is mainly useful for basic HEVC to MP4 conversion, not professional transcoding workflows.
Step 5. Click Browse, choose an output folder, and name the converted MP4 file. Then click Start to convert HEVC to MP4 with VLC.
Pros
- Free and open-source
- Works on Windows, Mac, and Linux
- Useful if you already have VLC installed
- Can convert HEVC to MP4 with basic presets
- No need to install a separate converter for small one-time tasks
Cons
- Not a dedicated video converter
- Conversion settings are not very intuitive
- Limited control over output quality and file size
- Not ideal for batch conversion
- May be slow or unreliable for large 4K/8K HEVC files
VLC can work as a basic HEVC to MP4 converter, but I would not use it as my first choice for serious conversion tasks. It is fine when you only need to convert a small file and do not care much about detailed output settings.
However, if you want better control over quality, file size, audio settings, or batch conversion, VLC quickly shows its limits. For large HEVC files, 4K videos, or regular conversion work, a dedicated HEVC to MP4 converter is usually easier and more reliable.
#5. Convertio: Online HEVC to MP4 Converter for Small Files
Convertio is an online HEVC to MP4 converter that works directly in the browser. It is useful when you need to convert a small HEVC/H.265 file and do not want to install desktop software. You can upload a video, choose MP4 as the output format, and adjust some basic settings before conversion.
Compared with many basic online converters, Convertio gives you more control over the output. For example, you can choose the video codec, adjust the profile and level, change the frame rate, and use CRF-based quality settings. This makes it more flexible than a simple upload-and-convert tool.
That said, Convertio is still better for small and occasional conversions. The free version has file size and usage limits, and uploading large HEVC videos can take a long time. I also would not use it for private or sensitive footage, since the video needs to be uploaded to an online server before conversion.
How to Convert HEVC to MP4 Online with Convertio
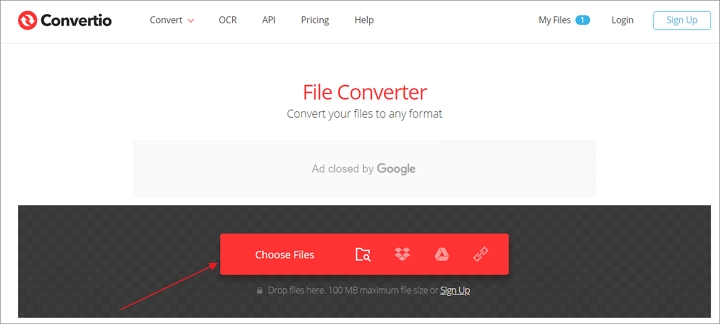
Step 1. Go to the video converter page of Convertio in your browser.
Step 2. Click Choose Files and upload the HEVC/H.265 video you want to convert. For free users, make sure the file does not exceed the allowed upload size.
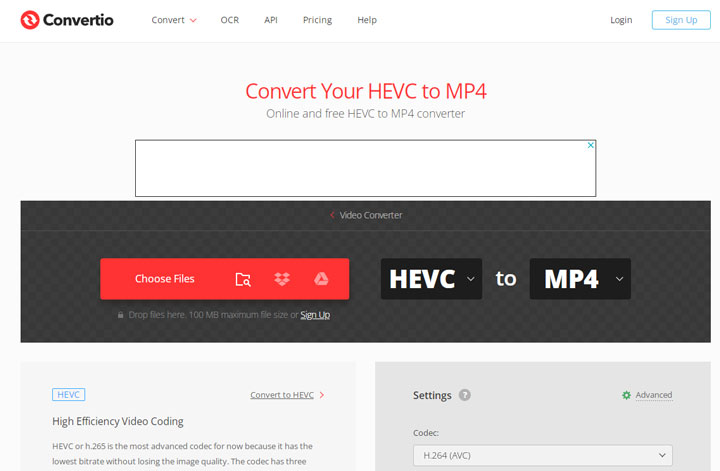
Step 3. Choose MP4 as the output format. If needed, click the settings icon to adjust the video codec, profile, level, frame rate, CRF, or other available options.
Step 4. Click Convert and wait for the online conversion to finish. Once the process is complete, download the converted MP4 file to your computer.
Pros
- Works online without software installation
- Simple interface for small HEVC to MP4 conversions
- Offers more output settings than many basic online converters
- Supports many video, audio, image, and document formats
- Useful for quick one-time conversion tasks
Cons
- Free version has file size and usage limits
- Uploading large HEVC files can be slow
- Not ideal for private or sensitive videos
- Online conversion depends heavily on internet speed
- Paid plans may not be cost-effective if you convert videos often
Convertio is convenient if you only need to convert a small HEVC file once in a while. I like that it gives users some control over codec and quality settings, which many online converters do not offer.
However, it is not the best choice for large HEVC files, 4K videos, batch conversion, or private footage. Once file size, upload speed, and paid limits become an issue, a desktop HEVC to MP4 converter is usually more practical.
#6. FreeFileConvert: Basic Online HEVC Converter for Simple Tasks
FreeFileConvert is another browser-based tool that can convert HEVC videos to formats such as MP4, AVI, MOV, and MKV. It is designed as a general file converter, so it also supports documents, images, audio files, archives, and other file types.
For HEVC to MP4 conversion, FreeFileConvert is very simple to use. You upload the file, choose the output format, and start the conversion. This makes it suitable for quick and basic tasks, especially if you do not want to install anything.
However, the simplicity also comes with limitations. FreeFileConvert does not give you much control over video settings like bitrate, frame rate, quality, audio codec, or compression level. The output may end up larger than expected or look worse than the source video, especially when converting HEVC files that need careful quality control.
How to Convert HEVC to MP4 Online with FreeFileConvert
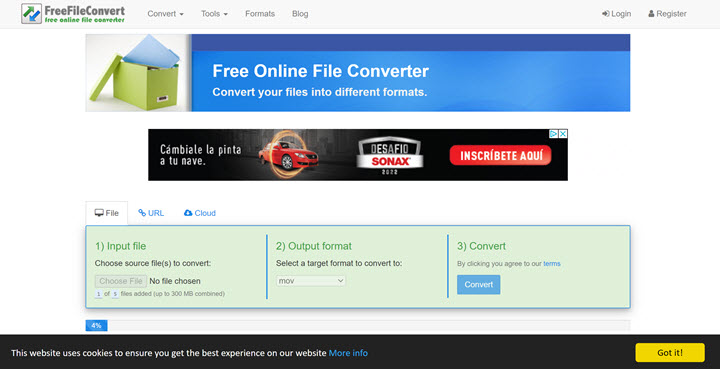
Step 1. Go to the video conversion page of FreeFileConvert.
Step 2. Click Choose File and upload the HEVC/H.265 video you want to convert.
Step 3. Choose MP4 as the output format if it is available for your source file.
Step 4. Click Convert and wait for the file to be processed. After the conversion is finished, download the MP4 file.
Pros
- Free to use for basic online conversion
- No software installation required
- Simple upload-and-convert process
- Supports many file types besides video
- Useful for small and non-sensitive files
Cons
- Very limited control over output quality and file size
- Not ideal for large HEVC files or 4K videos
- May not always offer MP4 as an output option depending on the source file
- Not suitable for private videos that you do not want to upload online
- Ads and page distractions may affect the user experience
FreeFileConvert is fine for a quick and simple online conversion, but I would not choose it for quality-sensitive HEVC to MP4 tasks. It does not offer enough control over encoding settings, so the final result can be unpredictable.
In my experience, it is better treated as a backup option for small files. If you need to convert large HEVC videos, adjust quality, keep file size under control, or process multiple files, a dedicated desktop converter will be much easier to work with.
Common HEVC to MP4 Conversion Problems and Fixes
HEVC to MP4 conversion can go wrong in different ways. The output may become too large, look softer than the original, lose audio sync, or still fail to play on certain devices. In most cases, the safest starting point is to choose MP4 with H.264 video and AAC audio, especially when the goal is better compatibility.
If you do not want to test bitrate, frame rate, audio codec, and other settings manually, a guided converter such as VideoProc Converter AI can make the process easier. It provides ready-made MP4 profiles, GPU acceleration, and basic quality and compression controls. Still, the exact fix depends on the problem you are dealing with.
The Converted MP4 File Is Too Large
This often happens because HEVC is more efficient than H.264. When you convert HEVC to H.264 MP4, the file may become larger if the converter tries to keep similar visual quality. Instead of lowering the resolution blindly, use a proper compression setting or quality slider. If quality matters, keep the original resolution and choose a quality-focused preset. For example, in HandBrake, Super HQ presets are usually a better choice than speed-focused presets when you want to preserve more detail.
The Output Video Looks Blurry
A blurry output usually means the HEVC file was over-compressed. This can happen when the bitrate is too low, the resolution is reduced too much, or the HEVC to MP4 converter uses a low-quality preset. Try converting again with a higher-quality MP4 profile and keep the original resolution when possible.
Audio Is Out of Sync
Audio sync issues are common with HEVC videos from phones, action cameras, screen recorders, and some cameras. The problem may come from variable frame rate, unusual audio settings, or imperfect timestamps in the source file. For most users, the easiest fix is to convert the HEVC file again with a standard MP4 profile that re-encodes video and audio together, such as H.264 video with AAC audio, instead of only copying the original streams.
The Converted MP4 Still Will Not Play
If the converted MP4 still will not play, check whether the file is still encoded in HEVC. Some tools only remux HEVC into an MP4 container, which keeps the original HEVC codec. This is fast and keeps the original quality, but it does not help if your device, TV, editor, or media player cannot decode HEVC. For wider compatibility, transcode the video to H.264 MP4 instead.
4K HEVC Conversion Is Too Slow
4K and 8K HEVC files are heavy to decode and encode. If the HEVC to MP4 converter relies mostly on CPU encoding, the process can be slow and CPU usage may become very high. For large HEVC files, use a desktop H.265 converter with hardware acceleration instead of an online tool. Online HEVC converters also require uploading and downloading the full video, which can take even longer.
HDR or 10-Bit Color Looks Washed Out
HDR and 10-bit HEVC videos can look washed out after conversion if the converter does not handle color information properly. This often happens when HDR HEVC is converted to standard H.264 MP4 for older devices or editors. If color matters, test a short clip first before converting the full video. For casual playback, SDR H.264 MP4 is more compatible, but it may not fully preserve the original HDR look.
HEVC Conversion: Optional Reading
1. Is HEVC Better Than MP4 H.264/AVC
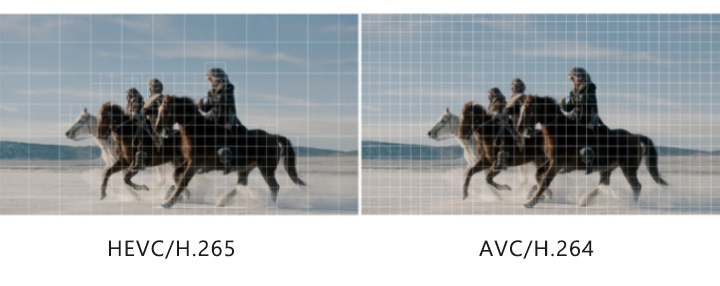
HEVC is superior to H.264 with regard to storage, bandwidth saving, and picture quality. HEVC file looks more crispy and retains more details than H.264 when the given bitrate and other properties are the same. This owed a lot to the application of the more advanced compression algorithm which is featured with coding tree united based blocks, the optimized motion-vector prediction, 35 directional intra-prediction modes, and enhanced interpolation filter, etc.
1) HEVC VS MP4 H.264: Some Key Improvements
A. Block Size
The basic building units of H.264/AVC are the macroblocks[3], which consist of 16 × 16 samples. However, many recent studies found the larger pixel block size is much more efficient to compress high-resolution videos. The small 16x16 blocks are insufficient to capture the increased spatial correlation from 1080P and other large videos. In HEVC, a slice is subdivided into multiple CTUs (coding tree units)[4]. Depending on the complexity of the picture, these CTUs can have different size: 16 x 16, 32 x 32, 64 x 64. In this way, the efficiency and flexibility of compression can get improved.
B. lock Partitioning Structure
Unlike the macroblock of H.264, the CTUs of HEVC include CU (Coding Unit), PU (prediction Unit), and TU (Transform Unit). The separation of these 3 units makes the division of each portion better fits the texture features of motion pictures, brings up much flexibility in transformation, prediction and coding process, and is good for fulfilling the function of each unit.
C. Parallel Tool
The coding of HEVC is much more complicated than H.264. To facilitate coding efficiency, two high-level parallelization tools[5] are introduced to HEVC: Title and WPP (Wavefront Parallel Processing). Tiles divide a picture into several groups of coding tree blocks. Each Tile can be regarded as an LCU (Large Coding Unit) that allows for being decoded separately. By using WPP, the consecutive rows of CTUs are decoded in parallel using multi threads. With the increasing demand for viewing high-resolution videos, these parallel tools allow the computer to make full use of multi-core processors to play these contents smoothly.
D. Frame Prediction
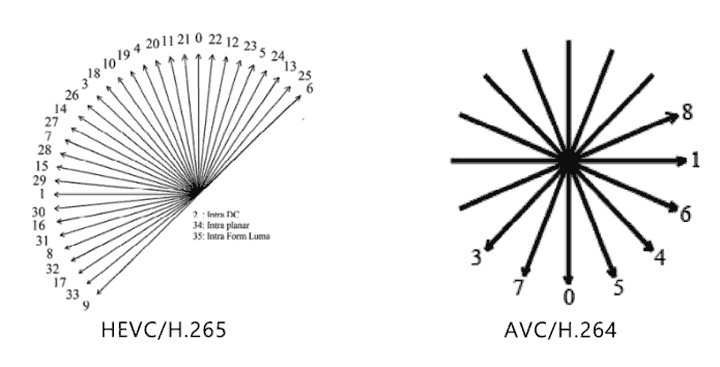
As for Intraframe prediction, HEVC supports 33 angular modes while H.264 only allows 8 different modes. More angular prediction mode brings HEVC higher coding efficiency and is also helpful for getting a smooth sample surface. As for internal Frame prediction, HEVC provides higher compression ratio and picture quality as well as removes redundancy in a video sequence by optimizing the motion prediction.
E. SAO (Sample Adaptive Offset)
HEVC introduces SAO[6] with the intent to reduce sample distortion, increase the compression ratio, and decrease the bitrate. This new in-loop filtering technique classifies the reconstructed samples into various categories based on BO (Band offset) and Eo (Edge offset) to get an offset for each category, and then adds that offset to each sample of each category. The adoption of SAO receives 2% to 6% save in bitrate with only a 2% increase in the consumption of decode/encode resources.
2) Test Data: HEVC VS MP4 H.264
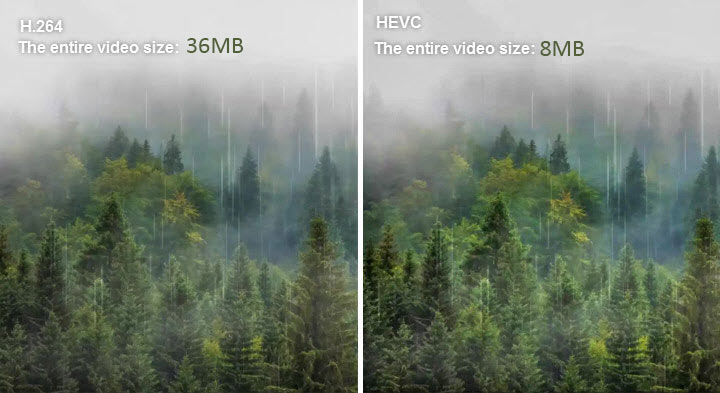
A. Save Storage Bits: HEVC > H.264
- One minute of 1080p HD, 60fps H.264 video takes up around 175MB of storage space on your iPhone.
- One minute of 1080p HD, 60fps HEVC video occupies 90MB of storage space on your iPhone.
B. Save Bandwidth: HEVC > H.264
- Around 32Mbps of bandwidth is required to stream 4K broadcasts.
- Approximately 15Mbps of bandwidth is needed to stream the same content.
C. Popularity: H.264 > HEVC
- Despite that many people use both H.264 and HEVC, overall H.264 users is twice that of HEVC users.
- The majority of editing software can't decode HEVC correctly.
D. Quality: HEVC > H.264
- HEVC delivers better picture quality when the given bitrate is the same as the MP4 H.264 clip.
2. What Devices and Browsers Support HEVC Natively?
1) Smartphones, TVs and computers:
- iOS 11 or later iPhone devices.
- Android 5.0 or higher smartphones.
- Almost all 4K UHD TV sets.
- Windows 10, macOS High Sierra, or later.
2) Hardware on Windows 10:
- 6th Generation Intel Skylake or newer.
- AMD's 6th Generation Carrizo APUs or newer.
- NVIDIA GeForce GTX 900 series or newer.
- AMD R9 Fury, R9 Fury X, or newer.
3) DSLR, action cameras, and drones:
- GoPro Hero 6, Hero7, and Hero8.
- PHANTOM 4 PRO, MAVIC 2 ZOOM, MAVIC 2 PRO, PHANTOM 4 PRO, PHANTOM 4 ADVANCED.
- The entire camera line of ZCam.
- Panasonic Lumix S1H, AU-EVA 1, AG-CX350, AJ-CX4000GJ.
- Canon XF-705, EOS-1D X Mark III, EOS R5.
4) Browsers:
- IE11; Edge12-18(Partially Supported); Safari 13, 13.1, 14-TP; iOS 11-13.3, 13.5, 14.0, and later.
Reference:
[1] Entropy encoding - High Throughput CABAC Entropy Coding in HEVC - IEEE[2] Hardware acceleration - Allows decrease latency and increase throughput. - Wikipedia
[3] Macroblocks - A liner block transform based processing unit in video compression formats. - Wikipedia
[4] CTUs - Conceptually corresponds in structure to macroblock units. - Wikipedia
[5] SAO - Improved Sample Adaptive Offset for HEVC - Hong Kong University


