


Whether you are shrinking a massive 4K file to share on social media or trying to blow up an older, low-res clip to fit a modern display, degraded quality is the last thing anyone wants when resizing a video. However, the process of downscaling or stretching those pixels can easily ruin a video if you don't use the right tools.
Changing the resolution is actually changing the total number of pixels that make up that video. When you decrease the resolution, regardless of the software, it physically discards data. When you increase the resolution, the software actually adds data, no matter the specific method employed. This process makes it prone to generating artifacts, thereby compromising the video's quality.
Fortunately, it doesn't have to be that way. In this guide, we are going to show you exactly how to change video resolution using different video resolution converters. Let's see how to use each of these tools to get the perfect size and the sharpest image possible.
Change Video Resolution with AI
Like said, changing video resolution alters the total number of pixels. Traditional upscaling uses mathematical guessing to inject new pixels, while AI video upscaling tools revolutionize this by replacing blind math with contextual intelligence. Instead of merely stretching and blurring a low-quality file, AI dynamically reconstructs crisp details, sharpens borders, and filters out compression noise, transforming a pixelated video into a naturally sharp, high-fidelity experience that traditional methods simply cannot replicate.
This is precisely what VideoProc Converter AI does. Its Super Resolution tool can increase the resolution by up to four times the original size, reaching a maximum clarity of 4K. It uses Convolutional Neural Networks (CNNs) and deep learning to recalibrate the video contents when upscaling happens. When lowering resolution, it also intelligently determines which data to retain and which to discard.
So why not give VideoProc Converter AI a try and check how to use it for video resolution switching?

To change a video into higher resolution:
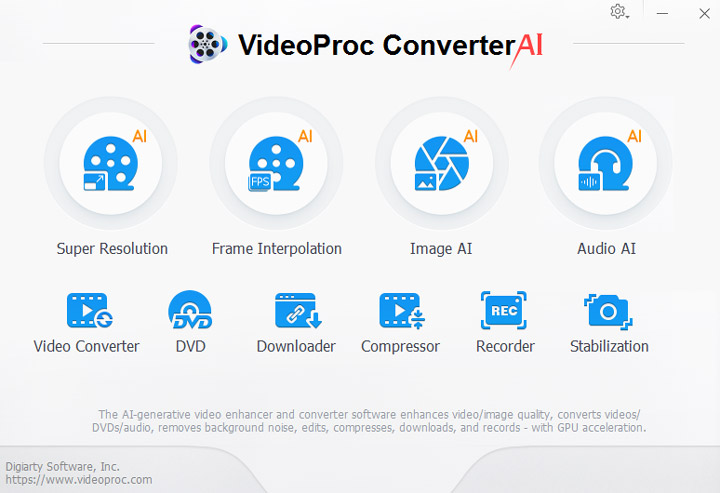
Step 1. Still launch VideoProc Converter AI on your Windows or Mac computer, and then choose the Super Resolution tab.
Step 2. On the new interface, choose the Add Media button to impot your video.
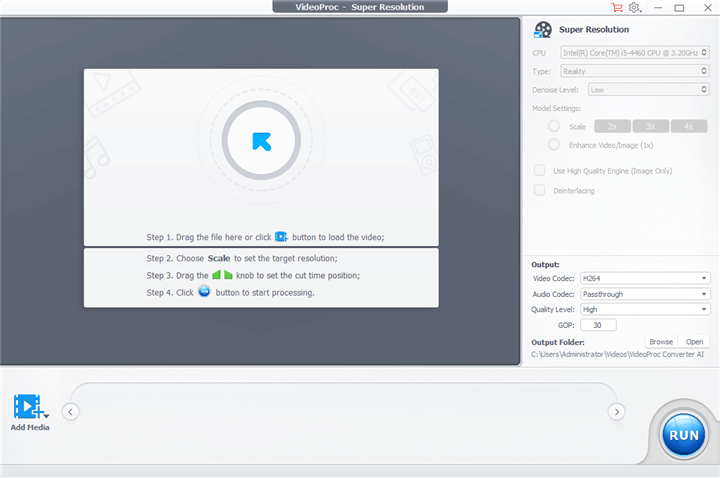
Step 3. Then head to the right side, and under the Settings feature choose how many times you want to enlarge your video. For example, to upscale 1080p to 4K, select 2X in the Scale list after importing the 1080p video.
Step 4. Lastly, set the output saving folder and click the RUN button to start processing your video.
To change a video into lower resolution:
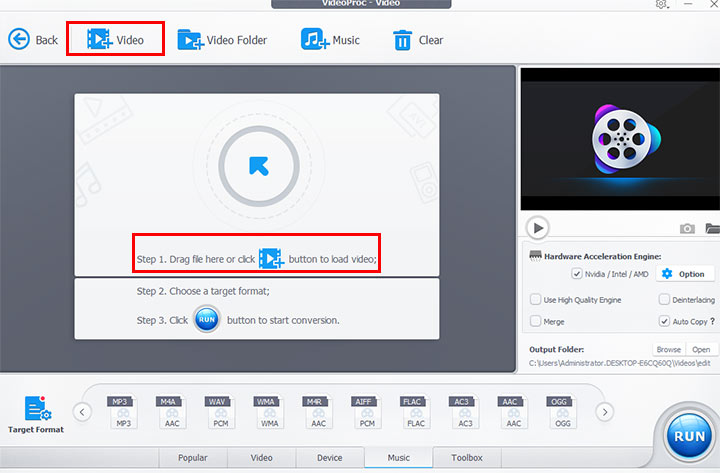
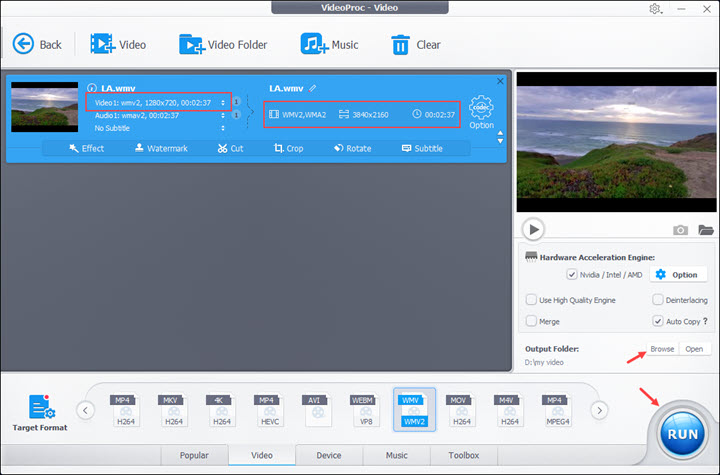
Step 1. Launch VideoProc Converter AI, and then click the Video button on the launching interface. After entering the video processing panel, click on +Video to import video file(s). When the file is loaded, jump to the lower part of the interface, click on Video tab and choose an output format. Now, you are allowed to change the source video format to another one, or you can keep the original as it is.
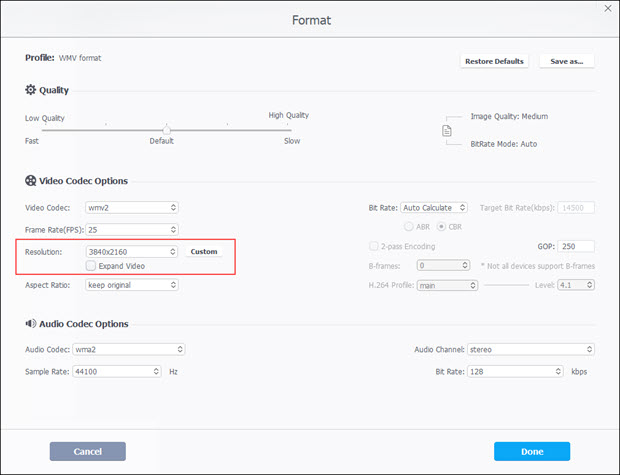
Step 2. Then choose the cogwheel menu Option appearing in the top right corner of the format tab. In the Format settings, go to Video Codec Options column > Resolution, then choose preset video resolution from the drop-down list. Otherwise, you can also click the Custom button to input the desired width and height number. Lastly, click the Done button.
Step 3. Now got to the lower right corner of the panel, click on Browse to set an output directory of your converted video file, then hit the RUN button to start the video resolution conversion.
Change Video Resolution for Free
Handbrake is a free and open source transcoder for video and audio files for Windows, macOS, and Linux. Most users may apply it as video format changer. However, it actually is video editor with many basic features. With it, you can edit file tile, chapter, and subtitle, add filters with options of deinterlacing, decomb, denoise, detelecine, deblock, grayscale, cropping and scaling, and more. Surely, converting video resolution must be included. But please remember that Handbrake only supports video container of MP4 and MKV. Besides, Handbrake does not allow upscaling.
Step 1. Get this application on your computer from here, if you have not yet.
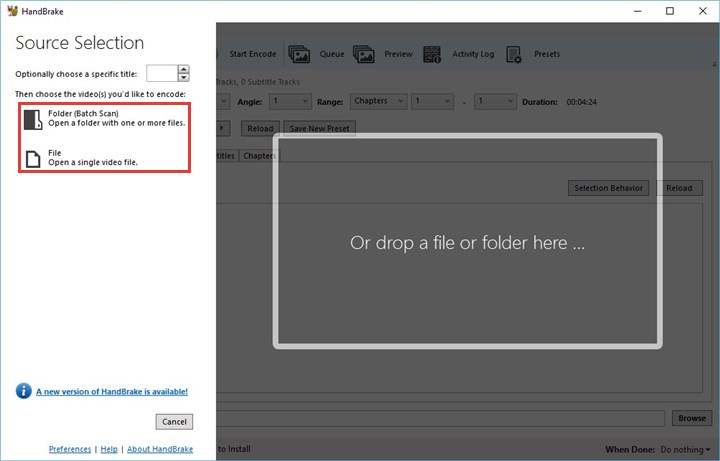
Step 2. After you install it, open it and import the video file by clicking the File or Folder menu.
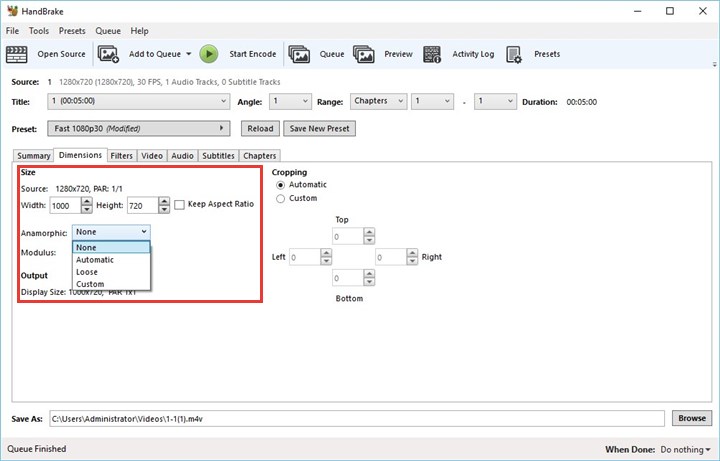
Step 3. Now you will be in the editing page. Choose Dimensions feature where we can customize the resolution numbers. Now make sure of Anamorphic with None option (we can set it to another, but there are some tiny differences among them. We will tell you in the following.), and then directly input the number that you want into the Width or Height box. If you want to change both width and height number but not at the original aspect ratio, please make sure of the Keep Aspect Ratio box unchecking.
In Anamorphic, there are None, Automatic, Loose, and Custom choices.
When choosing None, we can change either Width or Height, since there is the option of Keep Aspect Ratio.
When choosing Automatic, we can change both Width and Height, and no Keep Aspect Ratio option.
When choosing Loose, we can only customize the Width number.
When choosing Custom, we can have two more options of Display Width and PAR. PAR is shot for pixel aspect ratio. So if you also want to change the aspect ratio of a video, this option is recommended.
Step 4. Then just click the Start Encode button to make the conversion.
Change Video Resolution Online
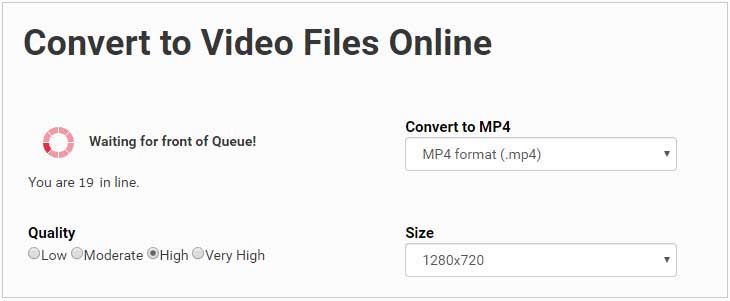
We know that there are a lot of video resolution converters online (free or paid). What they beat the desktop applications is its convenience and requiring no downloading anything. Here what we recommend to you is File-Conversion.
Step 1. Open this tool in your browser.
Step 2. Click the Select a File button to import the video clip which you plan to process. It may take a while, depending on the size of your file. And please note that this tool has a harsh limit on the files size. If the file size excesses the number that it allows, there would be an error message and file would not be loaded successfully.
Step 3. Right besides this button, there are a number of format options that you can choose, if you would also like to change its format.
Step 4. Then in the Size option, you can now choose the video resolution that you prefer for your file. What it disappoints us is that it has no customizing option, inputting the width and height numbers that we like. Maybe it can add this feature in the future.
Step 5. Then if you have some requirements on the output quality, you can set it to High or Very High in the Quality feature. Surely, higher quality, longer exporting time.
Step 6. Lastly, just click the Convert button to start processing and exporting all your settings above.
Change Video Resolution in Premiere Pro
Adobe Premiere Pro is the undisputed heavyweight champion of the video editing world. When it comes to changing resolution, Premiere Pro allows you to dictate exactly how your pixels are handled. You can trim, color correct, and add graphics to your video in the exact same workspace before exporting. However, because it is a professional suite, it comes with a steep learning curve and a premium price tag. Premiere Pro requires a relatively powerful computer to run smoothly, especially when handling 4K files.
- Open Adobe Premiere Pro and click New Project.
- Go to File and click Import to bring your video into the software.
- Drag and drop your imported video onto the timeline to create a new sequence.
- Once you are ready to save, go to File, select Export, and click Media.
- In the Export window, look for the Video section.
- Find the Frame Size settings. You will need to uncheck the box that says Match Source (or click the lock icon) to unlock the dimensions.
- Type in your new desired resolution (for example, 1920 for width and 1080 for height).
- Choose your file destination and click the Export button at the bottom right.

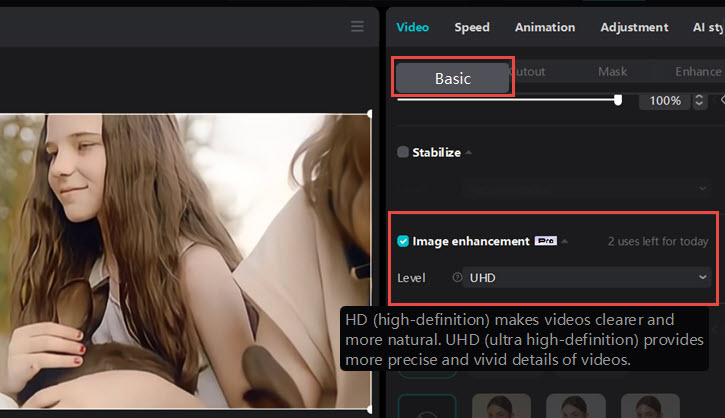
Change Video Resolution in CapCut
If you primarily shoot and share videos from your smartphone, CapCut is arguably the most convenient tool available. You can change resolutions on the go, without ever needing to transfer files to a desktop computer. The interface is incredibly visual and relies on a simple slider rather than typing in exact pixel dimensions. Once exported, CapCut offers direct buttons to share your newly resized video straight to platforms like TikTok, Instagram, etc.
On the other hand, however, CapCut upscaler lacks the advanced, detail-enhancing AI Super Resolution found in desktop tools. As a result, when upscaling video resolution, the output video often takes on an artificial, plastic-like appearance. You can view our test results here. Anyway, here's how to change video resolution in CapCut on mobile.
- Download and open the CapCut app on your iOS or Android device.
- Tap the blue New Project button and select the video you want to resize from your phone's camera roll.
- Tap Add in the bottom right corner to bring your clip into the editing timeline.
- Look at the very top right corner of your screen. You will see a number indicating the current export resolution (it usually defaults to 1080p). Tap on that number.
- A drop-down menu will appear featuring a Resolution slider. Simply drag the slider left to downscale (e.g., to 720p or 480p) or right to upscale (e.g., to 2K/4K).
- Once you've set your desired resolution, tap the Export icon (the upward-pointing arrow) right next to it. The app will process the video and save the resized version directly to your phone's gallery.
FFmpeg Change Video Resolution
If you prefer typing commands over clicking buttons, FFmpeg is the ultimate tool. It is a free, command-line utility. It is open-source without watermarks or file size limits. While it entirely lacks a graphical user interface, it is incredibly powerful, lightning-fast, and perfect for users who want to automate tasks or batch-process multiple videos at once. But please note that for novices, you have to memorize or look up specific text commands to perform even basic tasks.
- Download and install FFmpeg on your computer.
- Open your computer's Terminal (on Mac/Linux) or Command Prompt (on Windows).
- Navigate to the folder where your video is saved using the cd command.
- To change the resolution, type the following basic command, replacing "input.mp4" with your file's name and "output.mp4" with your desired new file name:
ffmpeg -i input.mp4 -vf scale=1920:1080 output.mp4 - Press Enter.
You can swap 1920:1080 with whatever width and height you need. To automatically keep the correct aspect ratio without stretching the video, you can type the width you want and use -1 for the height, like this: scale=1280:-1.
Change Video Resolution with Sony Vegas Pro
Sony Vegas Pro is a non-linear video editing system for Windows only. It has a powerful post-processing function. With it, you can edit your video materials at will, like adding special effects, adjusting colors, editing subtitles and more other operations. It also includes powerful audio processing tools that can add sound effects, record sounds, process noise, etc. In addition, Vegas Pro can also help users quickly output the edited video into a variety of formats, publish it directly on the Internet, burn it into a CD or record it back to a tape. So, changing video resolution would be just a piece of cake to it.
Step 1. Download and install this application on your Windows 7/10 computer with this link. After installation, you need to register and activate it. Sony Vegas Pro provides users with a 30-day trial plan.
Step 2. After activation, open it and load your video clip which you plan for video resolution changing, by File > Open > Find the file and double-click on it. Then choose the gear button which would pop up another window.
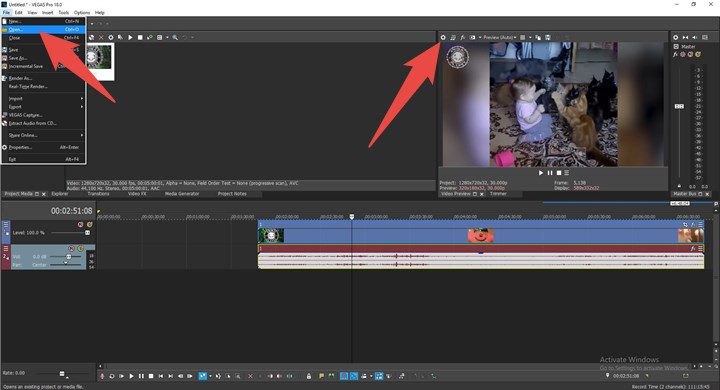
Step 3. In the new window, you can change a bunch of your video properties. Find the Width and Height parameters, input the number that you prefer, and click the OK button. That's it. Now you can render the file and export the file with the altered video resolution.

Change Video Resolution with VLC Media Player
VLC is mostly working a media player. But we all know that it has a bunch of gifts for video editing. They just hide so deep, and it needs our efforts to dig them out. So is its video resolution changer.
Step 1. Launch VLC media player on your Windows or Mac computer. If you don't have it yet, you can get it here.
Step 2. After we get into its homepage, find Media, and then choose Convert / Save option, which will lead us to another window.
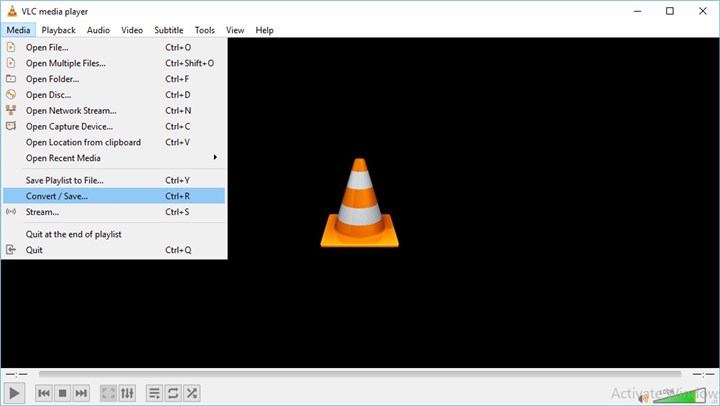
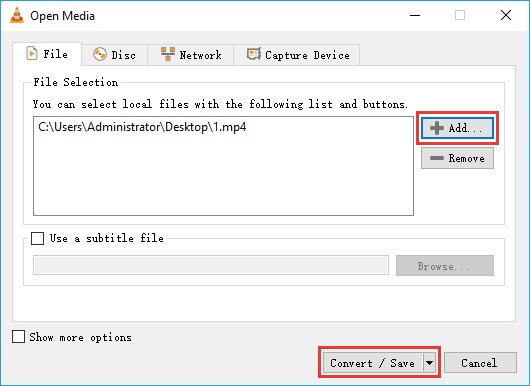
Step 3. Choose the Add button to locate the video file and import it into VLC. Then click on the Convert / Save button to the next window.
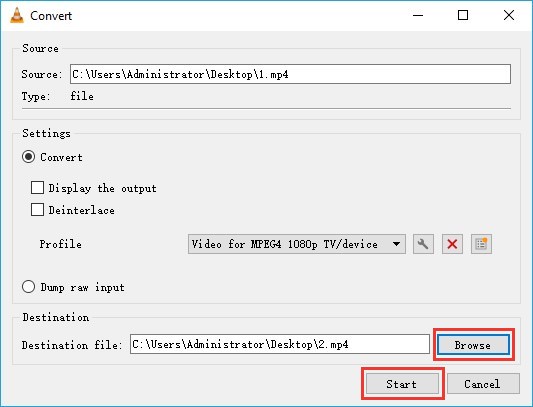
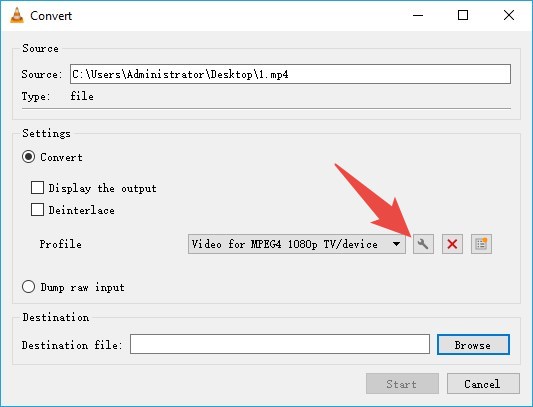
Step 4. In the new window, choose the wrench menu which will provide you with options of editing selected profile, including video and audio tracks formats, codec, bitrate, quality, frame rate, filters, as well as the resolution for sure.
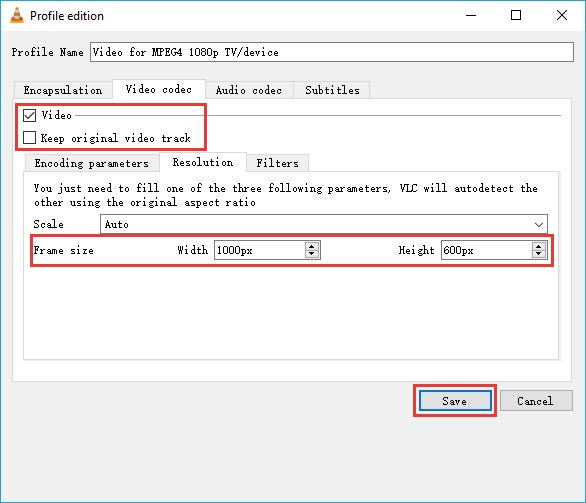
Step 5. In the profile editing page, please check the Video option and uncheck the Keep original video track option. Then choose Resolution column. Now what you just need to do is inputting the numbers into the Width and Height boxes. Click Save button back to the previous page.
Step 6. Choose Browse to name the output file and click on the Start button to let VLC process your video file. Compared to VideoProc Converter AI and Handbrake, VLC would cost more time on this job.