1. HDR in Different Contexts
HDR and high dynamic range are cover terms for many things depending on the specific context. Even inside the scope of photo and video, it can be referring to completely different ideas.
Besides the complexity of the production, mastering, delivery and display process that involve high dynamic content or scenes, the marketing strategies of various brands that takes HDR as a hype also add ambiguity to it.
1.1 High Dynamic Range
The idea of dynamic range — note that we didn't capitalize the phrases — is to describe the ratio between the largest value and the smallest value contained in a changeable amount.
Now in terms of imaging (including the videos and images), dynamic range describes the ratio of luminance in the lightest area comparing to the darkest area, that is, if the contrast is high between the darkest shadows and that of the brightest highlights. So, for a high dynamic range, that ratio is higher than what we can see on traditional standard dynamic range (SDR) TVs or computer monitors.
1.2 HDR Content: Video, Image, and Game
To be able to view HDR content, it entails that from capturing, production, to delivery and displaying device, each phase is dealing with true HDR content. For instance, in terms of display, the TVs or projectors must be HDR compatible, with a peak brightness that matches certain HDR standards, such as 1,000 nits as opposed to 100 nits of SDR display.
Even if the content delivered to you is an HDR video, yet your TV doesn't support HDR display, then what you are seeing is not a high dynamic range video. There are TV or mobile phone manufacturers claiming their product support HDR video, and you need to make sure what does it mean in fact. Sometimes, it only means the device can play that HDR video (as opposed to not being able to decode the content and instead showing you a playback error message), but not in high dynamic range format, meaning you are still watching SDR, and not enjoying the wide gamut and higher brightness level in HDR content.
Similarly, when a game is mastered in a high dynamic range in the production, and your device support displaying it, then you are enjoying the HDR video game.
If the pictures are created the same way as described above, and you are viewing that image in an HDR device, then what you are seeing is an HDR photo. However, this is not the same as the HDR photography technique that involves exposure bracketing and merging.
1.3 HDR Photography Technique
To deal with the dilemma of capturing photos in a high dynamic range, there are several techniques invented, one of which is to take multiple shots of the same scene, only change the exposure for each shot, and later merge them into a single photo.
According to the search result of HDR photography, when most articles talk about HDR photography, they are referring to this exposure bracketing technique. This technique is also applicable to video capturing, and as you can see, the video produced in this way is not the same as the HDR videos discussed above.
After merging the pictures, most photographers still choose to tone map it to an 8bit JPEG, meaning it is not a high dynamic range photo, but rather a photo being processed to better reproduce the high dynamic range scenes.
Even if the photographer export the image as high dynamic range, yet your monitor is SDR, then you are still not viewing the content as HDR.
1.4 HDR Disambiguation
From what has been discussed above, when one refers to HDR without providing context, we can't determine the connotation of the term.
- If it involves exposure bracketing and merging, then the HDR photos or videos are files created using this HDR photography technique.
- If the videos or images are stored in HDR format and displayed in HDR compatible-monitor (not only support HDR, but also display it in HDR instead of SDR), these media files are also called HDR photos or HDR videos.
For instance, the HDR photo on iPhone can be referred to as the image created and merged in-camera; but if you have iPhone 12 Pro and higher models, which support Dolby Vision and has HDR display screen, then the HDR photo and video are different from that exposure bracketing result.
1.5 HDR Audio
Dynamic range is also used in audio to describe the bit depth used during the quantization process, with a high dynamic range using more decibels to sample the recordings. Since it clearly belongs to the area of audio processing, and there is no ambiguity as that in video and image, we will not discuss high dynamic range in the field of audio engineering in this article.
2. HDR Video Content: From Capture to Display (HDR TV)
2.1 What Is HDR Video Content
Dynamic range means the difference between the brightest area and the darkest area of an image, and therefore is related to the contrast. Just as its name suggests, high dynamic range has larger difference than the standard dynamic range (SDR).
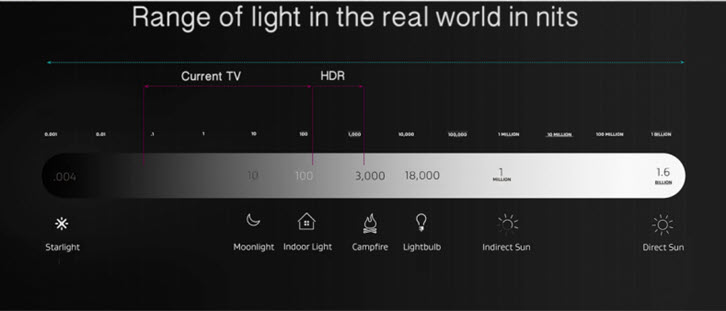
In terms of photography, the difference of the amount of light is described as stops. In that sense, the dynamic range of human eye is about 20 stops, and since one stop doubles the amount of light, that 20 stops entails a contrast ratio of 1,000,000 : 1. For SDR, the dynamic range is roughly 6 stops as per Rec.709 specified (we will discuss Rec.709 and other standard later in this post). For HDR, it is at least 13 stops.
In terms of display, the luminous intensity is measured in cd/m2 (unit derives from the International System of Units "SI"), or described by Nits, a non-SI unit. Since 1 Nit = 1 cd/m2, we will use Nit for ease of writing in this post. An HDR content can be up to 10,000 nits peak brightness when recorded by professional devices, and in practice mastered at 1000 to 4000 nits for consumer monitor such as HDR-enabled TVs. While for SDR, it is roughly 100 nits.
Note: SI is abbreviated from the French Système international (d'unités).
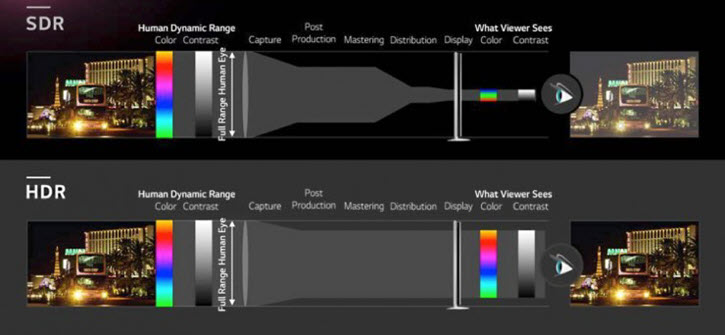
What does HDR mean for human eyes? As you can see, it significantly increases the contrast between the darkest and brightest parts than SDR, meaning you can see more details that are otherwise unavailable in SDR. Since luminance influences how colors behaves, it also means you can distinguish more shades of gray in between, and thus more details with delicate nuances of color. In short, HDR can provide you with better viewing experience much closer to what we see in the real world, making it more immersive and pleasing than SDR.
HDR vs SDR Video
From above information, you already know the difference between HDR vs SDR in terms of the contrast difference, then what does this mean for HDR vs SDR video? Due to how we perceive light, dynamic range and color are tied together, with the change of one influence the behavior of another. You probably already know the color behaves more complex than what we know about them, with hue, luminance, saturation influence one and another.
Therefore, even if dynamic range describes brightness and darkness contrast, the differences of HDR vs SDR video also involves another aspects that can influence the image, including bit depth, color volume and so on. You will see this more clearly with comparison charts further below.
Before HDR video is made available for consumers (with HDR TV that can correctly display the high dynamic content), it doesn't mean that there is no HDR content. Professional cameras are able to record high dynamic range content, with information stored in the RAW or logarithmic formats, but that is only for storage purpose. That content is converted to SDR video, so that the content can be viewed normally on household TVs. Now thanks to the advance in TV manufacturing tech, HDR TVs can display these content as HDR. There are different standards to convert raw content into HDR.
Before getting into detail, let's first take a look at aspects that influences image quality.
Image Quality
High dynamic range is one aspect to consider during the chasing of vision that's similar to what we see with bare eyes. But as already mentioned above, the complexity of how color behaves entails that brightness and other aspects of color are mutually affected. Therefore, when talking about HDR video in terms of its standard, it involves more concepts beside luminance level.
No matter it's the development of HDR, 4K, 8K, high FPS video, it reflects our effort to enhance image quality, or ultimately the viewing experience in all possible aspects.
Generally, there are five aspects to consider when you are trying to enhance the quality of an image, namely, resolution, frame rate, bit depth, color space, and brightness.
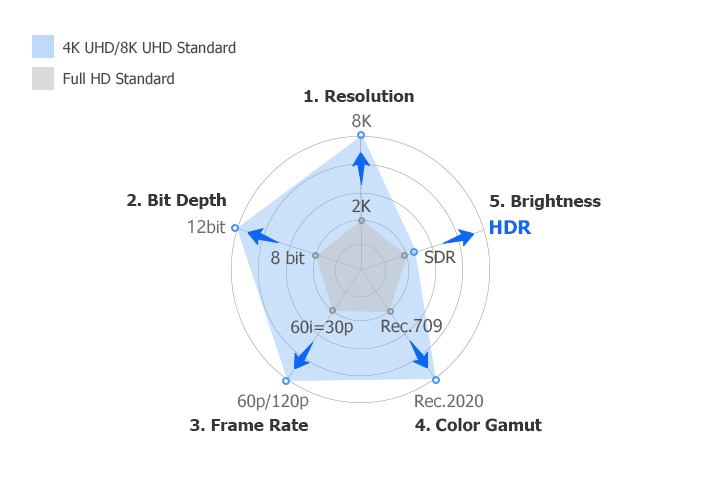
Image Resolution: the size of the image. For instance, the most widely used 1080p has a resolution of 1920x1080, meaning there are 1920 pieces of pixels horizontally, and 1080 pixels vertically. Under the Rec.2020 standard, 4K/8K UHD has a resolution to 3840x2160 and 7680 × 4320.
Frame Rate: technically known as temporal resolution, as image resolution is known as spatial resolution. Frame rate determines the number of frames per second, and higher number result in smoother viewing experience. Most film are viewed at 24 fps, while action cam such as GoPro offers high frame rate up to 120 FPS, making it ideal for scene with a higher degree of motion.
Bit depth: it determines the number of colors within a certain range, and thus the fineness of color gradation. For instance, the 8-bit color in SDR video that 16,777,216 shades of colors (RGB combinations being 256x256x256 possibilities, where 256 is the result of 2^8). 10 bit is 1,073,741,824 colors that is 64 times of the colors available in 8bit mode, and 12 bit is a whopping 68,719,476,736 number of colors.
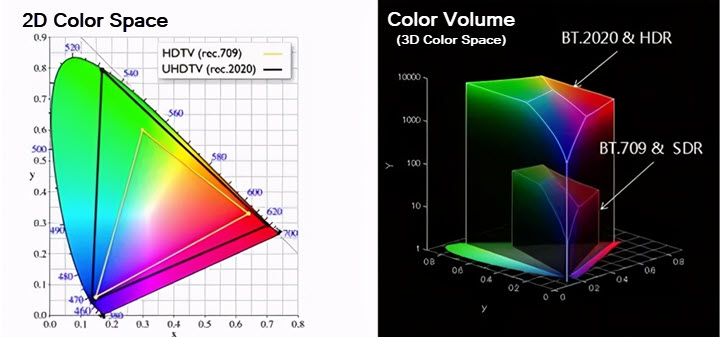
Color Gamut: it determines the borders of the infinite color in the nature that is being modeled into a finite range. For instance, the Rec.709 standard determines a color space of Rec.709 (sharing the same name of the standard), and Rec.2020 standard specifies a color space of Rec. 2020. The Rec.2100 also uses the color space previously specified in Rec.2020.
The triangles below are the borders of color space Rec.709 and Rec.2020 on the CIE 1931 color chart respectively.
Rec. 709 only covers about 36% of the range of the chart, and Rec.2020 color gamut covers almost 76% of the chart. For that reason, Rec.2020 color space is commonly referred as wide color gamut.
Color Gamut vs Color Space
When dealing with HDR and SDR videos, you may encounter concepts such as color space and color gamut, which are sometimes mistakenly used interchangeably as their concepts can overlap to some extent. To be clear, a color gamut is the scope of colors that are available on a particular device, such as TVs, monitors, and other screens, and the range of these colors can be interpreted from a color model.
For instance, the color gamut of Dolby Vision format display should cover at least 99% of DCI-P3 color space.
Rec. 709 vs Rec. 2020 vs Rec. 2100
International Telecommunication Union- Radio communication Sector (ITU-R) sets out standards for content deliver in TV broadcasts, video streaming and Blu-ray.
Rec.709, also known as BT.709 or ITU 709, is the ITU-R recommendation for HD content delivery.
Rec.2020 is ITU-R recommendation for UHD delivery, and Rec.2100 for HDR delivery.
Each recommendation has specified aspects mention above, namely, color space, gamma, FPS, pixel resolution and bit depth. There are other details such as black and white points, or whether the content is progressive or interlaced.
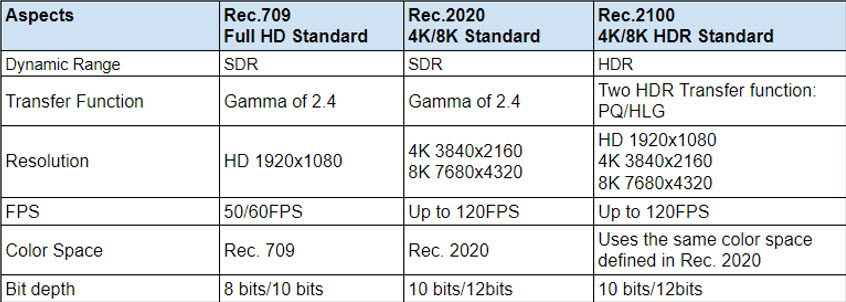
As you can see, from Rec.709 to Rec.2020, there are changes in resolution, FPS, color space and bit depth that enhancing the view experience largely, while the dynamic range still remains the same as that specified in REC.709, which is the 100nits SDR for Full HD and 4K/8K broadcast.
Rec.2100 incorporates the definition of HDR to extend Rec.2020.
Many questions and misunderstandings of HDR video can be resolved with the information displayed on the chart above. For instance:
Is 12bit video an HDR video?
Not necessarily. Although it is true that HDR video offers stunning color performance in terms of vividness and brightness, that 12bit does enhance the fineness of color gradation as compared to 8 bit, the Rec.2020 for 4K/8K delivery also can achieve a 12 bit depth, but it is SDR.
HDR is about luminance contrast, and it has nothing to do with color volumes, right?
It depends on what you mean by HDR. For the scope of the darkness and brightness, the wider one is HDR, and the narrow one is SDR. If you are talking about HDR video, then besides having a high dynamic range, HDR video still entails that it has a larger color space and bit depth as compared to SDR video. If you are referring to HDR display standards, there are HDR10, Dolby Vision, HDR10+, HLG (this standard shares the name of its transfer function) and so on.
Speaking of transfer function, you can also notice from the chart that the transfer function of SDR and HDR are different. SDR uses a standard gamma, while for HDR, Rec.2100 defined two HDR transfer function: PQ and HLG.
2.2 Transfer Function
When light hits the camera, the information is stored on the sensor, with optical information converted to electrical signals, and when electrical signals being processed by processors of a monitor, the electrical signals are converted into optical information that controls how the screen shows the signal. That control is a mathematics function known as transfer function to determine how the signal is interpreted. For SDR and HDR, that transfer function differs, and among various HDR standard, the transfer function can be different too.

When we record a video, the data records a color space as permitted by the recording device. However, that color space maybe be converted via a transfer function that is different to the color space and transfer function in terms of delivery. For instance, you can use Sony XDCAM with a color space of an S-Gamut.3cine (color space) on a gamma of S-Log 3 (transfer function), and it will be delivered to Rec.709 screen (such as our computer monitor), then as specified by Rec.709, it uses a Rec.709 color space on a standard gamma of 2.4. That is for SDR.
For HDR, there are two types of transfer function: PQ and HLG, as specified in Rec.2100 by ITU-R. It is the effort to meet the requirements with various manufacturers and broadcasters.
- PQ (Perceptual quantization): Mainly used for films and internet streaming. It is based on the characteristics of human visual perception, in an aim to reproduce accurately what our eyes see. Therefore, it can utilize the high-end display, projectors and all the related equipment for immersive viewing experience.
- HLG (Hybrid Log-Gamma): Jointly developed by the BBC and NHK. Since it is backward compatible with SDR, meaning there won't be abnormal viewing experience if the user doesn't have HDR-compatible TV, HLG is ideal for broadcast TV and live video feeds.
2.3 HDR Standards
Due to the marketing strategy, support devices and development by different stakeholders within the industry, there are several HDR standards currently. They differ in the following aspects.

HDR10
HDR 10 is announced by the Consumer Technology Association in 2015, and is the most widely spread standard, partly because it is an open HDR standard. It comes with static metadata, and is not backward compatible with SDR displays.
HDR10 supports a high dynamic range with a 10 bit color depth, allowing for 1.07 billion colors. For consumers looking for screens that are able to display HDR10, ones that conform to the specifications of UHD Premium standard will do. Similarly, discs claiming to be Ultra HD Blu-rays should support HDR10.
For video editing and color grading, HDR10 standard uses the Rec.2020 color space.
Dolby Vision
Dolby's audio tech is well known in the industry, and for HDR standard, Dolby Laboratories put forward what's called Dolby Vision.
It goes a step further and offers 12 bit color depth, and a peak brightness up to 10k Nits. Though in practice, 4000 nits is more commonly used by studios.
One of the major merits of Dolby Vision is its support of dynamic tone mapping. With the dynamic metadata included, it tells the display to adjust the luminance contrast on a scene-by-scene or frame-by-frame bases. In that way, image can be optimized based on the capabilities of a specific device.
The drawback for content creators, providers and device makers is that Dolby Vision requires license fee. Owners of non-HDR TVs won't be able to view Dolby Vision content, and HDR TV users may be able to view the Dolby Vision content in HDR10 if the TV is not Dolby HDR supported.
HDR10+
As the intended rival of Dolby Vision, in 2017, Samsung announced HDR10+ standard which adds dynamic metadata as an update for HDR10. In the same year later in August, together with Panasonic and 20th Century Fox, Samsung formed the HDR10+ Alliance to promote this standard.
The benefit is, this standard shares some of the nice features that Dolby Vision supports, yet it is less expensive comparing to Dolby Vision.
It is supported in Amazon Prime Video and media box such as Amazon Fire TV Cube and Ultra HD Blu-ray players.
HLG
HLG is co-developed by BBC and NHK Japan initially in an aim to better deliver HDR in broadcasts, considering the fact that TVs and other displays of each viewer can be very different.
HDR10, HDR10+ and Dolby Vision use display referred transfer function PQ, while HLG has its own Hybrid Log Gamma (HLG) which is scene-referred. When talking about HLG, one can be referring to the HDR standard, or this standard's transfer function HLG.
This logarithmic curve are able to interpret the input value as relative, instead of the absolution luminance in PQ, thus make it more compatible for TVs that are not HDR-friendly.
Technicolor HDR
Also known as Advanced HDR (AHDR) is yet another HDR standard, but it enjoys less popularity compared to above-mentioned ones. It is put forward by Technicolor and Philips in an aim to solve SDR and HDR capabilities among less-capable TVs.
2.4 Working with HDR Video
If you are trying to edit HDR video, there are several aspects to consider. For non-professionals, general users are more likely to set their hands on open standards such as HDR10 and HLG.
For the color to be displayed properly, you need an HDR-capable monitor that supports the peak brightness specified by HDR. And since there are much larger data included as compared to SDR workflow, editing station is the choice to keep up with the computing intensive process.
Mainstream video editing software has gradually added support for HDR editing, including Avid Media Composer, Adobe Premiere Pro, Final Cut Pro, Vegas Pro, etc. And since Apple has announced a special version of Dolby Vision for its iPhone 12 Pro series, there are added support in iMovie for HDR videos captured by iPhone.
For common users, without some learning curve, HDR editing could be troublesome. For instance, when you drag the HDR video into the editing software, without knowing how to set up, you might see the video clip being washed out or displayed improperly.
There are generally two choices: convert the HDR into SDR to editing, or set up the project properly for HDR editing workflow.
Take Final Cut Pro as an example, if the HDR video is shot by iPhone, follow these steps:
Step 1. Go to Effects, HDR tool, and choose PQ to HLG (Rec.2100).
Step 2. Adjust the peak brightness to 100 nits.
Step 3. If you are going to use LUTs, remember to set the output as Rec.2020 HLG color space in custom LUTs settings.
Step 4. Adjust export profile.
Since the default H264 export profile only support 8-bit color depth, you need to create a customized output profile.
- Go to the Compressor app, and create new profile.
- Choose MPEG-4, tick optimization for the web, use 10bit color from the drop-down menu, and make sure to tick include Dolby Vision 8.4 metadata.
3. HDR Photography
Why High Dynamic Range Scenes Pose Challenge for Cameras
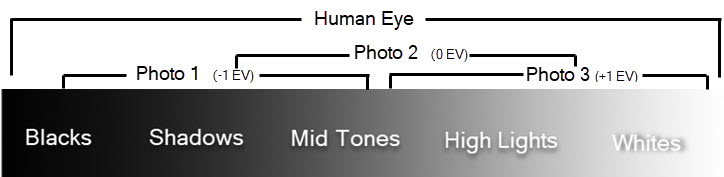
When you are encountering a scene with a high dynamic range, that is, when there is a large contrast between the brightest area and the darkest area, it is challenging for the camera to capture or display the scene the way we see it in person.
Imagine this scene, when you are taking a photo inside a room in the afternoon, featuring the window with bright sunshine coming through. Now if you expose the interior layout, what your eyes can see through the window will be blown out in the digital image; and if you adjust the exposure for the window area to be captured properly with details, the interior environment would be too dark to display.
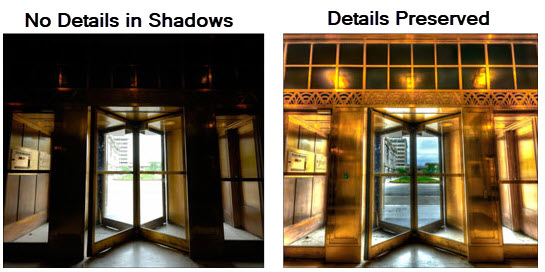
The problem is, our eyes have intricate structures to adjust and adapt to different luminance levels and are capable of seeing scenes with a high dynamic range, equaling to 20 stops or so; while for the general cameras, they are limited to 7 stops.
How to Resolve this Dilemma
Possible solutions could be: using a camera that is capable of recording high dynamic range information, store it natively in high dynamic range formats, and the post-editing and delivery, make sure the software can master high dynamic range profiles and that the display monitor can show the picture in the brightness level and tonal detail intended by the producer. In this sense, it is the same as producing HDR videos that truly have a higher dynamic range than the traditional SDR.
Yet, general consumers may not have HDR monitors that have a peak brightness of 1000nits or above, most of us still use the general 100 nit SDR monitor. To approximate the appearance of high dynamic range photos, there is a technique called exposure bracketing to deal with this issue.
3.1 Exposure Bracketing
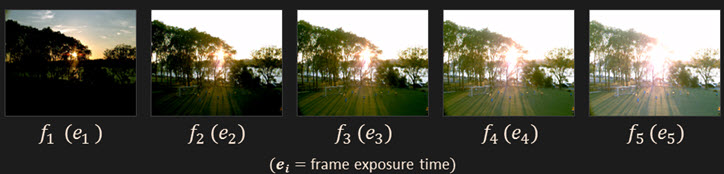
Bracketing in photography refers to the practice of taking multiple shots of the same scene, with some changes in the camera settings for each bracket. For instance, there is ISO bracketing that takes several shots under different IOS settings.
For the exposure bracketing, the photography changes the exposure level for each shot, thus capture a series of shots under different exposure values while other settings remain the same.
In post-editing, you can take those brackets into capable software and merge them into one picture, taking details captured at a dark area with high exposure and the details of a bright area with less exposure. In that way, you have created a photo that approximates the high dynamic range seen by our eyes.
As you can see, the technique involves both the shooting phase and the post editing phase.
3.2 Shooting Brackets in High Dynamic Range Scene
One aspect worth noting is, you don't always need to prepare to shoot for HDR photos. Post-editing an "HDR photo" for a scene that doesn't involve large luminance contrast may result in HDR that looks unreal, and less appealing in aesthetic concerns. For instance, in a scene where the brightness level can be correctly recorded by the camera.
So how can you be sure you are in a high dynamic range scene? Simply take a photo at the exposure suggested by the camera, and then examine these shots: does it capture the details of the brightest and darkest area? Or the brightest area is blown out and the darkest area is pure black without shades of details? If the camera fails you, then you can try the exposure bracketing technique.
Compose with a Steady Camera
Since you need to merge multiple shots into one, it is ideal for shooting a static scene without too much movement. For instance shooting the architecture, landscape photography, or real estate pictures. HDR photography is not suitable for sports or scenes with movements. It will result in a ghost effect.
For that reason, you normally need a tripod to secure the camera. Additionally, you can set a timer to delay the shot, so that you don't need to manually press the shutter, which may introduce additional movements. For more professional situations, you can also use a wireless release control instead of using the in-camera timer.
Check the White Balance
Though checking white balance is not exclusive to HDR photography, it is important for every shooting. You can take with you a color checker on set, making sure the color balance is consistent through each bracket in the series.
Change Shutter Speed
In HDR photography, the aim of bracketing is to capture different exposure for the same scene. You may already know that changing either shutter speed, ISO or aperture will influence the amount of light hitting the camera sensor, thus affect the exposure of a shot.
However, for this specific scenario of merging brackets, the option is to change shutter speed, instead of the other two settings. Changing aperture will influence the depth of field (DOF), making each shot different in terms of DOF, while the only difference you want is the exposure. Similarly, ISO will introduce unwanted noise in the image. You can fix ISO at 100 and keep it throughout the brackets.
Many cameras today also offer you the Auto Exposure Bracketing (AEB) options, though there are debates going on regarding this feature. You can compare manual and auto options and find one that works for you.
Review the Brackets
After exposure bracketing, you can check the LCD screen and see if the brackets on both sides meet your expectation.
Go to the highest exposure level (the one taken with the lowest shutter speed) and check if it captures all the details in need in the darkest area. Then go to the fastest exposure and make sure there are no blown-outs in the whites. If there are skies, doorways, or windows, you can check whether there are details in them.
Tip: After shooting one series of brackets, you can take a photo of your hand so that you know this is the end of this group. Then you can start shooting for other scenes. In the post-editing, this trick work nicely for you to browse and manage pictures.
3.3 Post Processing for HDR Photography
There are plenty of software capable of merging multiple exposure brackets into a single photo, for instance, Lightroom and Photoshop are popular among photographers. Here is a walkthrough of using Lightroom and Photoshop, so you can have a general idea of how it works, with related concepts involved in the process.
- Import the shots into Lightroom, select multiple shots, right-click and select Photo Merge > HDR.
- Wait for the Lightroom to create an HDR preview, and if the source photo is RAW, Lightroom will create an RAW HDR preview.
- If there are slight movements in the brackets, you can tick Auto-Align so that Lightroom will try to align each shot to reduce ghost effects.
If you are happy with the preview, you can apply it and go on edit the photo as you normally do in Lightroom.
Photoshop works similarly:
- Go to the File from the menu, and navigate to Automate > Merge to HDR Pro.
- Click browse and choose a set of pictures you want to use, and tick Attempt to automatically align source images.
- Adjust the black and white points in the histogram to better distribute the exposure according to your intent.
- Choose the tone mapping method. You can keep it as the default Local Adaptation.
- Change properties such as edge glow, tone, and detail, and use advanced settings. The process is partly technical and partly personal taste. The rule of thumb is don't overdo it.
- Go to Image > Mode, and choose 16bit or 8bit mode.
3.4 Tone Mapping for High Dynamic Scenes
Tone mapping is an important process when dealing the high dynamic scenes. Before going further into this concept, it is beneficial to have some background knowledge of how our eyes work.
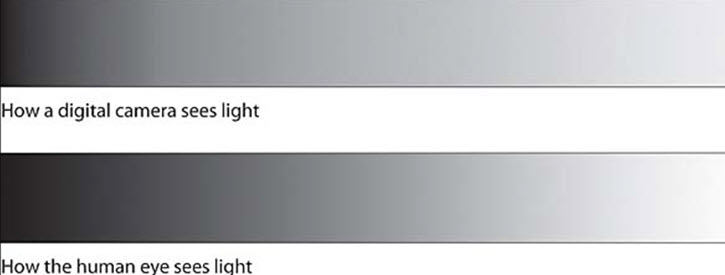
Our eyes don't respond linearly to the change of lights. By linearly, it means proportionally. When photons hit the retinas in our eyes, the response is a curve instead of the linear line. We are more sensitive to the changes in the dark tones than that of the bright tones. Contrarily, a camera responds linearly to the photons hitting its sensor. For instance, when there is twice the luminance, the sensor records twice the brightness level.
A high dynamic range scene can have as large as a contrast ratio of 100,000:1, while an 8-bit JPEG only has 255:1
If you proportionally squeeze that 100,000:1 into 255:1, with levels distributed evenly to describe the light and dark areas, the resulting image would be dark for the human eyes.
So, instead of using the values equally to describe the light part and the dark part, we use more of the values available to dark areas, and less to light areas. After all, our eyes are less sensitive to changes in light areas.
With curve tools available in the photo processing software, you can utilize this feature of our eye and adjust the luminance level of darkness, mid-tones, and highlight areas accordingly.
3.5 Problems in HDR Photography
HDR photography is sometimes infamous due to the unreal look and overdone images populated over the internet. There are halos and other artifacts in the image when handled poorly in post-processing. However, it is a misconception that merging brackets can never achieve a natural look.
There are aspects that can use some care when you are having fun with image processing software:
- Ghost effects: it is caused by moving objects among the brackets. You can use the align feature in post-production to fix slight movements.
- Halos: when you are dragging the curves to change the local contrast, there are chances that the contrast hierarchy is changed, and you will see a glow around the edges.
- Neon lights: there are chances the neon lights in your scene being completely blown out. If you are shooting at night, make sure the fastest shutter captures the detail of the neon signs.
3.6 Other Ways to Deal with High Dynamic Range Scenes
Besides exposure bracketing, there are other ways to handle scenes with a high contrast of brightness and darkness level. For instance, you can shoot log or raw files, with more information stored in the sensor than the JPG format, which already process the exposure inside the camera.
Another method is using GND filters, which helps to compress the brightness level presented to the camera.
Since human eyes are more sensitive to the changes of light in the dark area, and less sensitive the that of the brightest area, a GND filter is designed as such to compress the contrast level. As shown in the picture above, the upper side of the filter lets less light go through, and the bottom side filter passes more light, for the mid-tones, there is a gradual blend to connect both sides.
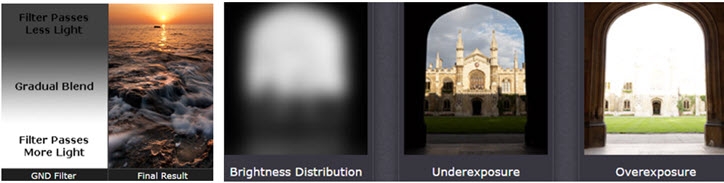
Then when you apply the GND filter to your camera lens, you can exposure for the dark area without light clipping in the brightest parts of the scene.
However, GND only works nicely if the light is distributed linearly, from top to the bottom for instance. Imagine you are exposing for the doorway scene, the brightest area is inside the frame of the doorway, and there are harsh edges of the luminance change. In that case, the GND filters won't work.
Once again, these methods only deal with the shooting process, and you still need to determine how to process them in the post. When we are talking about HDR under these scenarios, we are talking about how to deal with high dynamic scenes so that the resultant picture can display the scenes more ideally. It never means the resultant picture itself is an HDR photo in terms of 1000 peak nits or higher in the display.


