Green screen is one of the most frequently adopted techniques in filmmaking. It ushers in a movie era with fantasy scenes that are inaccessible in real life, transports us into the deep space, and brings onto screen whatever one can dream up.
The idea of removing background or masking part of the scene has been existed long before the modern-day, without the help of digital video effects software. French filmmaker Georges Méliès, the godfather of VFX, found the method to create matte with double exposure, American director Norman Dawn improved the matte with the glass shot, and Disney used to adopt sodium lap and prism to create a real-time matte to remove background.
Things have been much easier with the chroma keying technique in post-production software, such as After Effects, Final Cut Pro, Premiere Pro, and many chroma key tools and plugins for users of all levels.
What is Chroma Key
Chroma key is one of the keying process commonly used in filmmaking, visual effects creation, broadcasting, and gaming. The color spill is the biggest challenge during the shooting stage. Bearing in mind these concepts, we can start to make green screen videos from scratch.
Keying: It is the process of isolating certain parts from the image by color or brightness. With this selection, one can remove it to make it transparent (green screen in VFX) or perform color grading, such as adjusting only the sky's color without affecting the environment.
- To separate the elements by color requires Chroma keys
- To operate the brightness level Luma keys are needed.
Chroma Key: It singles out a particular color from the background, making it transparent so that the subject can be composited with another background. Alternatively, the actors can wear green color cloth, and get removed in post-production to become invisible. Chroma keying is also known as color keying, or as what the broadcasting industry conventionally called, color-separation overly (mainly by BBC).
Since the color needs to be uniform and distinct from the subject, green and blue screens are commonly used as they differ from human skin tone.
Spill: When the color of the background is reflected on the subject, a spill occurs. For instance, the green screen can be reflected the sweating face of a character, especially when the light is too bright. Keying out the green will also remove part of the image of the subject since there is a green hue. Composition software usually comes with the feature to suppress the spill. Plus, hold-out matte can be added to restore the image when the keying eats into the image.
Green Screen VS Blue Screen: Why Use Green Screen as the Background
Theoretically, any solid color can be used as a background. In the post-editing, one will simply use the eyedropper to pick that background color and key it out.
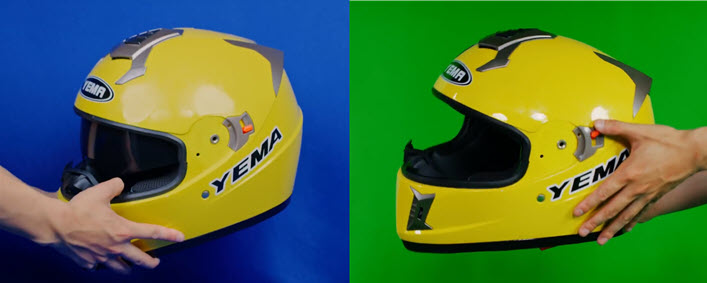
In practice, you probably have seen both green screen and blue screen adopted by filmmakers. Here are 5 reasons when a green screen is preferred.
- You can save on lighting equipment since a green hue is easier to get lit up than the blue backdrop. The green screen will produce higher luminance than a blue screen under similar lighting conditions, making it cheaper for production as you don't need to purchase extra lights.
- Green is brighter on a digital display, thus making it easier to key out in post-production.
- Outdoor friendly. As shooting outdoor usually involves blue sky, using green background to distinguish it from the sky makes sense. Otherwise, the sky will become transparent when keying out a blue screen.
- Green is less likely to be found as human skin tone, resulting in nice and neat keying without image loss.
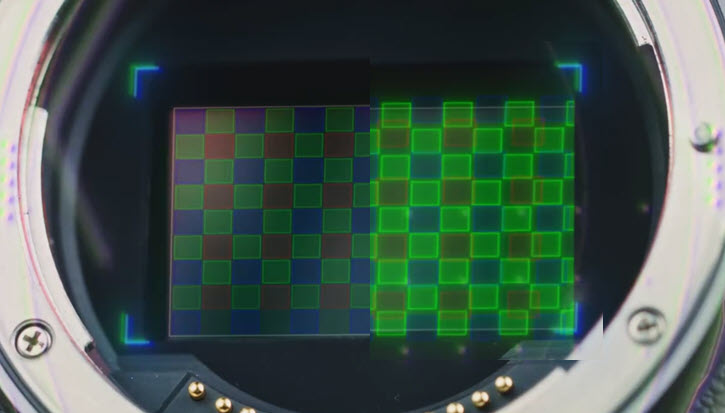
- It registered more information on digital cameras. Most digital camera sensors use a Bayer pattern which has twice as many green photosites as red or blue. For that reason, there is more information of the green hue to work with.
Green Screen VS Blue Screen: When Blue Screen is a Better Choice
If you have watched those behind-the-scenes movie secrets from Hollywood blockbusters, you will also notice the use of the blue screen. For filmmakers, it is a preferable choice over green screen under these situations:
1. The props, character's wardrobe or costume contain green tones. For instance, the uniform of soldiers might be green. To prevent unwanted image loss, blue screen is a better choice.
2. Physical environment. If the environment has a blue shade, using a blue backdrop is preferable as it can blend in with the environment when keying out.

3. Night scenes. Since the color blue has lower luminance than green, it is nice to shoot dark scenes.
4. When the subject has a gloss surface that tends to reflect lights, it will influence the background, making it less evenly lit and causing problems for the post-production. Blue screen is more suitable to alleviate the problem since the color blue is less reflective than green.
The light reflectance values for Light Green is 40 - 50%, Medium Green 15 - 30%, Medium Blue 15 - 20%, and Dark Blue 5-10%. As you can see, green is more reflective than blue.
The History of Chroma Keying
As one of the composition techniques, chroma keying has been evolved and developed among previous tricks to make something look real. Actors can be placed, economically and safely, into exotic locations or imaginary places, which are otherwise unavailable with normal photography and video recordings.
Today's VFX combine live-action scenes with computer-generated imagery world, and previously when there is no computer in aid, real word scenes are composited ingeniously with trick shots, such as double exposure, matte painting, and other ways to create real time matte.
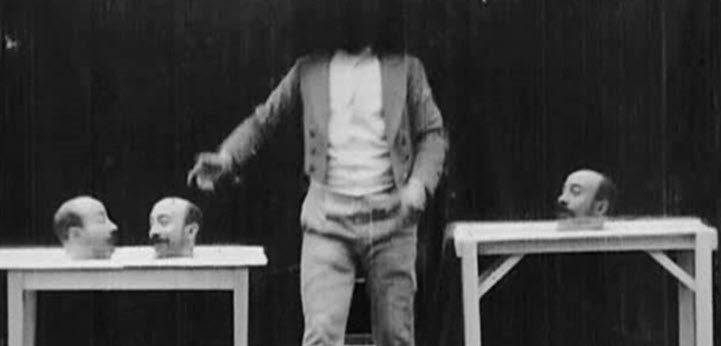
George Méliès and Multiple Exposures
The techniques to create virtual things can be traced back to 1890s. George Méliès (1888–1923) used multiple exposures technique with matte to create the "trick shot". It was done by covering up a small section of the film stock, so that the covered area will not be exposed to the light. Then reverse it the second time, and the previously blocked black areas are now the only section that can be exposed to the light, hence the name double exposure. The technique is widely used in Films Four heads are better than one (1898), A Trip to the Moon (1902) and The Impossible Voyage (1904) directed by George Méliès.
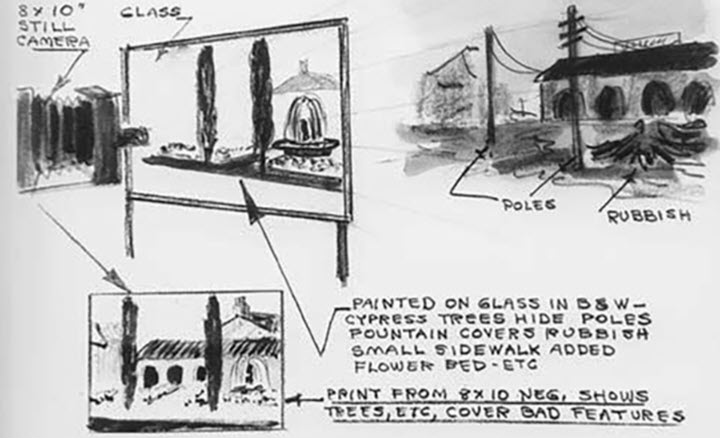
Norman Dawn and Glass Shots
Norman Dawn (1886–1975) also made a significant contribution in innovating the multiple exposures technique. With his glass shot technique, it is possible to create in-the-camera double exposure in a fascinating way. During the shot, a large plate of glass is placed between the camera and the live-action scene. It will appear as if the paining on the glass is part of the real world. Films such as Missions of California (1907) and Call of the Yukon (1938) was directed by Norman Dawn.
Disney and Yellow Screen (Sodium Process)
To create a real-time matte, another attempt is the sodium process, developed by Wadsworth Pohl and refined by Disney's in-house engineer, Petro Vlahos.
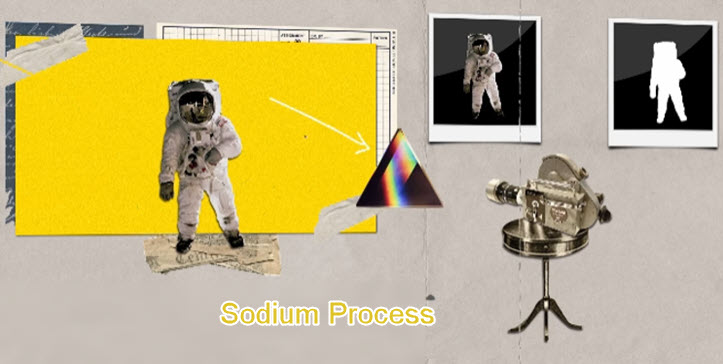
It is known as yellow screen since the white background drop is lit up by yellow sodium lap. In fact, there are both sodium light and general stage lighting. The trick part is: a prism is placed between the camera and the live-action scenes. The sodium light will be projected solemnly onto a separate film carrier through the prism, thus creating a highly contrasted black & white matte, in real-time. Ordinary light goes to another normal film stock in sync with the matte. The yellow screen technique is used widely in Disney’s original version of Mary Poppins.
How to Shoot a Green/Blue Screen Scene
Once you have decided on using green or blue screens, created the storyboard, and prepared the shotlist, it's time to start rolling and film the first take.
There are four essential tips to ensure precise chroma keying.
1. Shoot 1080p/4K 10 bit 422 or Higher
10 bit here refers to the bit depth and 422 is one of the chroma subsampling options. A higher bit depth and chroma subsampling can guarantee the quality of chroma keying in the post.
For general usage, 8 bit can be enough for small screen display, from video recording to playback. However, when you try to remove the background or perform color grading, the problem arises.
It is especially noticeable when dealing with an image that contains nuances transitions, such as the blue gradient in the sky. For an 8 bit video, you may find color banding resulting from inaccurate representation in computer graphics.
10 bit color depth offers 1.07 billion colors comparing to the 16.7 million colors in 8 bit. In essence, it leaves more room for post-production, from keying to color correction.
As for the YCrCb chroma subsampling, 4:2:2 lose 50% data comparing to 4:4:4, and there is a 70% data loss in 4:2:0.
The first 4 represents the number of pixels, which is the same for the three modes. The second 4 represents the color samples from the pixel for the first row, and the third 4 for the second row. Therefore, with 4:2:2 sampling, it only samples two pixels for every two rows of four pixels; and for 4:2:0, it only samples 2 pixels for 2 pixels from the first row, with the second row duplicates the first one.
4:2:2 and 4:4:4 give colorists more room in post-editing with higher color resolution. They help to produce a smooth mask in terms of chroma keying, green screen, and other compositions, eliminating jagged lines and color banding.
2. Use High Shutter Speed
Lower shutter speed results in motion blur. While motion blur can be an aesthetically intended effect in photography and videography on certain occasions, it can be detrimental in keying out the background.
A shutter speed between 1/15 and 1/60 sec can create intended motion blur, and 1/250 second or faster can capture dynamic subjects with little or zero motion blur.
3. Achieving the Cleanest Key with Neat Green Screen
It is important to keep the green screen flat without any wrinkles or seams. If you have folded it, go steam it out to remove creases. Any wrinkle will result in shadows and uneven lighting, which will cause difficulties for post-production.
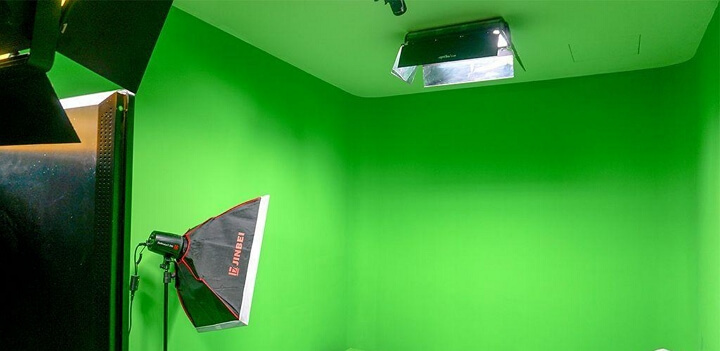
4. Set up Everything and Light the Actor First
After setting up the green screen, it's essential to decide the position of the actor.
- Getting too close to the background may result in color spill, with the green shades bouncing back on the actor as a result of light reflection.
- The Shadow of the actor can fall on the green screen, which will also cause problems in post-editing.
- It is advised to light the actor first, and then light the green screen. The reason is, if you light up the green screen first, the later lighting for the actor may influence the background.
In short, separating the actor from the green screen and lighting in the right sequence are essential to carry out a task nicely.
How to Make a Chroma Key Video
Removing green screen (and blue screen) in post-production can be simplified if the footage is shot properly as planned. For hobbyists and mini filmmakers, it is usually a one-click process in the post.
How to Chroma Key with Green Screen Editor for Beginners
As analyzed above, it is recommended to shoot in 4K 10bit to leave more room for the post. To demonstrate the process, a free video editing software VideoProc Vlogger is used as an example, since it supports smooth 4K editing with full hardware acceleration, and can well handle the 10bit video on the timeline with smooth scrubbing.
You can watch the video tutorial or read the text instructions below to remove the green screen in video editing.
Step 1. Launch VideoProc Vlogger and set up the project using the same resolution and aspect ratio as the source footage.
Step 2. Create the project, import video clips into the media library and drag them to the timeline.
Step 3. Place the main video on the video track, and place the green screen video on the overlay track.
Step 4. Make sure green screen clip is selected, scroll in the Inspector Panel to go to the Chroma Key section.
Step 5. Click on the color and use the eyedropper to pick the green background, then click Enable Chroma Key.
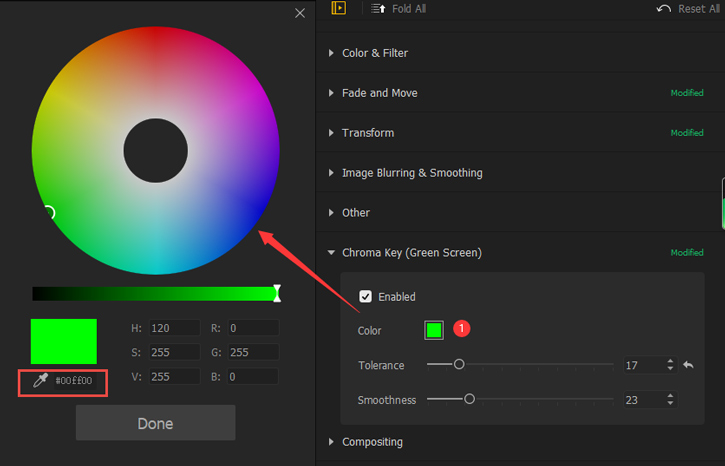
Step 6. Adjust tolerance and smoothness to achieve the desired effects.
- Tolerance: It controls how wide the hue will be considered as belonging to the key color. Dragging the slider to the right will make it more tolerable, meaning more hue will be recognized as the color to be removed.
- Smoothness: It blurs the edge of the keyed image. Increasing the value will result in a more transparent effect in the overlay.
How to Chroma Key in Premiere Pro
To remove green screen/blue screen background, you can use the powerful Ultra Key effect in Premiere Pro. Before you start to chroma key the footage, you can use the matte to trim out extra areas.
The following example uses green screen footage, it is also applicable to blue screens and other colored screens. If you are curious about how to use blue screen in Premiere Pro, follow the steps below.
Step 1. Click on the clip and go to the Effects Control panel. Click the Matte icon to add matte around the footage.
In this way, you don't need to work with the entire image, but concentrate on the areas around the subject.
Step 2. Use the Ultra Key to remove pure color background.
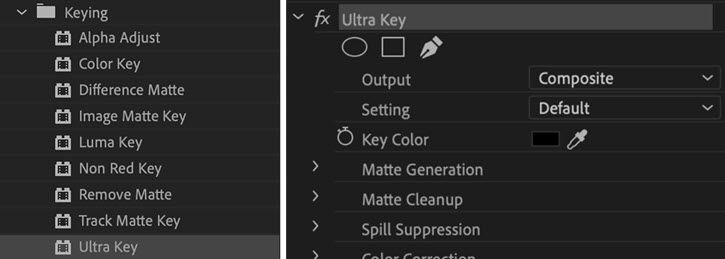
- Go to Effects > Video Effects > Keying > Ultra Key.
- Drag and drop the Ultra Key effect onto the clip to make it effective.
- Click the clip, go to the Effects Control panel, and click to expand the Ultra Key effect for fine-tuning.
Step 3. Use Eye dropper to key out the color.
- Under the Ultra Key effects, click the eye drop icon, and hover the mouse to the image in the project monitor.
- Click on the green screen (or other color that you want to remove) with the eye dropper.
- Depending on the lightning condition when the footage was recorded, you may need to change the green color to a lighter or darker shade to get a perfect key.
Step 4. Refine the keying settings.
You can change the output view to Alpha under the Ultra Key parameter settings. Any area in the white channel will be preserved, and any area that's black will become transparent.
The sharper the edge between black and white, the cleaner key you will get. If there are blurriness and soft edges, you will see a spill of green shade onto the skin and face of the subject.
Tweak parameters under Matte Generation/Cleanup and Spill Suppression to tune for a perfect key.
How to Chroma Key in DaVinci Resolve
The procedures to remove green screen in DaVinci Resolve is slightly different from that in Premiere, however, the underlying logic is to specify the color you want to get rid of, and fine tune the selections.
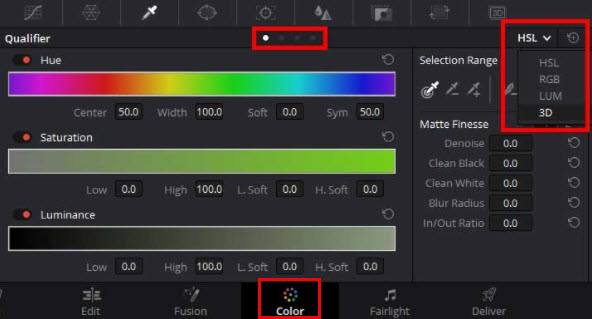
Step 1. Use the 3D mode for the Qualifier tool.
- Qualifier tool is inside the Color tab in DaVinci Resolve.
- Click the HSL drop-down menu, and switch it to 3D.
Step 2. Identify areas to be removed.
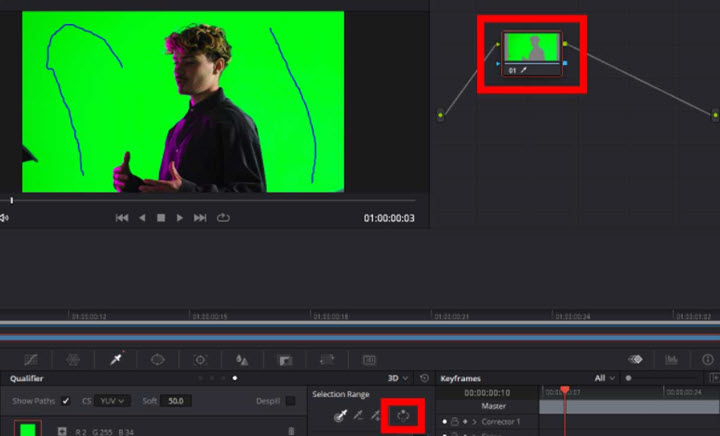
- Press the mouse and scrub the area you want to remove. You will notice DaVinci Resolve draw lines when you scrub the green screen area.
- There will be a small rectangle node thumbnail showing the current selection.
- Right-click under the node, and choose Add Alpha Output
Step 3. Revert selection.
You will notice it is the subject being removed, instead of the green background.
Click the revert icon under the Selection Range panel.
Step 4. Refine the keying.
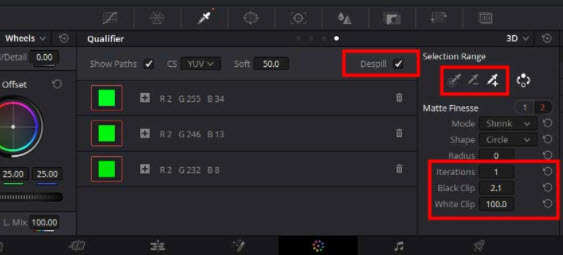
To deal with green color spill, or noisy green pixels, you can play around with several settings to get a clean edge.
You can expand or shrink selection range, change Matte Finesse parameters, or dial the despill parameters.
How to Refine the Keying
For serious production with big-budget, professional software is used in the pipeline to pull the key. There are general features included to achieve a degree of finesse. Although the tools are termed differently in various green screen editors, the underlying logic remains the same.
1. Outer Key
In the initial stage, you will want a wider band around the character or subjects you are keying. To do that, you can use eye dropper to select the main hue of the green screen to key out the outer portions, with Shrink or Grow controls.
Also, you can create a garbage matte by quickly drawing masks to designate unwanted elements by large. In that way, one can handle imperfect shots such as unevenly lighted green screen, shadows from the character or green screen wrinkles, before moving on to the next step.
2. Inner Key
Shrink controls are mainly used in this step, and the aim is to refine the key. This may result in a bit of loss in the subject's edge that you meant to preserve instead of turning into the transparent channel.
3. Edge
To restore the loss of image during the core keying process, one can use feather and erode controls, adjust the black and white levels, or color correct the edge.
Tip: Use Presets for Shots
For dedicated VFX software, the value used in the keying process can be saved as a preset and apply it to other shots, provided that the shots are conducted on the same day under the same conditions. In that way, you can reduce the work when dealing with a series of shots. The presets can be used as the start, and when you can manually go on to deal with the quirks in each shot.


