
There is nothing so annoying as a video marred by a watermark. Luckily, removing a watermark from a video is not as hard as it seems to be. Many tools can help us remove watermarks from videos online or offline for free. Keep reading to find the easiest 9 ways to get rid of watermarks on videos.
How to Remove Watermark from Video Online Free
1. Remove Watermark from Video via HitPaw
HitPaw is a feature-rich video editor that provides you with tools like cut, speed, crop, rotate, resize, subtitle, and convert to handle routine video tasks. Moreover, there is a dedicated watermark remover, allowing you to remove multiple watermarks and other redundant objects from the video. The major drawback of HitPaw is it constrains you to handle video with a size not larger than 100MB. Here's how to remove watermark from video online with HitPaw.
Step 1. Visit the online HitPaw video watermark remover on your browser.
Step 2. Hit Choose File to import the original video to this web-based application.
Step 3. Drag and adjust the watermark selection box until it covers the watermark.
Step 4. Hit Save to export the video without a watermark.

2. Remove Watermark from Video via Apowersoft
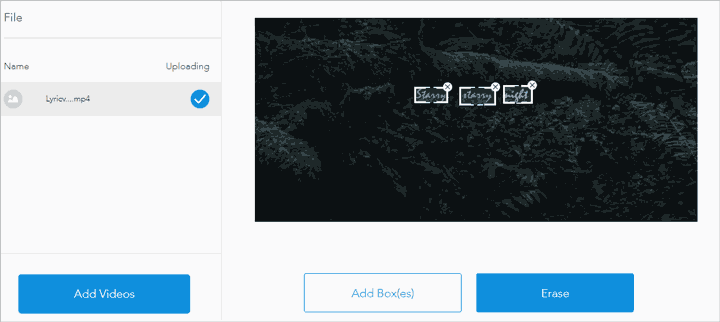
Apowersoft Online Watermark Remover is a free and web-based application, allowing you to delete watermark from MP4, MOV, FLV, MKV, and WMV video online without installing any third-party software. You can even apply this handy tool to remove or blur multiple unwanted objects from a video or picture within a few simple clicks. From our test, it works best when the area around the watermark is relatively featureless. Here's how to remove watermark from video online with Apowersoft Watermark Remover.
Step 1. Tap on Remove Watermark from Video to load up the source video to Apowersoft. This process may take minutes to hours depending on your network environment and file size. You are advised to reload the video instead of waiting if the uploading progress bar got stuck at 95%+.
Step 2. Drag and move the appeared box until it perfectly fits the watermark.
Step 3. Click on Erase. Apowersoft starts to erase the video. Once everything ends, hit Download videos to export the video.
How to Remove Watermark from Video without Blur
1. Remove Watermark from Video via VideoProc Converter AI
Operating systems: Windows, Mac
VideoProc Converter AI is a beginner-friendly video editor. With it, you can remove the watermark from the video in 4 simple ways. Let's start everything by downloading and installing VideoProc Converter AI on a PC or Mac.

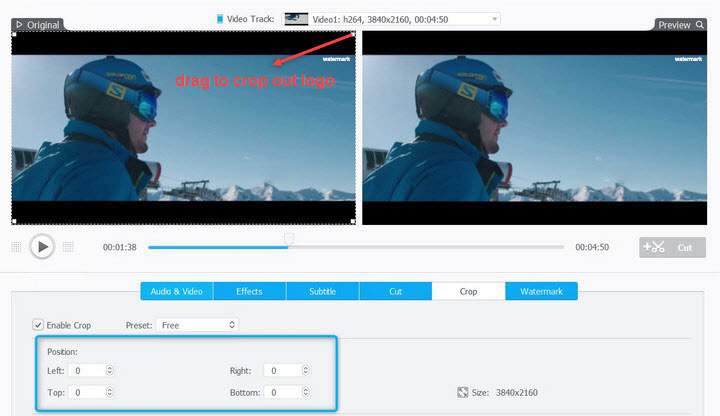
Option 1. Crop Out Watermark from Video
If the watermark is located in the corner of a video, you can use the video crop feature to crop small watermarks on the borders of the video without ruining the composition of the picture.
Step 1. Open VideoProc Converter AI. Click Video on the main interface. Drag and drop the clip(s) from your local disc to the computer.
Step 2. Press Crop and check the box of Enable crop.
Step 3. Drag the box that appears on the left preview window to keep the portion with the watermark outside the selected range. Click Done and press Run.
📢 No More Worries About Quality Loss After Cropping Video
When you crop a video to remove the watermark, the frame size gets smaller. If you try to stretch the cropped video back to full screen, it may appear blurry or pixelated. Fortunately, VideoProc Converter has an AI solution. Its Super Resolution feature can enhance cropped videos to maintain maximum quality and sharpness, without visible artifacts or quality loss.
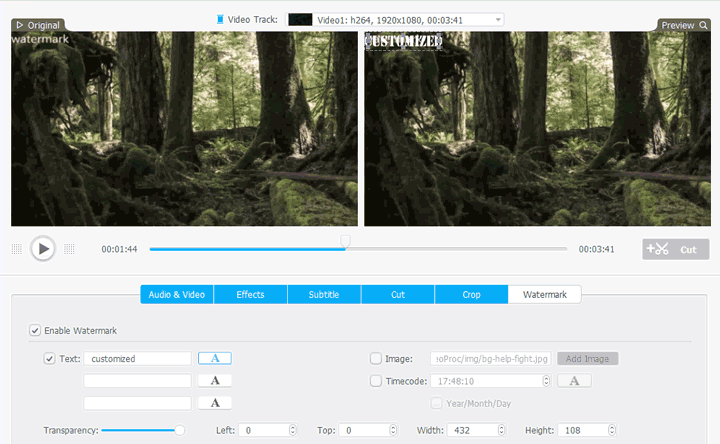
Option 2. Replace the Video Watermark with a Larger Picture Logo
If the original watermark put on your video is small, and you don't want to lose any frames, the fastest solution is to replace the watermark with a larger picture logo.
Step 1. After importing the video to VideoProc Converter AI, click on Watermark and tick Enable Watermark on the new panel.
Step 2. Select Text/Picture/Timecode to add different types of logos.
Step 3. Move the cursor on the slider left/right to decrease/increase the transparency of your logo.
Step 4. Move the watermark box that is shown on the preview windows to change size and position directly. Press Done and hit Run.
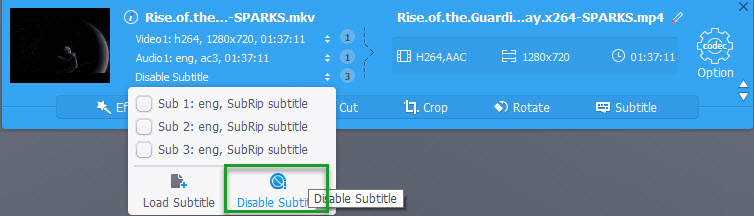
Option 3. Convert to Remove Softcoded Subtitle Watermark from Video
Have you ever noticed some watermarks are shown when playing them on specific devices but disappear when playing on a few apps? This type of logos on movies are not images, but some removable softcode subs. If the videos come with softcoded subs as watermarks, you can apply the built-in converter supports to add or remove softcoded subtitles in seconds.
Step 1. After importing the video to VideoProc Converter AI, click Subtitles and select Disable Subtitle.
Step 2. Hit Run. You will then be given a video without a watermark.
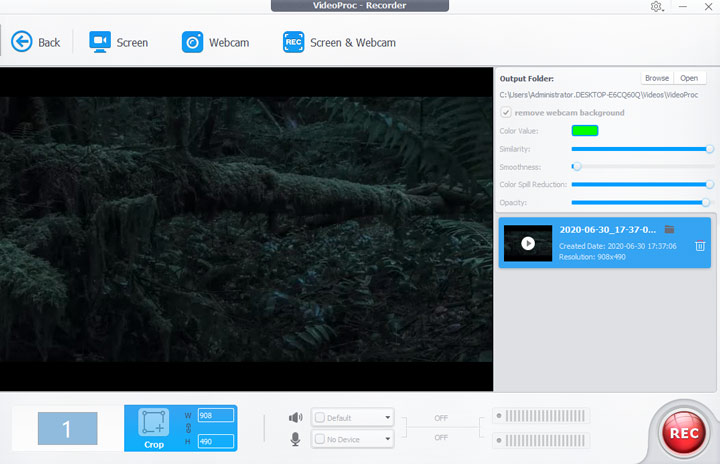
Option 4. Record the Preview Video to Remove Watermark from Video
Many video editing apps allow you to edit video for free, however, requiring you to pay to remove the watermark that appears on the generated clip. These logos are usually put in the middle of the video. It's hard to delete them without damaging the original frames. The good news is, when you preview the video, chances are there won't be any annoying logo. In this case, you can record the screen while previewing the clip to remove the watermark.
Step 1. Click on Recorder and press Screen after you launch up VideoProc Converter AI.
Step 2. Adjust the box that shows on the screen with your mouse to set the recording area. Hit OK to confirm.
Step 3. Click Rec, and preview the video that you just made. VideoProc Converter AI will start to record the screen in 5 seconds.
Step 4. Click on Stop when the video ends.
2. Remove Watermark from Video via Premiere Pro
Operating systems: Windows, Mac
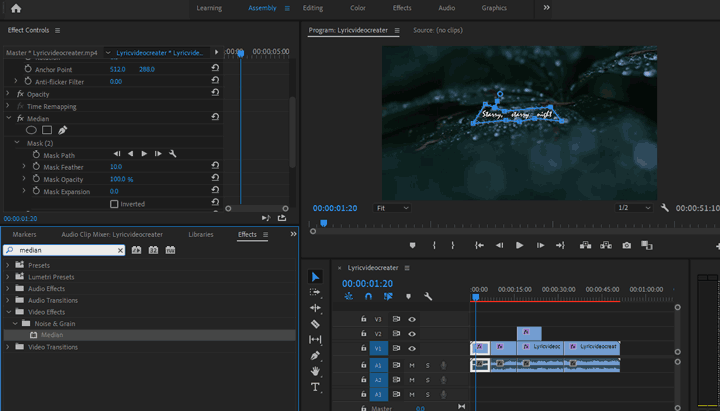
If the watermark covers the essential content of a video or the background of the watermark is way too much complicated, then removing the watermark from the video by cropping the frames or adding a picture/text overlay might severely affect the video. You might want to try out some paid video watermark removers. However, most of these tools can't distinguish the video and the watermark well. That's why we advise you to use one of the most expensive and powerful video editing software – Premiere Pro to remove watermark from video. With its useful masking and tracking features as well as the powerful median effect, you can perfectly delete the watermark from the video. Here's how.
Step 1. Click New Project and hit OK. Click File and choose import to add the video that doesn't need a watermark to Premiere. Drag it to the timeline.
Step 2. Go to the Effects tab, enter median on the search box. Click Median and drag it over the clip that was just added to the timeline.
Step 3. Go to the Effect Control tab and scroll down to find Median. Once you click the ellipse or rectangle shape, you would gain a selective box on the preview windows. Drag the border to reposition and resize, so it can cover the watermark. Tips: you can use Pen tools to make a precise mask.
Step 4. Increase the Radium value until you get the desired result. This solution doesn't seem to be complex. However, it may blast up the CPU and memory usage rate. It's definitely a big challenge to your computer.
Step 5. Navigate to the top menu box and press File, click on Export > Media. This will lead you to the Export Settings panel. Hit Export after you choose the needed format and resolution.
3. Remove Watermark from Video via Davinci Resolve
Operating systems: Windows, Mac, Linux
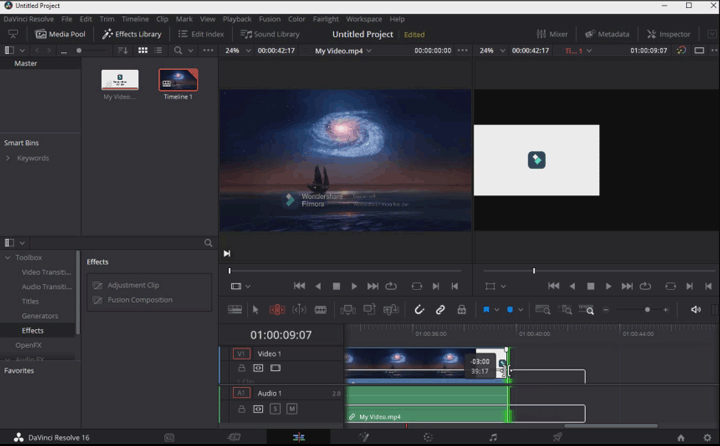
If your video comes with moving watermarks or some large brand pictures in the center, then we suggest you try out DaVinci Resolve. It has an awesome object remover tool, supports motion tracking, and can adaptively blend the data from the surrounding pixels. Whether there are one or many moving watermarks in the center or the corners of the video, simply add masks around the watermarks, get the track going, hit the Object Removal tool, and DaVinci Resolve can do the rest for you. Let's check the detailed steps.
Step 1. Go to the official site of DaVinci Resolve to get the installation packages. Follow the shown instruction to have it installed on your computer.
Step 2. Click the icon to launch it up. Click on Create New Project, and then enter its name. After that, you click on Create.
Step 3. Right-click on the media pool > choose Import media, select the video with moving watermark, and click Open to import it to DaVinci Resolve.
Step 4. Drag the clip to the timeline, and then you come over to the color page. Press Alt+S hotkey to create a new node.
Step 5. Rag the playhead to the start of the clip. Press the power window, and choose a shape to add to the clip. There I use the circle shape.
Step 6. Drag the corner of the chosen power windows shape, so the inner shape is roughly the size of the watermark. Drag its center to cover the watermark in the frame.
Step 7. Tab Track and press Track forward. DaVinci Resolve starts to track forward. Note: make sure the play head is at the start of the clip.
Step 8. Hit Library, scroll down to find Object Removal, and click and drag it over the second node that we just created. Click on Scene Analysis to let DaVinci Resolve begin analyzing the selective frame and the around background, and removing the moving watermarks from the video.
Step 9. You may find the mask you just create turns to a gray lump after analyses. (You can skip to the next step if everything goes fine.) Scroll down the setting menu and click on Build Clean Plate.
Step 10. Click Delivery to enter the delivery page. Choose the desired output formats and hit Start Render.
How to Remove Watermark from Video Free Offline
1. Remove Watermark from Video via Video Eraser
Operating systems: Android
Some short videos downloaded from Android devices come with transparent or monochromatic logos. Instead of turning to desktop software, you can use a capable mobile-based application like Video Eraser for Android to remove watermark from video fast with ease. Though it is not as powerful as most of the other pc-based tools listed in this post, it can handle videos with monochromatic watermarks. Here's how to remove watermark from video on Android with Video Eraser.
Step 1. Go to the Google Player App Store. Enter Video Eraser - Remove Watermark from Video on the search bar to find the app, and have it installed on your Samnang, Huawei, or other android phones.
Step 2. Hit Remove watermark from the video once you open up the application. Add the source video to the app.
Step 3. Hit the blank area to add a rectangle mask. Adjust the mask until it overlays the entire watermark.
Step 4. Tap Done to save the video that already gets rid of the watermark on your phone.

2. Remove Watermark from Video via Video Eraser
Operating systems: iOS
iOS users can use Video Eraser – Remove Logo to remove watermark from video. This lightweight program works like a video cropper that can chop off the unwanted watermark in the video. In addition, it lets you add and edit watermarks. A quite disappointing thing is it can only delete watermarks from MP4, MOV, M4V, and 3GP videos. Here's how to remove watermark from video on iPhone with Video Eraser.
Step 1. Download Video Eraser on your iOS devices (including iOS 13 and iPad).
Step 2. Open up the application and hit the plus button to import the video from the photo library.
Step 3. Choose the video button on the application. Choose Remove Watermark and then drag the cropping box until it overlaps the watermark.
Step 4. Locate the Start button on the right corner and hit Start. Once finished the video watermark removing process, you can hit Processed to view the outcome.
Remove Watermark from Video via Movie Maker
Operating systems: Windows 7
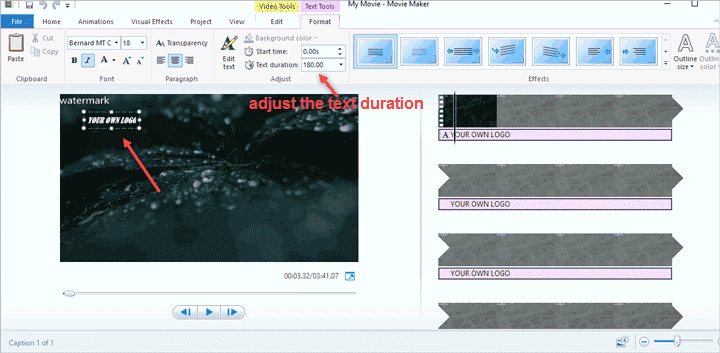
Windows Movie Maker, offered by Microsoft, is a free video editor. It offers a few popular editing features that can satisfy the very basic editing demand of most users. But have you ever considered applying Windows Movie Maker to remove the watermark from a video? Though it's not a professional video watermark remover tool, its built-in text overlay utility allows you to add a text layer to replace the existing text watermark. And in this way, you can remove a small but very prominent watermark from the video. Here's how.
Step 1. You should be able to get Windows Movie Maker on the startup menu if you are running Windows 7 or an earlier Windows system. Otherwise, you have to manually get Windows Movie Maker installed on Windows 8/10.
Step 2. Once you have Windows Movie Maker download and installed on your Windows PC, click on Add Video and photos to import the video with a watermark that you want to erase.
Step 3. Hit Caption to get access to the text box on the preview windows. Click the text box. Enter the text content.
Step 4. Change the duration of the text. Usually, it should be the total length of the entire clip.
Step 5. Adjust the properties on Font, Paragraph, and Outline size/Color tab to make sure the text layer has covered the original logo.
Step 6. You should be able to get Windows Movie Maker on the startup menu if you are running Windows 7 or an earlier Windows system. Otherwise, you have to manually get Windows Movie Maker installed on Windows 8/10.
Step 7. Click on Home > Save movie and choose the desired output formats, and click Save
Remove Watermark from Video via iMovie
Operating systems: Mac
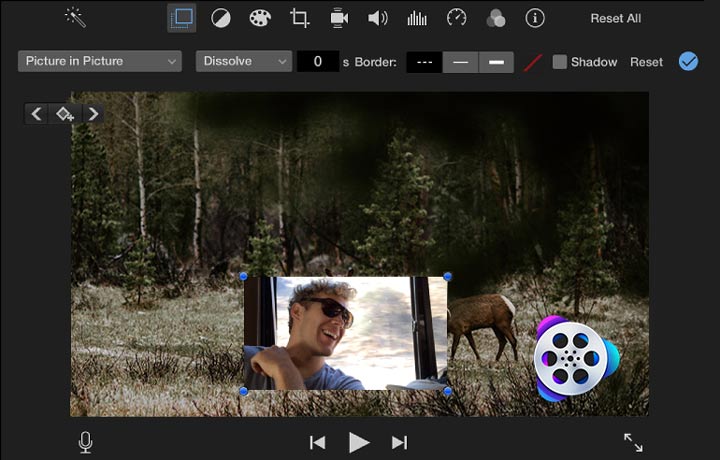
Mac users can utilize the prebuilt video editor – iMovie to remove watermark from video for free. Just like Windows Movie Maker, iMovie doesn't come with a professional watermark eraser utility. However, it has a flexible picture-in-picture utility that can help you add your own image to replace the original watermark to eventually achieve your purpose of removing the watermark from the video. Here's how.
Step 1. Drag the prepared PNG or JPG image to the media pool of iMovie. Drag and place it over the video track.
Step 2. Select the image on the timeline. Click on Video overlay settings on the preview window, and from the contextual menu, choose picture-in-picture.
Step 3. Hit the cropping icon, and select Fit. After that, drag the border of the image to resize and reposition it.
Step 4. After you cover the entire watermark with the images, click on the Share button. Enter descriptions, and set proper quality, resolution as well as compress mode, click Next.
Step 5. On the new panel, set up the folder name and path and then click on Save.
FAQs about Removing Watermark from Video
Is it illegal to remove a watermark from a video?
The original author owns the copyright. This doesn't matter whether the video is watermarked or not. And though a watermark itself is not a copyright, the Digital Millennium Copyright Act (DMCA) makes it illegal to remove a watermark without the approval of the original creator.
Therefore, the answer depends on whether you are authorized to delete the watermark or not. This also explains why it is accepted to remove a watermark applied by some commercial software on your own work.
How to remove KineMaster watermark free 2021 legally?
In an Android device, you can easily remove KineMaster watermark-free. All you have to do is adding any of the Muserk music tracks from the KineMaster store, and then sharing the content on YouTube.
How to remove watermark without cropping?
There are several ways to remove watermark without cropping, for instance, replacing with text/images/watermarks, adding Gaussian blur, getting covered with mosaics, applying DeLogo filters, adding medium effects. This post covers 10 no-cropping ways.
How to remove watermark without blur?
If the watermark interferes with the view of the main objects of videos, then replacing the watermark by adding up a background mask is a good way out. Suppose the watermark is small and discrete, you can simply crop it out with VideoProc Converter AI.


