
We all want to make grate travel videos, but how? It's not about shooting here, there, and everywhere. In fact, there are several tips for you to make a travel video that's compelling for audiences. Even though it is not the blockbuster type that you pursue, you need to make sure that the footage is smooth and comfortable to eyes. Tips for making a travel video can be narrowed down to the pre-production, production, and post-production. In the following, I will explain to you how to make a compelling travel video in the plainest words. Without further ado, let's get started.
1. Prepare Gear for Shooting Travel Videos
The camera main body, backup camera, flying drones, lens of different angles, tripod, intervalometer, and many other high-end and professional level pieces of gear are good for getting amazing travel footage.
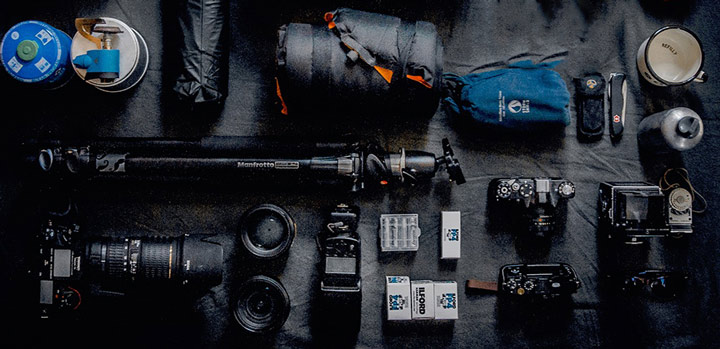
However, as you are on a travel, too much gear might make your travel confusing than pleasant. Unless we are making travel videos for a serious commercial project, it's definitely okay to take only the essential videography gear on our travel. And the essential travel gear includes:
1) A smartphone or camera. The prevalent options are DJI drones for aerial videos, GoPro action cameras for adventure travel videos, and smartphones for short film and story-telling videos.
2) Tripod with a wireless remote. Most cameras offer the anti-shake feature, but it's still tricky to record no-shaky videos. That's why we need a tripod. And the extra wireless remote control feature can help us record travel videos from a distance of around 30 feet.
3) Some batteries. Shooting videos consumes much battery power. To avoid missing any memorable scenery because of running out of the battery, make sure you get some backup batteries or the power supply.
2. Plan Your Travel Videos
Before starting the shot, ask yourself a few questions: What is your travel video about? What do you want to emphasize? What do your audiences want to see? These can help you make a travel video that your audiences would like to watch.
If you want to make your video shoots look more appealing, you can draw a storyboard in the early stage, and make shooting and editing according to that.
3. Film Your Travel Videos
Chances are that you don't have much shooting experiences, here are some video shooting tips for you.
1) Make scenes to connect the character with the place where they are spotting. Mark the character with the scene and building up a relationship between them.
2) Shoot a high frame rate, and it would definitely make your travel video unlike the previous one. But sadly, not every camera has the ability of high frame rate shooting. If, however, you are with an iPhone, there you go, you can have a try on its slo-mo feature. It works as well.
3) Shoot the same behavior of one in different scenes. For instance, when he is walking, taking selfies, or has other interesting actions, etc.
4) You can adjust the shooting distance or focal length, switching to various ways to shoot the subject. When you are shooting a person, try featuring his state from different angles: his hand, his back, etc. with different shots such as bust shots, full-body shots, snapshots, etc.
4. Manage the Travel Videos
When you go back from the trip, there are maybe dozens of GBs or even hundreds of GBs of travel footage. You must be aware of each of your materials and organize them in a specific order, which is very important for post-production.

It is suggested to divide all videos and photos you've recorded during your trip into several folders and manage them with labels, so you won't have trouble finding the source when editing the rough footage into an impressive travel video.
5. Edit Your Travel Videos
Now, let's dive into the post-production stage. In a nutshell, we need to: 1) Assemble, trim, and rearrange the videos. 2) Fine-tune the videos by chopping up unnecessary frames, removing fisheyes, adjusting speed, and color grading, etc. 3) Add the stuff that you want to show in the final travel video, including transitions, titles, and music, etc. Sounds tricky? Don't fret. With the help of VideoProc Vlogger - a streamlined, powerful, yet free video editing software everyone can edit appeal travel videos in simple steps. Below is the workaround that I often use to edit a travel video.

Step 1. Start a Project
Download and install VideoProc Vlogger. Open it up. Enter the project name, select the wanted output file location, click on + New Project to create the project. Surely, if necessary, feel free to choose a new resolution, frame rate, or other parameters.

Step 2. Add Travel Videos
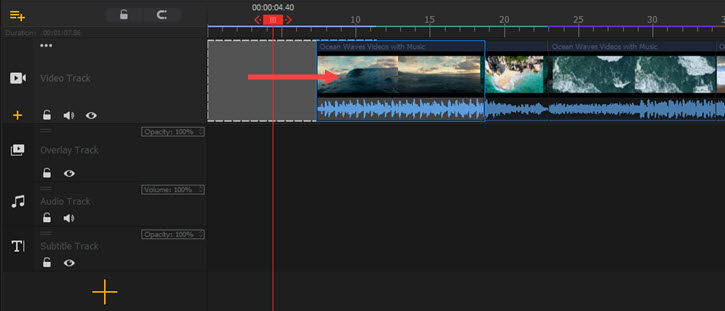
Drag the folders that hold the travel videos that's been well organized onto Media Library. Now you can drag the folders onto Video Track. The videos and photos will assemble and arrange on the timeline in order.
Step 3. Trim and Rearrange
1) Trim a travel video clip. Select the target video clip, and then simply drag its edge to the point where you need to clip start or end.
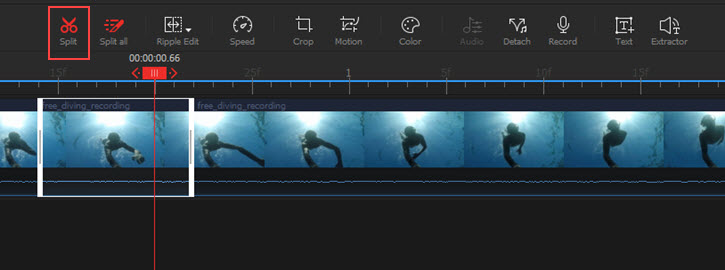
2) Delete parts of a clip. Move the playhead to the start point of the unwanted section, and press Split. Then you move the playhead to the end of that section and press Split again. Select the target clip and press the backspace bar.
3) Rearrange the travel video clips. Click on the target clip and then drag it left or right, you can change the sequence. If you are changing the sequence of some really long video clips, the fastest method to get things done is right-clicking on the clip and choosing Move Forward or Move Backward.
Step 4. Fine Tune the Travel Videos
Select the target travel video clip and then follow one or many of the below steps to make it look better.
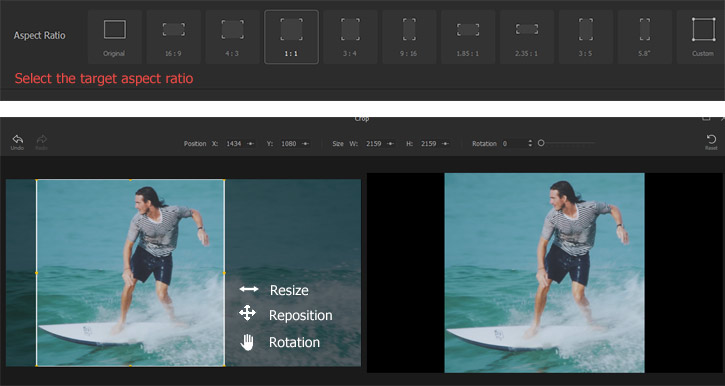
1) Crop to rebuild the focus of the travel video or remove the redundant frames. Select the travel video clip, choose Crop, and then drag the cropping box on the left window.
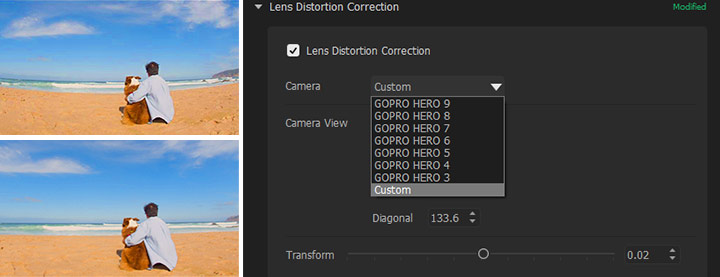
2) Remove the fisheye caused by the wide-angle of action cameras like GoPro to give a more realistic view. Go to the Inspector panel located on the right of the preview window. Scroll down your mouse to find the Lens Distortion Correction menu. Select the model of the shooting device to quickly remove fisheye from the travel video. You can also customize the settings on the Camera View setting options to get the desired result.
3) Adjust speed to make your travel video truly engaging. Click on the Speed button. You can select a constant speed preset on the pop-up Speed Editor to change the video speed at a new speed rate. Want the video speed to change progressively over time? You just need to select a variable speed change effect such as Montage and Bullet or drag your mouse to manipulate the yellow curve.
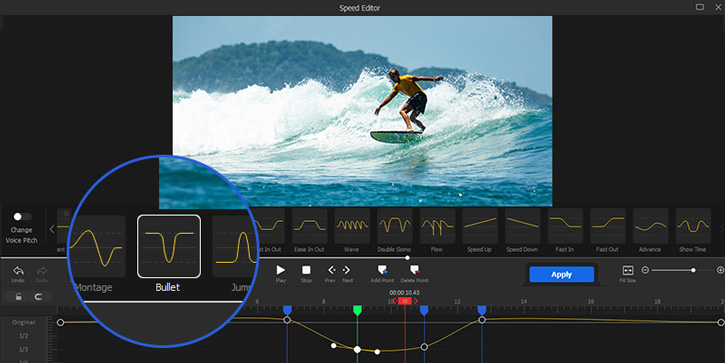
Learn more about adding rhythm to travel footage>>
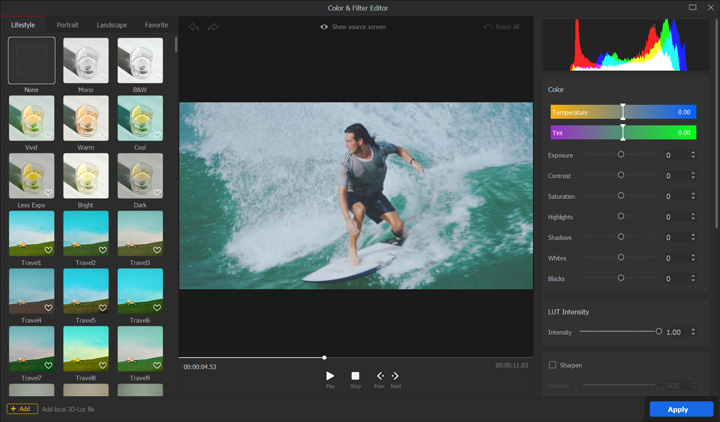
4) Color grade the travel video to adjust the exposure, hue, contrast, temperature, tone, or more. Click on Color. Choose a readymade LUT to fast color grade the travel video or adjust the setting options on the right to get the cinema-quality color effect.
Step 5. Add a Personal Touch
1) Transitions. They are making the switch between different travel video clips recorded from different locations or angles more natural. Click on the Transition button, select the loved transition effect, and drag it in between two clips.
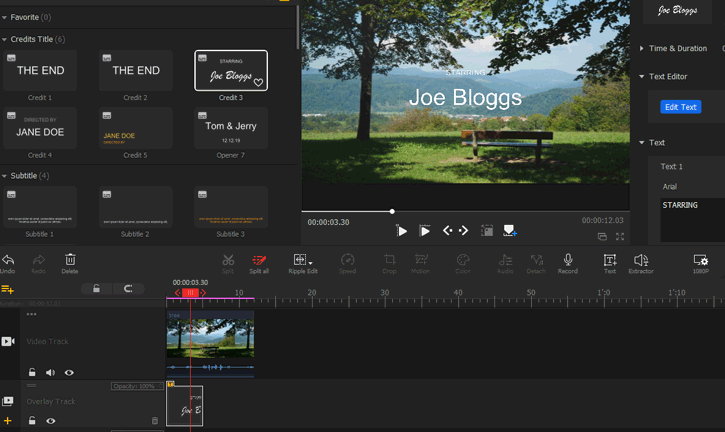
2) Text. They can help the audience better retain the message you want to convey. Click on Titles, choose the loved Credit Title, Subtitles, or Titles templates, and drag it onto Overlay Track.
3) Music. One of the easiest methods to set the mood for the travel video is adding background music. Add the background music file onto Media Library, drag it onto Audio Track, and then adjust its length to match the travel video. That's all.
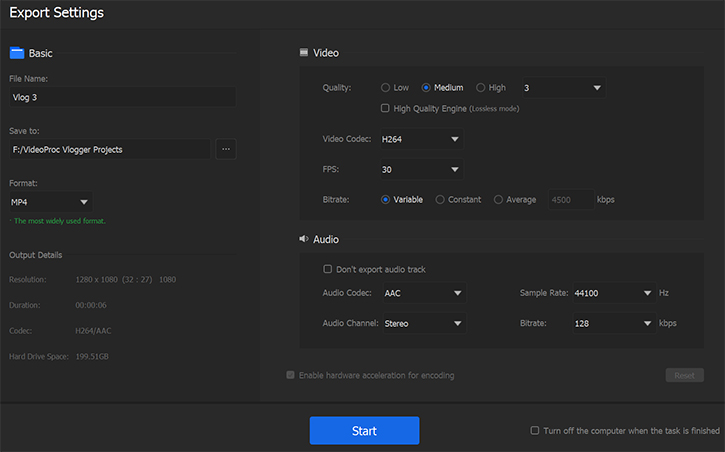
Step 6. Export the Travel Video.
Click on Export. Enter the file name and the output file location. Press Start. VideoProc Vlogger starts to export the travel video we've made. You can also change the video and audio properties settings for getting the best view experience on certain devices or platforms.
Free download and install VideoProc Vlogger and start to make appealing travel videos without hassles!


