
Whether you want to create an engaging vlog, build your brand on YouTube, or simply trim and polish some footage, editing video is an extremely useful skill to have. However, many people are deterred away by complicated and expensive software. What's more, editing videos for YouTube requires optimizing for a short attention span, creating catchy intros and outros, adding appropriate transitions, and ensuring high-quality sound, to name a few specific requirements.
Luckily, there are simple and intuitive options out there for editing your YouTube videos. In this post, we'll show you the best free video editing software, how to edit YouTube videos with them step by step, and some pro tips for crafting binge-worthy YouTube content that leaves your audience hungry for more.
How to Edit YouTube Videos with Studio Editor
YouTube comes with an editing feature in Studio to help creators to modify videos conveniently. If you find unsatisfied footage upon uploading and don't want to re-edit it in the video editing software, you can quickly trim and cut it in YouTube Studio Editor. As working seamlessly with YouTube, the Editor has special features for you to avoid copyright infringement – royalty-free music and automatic object blur.
Step 1. Upload a Video to YouTube Studio
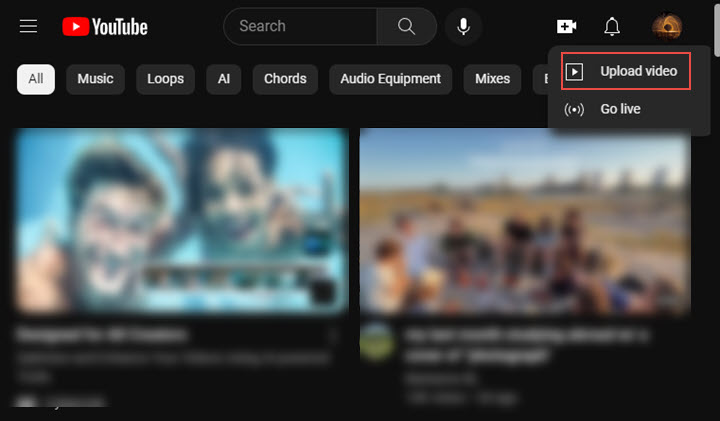
Go to your YouTube channel on a web browser on your computer. Click the upload icon in the top right corner. Then select a file on your computer to upload.
Step 2. Finish Video Uploading Settings
Then you'll be landed on a page to add video title, description, elements, visibility, check copyright issues, and so on. Just fill it according to your needs. Make sure to set it as a Private or Unlisted Video, because we are going to edit it before publishing it. Click Save and wait for it to complete the uploading process.
Step 3. Open YouTube Studio Editor
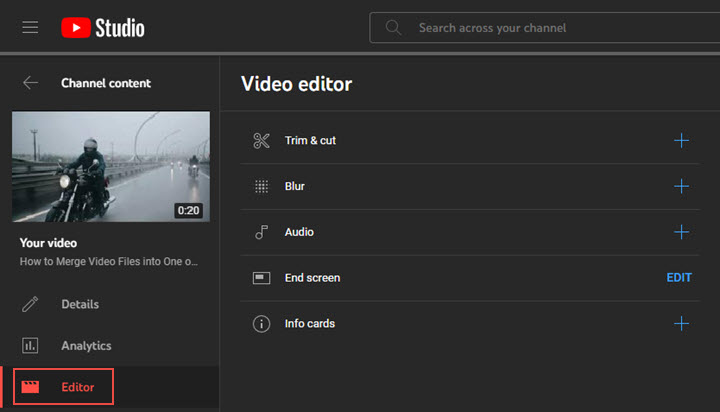
Once it's uploaded, you can find it in the Content tab from the left menu. Click the pencil icon for details settings. Select "Editor" from the left menu and click "Get Started".
Step 4. Edit the Video in YouTube Studio Editor
Heads Up: Once you save the changes in one editing feature, you won't be able to apply other changes to the video until YouTube finishes processing the edited version, which might take a few hours. So it's recommended to use YouTube Studio only when you want one change one upload.
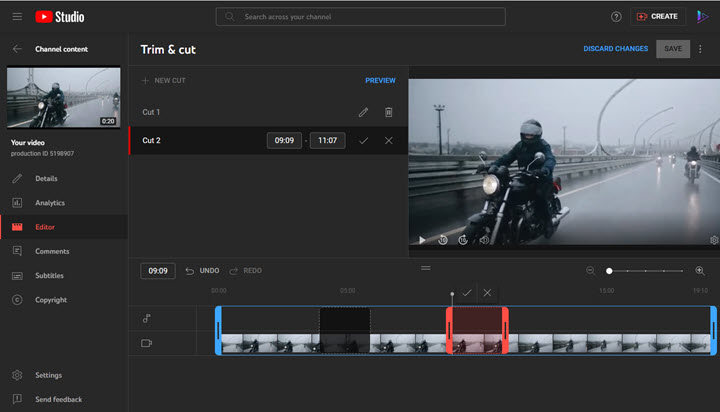
Trim and Cut the Video
Open "Trim & Cut". Drag the edge of the clip to trim its beginning or end.
Put the playhead where you want to delete, click "NEW CUT", and you can remove any part of the video in the timeline. Click the check icon to confirm.
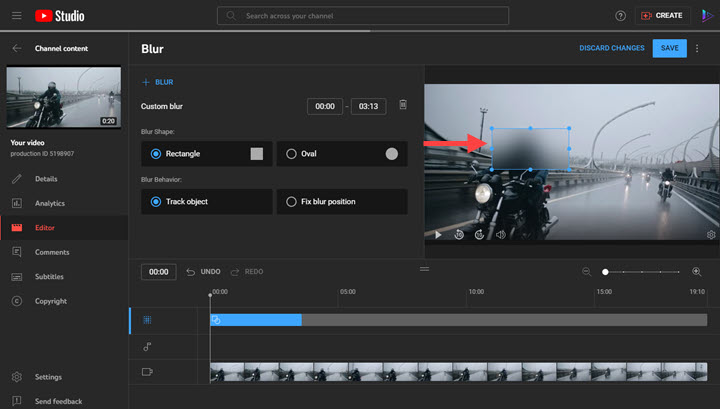
Blur Part of the Video
Open "Blur". If you choose to add face blur, you'll see it start detecting and blurring human faces automatically. Also, you can adjust the blur effect manually in the Custom blur option which includes settings of blur timing, shape (rectangle or oval), and behavior (track object or fix blur position).
Add Music
Open "Audio". Browse to select the music in YouTube Audio Library that allows using the music in any video without copyright issues. Click the play button to preview. Once decided, click "ADD" and it will show up in the audio track. Then you can drag the edge of the clip to shorten it or move its position where you think it's time to start and end. Click the adjustment icon, and you can decrease and increase the audio volume.

Add End Screen and Info Cards
When you are going to add the end screen and info cards, it asks you to choose the media type first, for example, add video, playlist, or channel. Just choose the one in terms of your needs. To add an end screen, your video must be over 25 seconds. And to add a link to the info cards, your channel must be in YouTube Partner Program.
Step 5. Save and Publish
Click "SAVE" to apply changes. Then it will let you confirm the edit again. When it finishes processing the editing, you can change the visibility to Public or set a time to publish.
Troubleshoot: YouTube Studio Editor Not Working
When editing a video on YouTube Studio, you may encounter issues occasionally, including the audio is not properly processed, can't add another audio track, or the trim features not working. Usually, these problems are associated with the web browser or YouTube server. So, to fix such issues, you need to update your browser or wait for the server to recover for several hours.
How to Edit YouTube Videos for Free with VideoProc Vlogger
The built-in video editor on YouTube works well when you only need simple changes upon uploading and only perform one action one edit. Whether YouTube is your side hustle or you aim to become the next phenom, VideoProc Vlogger will assist your to polish content for your channel. It's designed specifically for making vlogs, traveling, gaming, sports, reaction, tutorial, and all sorts of YouTube videos.
VideoProc Vlogger is a completely free YouTube video editor that serves users of all levels with its streamlined workflow, straightforward interface, complete presets, and custom controls over every edit you applied. Basic features include cut, merge, crop, music, transition, filter, and text. And notably, it has a wide array of advanced tools typically only found in paid software, such as color grading, speed ramping, chroma-keying, motion cropping, 3D LUTs, and more.

VideoProc Vlogger – Best Free YouTube Video Editor
- Support 8K/4K, HDR, RAW, Log, HEVC, AVC, images, audio files, and 470+ formats.
- 150+ free and stylish effects, filters, transitions, titles, and 3D LUTs.
- Professional yet simple speed ramping, color grading, audio editing, motion editing…
- Better editing experience: frame-by-frame editing, cutting to the beat, real-time preview.
- Fast rendering and high-quality output by Level-3 Hardware Acceleration.
Now download and install VideoProc Vlogger to edit stunning videos for YouTube for Free!

Step 1. Create a New Project
Launch VideoProc Vlogger and create a new project. You can keep the default project settings or set the resolution, frame rate, file name, and location manually.

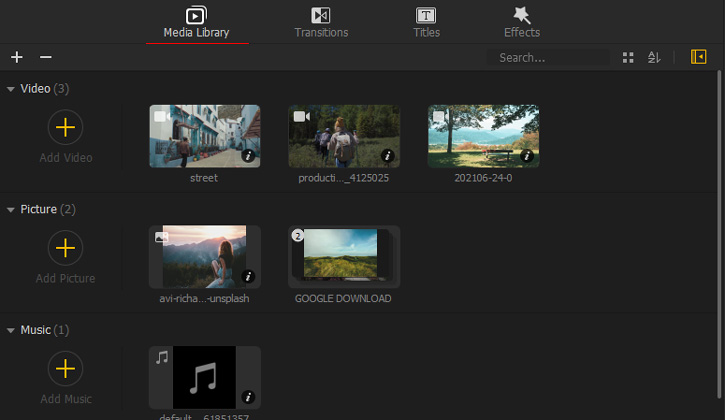
Step 2. Import Media Files to VideoProc Vlogger
Drag and drop the files you are going to edit to its interface. These files will be sorted in Media Library by file type – video, picture, music, and subtitle. Next, drag and drop files to the timeline. You can drag the clips and tracks to re-sequence freely.
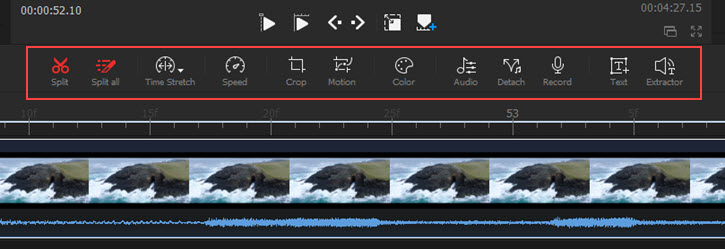
Step 3. Edit Video Clips
Click on the video clip, then you can edit it with features in the toolbar, such as split, change speed, crop, add motion effects, add texts, etc. And in the Inspect panel on the right side of the preview window, you can adjust video opacity, transform, color and filter, etc.
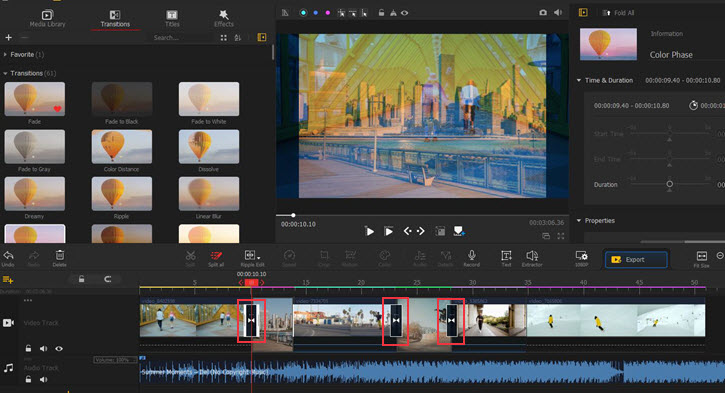
Step 4. Add Transitions and Effects
Open the "Transitions" tab next to the media library. Double-click on any of them to preview, then drag and drop it in the middle of two video clips. To add an effect, just drop it in the effect track. You can repeat the step to add more.
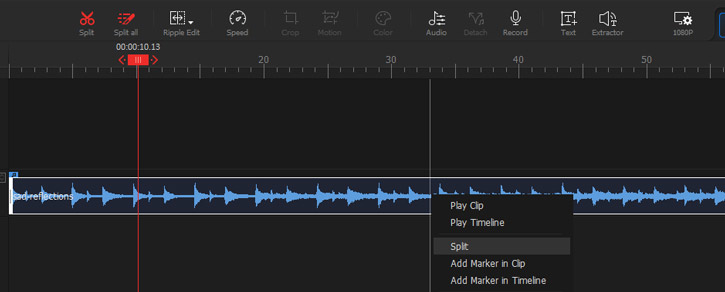
Step 5. Add Background Music
Add an audio file to its media bin. Then drag it to the audio track. Click on the audio clip, and you can adjust its volume, split it, and move it. If it's longer than the whole video, just trim off its end to fit your video. Click on the audio track, move to the Inspector panel, and you can adjust its volume, and add fade-in and fade-out effects.
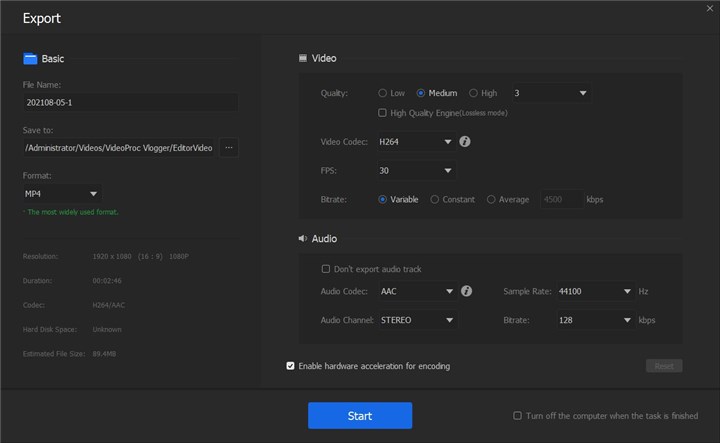
Step 6. Export
Watch the video from the beginning to the end. If you are satisfied, click "Export" above the timeline. Choose an output format and output folder. Hit "Start" to export the video for YouTube.
How to Edit YouTube Videos on iPhone
If all the videos are stored on your iPhone or when a computer is not available for you, iPhone built-in video editor can help you to make a video for YouTube as well. The editor in the Photos app allows you to trim, add filters, crop, rotate, and adjust the rotation of individual video files. To edit multiple videos, you can turn to iMovie. Here's how to use it to edit YouTube videos on iPhone.
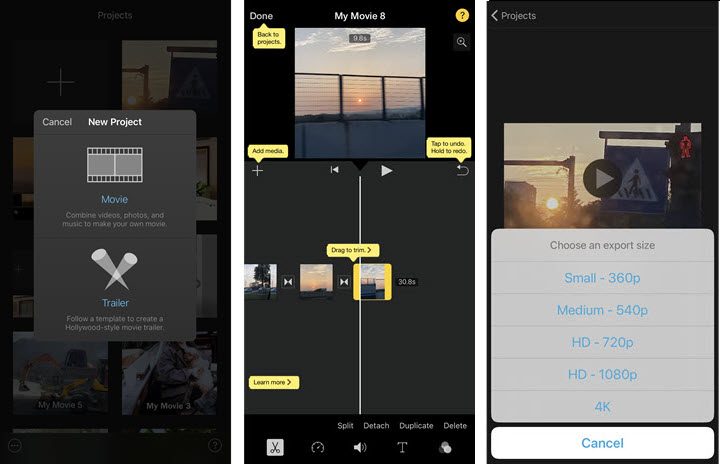
Step 1. Open iMovie. Choose "Movie" mode in New Project.
Step 2. Select videos and photos from your iPhone. Tap "Create Movie" at the bottom. Then you enter the editing workplace.
Step 3. Tap and hold to move the clip to re-organize your video. Tap the transition icon to add transitions and adjust the transition duration.
Step 4. Tap on an individual clip, and you can edit it solely, like say, cut, duplicate, detach audio, add text, filter, adjust speed and volume.
Step 5. After editing the current media files, you can tap the plus icon to add more media files from your iPhone.
Step 6. Tap "Done" on the top left corner to get back to projects. Hit the export button at the bottom, tap "Save video", and choose an export size. When it's completed, you can upload the video to YouTube from iPhone Photos.
Pro Tips to Elevate Your YouTube Videos
To rise above the sea of mediocre content and amateur footage, you need pro techniques designed to elevate your videos and gain more views, likes, and subscribers. If you've learned how to edit a YouTube video with basic skills, here are pro tips for you to bring your YouTube videos to the next level.
Keep Engaging Pace
Delete long pauses, "um's", stutters, and dead air, to keep your footage concise. You can change between shots every 5-7 seconds and use different angles and framing to keep the pace engaging and maintain visual interest. It is recommended to use extremely short or long cuts only for effect, while abrupt cuts or lingering shots should be used intentionally for impact or emotion.
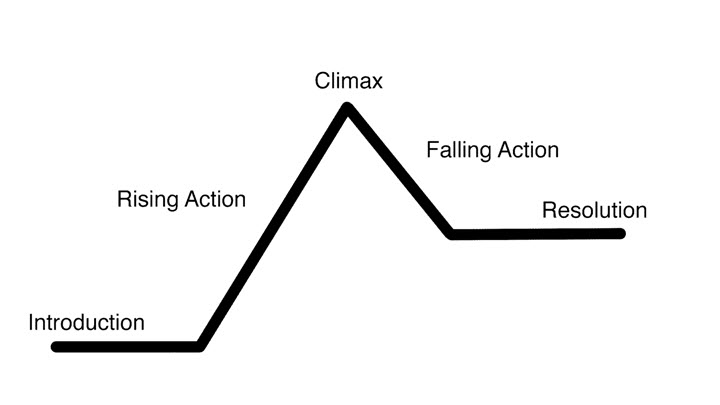
Establish Your Story
Your YouTube video should consist of a clear introduction, climax, and resolution, starting by explaining the topic, building up key themes or messages, and concluding in a memorable way. To capture and hold your audience's attention, it's crucial to establish your story or message within the first 30 seconds. Then use transitions to move between ideas. Subtle effects like crossfades indicate you're moving into a new thought or related topic.
Add Intros and Outros
Keep intros under 5 seconds. The YouTube video intro should be a short animation or stinger to brand your video. Place end screens over the last 5-20 seconds. End screens encourage viewers to subscribe or watch another video. Credit any music or stock footage at the end. Attribute any resources used properly to avoid copyright issues.
Employ Various Video Framing
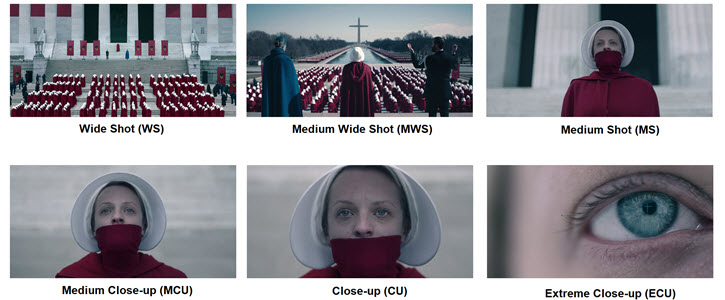
Use the rule of thirds to frame interesting shots. Place your subject off-center for the most visually compelling composition. Get a variety of wide shots and close-ups. For instance, wide shots establish the scene, and close-ups create intimacy. Shoot cutaways and b-roll to mix it up. Keep the camera at eye level. A straight-on angle is the most flattering and natural viewpoint for your audience.
Distribution and Interaction
Upload on a consistent schedule so viewers know when to expect new videos. For most genres, multiple times a week or once a week works well. Engage with your viewers in the comments. Respond to all comments on your videos, especially when you're first starting out. Build that connection. Promote your videos on social media. Share your latest uploads across platforms to increase visibility and drive more traffic back to YouTube. Engage with anyone who comments on your social posts as well.
FAQ
Is there a way to edit YouTube videos for free?
Of course. VideoProc Vlogger is a completely free video editor with any limits on video quality, size, or watermark. It comes with both basic and creative editing features for users of all levels. You can also use open-source video editors, for example, OpenShot, Shotcut, and Kdenlive. But they are not as intuitive and beginner-friendly as VideoProc Vlogger.
How do you edit a YouTube that is not yours?
Firstly, you need to save the video from the channel. This can be done quickly with VideoProc Converter AI. Then you can edit to your liking in VideoProc Vlogger. If you don't want to switch from one app to another, VideoProc Converter AI also performs trimming, cropping, rotating, merging, and multiple quick edits.
Is it possible to edit an existing YouTube video?
Yes. You can edit an existing YouTube video either it's published or unlisted. Find the video in YouTube Studio, open Editor, and you can trim, cut, blur, or add audio to it.
How to cut a clip from a YouTube video?
When you plan to share a part of a YouTube video, click on the "Clip" icon instead of Share. Then you can set the duration freely. After that, add a title, and click "Share clip". Finally, you can get a link containing only the clip cut from the YouTube video.


