
In an era full of uncertainties caused by COVID-19, marketers, educators, administrators, and faculty worldwide have to adapt to new ways of attending meetings, classes, and parties remotely. During the pandemic, over 300 million people around the world hold and record meetings on Zoom. Now it becomes pretty normal to communicate, collaborate, and even spend Thanksgiving and Christmas with families over Zoom meetings.
Zoom allows holding a meeting for 40 minutes to 24 hours, and it archives the video conference for all users when it is ended. Basically, you don't need to edit the recording. But if it is too long, you need to remove unneeded pauses and filler words like er and uh. Then you'll get a better video for sharing with the public.
Today, we'll show you how to edit a Zoom recording online and what is the best Zoom recording software to crop and trim Zoom videos on PC and Mac. Let's begin now.

1. How to Edit a Zoom Recording Online
Zoom provides online services for paid subscribers. Once you choose "Record to Cloud", and the recorded video conferences, audio, and chat text are recorded in the Zoom cloud to free up the local storage on your computer.
While previewing the video online, you can edit it by specifying a playback range.
Step 1. Open your dashboard on Zoom and find the Zoom video recorded to the cloud.
Login to your Zoom account to zoom.us. Navigate to My Account > Personal > Recordings > Cloud Recordings. Now you can see all videos that are recorded to the cloud, then select a recording that you want to edit.

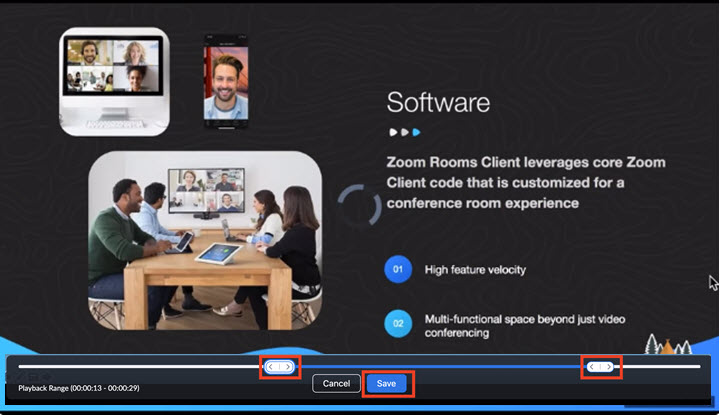
Step 2. Trim the Zoom video online.
Click the play button on the video thumbnail. Click the scissor icon in the lower right corner of the preview window. And drag the playheads to specify the start and end time of the Zoom recording. Hit "Save" and the video will be saved to the Cloud Recordings tab.
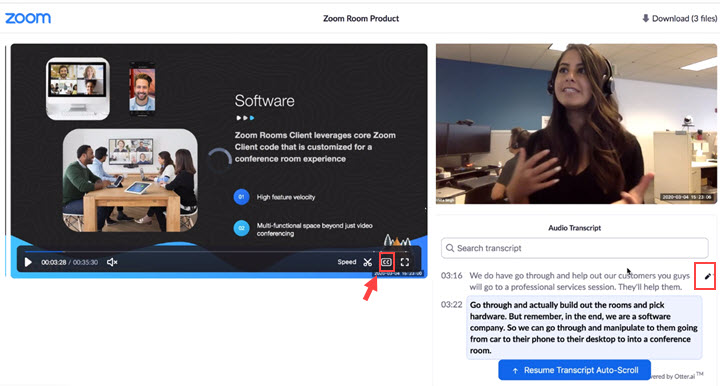
Step 3. Modify the audio transcript on Zoom.
If you've enabled Zoom "Audio transcript" in advance, you can find the transcript in the CC (Closed Caption) option. Click it, and you can preview and modify the transcript of your recording.
However, it is not actually a feasible way to edit your Zoom recording. The changes will not be applied to the recording if you are watching it on Internet Explorer, Safari, or on mobile devices using low bandwidth mode.
And it has limited video editing features. If you want to trim the middle part of the Zoom video, and remove "umm", "er" sounds, and some freezing moments, and apply more edits for better viewing, check the second method below.
2. How to Edit a Zoom Recording Offline
If you don't upgrade the plan on Zoom, your recordings will be saved to:
- C:\Users\asus\Documents\Zoom - Windows
- \Users\User Name\Documents\Zoom - macOS
Now you need the best Zoom video editor, VideoProc Vlogger, to edit Zoom recordings on your PC or Mac. It has been built with a full set of video editing tools including but not limited to cutting, merging, cropping, texting, removing background noise, etc. Furthermore, by the leading full GPU acceleration tech, VideoProc processes large and long Zoom recordings without any fuss.

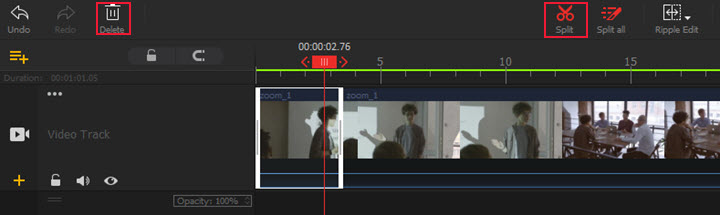
Step 1. Trim the zoom recording.
Open VideoProc Vlogger and create a new project. Import your Zoom recording to Media Library and drag it to the timeline.
Play the video and pause it when you want to cut. Click Split in the toolbar. Repeat the step to divide the recording into several parts.
Click to select the clip that you want to remove, and press the Backspace key to delete it.
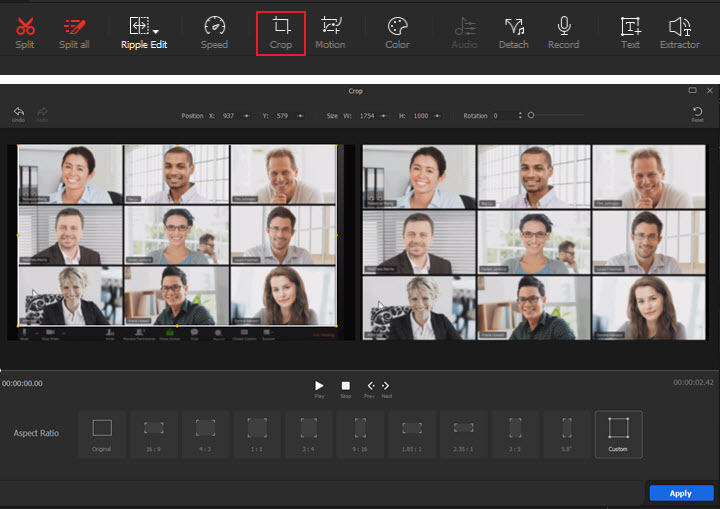
Step 2. Crop the Zoom video.
Zoom allows sharing the screen during the video conference, if you dragged some files into the recording area by mistake, this video cropping tool surely comes to your rescue before you share it with the public. What's more, you can remove black bars and the "Powered by Zoom" watermark (if it is enabled) by cropping the video on your computer.
Click Crop in the editing bar this time. Select the aspect ratio that you need, or you can choose the Custom mode to crop the frame freely. Then drag the box on the footage to reframe. When it is done, click Apply Crop to get back to the main editing interface.
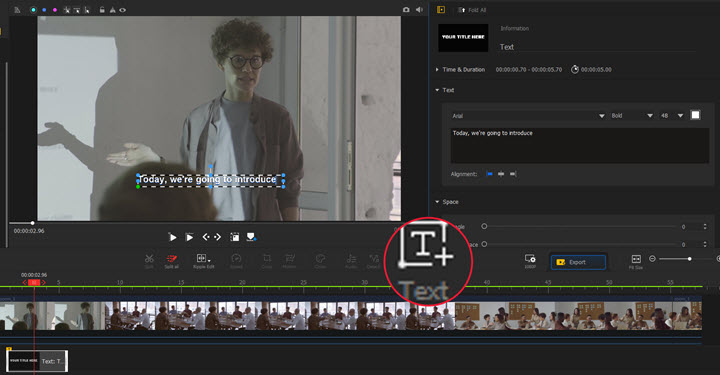
Step 3. Add subtitles (if necessary).
The next step is to add subtitles and texts to your Zoom recording for better viewing.
Put the playhead at the position where you want the subtitles to appear. Click the Text option in the toolbar, then type into the content. You can change its font, color, size, and position in the Inspector panel on the left side.
Step 4. Speed up the recording properly.
A Zoom webinar takes 30 minutes to several hours. And it is really time-consuming to browse the whole recording even you've trimmed off some parts. And the best solution to speed up the video recorded by Zoom.
VideoProc Vlogger supports a playback speed of 1/32x to 32x. And the proper speed for a Zoom recording is 1.5x to 2x. Click Speed > Constant and select a proper speed-up option.
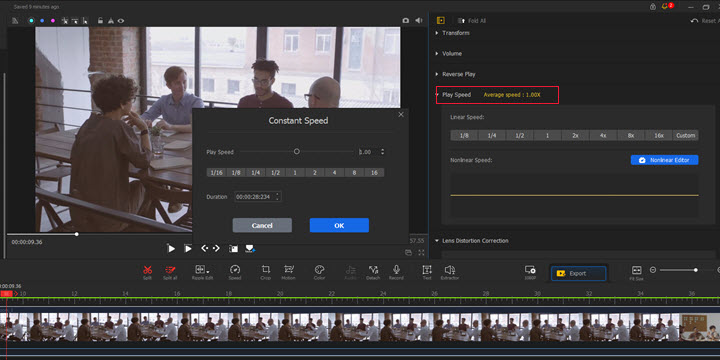
Tips: By default, VideoProc Vlogger changes video speed without changing the pitch, if you want a change, toggle on the option on the head of the speed menu.
Step 5. Add your brand logo.
Import your company logo in .png or .jpg to Media Library. Then place it to Overlay Track. Double-click on the logo in the preview window, and you can adjust its position and size by simply dragging.
You can also type the contact info or official website address on the screen with the Text feature of VideoProc Vlogger. This is also a good opportunity to promote your brand while sharing your Zoom video.
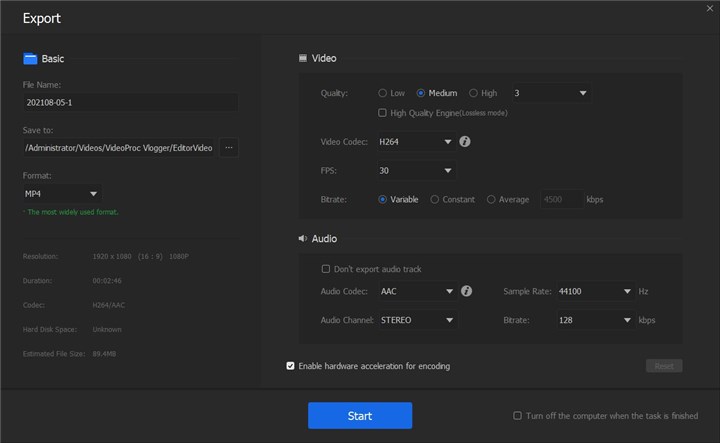
Step 6. Choose a proper video format for your Zoom recording.
Preview and check the edited Zoom recording. Hit the Export button above the timeline, and finish some settings like file name, format, and destination folder to export the Zoom recording.
Besides, VideoProc Vlogger has preset the output resolution by devices (iPhone, Android, TV, DVD, etc.) and video platforms (Vimeo, YouTube, Facebook, etc.). You can select the best format for your Zoom recording in terms of different use.
FAQs
1. How to edit a Zoom audio recording?
When the webinar on Zoom is over, it will be saved in 2 files, an MP4 video and an M4A audio file. First, you need to find the audio recording on your PC/Mac. Next, import it to the audio editing software, like say, WavePad and AVS Audio Editor. Then you can trim, cut, merge, and adjust the audio speed freely.
2. How to share a Zoom recording?
You can hit the share option on Zoom cloud recordings, customize the download and viewing rights, and set a password. Then copy and send the share link of the recording to your partners.
As for local recordings, we'd suggest reducing the file size with VideoProc Converter AI first. It achieves 90% video size reduction without visible quality loss. Then you can transfer a long Zoom recording over the internet in just a few seconds.


