
 To fix the problem of GPU acceleration in Premiere Pro, the first thing you need to make sure is that you have GPU acceleration enabled. If you've enabled Mercury GPU acceleration but still have that error message, you can try these workarounds below. Check Solution No.8 (Easiest Fix) to fix it in 1 click.
When you attempt to boost the speed of video processing in Adobe Premiere Pro, the best way is to enable GPU acceleration. But sometimes GPU Acceleration option is not available. When you are trying to apply certain GPU-accelerated FX, you'll get stuck by the error "This effect requires GPU Acceleration". This article will help you get rid of this error, enable GPU acceleration in Premiere Pro, and go with proper settings.

Here is a little background knowledge of what is GPU acceleration in Premiere Pro: GPU acceleration refers to the tech that employs GPU to speed up algorithm computing. Premiere Pro can leverages available GPUs to allocate the processing tasks to the CPU and the GPU to get better performance. Currently, many effects and plugins for Premiere Pro require GPU acceleration. Mercury Playback Engine (GPU accelerated) renderer is used to render certain effects and enhances playback.
When it is not properly set up, you may find that 100% of CPU is being used and the GPU is at 0% or 1% even though you are sure that Mercury Playback Engine is enabled. And it is still choppy, lagging, and even crashes sometimes. Read on for a complete guide to fix the problems.
Adobe Latest Update: With a new support for NVIDIA and AMD GPUs on Windows, Premiere Pro enables hardware acceleration to speed up encoding on those systems. And as many users expected, it now natively supports Apple's ProRes RAW codec.
Method 1. Enable Mercury GPU Acceleration
"This effect requires GPU acceleration" occurs in Premiere Pro because some the effects are computing intensive, and need hardware acceleration to ease the burden of CPU. GPU accelerated effects are indicated by a special icon in the effects bin.
If the effect you are applying to the clips and the tracks are GPU-accelerated by design, you need to make sure the Mecury GPU acceleration is turned on and that your graphics card supports it.
Step 1. Restart Adobe Premiere Pro and import files.
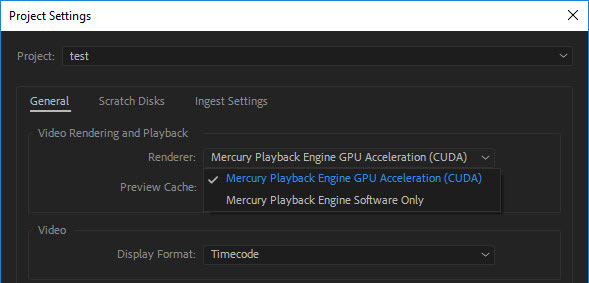
Step 2. Go to Project Settings> General> Renderer to recheck Renderer is Mercury Playback Engine GPU Acceleration.
Now you can see how GPU acceleration is going in your system, and then open Premiere Pro to verify if it runs faster.
If you also have Media Encoder installed alongside Promiere Pro, make sure to enable GPU for it too. The option is in the menu under the Queue panel in Media Encoder.
Method 2. Update Graphics Driver
If you cannot turn on Mercury GPU acceleration, chances are that you need to update the graphics driver to the most current version, and thus removing the warning of this effect requires GPU acceleration. Each manufacturer has a dedicated updating page, and you can download the driver for your specific usage.
Step 1. Figure out what graphics card you have.
For PC: Start>Run>Type "dxdiag">Display
For Mac: Apple>About This Mac>Graphics
Step 2. Download current Intel, NVIDIA or AMD driver for your card from the official website.
Step 3. Install the current driver.
Step 4. Reboot the computer.
Tips: Make sure to perform a clean installation of the graphics driver. Taking Nvida as an example, after downloading the latest driver from Nvidia official page, check the box for a clean install, instead of jumping into the express installation. The reason is, a clean install will remove remnants of old drivers that lingers on the system.
Method 3. Save as New Project to Restore GPU Acceleration
Some users reported that this method works for their existing project. To begin with, you need to delete media cache, and use the "save as" option to create a new copy of the project. Here comes the detailed steps:
Step 1. Go to preferences settings in Premiere Pro and click the Media Cache tab. Then click the blue Delete button.
Step 2. Go to File in menu, and choose Save As to save the existing project as a new project.
Step 3. Quit Premiere Pro and restart the computer.
Step 4. Launch the project, and copy and paste the sequence into a new sequence, and repeat step 2 to save it as a new project again.
Step 5. Close the program and restart computer again.
Launch the project and GPU acceleration should be working. Now you shall be able to apply GPU-accelerated effects without seeing the red banner of "This effects require GPU acceleration" If no, you can revisit other methods listed in this post.
Method 4. Uninstall Outdated Third-Party Extensions
GPU acceleration not available error may crop up when some third party plug-ins are problematic. For instance, the plug-in can be outdated after you updated Premiere Pro, or it can be a trial when you installed, and now it is expired.
To uninstall third-party plugins, you can quit Premiere Pro and use one of the following three methods:
Step 1. Use the uninstaller that comes with the extension when you installed it in the first place.
Step 2. Go to the installation folder of Premiere, and find the Plug-ins folder, delete the extension you no longer need, and clear the trash.
Step 3. Use the Adobe Extensions Manager for your version of the software. It is different for CC and CS versions.
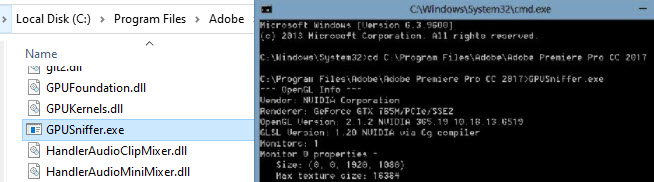
Method 5. Run GPUSniffer Executable from Premiere Installation Folder
Another rarely mentioned fix for "This Effect Requires GPU Acceleration" is to run the GPUSniffer.
Here is the general idea behind the fix: Premiere Pro may somehow fail to recognize the graphic card on your computer, and you can force run the program that Premiere Pro uses to detect the video card. The program is an executable called GPUSniffers.exe under the installation folder of Adobe Premiere Pro. As its name suggests, it will "sniff" out the GPU from the operating system.
Here is a quick guide:
Step 1. Close Premiere Pro if it is currently running on your computer.
Step 2. Right-click on the shortcut of Premiere Pro and hit Open file location.
Step 3. Inside the Premiere Pro installation folder, enter GPUSniffer in the search box.
Step 4. Double-click on GPUSniffer.exe to run it. You shall see the command-line tool start working.
Step 5. Wait for the window to close automatically, and re-launch Premiere Pro.
Method 6. Reorder Effects to Diagnose the Problems
In certain cases, you can change the order of the effects to see what is causing the warning of "this effect requires GPU acceleration". According to some users who reported the problem, how the effects are stacked one after another may cause the error.
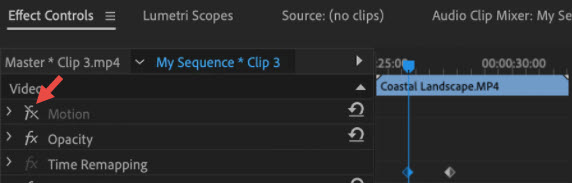
In the effects control panel, you can drag the FX to rearrange its order, and click on the FX icon to toggle on and off the effects. Do this one by one to see whether it makes a difference.
Method 7. Update the Hardware to for Sufficient VRAM
Sometimes you might also see the message "your system hardware does not support hardware acceleration for the current settings". In that case, you need to update the hardware and make sure the VRAM meet the requirement for computing-intensive effects.
According to Premiere Pro community support, at least 2GB VRAM is need for the GPU detection in 1080p timeline, and 4GB and above is needed for 4K timeline, and this is only the minimum requirement.
The recommending specs would be:
- 4GB VRAM for 1080p
- 6GB VRAM for 4K
- 8GB or higher VRAM for 6K or higher dimensions
If you are still seeing the banner warning "This effect requires GPU acceleration", it may be because you are editing VR HD content. In that case, 6GB can be a nice starting point, for 4K and 8K, higher VRAM and CUDA 9.2 are needed.
Method 8. Detect Hardware Info and Enable Full GPU Acceleration
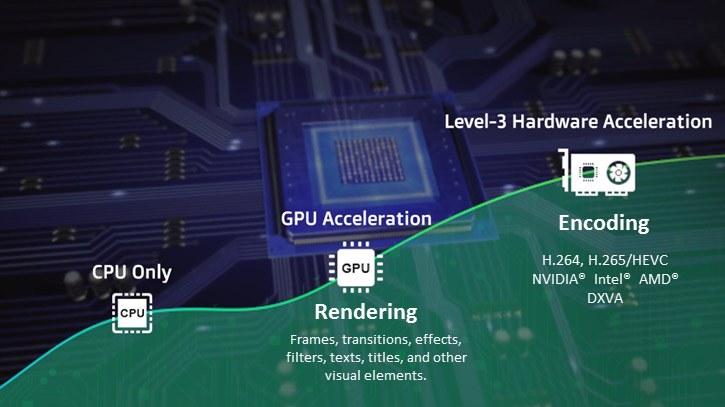
To upgrade the GPU hardware is expensive, and you might still seeing the notification that "this effect requires GPU acceleration" in Premiere Pro for software hiccups and unkown errors. In such cases, we recommend you try the best free alternative method. VideoProc Vlogger can display the detailed hardware information for you, and better even, it can make use of level-3 GPU acceleration in video editing.
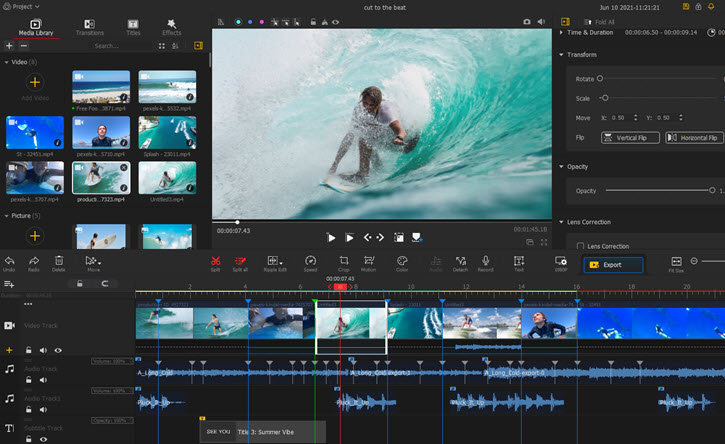
You can trust VideoProc Vlogger as the free and simple alternative to Premiere Pro, no matter you are editing 4K video content, or making videos just for fun to share to friends and families.
Click the download buttons below to free download VideoProc Vlogger, and get rid of the annoying "This effect requires GPU acceleration" forever.
VideoProc Vlogger - Use Full GPU Acceleration in Video Editing
- Smooth 4K HEVC editing, real time previewing, and fast rendering
- Unlimited tracks, stock templates for transition, VFX, titles, color filters.
- Create keyframe animation for motion and speed.
- Compositing with chroma key (green screen) and blend mode.


VideoProc Vlogger is the new leader in free video editing applications, with exciting features to add keyframe animation, use text templates, create video collages, color grade footage with LUTs, and support Level-3 Hardware Acceleration for encoding, decoding and rendering.
Get Started and Enjoy Hardware Acceleration
- If you are an experienced Premiere user, all the editing knowledge is transferable when using VideoProc Vlogger.
- If you are a beginner, the simple UI in VideoProc Vlogger can help you get going quickly. You can also check the official tutorials on YouTube.
Step 1. Download and launch VideoProc Vlogger.
- It will detect hardware on your computer automatically when you launch it for the first time.
- You can also check the hardware Info later in Menu > Settings (F2) > GPU.
- Click Scan Hardware to check whether your computer support hardware acceleration, and to what extent.

Step 2. Enable hardware acceleration for video decoding and encoding.
Go to Menu > Settings (F2) > GPU to enable it and enjoy smooth editing, real time previewing and fast exporting.
Step 3. Start editing video.
VideoProc Vlogger is optimized for 4K HEVC video editing. It supports full level hardware acceleration for video decoding, so that you can edit frame by frame with real time previewing.
- To maintain a balance between utmost image quality and relatively faster processing speed, VideoProc Vlogger is baked with intelligent image scaling algorithms.
- The basic idea is, instead of using one algorithm for all scenarios, the engine will analyze and evaluate the editing in the project, and implement the most efficient algorithm on a case by case basis upon rendering and encoding.
Unlimited Tracks
You can add unlimited numbers of video and audio tracks on the timeline using VideoProc Vlogger.
Compositing with Chroma Key and Blend Mode
- You can use chroma key to remove background such as green screen or other colors.
- You can use blend more to get creative, such as placing video inside text, doing the double exposure trick, etc.
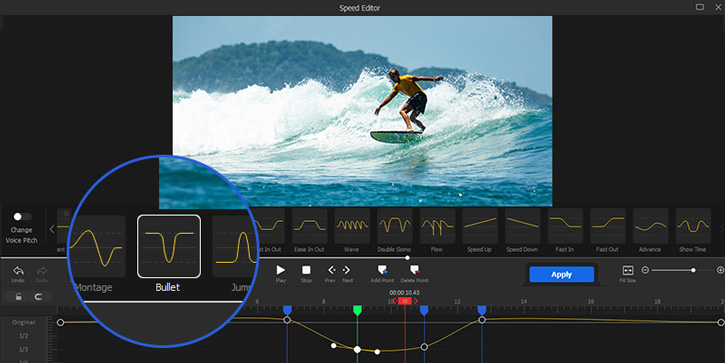
Create Speed Ramp with Curve Graph
- You can keyframe the speed to time remapping smoothly with Bezier curves, which looks more cinematic than an abrupt speed change.
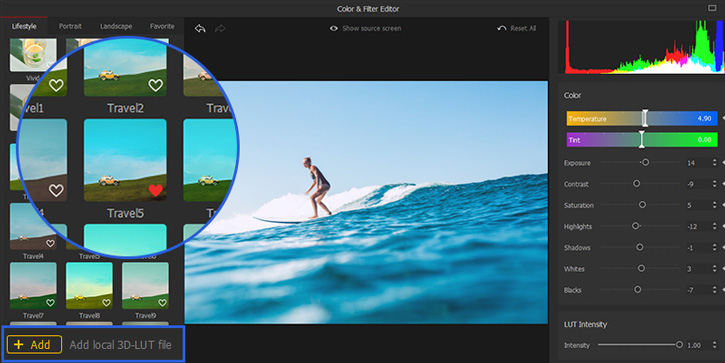
Essential Color Grading
- Use more than 90 templates for stylized look, or import unlimited numbers of 3D LUTs.
- Adjust white balance, exposure, contrast, hue, and go for HSL secondaries.
Audio Editing
- Use audio analyzer to detect beat, onset, and silence segment.
- Use the 10-band graphic audio equalizer to manage EQ settings.
- Add audio effects, change voice to robot, chipmunk, kid, etc.
Step 4. Export video.
Enable hardware acceleration for video encoding to speed up 4K exporting.
Addition Tips to Fix GPU Acceleration Not Available in Premiere Pro
Since many effects and plugins for Adobe Premiere Pro CC requires GPU acceleration for playback and rendering, if you don't have this enabled, you'll get daunted by errors or slow performances. The reason for failing to enable GPU acceleration lies in Premiere Pro itself, GPU and driver's version, and others. Then we will analyze them one by one to solve the problem for you.
1. Your graphics card and graphics driver don't meet the requirement of Premiere Pro
Whether a frame can be processed by Mercury Playback Engine GPU Acceleration depends on the size of the frame and the amount of RAM on the graphics card (VRAM). Adobe officially claims that it requires a GPU of 2GB VRAM at least, and it is better to have 4GB VRAM. As for graphics card, if it’s too old, it may not support Premiere Pro anymore. For instance, Premiere Pro CC 2019 uses CUDA 9.2 are not supported in the NVIDIA driver from 2017.
2. Your graphics card hasn't been detected by Premiere Pro
Adobe Premiere Pro is set to enable built-in CPU acceleration. You need to activate GPU acceleration manually. Before you choose Mercury Playback Engine GPU Acceleration, Premiere Pro will detect and recognize the GPU on your computer. Once it fails, there are no chances to enable GPU acceleration.
3. A GPU does not speed up all processes.
GPU acceleration works in real-time preview and export rendering, which means it won't speed up video processing from the very beginning to the end. So if you see that GPU usage is lower, don't worry, it is just the proper rest time.
Final Words
For Adobe Premiere users, if you get any trouble with GPU acceleration, check the hardware info with VideoProc Vlogger to solve it pertinently. On top of that, it allows you to edit videos simply, like cut, merge, crop,and denoise 4K videos shoot by iPhone, GoPro, DJI and 4K camcorders.
That's all for troubleshooting problems of randomly unavailable GPU acceleration in Premiere Pro. Hope them work for you.


