
Summary: Looking into how to remove Filmora watermark for free? You're in the right place. We're about to walk you through 8 tried-and-true methods to remove Filmora watermark, including how to crack Filmora 13/12/11/10 without leaving a watermark. Even better, we'll introduce you to a completely free Filmora alternative - VideoProc Vlogger.
"Filmora makes you have a ridiculously sized watermark if you don't pay $40-$100 annually"
"I also hate how in all their sponsorships the YouTubers say "Filmora is free" and what they don't mention is that it has a MASSIVE watermark" - from Reddit.
You came across Wondershare Filmora after wading through a sea of paid and free editing software. It's simple exterior and rich ready-made templates amazed you a lot. To take a close look, you read some reviews from YouTubers and experts. They all indicated this was a free yet reliable program. So, right off the bat, you added Wondershare Filmora to your arsenal and started to make your first video. After taking several hours to apply the edits, you clicked on Export to generate the care-crafted clip.
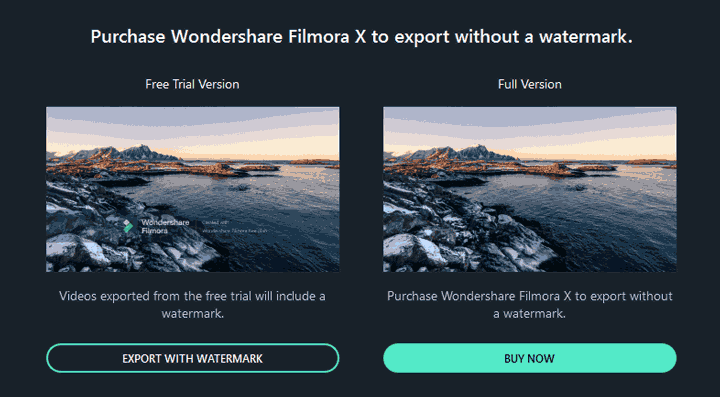
However, it reminded you the video exported from the free trial would include a watermark. Surely, you can press BUY NOW to subscribe to Filmora to erase the watermark instantly. However, it's unnecessary as numerous video editors are free of charge. That's why you're searching for how to remove Filmora watermark without paying.
- Method 1. Activate Filmora Without Product Key
- Method 2. Use Free Filmora Registration Code
- Method 3. Record Your Screen
- Method 4. Use Online Filmora Watermark Remover
- Method 5. Use Offline Filmora Watermark Remover
- Method 6. Remove Filmora Watermark on iPhone/Android (2 Tools)
- Method 7. Use Third-Party Editing Software to Remove Filmora Watermark (2 Tools)
- Method 8. Try a Watermark-Free Filmora Alternative
Comparison of the 8 Methods to Remove Filmora Watermarks
| Methods | Success Rate | Difficulty | Price |
|---|---|---|---|
Activate Filmora Without Product Key |
60% |
Medium |
Free |
Filmora Registration Code |
40% |
Easy but sometimes not working |
Free |
Record Your Screen |
100% |
Easy |
Free |
Online Filmora Watermark Remover |
30% |
Easy |
Free |
Offline Filmora Watermark Remover |
20% |
Easy |
Free |
Filmora Watermark Remover Apps for Mobile |
10% |
Easy |
Free |
Third-Party Editing Software |
60% |
Difficult |
Depends on the software used |
Watermark-Free Filmora Alternative |
100% |
Easy |
Free |
Why It's Difficult to Remove Filmora Watermark
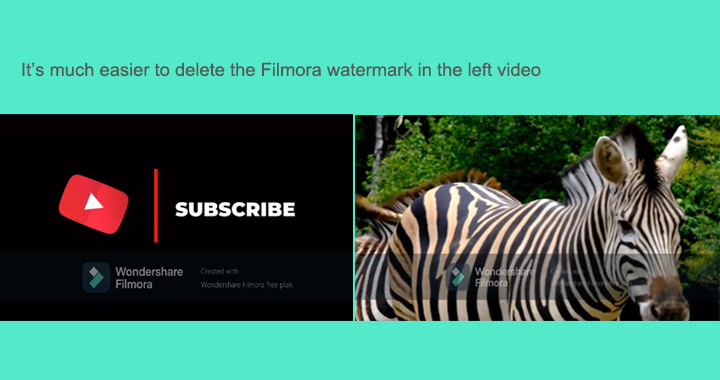
It's easy to erase the end credits added by Filmora by trimming. The real trouble is the huge semitransparent watermark that covers the lower middle of the screen. Applying the universal watermark removing methods like cropping, replacing, and blurring will definitely damage the authenticity and integrity of your video. This also explains the purpose of Filmora adding watermarks to the video - pushing free users to purchase the program.
Don't fret, I'm not saying there's nothing we can do to remove Filmora watermark. After doing a little sleuthing, I actually found some workarounds that can help you perfectly get rid of Filmora watermark. To show you how to do this, I've put together a guide that fleshes out 8 easy ways.
Method 1. Remove Filmora Watermark by Activating Without Product Key
Filmora watermark is created by developers to discourage software theft by offering a manner to prove the owner of the software. Thus, we can think of the Filmora watermark as a type of software protection added by the developer to limit the export capabilities. The cracked Filmora can bypass the activation system, so the software doesn't request you to login in or make the payment anymore. However, this method does not work for AI-driven features. You will not have access to the Creator Hub, online resources, or other internet-dependent functionalities.
Note: Although a great many individual users and small businesses use the cracked Filmora, it is one of the most illegal and risky ways to use Filmora without a subscription.
Step 1: Go to ThePirateBay which is one of the best torrent sites for downloading cracked software. You can also use other torrent sites.
Step 2: Search for Filmora 15, 14, or any other version you need. Download the one with the most seeders and the fewest leeches.
Note: If you don't already have a torrent download manager installed on your computer, download one. Then, click the Download Magnet Torrent button to automatically open the torrent download manager and start downloading the selected cracked Filmora install pack.
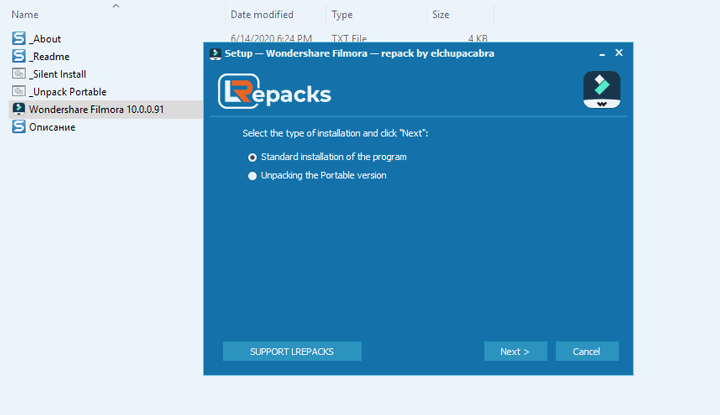
Step 3: Once the download is complete, extract the downloaded file. You should find an installation instruction text file that will guide you through the process of installing the watermark-free version of Filmora.
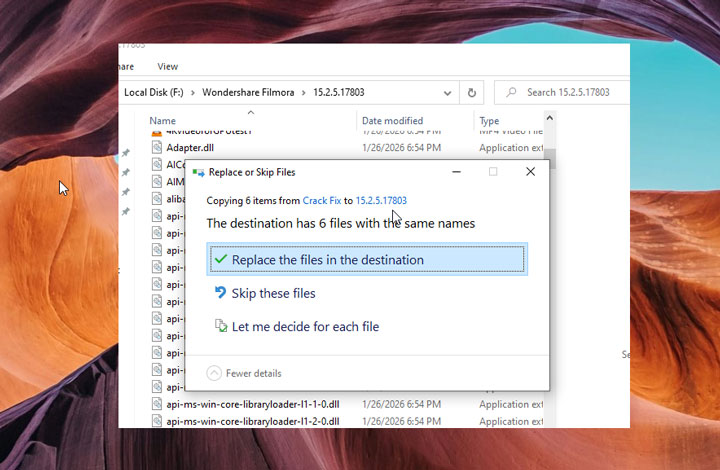
Step 4: Depending on the crack file you have, you may need to unzip it and replace the corresponding files in the installation folder with the cracked versions.
Follow the instructions carefully to get the cracked Filmora installed.
Method 2. Free Remove Filmora Watermark with Free Registration Code
We can Google "Filmora Free Code" to get many free registration codes. With them, we can activate the software for free and export Filmora without watermark. Here are some working free Filmora registration codes.
Note: These free codes are often temporary. Once they are detected by Filmora or used from multiple IP addresses, they may stop working.
- c2941647@drdrb.com | 10403029CF3644154841651AF141E800
- sushmabhardwaj.dk@gmail.com | 82A8310B0877122837B5C625FF9D2F19
- c2942163@drdrb.com | 35706E040C63EE00E377911BB9A3B301
- c2942269@drdrb.com | 00289623F7B3B81E14AEB526144B6D08
- c2943267@drdrb.com | D772BE0279AFE60AF0E1D2109CA89A19
- hebby@ziggo.nl | KH6DZ209EECB3B27D9VA9419KH8V5X2F
- bidjan@ziggo.nl | GO8B0909EEC77B27DFEA94190F3A0223
- c2943297@drdrb.com | FB9694298253B51545E70D22B3033808
- admin@bofile.com | 2E1540E40E4C849905792F611A0EAF3715
- mojado@gnu.org | 1C670A76D88EAA0945B8762F4B4A2B1A
Method 3. Free Remove Filmora Watermark by Recording Screen
Preparation: Change the Filmora display settings.

Navigate to the right bottom of the Filmora preview window to find a screen shaped icon and click on this.
Press Change Project Aspect Ratio to enter the new panel to lead yourself to the Project Settings panel.
Change the resolution, aspect ratio, and frame rate parameters to the target value. Hit OK. Click on the full-screen icon in the lower right corner of the preview window.
Step 1: Download the Program
Download VideoProc Converter AI on your computer or Mac.

Step 2: Enable Screen Recorder
Launch this 4K Filmora watermark remover on your Windows or Mac, hit Recorder to acquire the screen recorder feature. Go to the bottom of the interface to find the volume icon. Choose Realtek Digital Output to capture the audio.
Tips
You can hit the round gear icon on the top-right corner of the Recorder panel, click on Settings, and then:
- Choose High as the Recording Quality option to get better picture quality.
- Pick MP4, MKV, FLV, MOV, and more video formats as the recording format.
- Stop your mouse, mouse click, or Key shown up while recording.
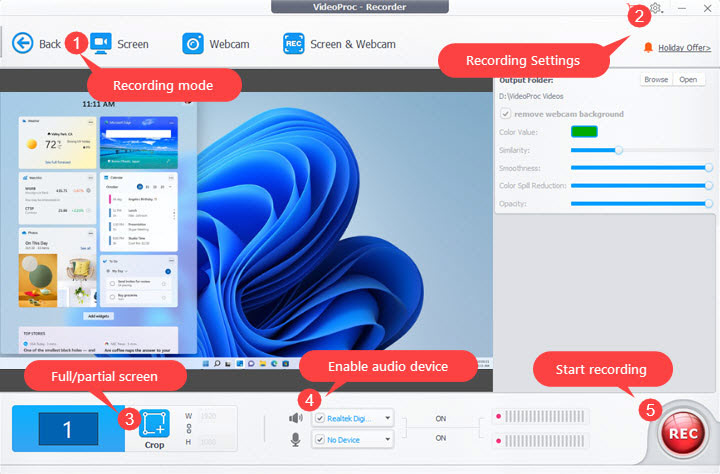
Step 3: Record Screen to Remove Filmora Watermark
Hit Screen > REC. Press Enter on your keyboard to start playing the video edited by Filmora and recording it. Hit the REC button again to exit the recording.
Method 4. Remove Filmora Watermark with Online Watermark Remover
There are a few online Filmora watermark removers available. Below, I will show you how to remove Filmora watermark using Apowersoft Online Watermark Remover, an online Filmora watermark remover that can help you get rid of the Fimora watermark.
Before Getting Started: Erase Filmora Watermark at the End of Your Video.
Most Filmora watermark removers don't come with the video trimming feature, so you have to use additional video trimmer to cut off the Filmora watermark at the end of the video. To do so, I suggest you to use VideoProc Converter AI. It's easy to use and supports to trim the unwanted Filmora watermark precisely by frame without any visible quality loss.
Step 1: Add the Filmora Video
Since this is an online Filmora watermark remover, you iust need to go to its homepage. Hit Remove watermark from your video and hit the blue rectangle bar to import your video generated by Filmora to it. This takes minutes or longer time for loading, depending on your network environment and file size.
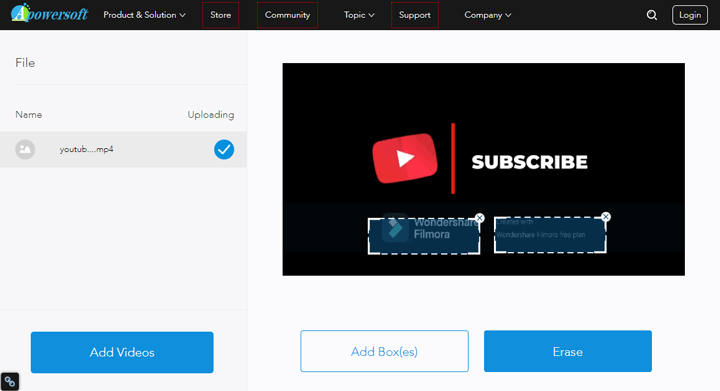
Step 2: Tweak the Filmora Watermark Removal Box
Drag the corner of the box that appeared on the preview windows until it perfectly covers the Filmora watermark. You can click on Add Box(es) to add a selection.
Step 3: Erase the Filmora watermark.
Press Erase to enable Apowersoft Online Watermark Removal to process your video. Once it is completed, press download videos to save the outcome on your local disk.
Method 5. Remove Filmora Watermark with Offline Watermark Remover
In addition to online watermark removers for removing the Filmora watermark, offline tools like Remove Logo Now are another viable option. However, again, they're only effective when the Filmora watermark is over a solid-color background. Also, since these tools lack a built-in trimming feature, you'll need an additional video trimmer like VideoProc Converter AI to remove the Filmora watermark at the end of your video.
See how to remove Filmora watermark using an offline watermark remover:
Step 1: Import the Video with the Filmora Watermark
Open Remove Logo Now on your computer. Press Add Files to select the video with Filmora watermark to import to the program.
Step 2: Cover the Filmora Watermark
Remove Logo Now offers us a pen, ellipses, square, and free-form tools. We can use either of them to smudge the Filmora watermark until all the redundant frames are covered in red.
Step 3: Get Rid of Filmora Watermark
Hit Remove and press Start. It takes minutes to delete the annoyed Filmora watermark.
Method 6. Free Remove Filmora Watermark on iPhone/Android
For mobile users looking to remove Filmora watermarks on iPhone or Android, try the following watermark remover apps:
1. Video Eraser - Remove Logo
Video Eraser is a versatile tool known for effectively removing unwanted objects from videos, including watermarks. See how to remove Filmora watermark using the app:
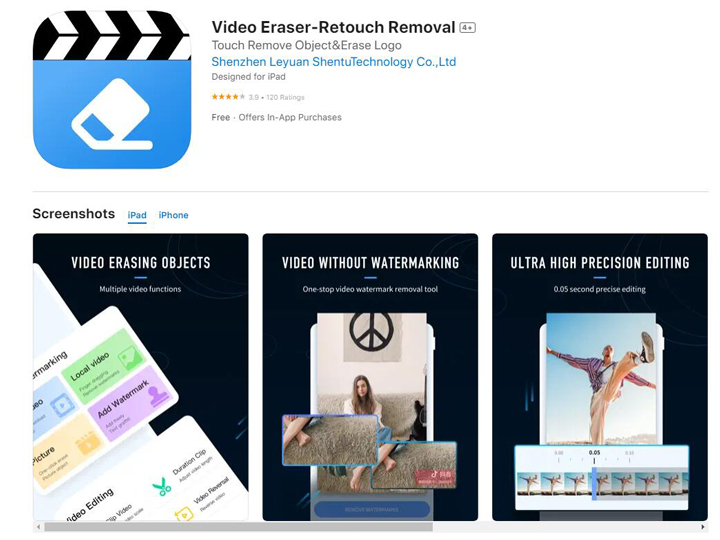
Step 1. Free download and install the Filmora watermark remover app on your phone.
Step 2. Open it, and import the video file you want to edit.
Step 3. Select the watermark area and tap Start to begin the removal process.
Step 4. Preview the edited video once finished and export.
2. Remove Logo from Video
Remove Logo from Video is another watermark remover app to remove Filmora watermark on iPhone/Android. Its simplicity and ease of use make it an excellent choice among mobile users.

Step 1. Download and install the app on your device.
Step 2. Select a video from your gallery and upload it by tapping the Start button.
Step 3. Click on the watermark logo to remove it.
Step 4. Preview the result and export the video.
Method 7. Use Third-Party Editing Software to Remove Filmora Watermark
Suppose you have a robust build PC, let's say it has 32GB of RAM, i9 processor, and dedicated graphics cards, then you can fiddle with some serious programs like DaVinci Resolve and Adobe After Effects to remove the Filmora watermark.
1. Free Remove Filmora Watermark with DaVinci Resolve
Notice: This trick doesn't guarantee to remove the Filmora watermark clean.
Step 1: Download DaVinci Resolve
Go to the homepage of DaVinci Resolve to find the desired version that matches with your system, hit Download. You will then be asked to fill in some personal information including name, email, phone, and address, etc.
After filling out the form, you can get the installation pack download link, hit this to start the downloading. Follow the instruction guide to install this pro-level video editing software on your machine.
Step 2: Import the Video with the Filmora Watermark
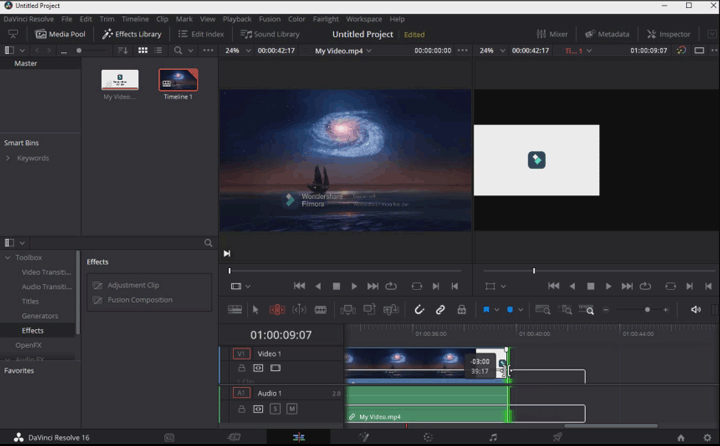
Press Edit to step into the video editing panel. Right-click on the media pool, select Import Media to pick the video with the Filmora watermark to feed into DaVinci Resolve. Add it to your timeline, and then you drag the end of the clip to trim off the Filmora watermark at the end of the video.
Step 3: Create A New Node
Drag the video to the timeline, and then hit Color on the bottom tab menu. This will lead you to the Color tab.
Press the hotkey Alt and S to build a new node.
Step 4: Select the Filmora Watermark
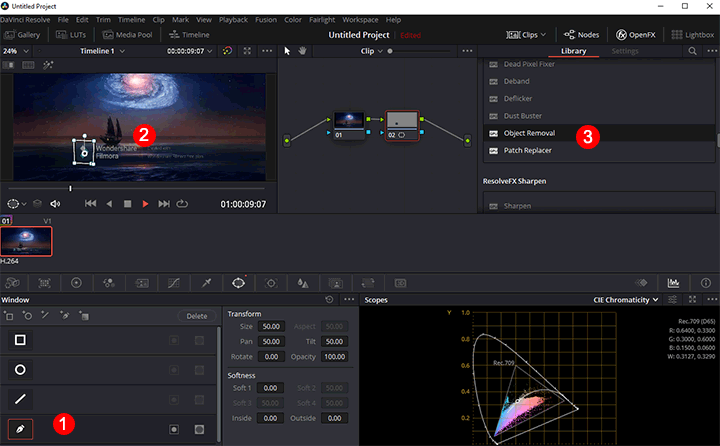
Underneath the preview window, you can find the power window. There you can use shape tools like rectangle, ellipse, or pen tool to draw a mask right around the watermark. Use one of them to select the square Filmora logo.
Step 5: Remove Filmora Watermark
Scroll down the Library tab to find the Object Removal button. Click this and drag it over the first node that we just created. Hit Scene Analysis. Now, DaVinci Resolve starts to analyze each frame of your video. This is a CPU and memory intensive progress that possibly will burst CPU usage to 80% and memory usage to 90%.
Step 6: Clean the Grey Lump
Once it finishes the scene analysis process, go to the setting panel and scroll down to find Build Clean Plate, and click this.
Step 7: Remove the Rest of the Filmora Watermarks
Since the Filmora watermark is made up of a square cyan logo on the left, a big Wondershare Filmora in the middle, an upright straight line, and two lines of words in a smaller size. We need to repeat Step 4, Step 5, and Step 6 to create 4 other nodes and apply the Object Removal command for each node one by one.
Step 8: Export Filmora Video Without Watermark
Hit Delivery, and choose the preferred output formats on the pop-up delivery page. Press Start Render to get the video without the Filmora watermark removed off.
2. Free Remove Filmora Watermark with Adobe After Effects
Adobe After Effects is another widely used video editor for removing the Filmora watermark. Although it isn't free, it offers a 30-day free trial with no watermark restrictions and no functionality limitations. Give a caution, similar to DaVinci Resolve, it demands a high-performance PC for running smoothly.
Step 1: Acquire the Program
Adobe After Effects offers 7 days of the free trial, so you can enjoy the content fill feature for free if this is your first-time use this industry-level video composition program. Otherwise, you need to subscribe to it at a fee of 29USD per month.
Step 2: Trim off the Filmora Watermark at the End
Launch up the program. Right-click on the media pool, choose Import > Files to feed the Filmora video with a watermark to Adobe After Effects. Next, you drag it to the timeline. Move the playhead at your timeline to the position where the Filmora end credits starts. Press Alt + ] on Windows or press Option + ] on Mac to trim off the watermark.
Step 3: Draw the Mask
Navigate to the top menu bar and find the pen tool. Just like what we do in Davinci Resolve, you need to use the pen tool to create masks for the Filmora watermark. The difference is, in Adobe After Effects, we can draw 6 masks or more for once. Thus, it's much more efficient.
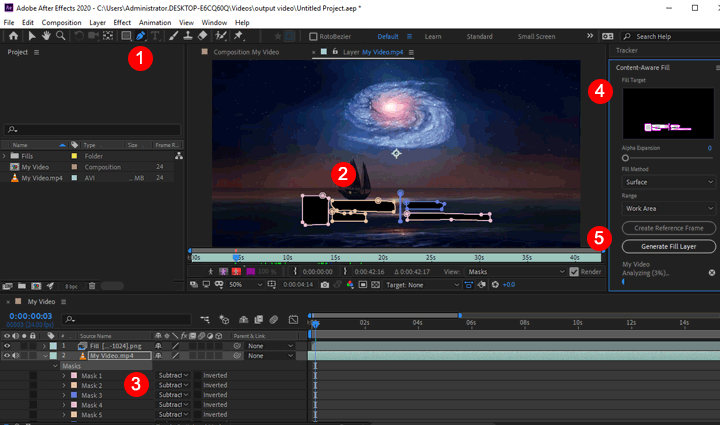
Step 4: Locate the Content-Aware Fill Tool
Go to the Mask, and select Subtract for each mask we just created. Move to the right panel of Adobe After Effects and scroll down to find the Effects & Preset tab. You can enter Content-Aware Fill on its search bar to locate the content-aware tool.
Step 5: Enable the Content-Aware Fill feature.
Click on the Content-Aware Fill tool. According to your specific demand, choose surface as the content filling ways and choose the working range as the work area. After that, you click on Generate Fill Layer.
Step 6: Analyze and Render the Filmora Watermarked Video
After the above steps, Adobe After Effects starts to analyze your videos frame by frame. This will devour horribly large computer resources. See if your computer isn't robust built, you are meant to encounter stutter and choppy.
DaVinci Resolve and Adobe after Effect take a similar workflow to erase the watermark. They firstly remove the area with the filmora watermark, analyze what's behind the watermark by the surrounding content, and then filling in the area of the removal.
Thus, whether the final video looks consistent or garbled is determined by how DaVinci Resolve or Adobe After Effects can figure out the area behind the Filmora watermark. From my test, they can better "guess" what the footage behind the watermark looks like when:
 The area behind the Filmora watermark doesn't have many details.
- The video is in plain color.
- The gray translucent bar on the bottom of the Filmora watermark is barely invisible.
Method 8. Try a Watermark-Free Filmora Alternative
If you want to edit your video with Filmora without watermark, why not try an alternative to Filmora like VideoProc Vlogger? As an impressive and free video editing tool, VideoProc Vlogger helps users edit and create videos without watermark. You can easily trim, split, speed up, slow down, add music, add text, change color, add effects, add filter, add overlay, and more. Just download this free software and edit your videos without trouble!


