CapCut is a free video editor developed by the same company that create the TikTok app. After its global launch in April 2020, this easy-to-use video editing app soon take a large share in the editing market. After all, the large user base of TikTok contributes to the growth of the CapCut app.
So, how to use CapCut to create videos easily for sharing or just for fun? We compiled the complete guide to make good edits using CapCut, covering everything from creating a new project, applying basic edits, venturing for advanced features, to exporting the video.
📕 CapCut Manual For Beginners - Free PDF Download
For users who prefer CapCut tutorial in PDF format, I have also compiled the PDF version here. You can download the manual and print out to learn easily.
- Download the CapCut Manual PDF here in MEGA Cloud Drive (PDF size: 1.3MB | 18 Pages | A4).
- Trick: You can press Ctrl+P (or Cmd+P) in browser, and select Print to PDF. This lets you store tutorials as local PDF files for offline reading, easy reference, or sharing.
*MEGA Cloud Drive is a secure and private cloud storage service. You can save the PDF directly without logging in, i.e., you don't need the MEGA account.

Note: This manual outlines my entire workflow for editing CapCut videos. I have attached the file here for the convenience of my readers. Note that this PDF is not an official tutorial from CapCut, and I am in no way affiliated with CapCut.
📢 Bonus Tip: Prepare Your Footage Before or After Editing in CapCut
As you build your skills in CapCut, you'll eventually run into situations where your videos or images need a quality boost, before you start editing or after you export the video. For creators working with multiple files or lower-quality footage, using an AI enhancer to elevate media files can save time and improve results. It allows you to batch-upscale and enhance footage, increase FPS for smooth visuals, and finish your CapCut projects with cleaner, higher-quality assets.
How to Use CapCut App
Step 1. Install CapCut app and open it.
Note: CapCut also has a desktop version so that you can edit videos on a bigger screen more easily.
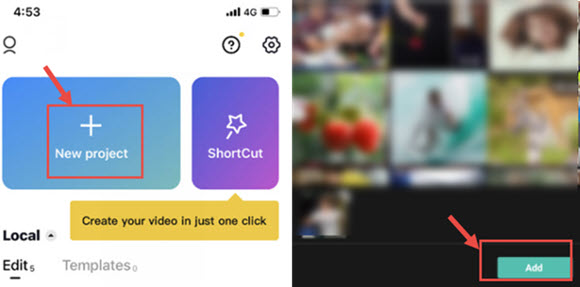
Step 2. Tap the "New Project" icon to create a project.
Step 3. Tap to select one or multiple video clips and hit Add.
Step 4. Start editing on the timeline.
Tips:
1. CapCut will save the project draft automatically. You can pause and resume editing anytime.
2. For automatic quick editing, you can also use the ShortCut feature to create videos in 1-click.
Introducing the CapCut Interface
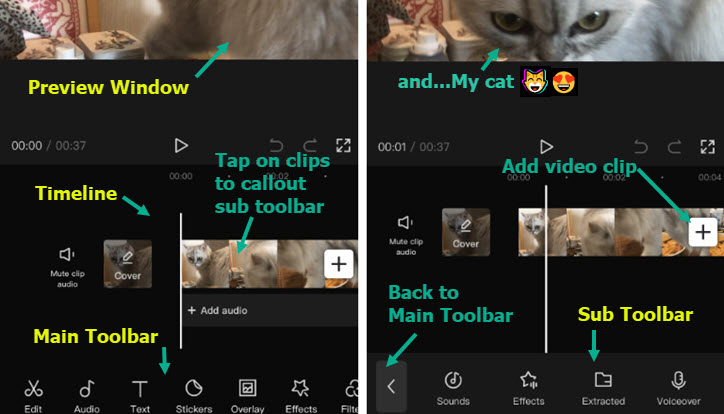
- Preview Window: You can playback video, or pinch, drag, rotate and interact with the clips directly in side the preview window.
- Timeline: You can assemble, arrange, and apply edits to video, audio, overlay, effects, and text tracks.
- Main Toolbar: All the tools you need can be found here. The Main Toolbar shows up when there is no clip selected on the timeline.
- Sub Toolbar: They are toolbars dedicated for different tracks and clips on the timeline. For instance, there are sub toolbars for videos clips, text, audio, overlays and so on.
You can also watch the video tutorial below.
How to Do Basic Editing in CapCut
How to Trim Videos in CapCut
After adding videos to the timeline, follow these steps to trim videos in CapCut:
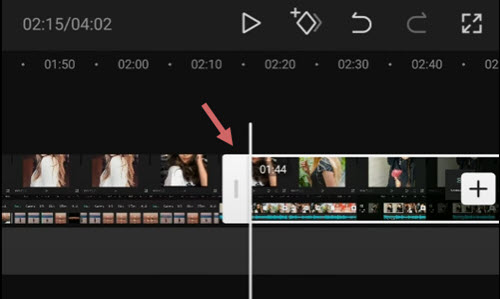
- Tap the video clip, you shall see white frames around it.
- Tap and hold on the white edge, and drag it to trim the video.
- You can also drag the opposite position to retrieve trimmed parts.
When you are trimming videos by dragging the edges, the adjacent clips will move along. In this way, there won't be gaps (and hence black screens) in your project.
If you want to trim out a section in the middle, you need to split the footage, and delete the clip in the middle. Read below.
How to Split Clips in CapCut
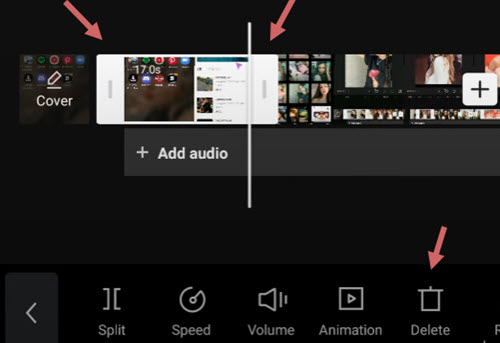
To split a video clip in CapCut, follow these steps:
- Tap the video clip to make sure it is selected.
- Hit the Split icon at the bottom of CapCut.
By splitting the video, you can perform the following edits:
- Add transitions in between after creating the split;
- Remove unwanted parts by tapping the split clip, and hit the Delete icon at the bottom of the screen;
- Insert new clips in between two video clips.
How to Resize Videos in CapCut
When you are trying to share videos to certain social platforms, the original video you created for another platform may not fit. Resizing videos in CapCut can make your video best fit the social media, and offer better viewing experiences for your followers.
To resize videos in CapCut, follow these steps:
- Tap the video clip that you want to change size.
- Tap the Format icon at the bottom of the editor.
- Choose a different as aspect ratio.
For instance, if you want to change horizontal videos to vertical, so as to better fit TikTok, you can use the 9:16 dimension.

When resizing the video, it is inevitable that some parts may be cropped, or are surrounded by black bars. In such a case, you can use the Canvas feature to polish the video.
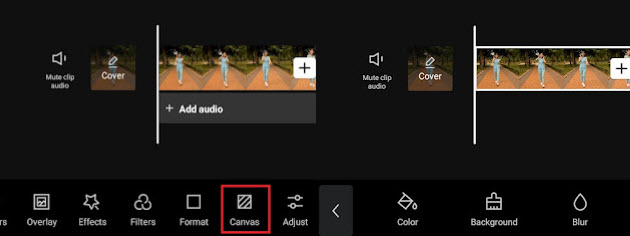
- After change format, tap the Canvas icon on the toolbar at the bottom screen.
- Tap the Color icon to change background color.
- Use the Background feature to add pictures as the video background.
Tips: For videos of low resolution, if you are editing on a desktop, you can use AI video upscaling tools to resize the footage. AI upscalers are trained with massive dataset to deliver natural and sharp image.
How to Mirror Video in CapCut
Mirror a video is a way to flip the video horizontally, or to create an interesting effect when two videos are put together side by side, while each one is mirrored to the other on the horizontal axis.
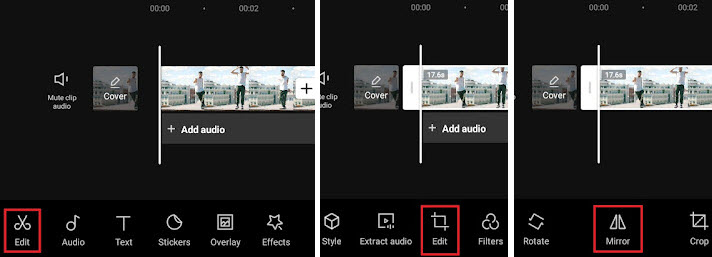
To mirror a video horizontally in CapCut, follow these steps:
- After importing the video clips into CapCut.
- You shall see the toolbar pop up at the bottom, tap the Edit menu.
- Here will be another Edit option right between the Extract Audio and Filters tool, tap it.
- Hit the Mirror tool inside the Edit option.
How to Rotate Video in CapCut
In CapCut, you can rotate the video to fix wrong orientations, or create the trendy rotation effects that features video zooming and rotating in animation.
Rotate Video in CapCut to Change Orientation
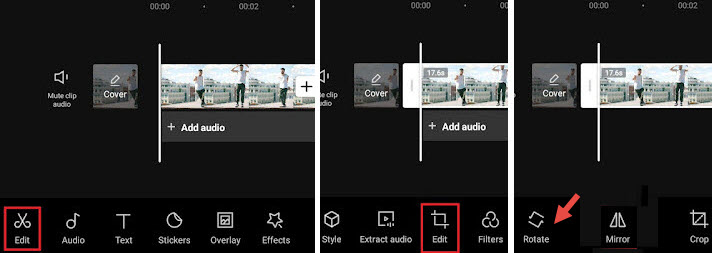
- Create a new project, add video clips from your camera roll, and Hit the Add button.
- Hit the first Edit button to go inside the video editing toolbar.
- Tap the second Edit button, and hit Rotate.
Note:
If you want to rotate part of the video instead of the entire video clip, tap on the footage and split it before using the rotate function.
Rotate Video in CapCut Using Keyframes to Create Motion Effects
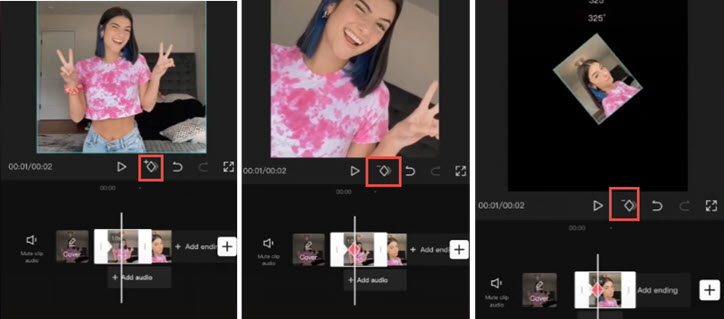
If you are trying to create video rotating effects, like those trendy videos that rotate videos and selfies photos, follow the steps below:
- Import video clips or pictures to CapCut.
- Tap on the clip, and tap the Keyframe icon to add a Keyframe. The Keyframe icon sits under the preview window (see screenshots above), next to the Play button.
- Tap on the clip and swipe to the right to move to a new position, tap the Keyframe button again to add another Keyframe.
- While staying on the second Keyframe, put two fingers in the preview window to pinch and rotate the clip.
- Repeat step 3 to move forward and create the third Keyframe, and repeat step 4 to pinch and rotate the clip. You can rotate it to 360 degree, 180 degreen or any angle that you like.
Playback and you shall see the clip rotating in motion. You can also make adjustment accordingly until you are happy with the result.
A little explanation here if you are curious about how the Keyframe works: for the first Keyframe, it keeps the original state of the clip, without another rotation or zoom-in, then in the second Keyframe, we rotate the clip. Therefore, from Keyframe 1 to Keyframe 2, the video starts to animate from the original state to another state with different rotation angle and scale, thus resulting in animation.
How to Change Speed in CapCut
CapCut offers two modes to change speed: Normal or Curve.
The Normal option allows you to speed up or slow down the video at a constant speed, such as 2x, 4x, 8x, etc.; the Curve option opens up to more editing possibilities, with the speed changing non-linearly to create impactful speed ramping effects.
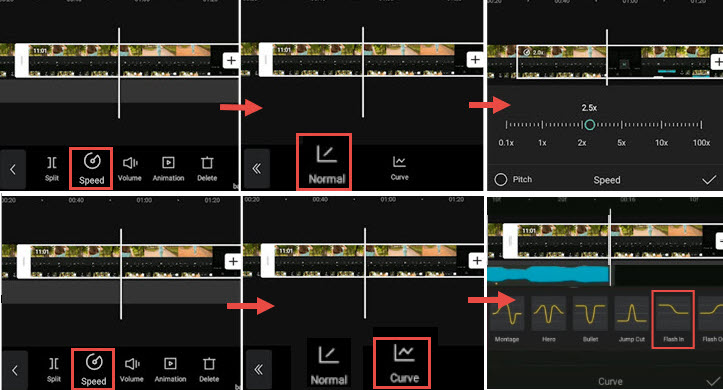
To use the constant speed modifier in CapCut, follow these steps:
- Tap the video clip on the timeline, and hit the Speed icon.
- Hit the Normal option to change the speed at the constant rate.
- Drag the slider the slow down video to 0.1x or speed up to 100x.
- You can toggle the Pitch option to decide whether to alter audio pitch when the video speed is changed.
To use the speed curves in CapCut, you can read the detailed guide to make velocity effects, including auto velocity effects.
To ease the speed when creating transitions, 3D zoom effects, or using keyframes, you can use the graphs feature in CapCut.
With the speed modifier in CapCut, you can make interesting Slomo video (Slow motion) to highlight a key moment, such as creating the bullet time effects.
How to Reverse a Video in CapCut
Reversing a video can create interesting effects, such as broken glasses restored or torn paper merged into one.
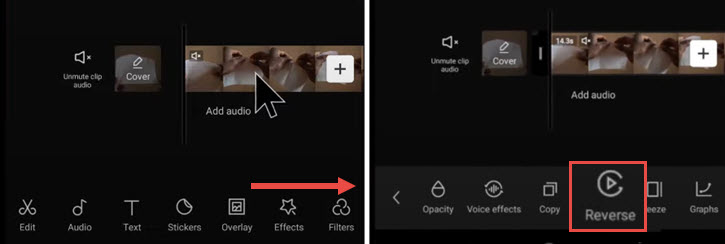
- Add video to the project in CapCut.
- Tap on the video clip, and swipe the toolbar at the bottom.
- Swipe all the way to the right until you see the Reverse icon.
- Tap on it to Reverse the Video.
How to Replace a Clip in CapCut
Replacing videos or pictures in CapCut is a handy feature. With it, you don't need to go through the hassle of trimming and adjusting the length of the newly add video clip to make it fit in, or re-apply effects again. The replaced video clip shares the same duration and effects of the original clip.
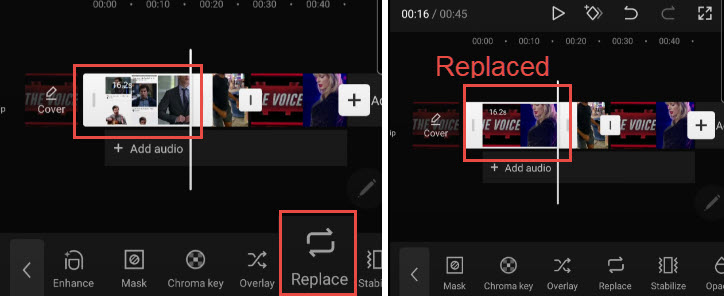
- Tap on the video clip that you want to replace. If you prefer to replace part of the footage, you can use the Split tool to cut up the footage, and tap the segment to swap.
- Tap and swipe the toolbar at the bottom, all the way to the right until you see the Replace icon.
- Tap Replace and find the video clip that you want to add.
Note:
The duration is set to be the same length to fill in the slot, still you can swipe the footage back and forth to make sure the parts you want are included in that settled duration.
How to Add Video Transitions in CapCut
Many trendy transitions in TikTok are 1-click templates in CapCut Video Editor. With these templates, you can create cool transitions without editing experience.
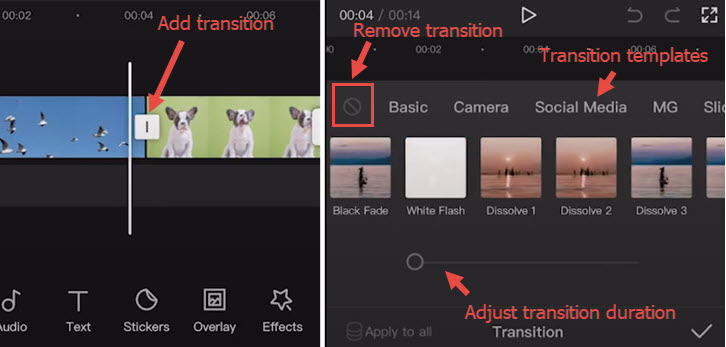
- Import two or more videos into CapCut project, or split a long video into two parts.
- Click the icon between two clips to enter the transition panel.
- Apply transition templates and playback to find one you love.
Note: you can tap the transition icon again to adjust or delete transitions.
- Drag the slider to adjust the transition timing.
- Tap the forbidden icon to stop applying any transition preset.
How to Use Trendy Templates in CapCut for Quick Editing
Using template in CapCut is easy, you simply open the template link, and replace the content with your own content. But where do you find the template links? Don't worry, we have a roundup of the trendy CapCut templates.
How to Use Overlays in CapCut
Using the overlay feature in CapCut, you can add videos, pictures and text on top of the main clip, thus creating Picture in Picture effect, special title effects, or use it in combination with green screen effects and more.
How to Add and Edit Overlays in CapCut
To add overlays to CapCut, follow these steps

- Import video or picture into the project as the main clip.
- Click the Overlay icon in the toolbar. If you cannot find the Overlay icon, make sure not to tap the main video clip.
- In the new window, Tap Add overlay.
- Browse the video or picture files and select one to add.
Note:
You can repeat the steps to add more overlays on the timeline.
To edit overlays in CapCut, follow these steps:
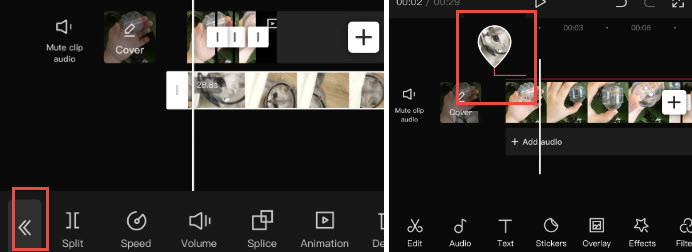
- Tap on the Overlay track, and you shall see the editing tools. You can split, trim, change volume, and so on in the same way you edit the main clip.
- Tap the double arrow icon once you finish editing the Overlay clip. It will take you back to the main timeline.
- To revisit the Overlay editing panel, click the waterdrop-shaped thumbnail.
Tips
- If your overlay is longer than the main clip, the rest the video will show black screens with only the overlays.
- You can tap the overlay clip and split or trim it.
- To change the position of the overlay clip on the timeline, you can tap and keep pressing on the overlay clip to move it.
How to Put Two Videos Side by Side in CapCut (or Create Split Screen Effect)
When you add two or more clips on different tracks in the timeline, and make they aligned on the timeline, these clips will show up in the preview window simultaneously in the same screen.
You can crop or use the split screen features to decide the parts to show and hide, or change the shapes of the split screen.
The video tutorial below is easy to follow.
To get started, add main video to the timeline, and tap Overlay to add overlay video.
- Tap the Mask icon at the bottom panel.
- Tap the Split icon, and move the split line in the preview window.
- You can also add more videos side by side by repeat steps above.
- Besides using the Split template, you can also use the Filmstrip template and so on.
How to Use Green Screen in CapCut
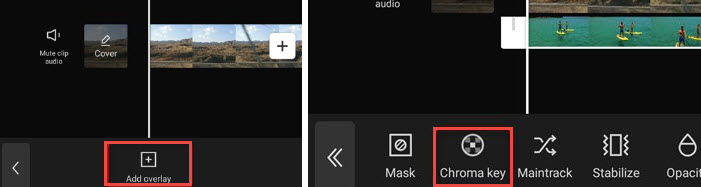
CapCut offers the Chroma Key feature to remove colors such as green screen.
- Import the main video to the project, and add overlays on top of the video.
- Find the Chroma Key icon in the overlay video's editing toolbar.
- Use the color picker to identify the color to remove.
You can read detailed tutorial on how to use Chroma Key in CapCut>>
How to Edit Text in CapCut
How to Add Text in CapCut
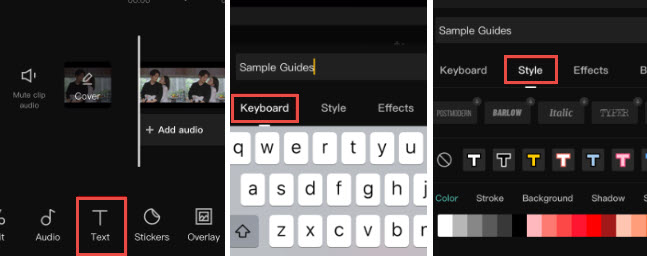
Adding text is easy and quick in CapCut:
- Create a New Project and import video, audio, pictures when needed.
- Tap the Text icon at the bottom toolbar.
- Type in the text as you like, and adjust its color, fonts, shadow, etc.
- After adding text to the timeline, you can drag its edge to make it longer or shorter, depending on how long you prefer it the stay on the screen.
Next to the Style tab for text, you can also apply Effects, Bubble, and Animation to the Text. Since they are presets, you don't need advanced editing skills to deal with the settings.
How to Make Text Transparent in CapCut
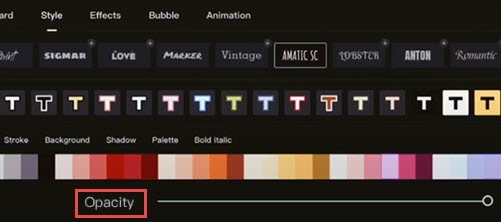
After adding text to the video in CapCut, you can adjust its transparency to create nice styles. For instance, it can be used as a way to add watermarks to the videos in CapCut.
- Tap Text icon, type in the text as you like, and hit the confirm button.
- In the style tab, drag the Opacity slider to change the transparency of the text and titles.
How to Use Text Tracking in CapCut
The text tracking feature in CapCut can automatically animate the text, in a way that the text follows an moving object in the video designated by you.
- Import video into CapCut project, and tap the Text icon.
- Add text to the video, and tap on that text clip.
- Swipe at the bottom toolbar until you see Tracking.
- Narrow down the area to track the object by dragging the arrow, and place the anchor on the central part of the moving object.
- Tap the green Tracking button to start auto-tracking.
When it's done, you shall see the text move along with the chosen object.
Note: You can ease out and ease in the tracking motion by applying the graphs feature.
How to Create the Text Behind Person Effect
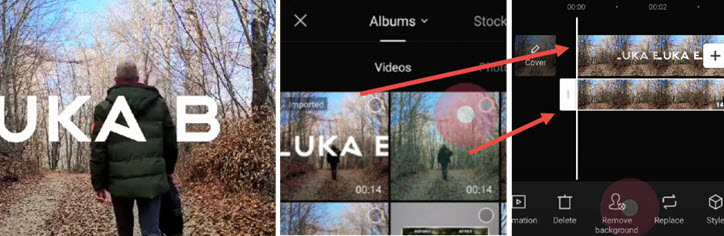
When combining text editing with other features in CapCut, you can create trendy text effects as other creators. Placing the text behind a person is such an example.
- Add text to the video as you normally do, and export that video clip.
- Create a new project, and import that video as the main video track.
- Tap overlay to import the raw video (one without text) as the overlay track.
- Use the Move background feature to remove the background, and it's done.
For detailed guide, you can watch the video tutorial by Luka, shown below.
How to Edit Audio in CapCut
How to Add Audio in CapCut
You can add background music, sound effects and other audio to the video by using the stock audio library in CapCut. These stock media files are royalty free, meaning you can upload the video to YouTube and other social platforms without copyright infringement.
Besides using stock music, you can also use CapCut to extract music from your favorite videos. With this method, you might not be able to share the video to the public, but only for personal sharing.
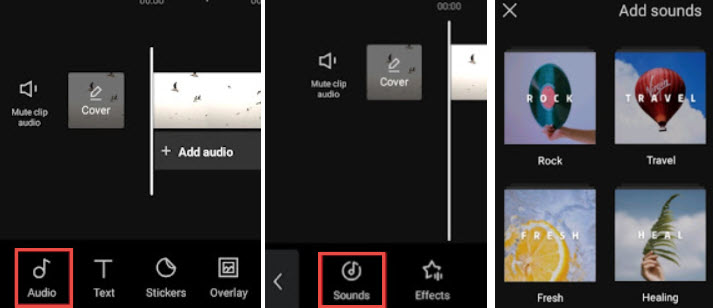
- Add the footage to a new project, and tap the Audio icon at the toolbar.
- Hit Sounds to open up the stock library, and pick your favorite track to add.
- You can tap on the added audio clip to trim, split or change its speed.
How to Change Audio Volume in CapCut
To make video louder or mute it, you can use the volume option in audio editing.
- For background music and environment sound inside the video, you can tap on the video track, and hit the Volume icon to change the loudness.
- You can also tap on the video, hit Extract to separate that audio onto the dedicated audiotrack. Then you can tap the audio clip and use the Volume tool on it.
How to Use Auto Caption in CapCut
If you love the speech to text feature in TikTok, chances are you will also be needing the speech to text feature. Using CapCut, you can turn video sound to captions automatically, thus saving time as you won't need to manually add captions.
- Create a new project and add the video.
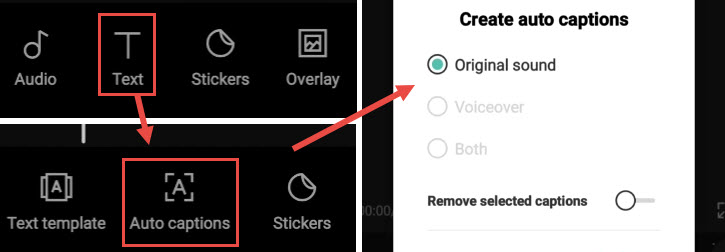
- Hit the Text icon from the toolbar. Do not tap on the video, otherwise, you will be directed to the video editing toolbar, where you won't see the Text icon.
- Hit Auto Captions. It sits in between the Text template and Stickers features.
- Choose to create auto captions from the original sound in the video, voiceover, or both.
- Wait for the app to finish analyzing and adding the text as captions.
You can playback and check if the caption is accurate. If you prefer to make adjustments, tap the Batch Edit icon to callout the keyboard, and correct the word when needed.
How to Isolate Voice or Reduce Noise
1. Tap the video clip on your timeline that contains the audio you want to clean up. (Alternatively, if you've already extracted the audio, tap the audio clip on the audio track).
2. Swipe the bottom toolbar to find audio-related options. Look for Voice isolationor Reduce noise. Tap the relevant option.
- Voice isolation:This AI tool attempts to separate spoken words from background noise and music. Activate it, and it will process the audio.
- Reduce noise:This might be a simpler toggle or slider to generally dampen background hiss or hum. Activate it.
3. Playback the audio to hear the difference. Some tools might offer an intensity slider.
4. Tap the checkmark to apply the changes.
How to Apply Advanced Editing in CapCut
How to Add Effects in CapCut
CapCut has many ready-to-use effects to enhance your video easily. It includes both video effects to add enchanting FX and body effects to polish your skin, figure, and so on.
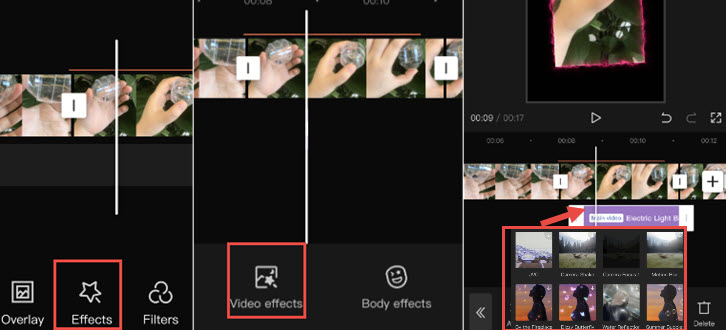
- Tap on a video clip and hit the star-shaped Effects icon.
- Tap Video Effects or Body Effects.
- Use the presets to polish the video clip. The effects will be shown as a purple clip underneath the main video.
Note: Once you go back to the main timeline, you won't see the purple clip, there is instead a colored line about the video clip, indicating that segment has effects applied. You can always revisit and edit or remove the effects by tapping the Star-shape Effects icon again.
How to Make a Picture Move in CapCut
To make a picture move in CapCut, you need to use the Keyframe features.
You can keyframe the position, scale, rotation angle, crop percentage and many other parameters in CapCut, so that the clip will transform from status 1 in Keyframe 1 to status 2 in Keyframe 2, thus creating the desired motion.
- After adding the picture as overlays on top of the video, tap on the picture clip.
- Swipe the clip to place the playhead at the point where you want the picture to start move.
- Hit the Keyframe icon under the preview window to add the first Keyframe.
- Move the picture to another position in the preview window, and hit the Keyframe icon again to add the second keyframe.
Playback the video, you shall see the picture move from position 1 to position 2.
Once you get the hang of CapCut editing, you can also up your game and learn how to add 3D Zoom in effects in CapCut. For quick editing and keep up with the trend, you can also use CapCut templates to have fun.
Will I Lose Everything If I Delete CapCut?
Yes, your projects and drafts will be deleted along with the app. If you are on iOS, you can choose to "offload" the app, which will delete the application itself, while keeping the documents and data inside it. However, it is not guaranteed that everything will be intact.
Tips and Tricks to Edit Faster in TikTok
Once you are familiar with the basic editing skills, you can take a look at these tricks that can greatly enhance your workflow.
00:38 Remove Background easily in TikTok
02:00 Use the Auto Caption feature to dub your footage
02:27 Go with Bilingual Captions to repurpose your content quickly
02:43 Remove filler words for a clean voice over.
03:47 Text-based Video Editing in CapCut
04:34 Enhance your voice in CapCut
05:29 Keep or isolate voice
How to Use AI Tools in CapCut for Your Creations
Taking video creation a step further, CapCut includes powerful AI tool packs, giving you a fantastic head start on your project. Here's how to leverage these features.
How to Add Voice Effects (AI Voice Changer)
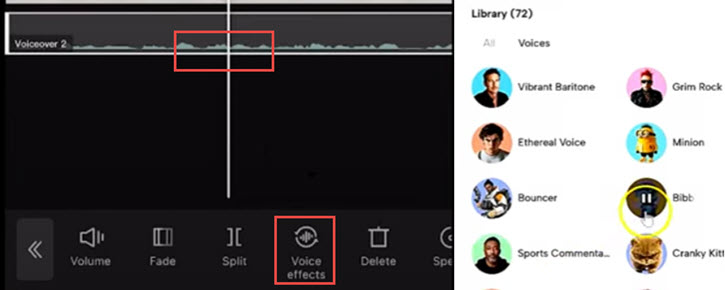
If you want to make your voice sound like a robot, chipmunk, or something else entirely, CapCut's voice effects can do that.
- Tap the audio clip you want to modify (either an extracted audio track, a voiceover you recorded in CapCut, or the audio within a video clip).
- Swipe the bottom toolbar and look for Voice effectsor Voice changer. Tap it.
- You'll see a list of different effect categories (e.g., Funny, Character, Retro). Tap through them to find various presets like Robot, Deep, High, Echo, etc.
- Tap on an effect to preview how it sounds.
Many effects have adjustable parameters like Pitch or Timbre. Use the sliders to fine-tune the effect.
Once you find an effect you like, tap the checkmark to apply it to your audio clip.
How to Automatically Remove Backgrounds with AI
CapCut's AI makes removing the background from people or objects in your video simple, without needing a green screen.
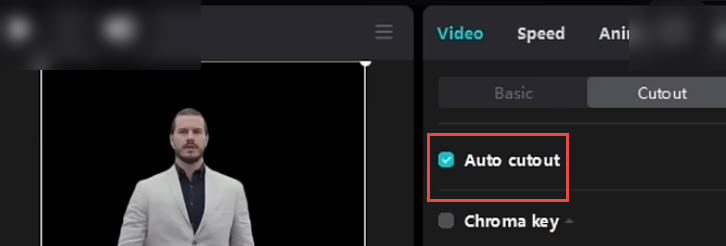
1. Tap the video clip on your timeline that you want to remove the background from.
2. Swipe the bottom toolbar to the right until you find the Remove BG option. Tap it.
You will see a few options, such as custom removal and Chroma key.
3. Tap Auto removal (it's a Pro feature).
CapCut's AI will automatically process the clip and remove the background. You'll see your subject isolated.
You can tap stroke to add an outline around your subject if desired.
4. Tap the checkmark to confirm.
Your subject now has a transparent background, which you can layer over other videos or backgrounds.
How to Use AI Color Correction & Color Match
If your video looks a bit dull or the colors aren't quite right, CapCut's AI can help adjust it automatically.
- Tap the video clip on your timeline that you want to enhance.
- Swipe the toolbar and find the Adjustment option. Tap it.
- Go to the Basic tab, and use Auto adjust and Color match options (both are Pro features).
CapCut will analyze the clip and apply automatic adjustments to brightness, contrast, saturation, and other color parameters.
- You can also adjust the intensity of the effect using a slider that appears.
- Preview the before-and-after. If you like the result, tap the checkmark.
How to Use Script-to-Video Maker in CapCut
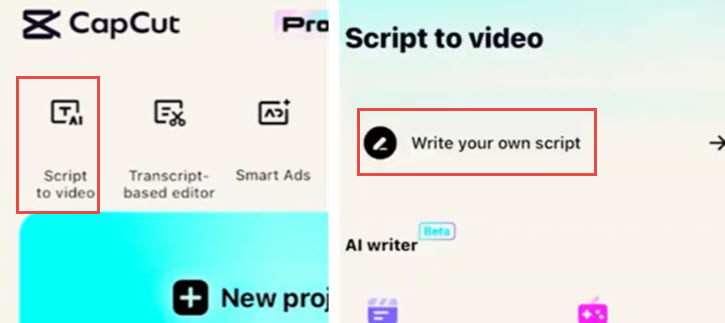
- In the new project page, hit Script to Video.
- Tap the option to write your own script.
- Wait for Capcut to generate scripts, then Generate Video.
- Review each scene in the storyboard and tweak in the multi‑track editor.
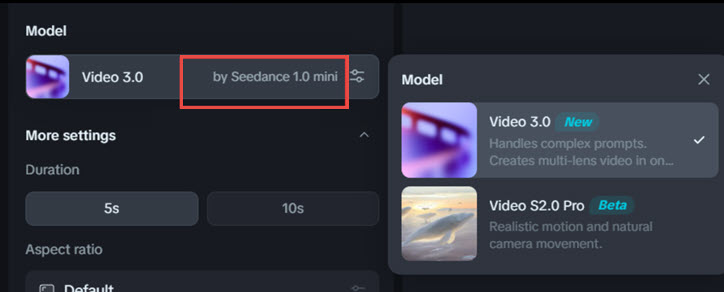
Use AI Effects Powered by Seedance Model
For customized effects powered by AI, you can now enjoy Seedance model in CapCut video editor. If that model is not available in your region, you can visit dreamina.capcut.com and go to the video generator, under the model: select by Seedance.
It's a nice feature during video editing, you can use it to create b-rolls for your video, or experiment with your conceptions. Below are some convenient use cases.
1. Animate images with CapCut AI.
You can even enter prompts such as "Camera slowly zooms in, cinematic lighting" to control the motion. This is perfect for reels, shorts, cinematic B-roll, ads, and storytelling.
2. Try cloth virtually with AI Model Fitting.
CapCut lets you showcase clothing designs on AI-generated fashion models, making it easy to create product visuals and ads without a photoshoot.
3. Create Consistent Characters with AI Reference.
If you want recurring characters in your videos (short films, AI stories, reels), CapCut’s Reference Image feature makes it possible. You can adjust the scope to Face reference, Object reference, Full character reference, etc.
How to Export the Video from CapCut

After finish editing the video, you can click the Export button in the top right corner.
CapCut support exporting video up to 4K, here are the export settings to tweak with:
- Resolution: 480p, 720p, 1080p, 2K/4K
- Frame Rate: 24, 25, 30, 50, 60
- Smart HDR: Option to turn video into "smart" HDR video
Bonus Tip: Free CapCut Alternative for Desktop and Laptop
Editing video on-the-go using mobile phones or iPad is flexible, still, in some cases, we prefer editing on a larger screen. If you love the simple interface of CapCut, you will love VideoProc Vlogger which runs on Windows and Mac for beginner editors, content creators, vloggers, and GoPro/DJI owners.
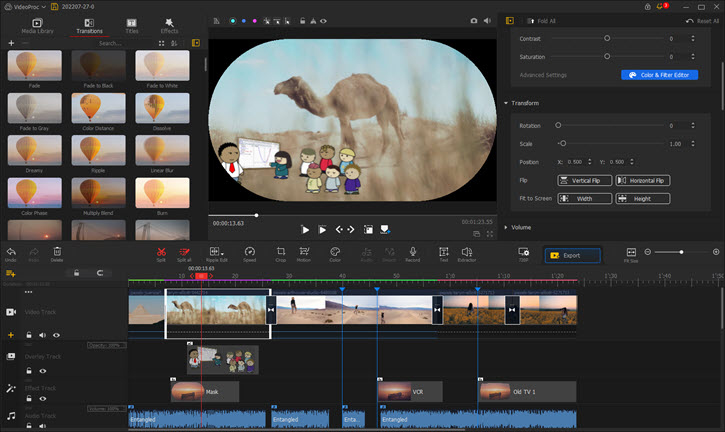

VideoProc Vlogger - Free CapCut Alternative for Windows/Mac
- Free forever - No watermark. No in-app purchase. Up to 4K export.
- Edit 4K/1080p/HEVC and large videos easily, even on old computers.
- Trendy templates: transitions, color filters, text, effects, voice changer.
- Support keyframes, velocity curves, green screen, cut-to-the-beat, etc.

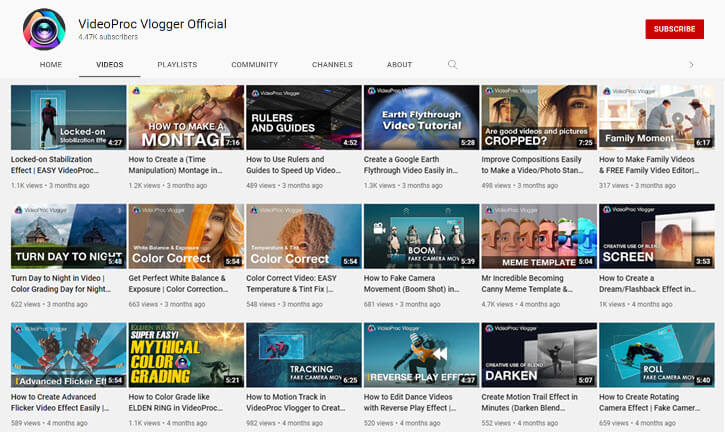
Besides fully-fledged features that can power up your video editing, VideoProc Vlogger also have an active and resourceful community to help users grow their editing skills and get inspired. Above is a screenshot of video tutorials on their YouTube channel.
A Note on Open Cut (Non-official CapCut Open Source Project)
Since mid-2025, Open Cut, an open-source video editor hosted on GitHub, has gained significant attention within the creator and developer communities, accumulating 45K Github stars so far. The project was created by an independent developer dissatisfied with CapCut's monetization model. Supporters praise its open-source approach, while others raise concerns about copyright, performance, and long-term maintenance. Tutorial in this blog applies to the official CapCut applications.


