
Videos on TikTok with velocity edit are enchanting to watch. The speed ramp, strong rhythm, and editing to the beat features together make the video stylish and impactful. Based on your personal taste, you can also make a velocity edit with flash, motion blur and other effects.
This post covers all the tutorials you need to make a velocity edit on CapCut, Velomingo and alternative tools.
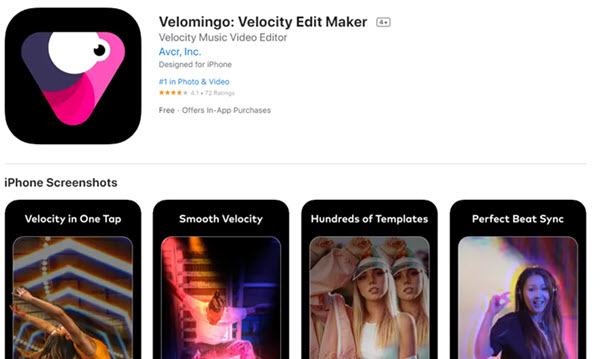
Part 1. How to Make a Velocity Edit via Velomingo Velocity Edit Maker
Besides editing and composing the effect all by yourself, you can also create auto velocity edit using the newly released app Velomingo. Currently, the Velomingo app is only released for iPhone. If you are on Android, you can use CapCut; For desktop users, you can use VideoProc Vlogger that has velocity edit presets in the Speed editor.
How to download Velomingo to make a velocity edit
Step 1. Go to iOS App store, and search for Velomingo. It comes with a flamingo icon.
Step 2. Install and open it. Tap the + Plus icon to import a slow motion video.
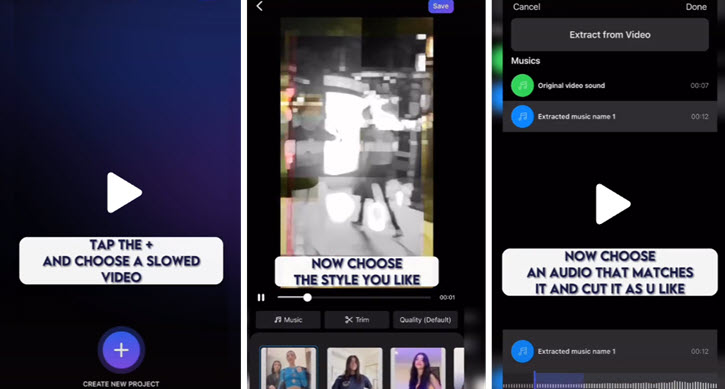
Step 3. Choose a velocity edit template at the bottom. Yon can swipe left and right for hundreds of velocity templates.
Step 4. Apply the edit, and tap the Music button to add a background music.
The Velomingo app also allows you to extract music from existing videos.
Part 2. How to Make a Velocity Edit on CapCut
CapCut recently released a new feature to create auto velocity edit (also known as smooth velocity edit), which is a 1-click effect to use. If you prefer manual edit with a higher degree of customizability, you can read on in the next part.
2.1 How to Make an Auto Velocity Edit on CapCut
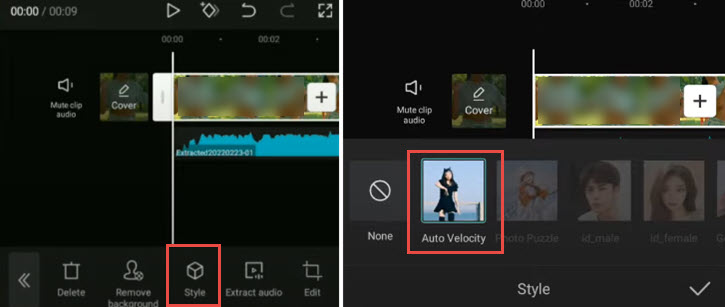
Step 1. Create a New Project and add video and background music to the timeline.
Step 2. Tap on the video clip and hit the Style tool.
Step 3. Apply Auto Velocity effects. It is the third effect in the presets.
2.2 How to Make a Velocity Edit on CapCut Manually
Many of you may already know the speed curve (montage, hero, bullet, etc) can be used to make a velocity edit. However, when you watch those velocity edit TikTok in the trending page, you might notice that using speed curve along isn't enough.
For instance, there are a sense of rhythms, pauses and flashes happing in a velocity edit. So, how to make a trending velocity edit? Here are detailed steps below.
Step 1. Launch CapCut app on your iPhone or iPad, and tap + New Project button.
Step 2. Select the video that you want to apply velocity edit. In most cases, a dancing video clip works nicely.
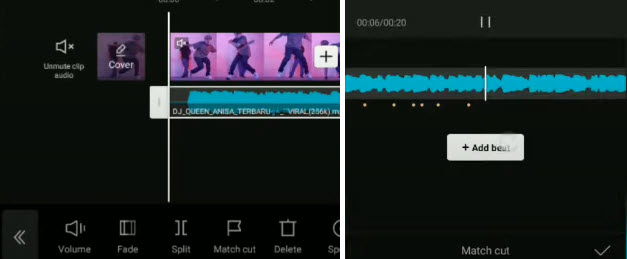
Step 3. Create beat markers by using the Match Cut option. This option will show up when you tap on an audio clip.
- For instance, you can add a background music under the video and tap on that music clip to make sure it is selected.
- Alternatively, if the video already contains a background music you want to use, you can tap on the video clip, and select Extract Audio. This option will extract the audio from the video, and place the music on the audio track.
Step 4. Generate the beat automatically or manually. You can try each method, and find one that suits your project the best.
- To automatically generate the beat, simply toggle on the auto-generate button, and select Beat 2.
- To manually generate beat, tap the play button to playback the music, hear the beat along, and tap +Add beat at regular intervals or any stressed point.
Step 5. Tap the check icon to apply the beat. Now on the main timeline, you shall see orange points on the audio clip, which are the beat markers we just added.

Step 6. Split the video clip at the beat marker.
Before you start splitting the video clip, you may also want to trim the video clip. For instance, if it takes so long to enter into the dancing part, then you can trim off the beginning part of the video.
Now you can split the video at the second marker, then the 4th, followed with 6th, and so on.
Remember to tap on the video clip, and then hit the Split tool. If the video clip isn't selected, you won't be able to see the Split tool.
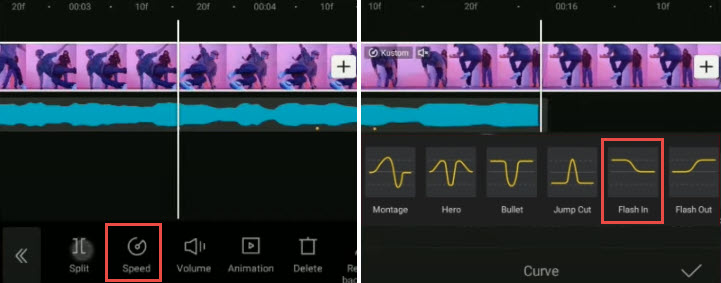
Step 7. Apply the flash-in curve in the Speed tool to every clip.
- To do so, you need to tap on the first clip, and tap the Speed icon (next to the Split icon), and tap Curve.
- Tap on Flash-in and confirm applying it.
- Then repeat applying the Flash-in speed curve to every clip.
Now you have finished the speed editing process. Still, most velocity edit also features blurring effect and flash effect. To continue creating the style, follow the steps below.
3.3 How to Make a Velocity Edit on CapCut with Flash
From Step 1 to Step 7 in the previous part, you have already applied speed ramp effects to each clip. To make a velocity edit on CapCut with flash and other effects, follow the steps below.
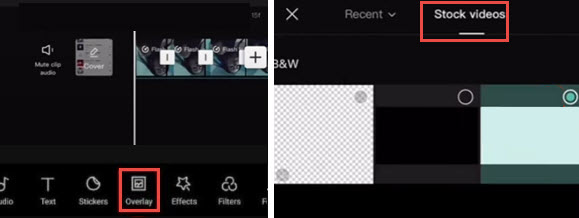
Step 1. Tap Overlay > Add overlay from the toolbar.
Step 2. Tap on the Stock videos tab, and find that White background image to add it to the overlay layer.
Step 3. Pinch and resize to fill with white background into the entire screen.
Step 4. Adjust the duration of the white background, making it in line with the first clip.
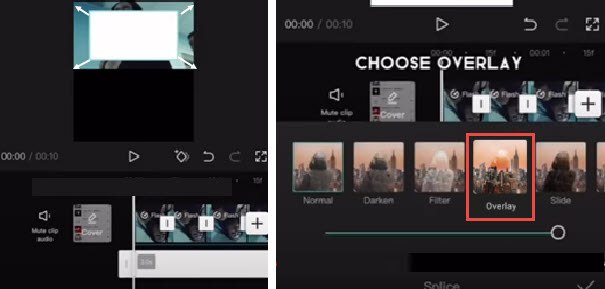
Step 5. Make sure the white background clip is selected, then apply the color blend mode in Splice, and use the Overlay effect (between Darken and Slide mode).
Step 6. Choose Animations > Out > Fade out effects to apply to the white background.
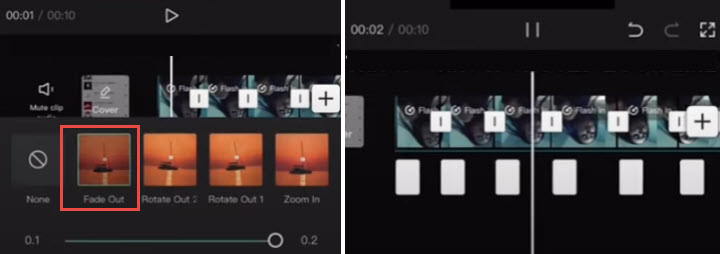
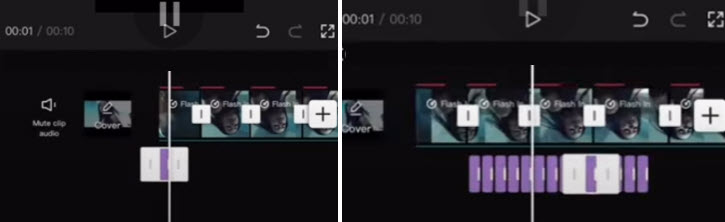
Now that you have finished applying the overlay blend mode and fade out animation to the first white background clip, you can tap on the copy icon from the toolbar to copy it for every beat.
2.4 How to Make a Velocity Edit on CapCut with Motion Blur and Shake Effects
To spice up the video, you can also add motion blur and shake effects to the video.
Step 1. Back to the main timeline, and tap Effects icon.
Step 2. In the Basic tab, choose Motion blur.
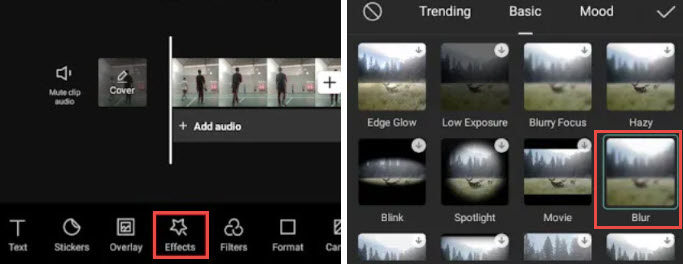
Step 3. Adjust the parameters of the motion blur effects. For instance, you can set horizontal shift to anything around 50, and intensity to 100.
Step 4. Make it lasts for 1s or 2s, and copy this effect for every beat.
Step 5. Repeat the same steps to add Shake effects in Video Effects > Basic. Set Speed and Intensity around 20 each.
Step 6. Copy the Shake effects for each beat, just as what you do for the motion blur effects.
Part 3. How to Make a Velocity Edit on CapCut for PC Alternative – VideoProc Vlogger
Sometimes, it's hard to make a velocity edit on a small mobile screen. Since you can post video to TikTok directly online from desktop and laptop, you can also use desktop video editor to streamline the process.
If you love the speed curve feature in CapCut, the best free video editor on PC that comes with speed curve feature is VideoProc Vlogger, and it is completely free, without watermark, just as the easy to use CapCut app.
In fact, given its features and the free pricing, VideoProc Vlogger is loved by users worldwide, making it a nice CapCut for PC alternative for Windows and Mac computers.

Watch the video tutorial here, or take a glance at the text guide below.
To get started, download VideoProc Vlogger for Windows or Mac and install it.

Step 1. Create a New Project. If you want to post to TikTok, you can choose 9:16 1080x1920 video.
Step 2. Import video and background music, and drag them to the timeline.
Step 3. Play the music and add markers for the beat.
Shortcut key for adding marker is Shift + M.
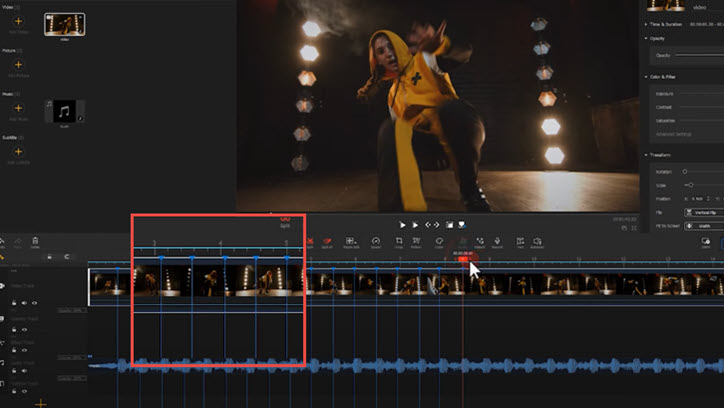
Step 4. Split the video clip at the markers.
To do so, you simply click on the video clip, and hit the Split tool on the toolbar.
Step 5. Apply the velocity edit.
Click the video clip, and go to the Speed Editor tool, then you can use the Flash-in just the same as how you do it on CapCut.
More Speed Curve Presets for Creativity
Besides flash-in, VideoProc Vlogger offers more presets than that in CapCut. There are 14 velocity presets to speed ramp the video. You can surprise yourself using these speed curves to create impactful videos.
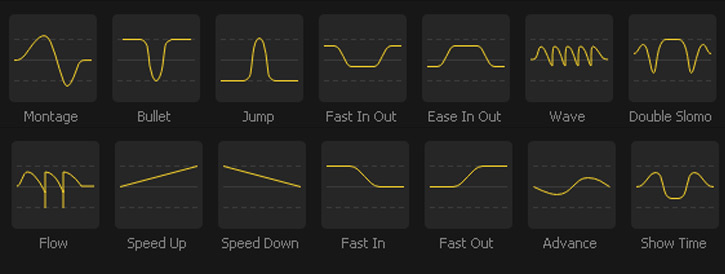
Step 6 (Optional). You can also go to the Effects panel, and add trending effects such as Glitch, Blur, etc.
Once you are happy with the edits, you can hit the Export button to save the video, and later post it to TikTok, YouTube, Reddit, and other popular social media.


