Ever wondered how to make your prints look super sharp and clear in larger sizes? It's not only about increasing the DPI of an image, but also about a higher image resolution. In this blog, we'll break it down with case studies and tutorials on how to increase the DPI.

For anyone who loves great-looking prints, whether you're into photography, design, or just want your pictures to fit the canvas in Photoshop, InDesign, and other software, let's dive into the details.
Before Increasing DPI in Image: Learn the Basics
1. Understanding DPI vs. Resolution in Printing
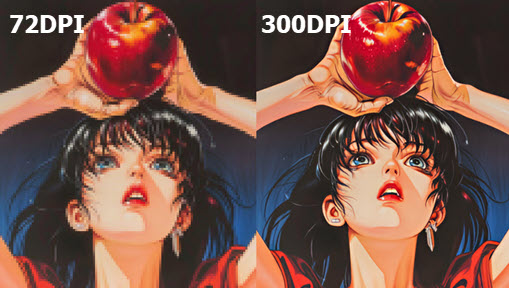
In printing, a higher DPI means there are more dots per inch, which generally translates to a sharper, more detailed image. However, simply changing the DPI value in your software or metadata—without actually resampling the image—won't improve the print quality.
To achieve a better result, you need to increase the image's resolution. This effectively adds more pixel data, ensuring that when the image is printed at a given size, it naturally exhibits a higher DPI and thus better clarity.
2. Print Size Calculator
Print Size = Resolution/DPI
Resolution = Print Size x DPI
For 300DPI:
Required Resolution = (Target Width × 300) × (Target Height x 300)
Example: 8"x10" print → (8x300) × (10x300) = 2400x3000 pixels
For 450DPI:
Required Resolution = (Target Width ×450) × (Target Height x 450)
Example: 8"x10" print → (8x450)×(10x450) = 3600 x 4500 pixels
3. DPI vs PPI
DPI (dots per inch) and PPI (pixels per inch) are related concepts used in different contexts. Many beginners and even seasoned designers get tangled in technical jargon. Here's the deal:
- DPI relates to the physical printing process, specifying how many ink dots are placed on paper per inch. It primarily affects print clarity.
- PPI is a measure of pixel density on digital screens, indicating how many pixels are present in each inch on a digital display or in a digital image file.
Key Takeaways
- - DPI alone doesn't guarantee print quality - resolution matters more.
- - AI upscaling outperforms traditional methods for quality.
- - For high-quality prints, go for 300 DPI or higher.
- - When viewing from distance (i.e. print for outdoor billboards), lower DPI is acceptable also.
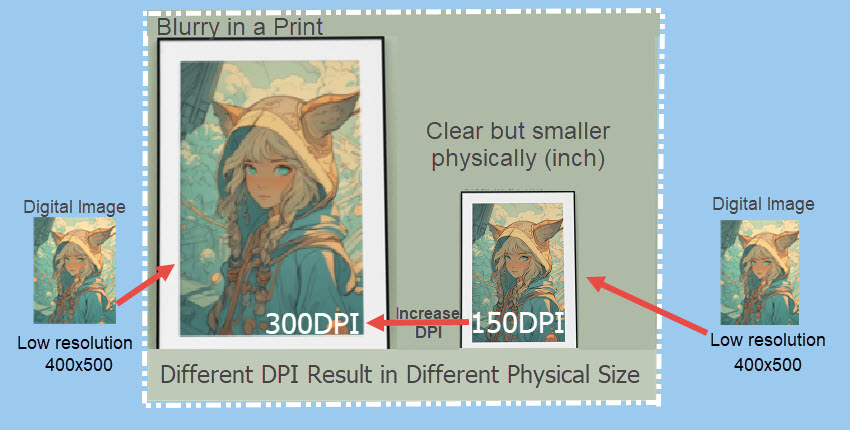
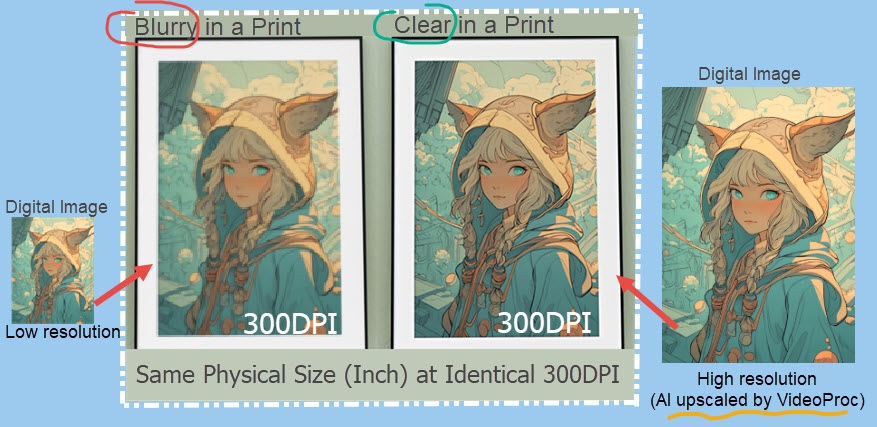
Print Size = Resolution/DPI, or Resolution = Print Size x DPI. When an image's resolution is fixed, higher DPI can only achieve smaller print size. If you want to maintain the 300DPI standard, the only solution is to increase the image resolution to achieve a larger print size.
You need to use AI-powered Super Resolution tool to upscale and increase the image resolution, so that when sending the image for printing, the DPI is increased for a given physical size.
DPI vs. Resolution: When Does Changing DPI Actually Help?
The practical need to adjust DPI settings is often misunderstood. To clarify when changing DPI is truly necessary and effective, the table below breaks down three common scenarios.
Scenario 1. Improve Quality in Prints
• User's Assumption (What You Thought You Want)
User thought increasing DPI can improve image quality and avoid pixelation for printed materials.
• Technical Reality / Clarification (What You Truely Need)
What you really want is to increase image resolution, so that for a given physical printing size, a larger resolution entails a higher DPI.
The increased DPI is the result of a higher resolution with details, which guarantee the quality.
Simply changing the DPI setting without upscaling won't improve inherent image quality.
Scenario 2. Meet Formal Submission Rules
• User's Assumption
Comply with technical requirements for academic journals, contests, or platforms that specify required DPI values.
• Technical Reality / Clarification
Digital image files don't inherently have a physical size or DPI until context (like printing or display) is given; DPI is just metadata. Submissions often require specific pixel dimensions and a specific DPI setting to ensure the image meets a minimum quality standard at a certain print size. Users need to adjust both pixel dimensions (if necessary, via resampling) and the DPI metadata field to meet these combined requirements.
Scenario 3. Change Display Size in Layout/Editing Software
• User's Assumption
Adjust how large an image appears when placed on a canvas in editing/layout software like Adobe InDesign or Photoshop.
• Technical Reality / Clarification
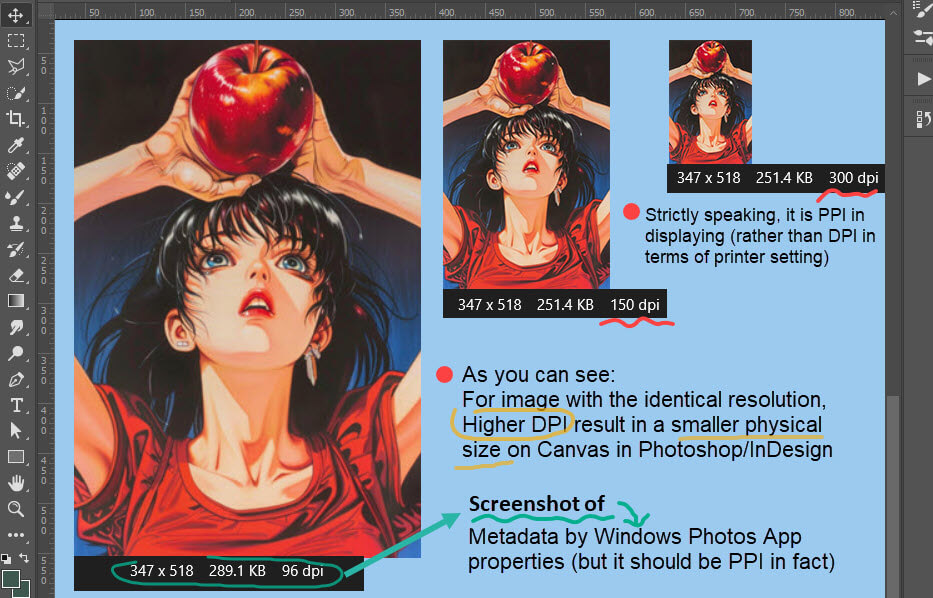
This aligns with user's assumption. Changing the DPI metadata (more accurately, PPI - Pixels Per Inch) without resampling alters the image's physical size. Software like InDesign uses this metadata to determine the initial placement size.
Images with identical resolutions (pixel dimensions) but different DPI settings will appear at different physical sizes on the canvas. E.g., a 200x200 pixel image at 300 DPI will display half the width/height of a 200x200 pixel image at 150 DPI.
How to Increase the DPI of an Image
Before jumping to the detailed steps to increase the DPI of an image, you may need to consider what's your true needs. As illustrated in the beginning of this article:
Print Size = Resolution/DPI
- 1800px/300=6 inch
- 3600px/300=12 inch
- 7200px/300=24 inch
To print larger file sizes while maintaining the high-quality 300 DPI, we need to increase image resolution.
1. Achieve Higher DPI in VideoProc Converter AI
Best For: Scenario 1. Improve Image Quality in Prints (or Digital Image Sharing)
Before the invention of AI Upsampling tech, we can only use the traditional upscaling algorithms, such as Photoshop's Preserve Details, Bicubic, and Nearest Neighbor. Now there are AI-powered ways to achieve better quality using the Super Resolution tool in VideoProc Converter AI.
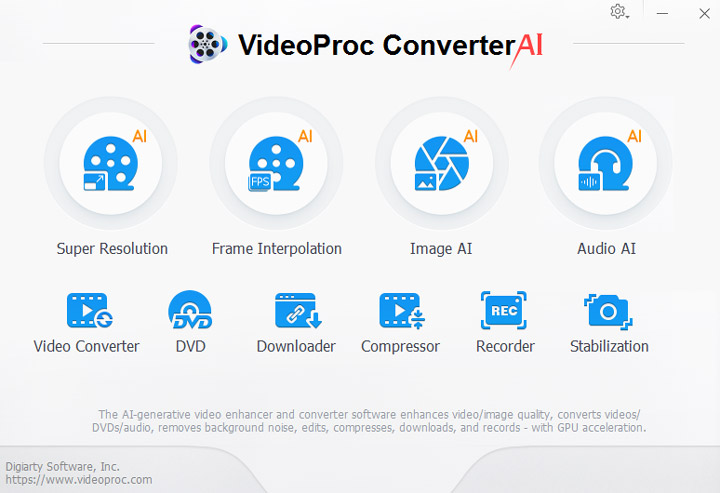
Step 1. Download and install VideoProc Converter AI, then import your images.

Step 2. Determine the DPI you need, increase image resolution, so that DPI is increased accordingly.
For instance, to print in 16 x 20 inch, if the source image is 1536 x 1920 pixels, you can only roughly achieve 96 DPI.
To increase DPI to 300, you need to increase the image resolution to 4800 x 6000 pixels for the 16 x 20 inch print.
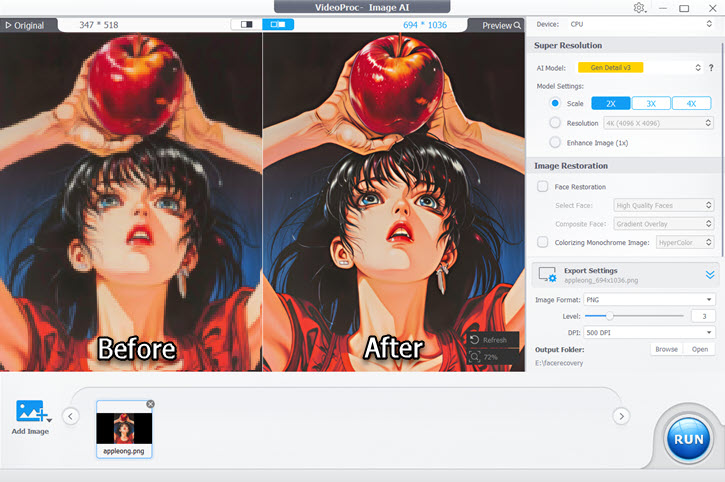
In VideoProc Converter AI, you can set the scaling factors to upscale your images.
Step 3. Export the image.
Note:
It often makes no sense if you are only tweaking that DPI number and view it on a computer. When printing, you should set the DPI value for the printer (or ask the printing-on-demand services to do that for you).
A few scenarios when you need to change DPI would be: for the designers to better fit the image in editing software such as Adobe InDesign. Read more about Actual PPI vs Effective PPI in our ultimate guide on everything about image resolution.

VideoProc Converter - Enhance Image/Video Quality with AI
- Upscale videos and images with AI-driven Super Resolution feature
- Best for photos, Photoshop/InDesign/Illustrator designs, AICG images
- DVD stills, wallpapers, posters, footage, blurring recordings and more
- 4K/8K resolution with natural realistic details, powered by deep learning data
- All-in-one: AI frame rate converter, denoise, restore and enhance files
![]() Excellent
Excellent ![]()
2. Using Clideo DPI Converter Online
Best For: Scenario 3. Change Display Size for Layout/Editing Software.
Cons: It can lead to quality loss.
Using the online DPI Converter is a quick way to change lower DPI to higher value. Clideo offers one of the best online DPI converters to easy nail this task. Here are detailed steps.
Step 1. Visit the Clideo DPI Converter tool.
Step 2. Click the button to upload the image and set a new DPI.

Note: Clideo supports these image formats: jpeg, jpg, png, bmp, gif, tiff, pjpeg, pbm, pgm, ppm, pnm, pict, pct, pic, wbmp.
The notable absence is webp. If you try to upload webp to Clideo, it will throw you an error saying that this type isn't supported. The is bad news as webp is widely used these days, especially if you are creating AI arts. MidJourney will save images in webp for upscaled images. You can learn more about how to achieve better resolution and quality for Midjourney.
Step 3. Click Continue and wait for the converter to finishing increasing the DPI.
Once it's done, you can download the image to the local drive or to cloud storage tools such as Google Drive or Dropbox.
3. How to Increase DPI in Photoshop
Best For: Scenario 3. Change Display Size in Layout/Editing Software.
Cons: Non-AI resampling methods (Nearest Neighbor/Bicubic) fail to generate details.
If you are creating images in Photoshop, the best practice is to determine the DPI in the very beginning, when you are creating the new project. However, if you are already working on it, and realizes that you prefer to change the DPI in Photoshop, follow the steps below.
Step 1. Open up the existing project and go to Menu > Image > Image Size.
The shortcut key is Alt+Ctrl+I.
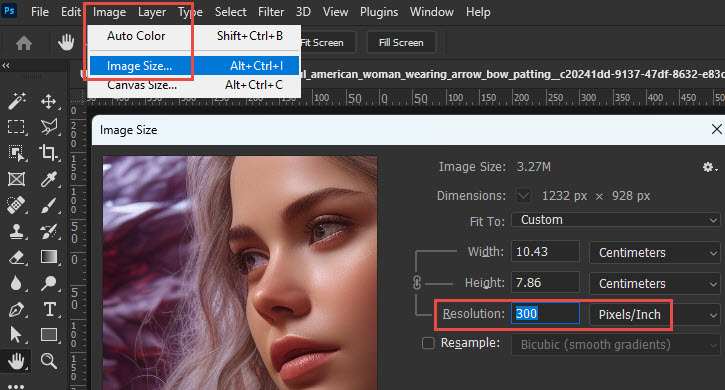
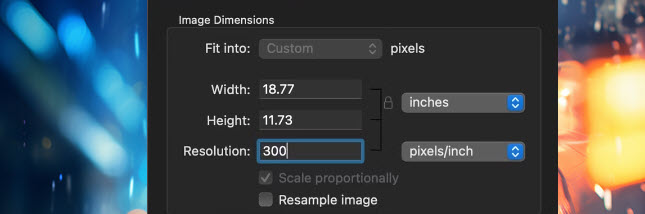
Step 2. In the Image Size window, increase the DPI by entering a larger value in the Resolution (Pixels/Inch) box.
For instance, if the source image is 96, you can increase it to 300.
Tips 1. Uncheck the Resample option if you don't want Photoshop to upscale your image with its built-in upsamping algorithms.
You can try entering different value, and check how the Width and Height values changes accordingly. Then you will understand how the Pixels/Inch works here.
For instance, for a 1232 px x928 px image, if I adjust its PPI to 300, it can be qualified for a 10.43x7.86 cm printing. If I lower the PPI to 150, the printing size will be 20.86x15.71. Because we need fewer dots per inch in printing, so its 1232x928pixels can be allocated to a larger paper size. But since there will be fewer dots per inch (150DPI vs 300DPI), the 150DPI printing will be of lower quality.
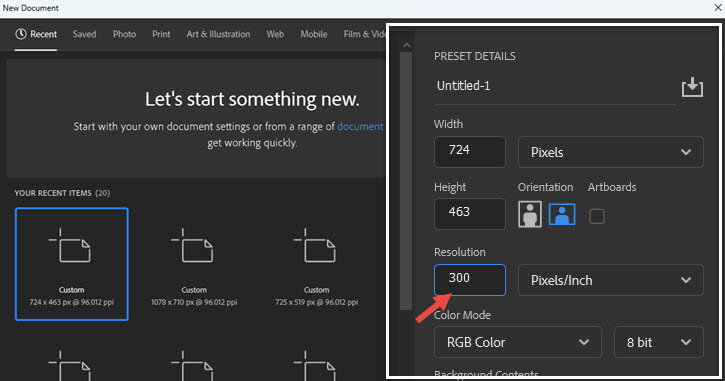
Tips 2. As mentioned above, it's a better practice to determined your final DPI when creating the project. To do so, simply enter the value when creating a new project. See example screenshot below.
4. How to Increase DPI with the Preview App on Mac
Note: It is more of a placebo than truely enhance image quality.
For macOS users, the Preview app is the quickest way to increase DPI of an Image as the app is pre-installed and free. The Preview app is a built-in image viewer and PDF viewer, with handy utilities to edit images, edit PDF, import images from iPhone, and check and edit image metadata. The DPI value is embedded in the Image Dimensions info.
Step 1. Locate the image you want to increase its DPI.
Step 2. Right-click to open the image in the Preview app.
Step 3. Change the value before the pixels/inch box.
Step 4. Save the changes to the image.
How to Check the DPI of an Image
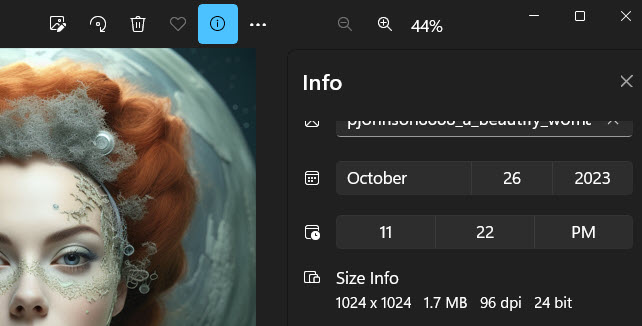
On Windows, double click on the image to preview in the default Photos app. Click the Information icon, and under the Info section, you shall see the DPI value next to the resolution. For instance, the following image has an DPI of 96.
If you are on Mac, open up the image in Finder > Preview, and go to Tools > Show Inspector to check its Image DPI.
How to Achieve High Quality for Different Printing Sizes
As discussed above, Print Size = Resolution/DPI. This means that to achieve a larger print size, you need a higher resolution or a lower DPI. To achieve a larger print size while maintaining quality, you best bet is to increase resolution, as you need to keep the DPI at 300 for high quality prints.
Cases:
If your image is 1800x1800, what size can you print? Or What DPI do you need?
It's a matter of priority. If you have a determined size, let's say 6 inches.
- 1800/6=300 DPI
- 1800/12=150 DPI
- 1800/24=75 DPI
As you can see, if you want a large printing size, the DPI will be reduced. Because the source image doesn't have enough pixels. Lower DPI will result in poor image quality. More dots per inch can make the image clearer with more details.
For most of us, quality will be the priority. Let's say we determined to have 300 DPI, and our image is 1800x1800. Then what size should it be printed?
- 1800/300=6 inches.
What if we need a larger printing size? Increasing the resolution will be the answer. It is a simple math.
- ?/300=12 inches.
- 3600/300=12 inches.
Free download VideoProc Converter AI and start to use its Super Resolution tool to increase image dimensions now.

FAQs
What Is DPI for Images?
DPI, an abbreviation for "dots per inch", serves as a metric for gauging the resolution or sharpness of an image, primarily in the context of printing and scanning. It indicates how many individual dots of ink or pixels are present in one inch of a printed or displayed image.
What Is 300 DPI?
A 300 DPI resolution means there are 300 dots of color or pixels in every inch of an image. It's a standard for top-notch print quality, especially in professional printing like magazines, brochures, or other high-quality publications. Higher DPI makes printed images sharper and more detailed.


