DaVinci Resolve is an industry-leading video editor developed by Black Magic and updated to DaVinci Resolve 18. Many professional post-production studios use it to do color grading and VFX because its top-notch rendering schemes deliver the videos in the best quality. Also, it's a good place to start for people who want to get into this field.
However, professional features and settings in export often throw users off balance. You may have experienced the same thing, failed to figure out its export option, or got files that can't be opened with common players.
Today, we'll walk you through how to export in DaVinci Resolve step by step. After reading this ultimate guide, you can export MP4, MP3, subtitles, and projects as your wish without any trouble. Let's begin.
- 1. Learn Export Features in DaVinci Resolve
- 2. How to Export Videos from DaVinci Resolve
- 3. How to Use Quik Export in DaVinci Resolve
- 4. Advanced Export Options in DaVinci Resolve
1. Learn Export Features in DaVinci Resolve
In order to master the skill of exporting in DaVinci Resolve better, let's have a look at its export features first. Different from other non-linear free video editing software, you can find export options in two places in this program.
Export Options in the File Tab
DaVinci Resolve, like most video editing software in the market, puts export options under "File" in the top menu. However, you will get files with strange file extensions after exporting with this option. That's because this option was designed for collaboration in post-production. Here you can get three types of files from DaVinci Resolve.
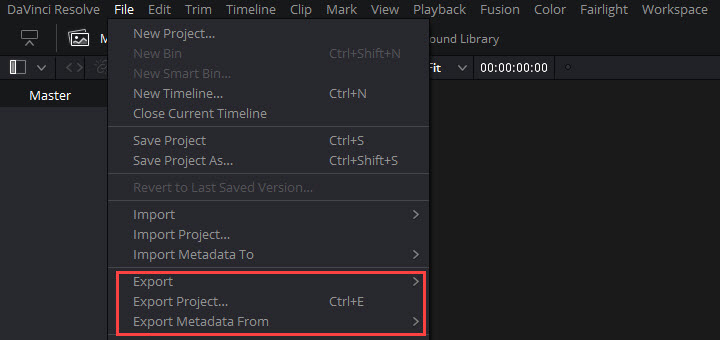
DRP: It's a project file with a .drp extension exported from "Export Project". It includes media tracks in the timeline, effects, transitions, texts, and all the edits in the project.
DRT: It stands for DaVinci Resolve Timeline and was added in v.17. It contains edits in the timeline instead of the entire project.
DRB: It refers to DaVinci Resolve Bin files. In Resolve 17, you can export an entire bin structure from your media pool so that you can import them to another project in an instant.
Export Options in the Deliver Tab
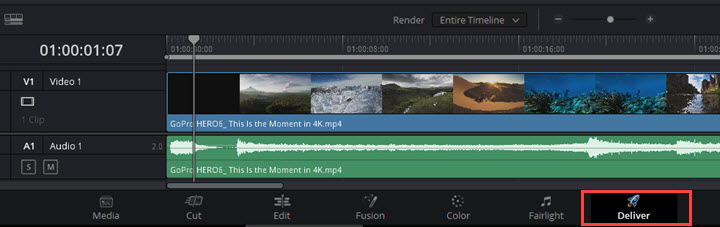
If you want to get standard MP4 videos or MP3 files from DaVinci Resolve, go to the "Deliver" tab under its timeline. It's the entry for media export and leads you to the output page on the left side.
On top of the export panel, it puts output presets for YouTube, Vimeo, Facebook, Final Cut Pro, IMF, etc. Meanwhile, you are allowed to adjust the presets or customize settings all by yourself. Under the "Custom" option, you can tweak settings of video, audio, and subtitles and that gives you full control over the file name, format, codec, bitrate, resolution, color space, data levels, etc.
2. How to Export Videos from DaVinci Resolve
Instead of searching methods to convert DRP to MP4, we should question how to export MP4 from DaVinci Resolve. Every video editing software allows video output. But DaVinci Resolve puts this option in the "Deliver" feature rather than the so-called "Export". Let's see how to export videos in DaVinci Resolve.
Step 1. Open Video export settings.
Click "Deliver" above the timeline. If you found no such option, head to the top menu bar, and click "Workspace" > "Switch to Page" > "Deliver".
Step 2. Customize output settings.
Choose basic presets for SNS or third-party video editing software like Premiere Pro, Final Cut Pro X, and Avid, then it will make changes to meet their requirements. All you need to do is to set the filename and location.
Alternatively, open the "Custom" tab and fine-tune video, audio, and file settings individually.
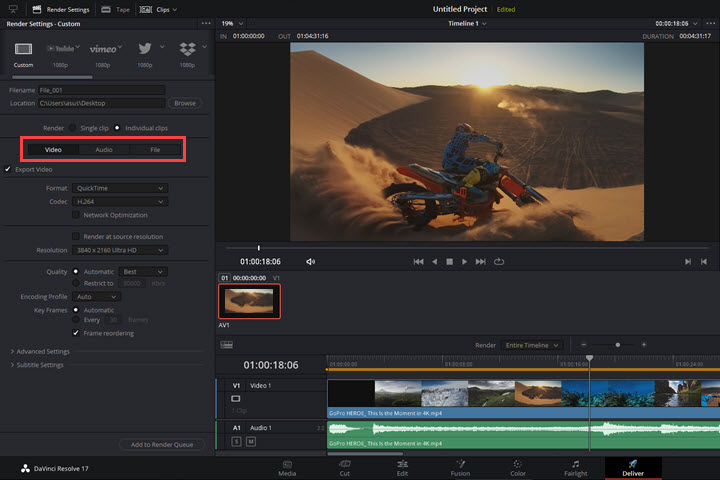
Video: Enable "Export Video" and then choose video format, codec, resolution, quality, and frame rate in the following options. DaVinci Resolve lets you export MP4, QuickTime, and AVI. If you choose MP4, then you only have two codecs available – H.264 and H.265. But you'll find DNxHD, GoPro Cineform, and uncompressed codecs in other format containers.
We recommend you keep it the same as the source. If you have more specific needs, you can change pixel aspect ratio, data level, color space tag, gamma tag, and more options in "Advanced Settings".
Audio: Enable "Export Audio" and then you can choose video code, data rate, channels, and bit depth. But note these options are determined by the video format you set. For example, AAC is the only audio codec if you export MP4 from DaVinci Resolve.
File: It handles the filename, file subfolder, digits in the file name, and so on.
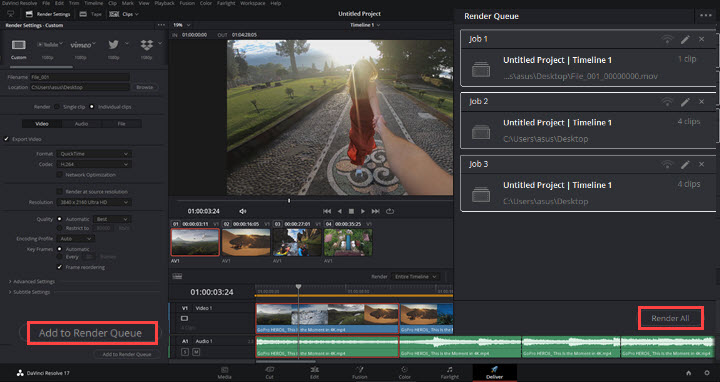
Step 3. Render in DaVinci Resolve.
Scroll down the "Render Settings" tab and click "Add to Render Queue". If you haven't finished settings for filename and location, it will pop up a window to ask you to do so. If you've done that, it would add the video to "Render Queue".
Then hit "Render All" or render any job in the queue, and you'll see the rendering in progress. When it ends, right-click on the job, open its file location, and you can watch the video exported from DaVinci Resolve.
Troubleshoot: Render Job Failed in DaVinci Resolve
If you followed the steps above but find the render would not start or get a message saying "Render Job failed as the current clip could not be processed", try the following methods.
Fix 1: Go to "Playback" > "Timeline Proxy Mode" > "Off".
Fix 2: Open "Deliver" > "Advanced Settings" > "Bypass re-encode when possible".
Fix 3: Open "Preferences" > "User" > "UI Settings". Cancel the option of "Stop renders when a frame or clip cannot be processed". Now go back and render it again.
Note: Fix 3 will skip unprocessed clip but leave a "Media Offline" frame in the final video so that you need to trim off this footage by re-editing it.
3. DaVinci Resolve Quik Export
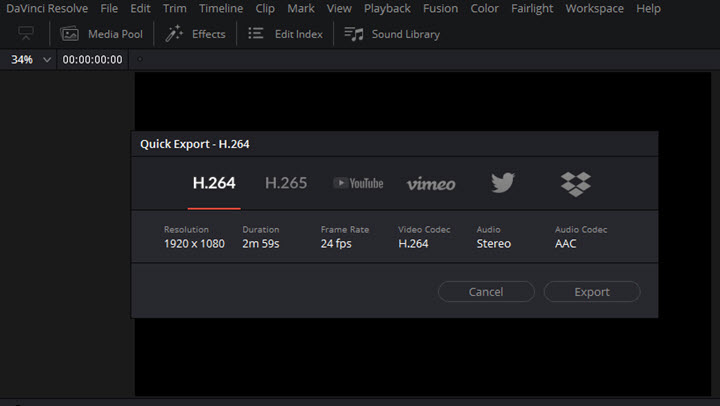
Quick Export in DaVinci Resolve was developed for exporting and uploading videos to YouTube, Twitter, Vimeo, and Dropbox quickly. It outputs videos in the original resolution and frame rate with H.264/H.265, AAC codec only and these settings cannot be changed like on the "Deliver" page.
In most cases, we would not recommend Quick Export unless you want a quick preview of the rendered file. Here's how:
Click to select the clips in the timeline on the "Edit" page. Move to "File" > "Quick Export". Choose preset profile by video codec or social media platform. Sign in to your social media account and hit "Export". Then it will start rendering directly.
Troubleshoot: DaVinci Resolve Quick Export Failed
The failure of quick export in DaVinci Resolve happens because the codec or resolution of the source can't be converted to the presets well, or some unknown errors. If it cannot be solved after several fixes, avoid using this feature to export videos in DaVinci Resolve and report back to its official technical team.
4. Advanced Export Options in DaVinci Resolve
In addition to common videos and audio files, sometimes we have different needs for output. So here comes tips roundup for your reference.
Export Projects with Media Files from DaVinci Resolve
It is to pack a .drp file and media files in Media Pool into a folder named with .dra extension. The next time you reimport the project to DaVinci Resolve on another computer, you won't be bothered by the loss of media files.
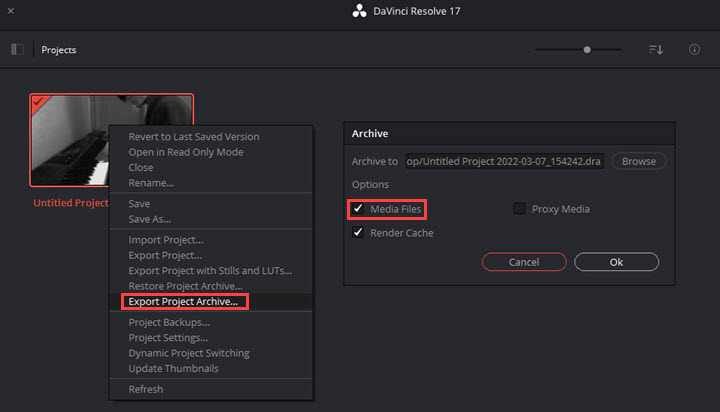
- Navigate to "File" > "Project Manager".
- Right-click on the thumbnail of your project and choose "Export Project Archive".
- Set the file location and filename to proceed.
- Hit "OK" and wait for it to archive the file.
Export Individual Clips from DaVinci Resolve
Again, we are on the "Deliver" page. Choose "Individual clips" in the "Render" option. This is going to render each clip in the timeline separately (as opposed to an entire video).
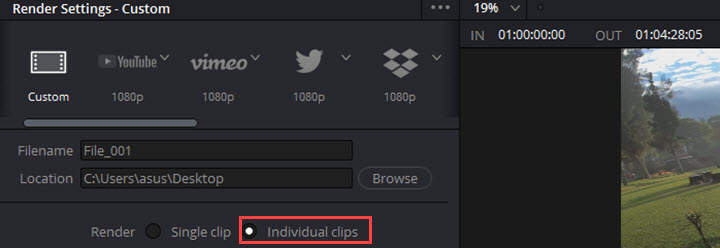
While the "Single clip" in "Render" means to render the selected clips in the timeline as a single file.
Export Alpha Channel in DaVinci Resolve
Alpha channel saves the transparency info of images and can help overlay any element on other videos without background. The key to exporting the alpha channel in Resolve is to choose a format that can contain alpha information.
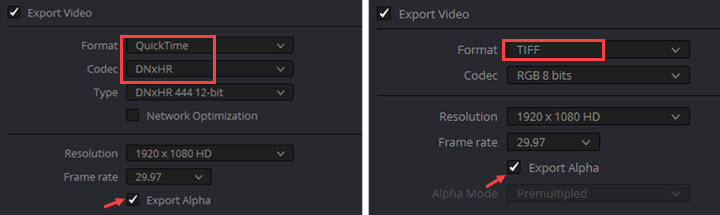
- Make a still or motion graphic in DaVinci Resolve, or key out a video with green screen in it.
- Open render settings in "Deliver".
- Choose QuickTime format with DNxHR codec if you want to export a video with alpha channel in DaVinci Resolve. Choose TIFF format for the transparent image.
- Check "Export Alpha" and start to render it.
Export Subtitles

Export Video with Subtitles
- Scroll down the Render Settings page and check "Export Subtitle".
- Expand the drop-down menu in "Format" and select "Burn into video".
- Render and export.
Export Subtitles Only
- Enable the "Export Subtitle" option.
- Choose "As a separate file" in "Format".
- Select a subtitle format: SRT (the most popular format for subtitle files), SRT without formatting, WebvTT, DFXP, or IMSC1.
- Render and export.
Customize Export Presets
DaVinci Resolve allows you to create your own output presets in terms of your habits. Follow the steps below, and you can find this feature.

- Open "Custom" in "Render Settings" and finish settings in your need.
- Click the three-dot icon in the top right corner of the settings tab. Choose "Save as New Preset".
- Type a name for your preset and click "OK" to save it.
- Now you can see the customized export settings in this tab.
Final Words
That's all for how to export in DaVinci Resolve. Hope you won't be bothered by export issues anymore. To learn more features to create cinematic videos like a pro, read our full review of DaVinci Resolve.
But if you are still thinking it's too complicated, we would recommend you edit videos by using VideoProc Vlogger, a free and capable video editor. It's as versatile as Resolve but much simpler that even beginners can get the hang of editing, exporting, and rendering in a short time.


