
 New AI features are available
"Hey Everyone: What's the easiest way to convert an already finished horizontal video into a vertical dimension for TikTok? I'm trying to repurpose my videos from YouTube but haven't found an easy way to do so."
Do you need to make a horizontal video vertical for TikTok, YouTube Shorts, Snapchat, Pinterest, Instagram Reels, and IGTV…without breaking a sweat? Well, changing the orientation of a video from horizontal to vertical is a quick way to make your video perfectly match various social media and short-form video platforms.
Luckily, you don't have to be "tech-savvy" to do it. In this post, I'm going to show you 6 easy-to-follow methods to convert horizontal video to vertical with the best picture quality. After reading, you may know how to make your horizontal video fit into a vertical frame without black bars, watermarks, or perceivable quality loss.

Common Strategies to Turn a Horizontal Video Vertical
Before diving into the detailed steps to make horizontal videos vertical using some of the best horizontal video to vertical converter, choose your conversion strategy based on your footage:
- Precise Cropping: Manually drag the crop frame to keep the most important area. (Most popular method.)
- Auto Reframe: Automatically crops while keeping the main subject or action centered.
- Expand with AI: Uses AI to generate new pixels and extend the top and bottom of the frame to fit a vertical ratio. (Cutting-edge but still experimental.)
- Split-Screen Layout: Stacks two or more videos vertically. (Best for gaming and reaction videos).
- 90-Degree Rotation: A quick fix for artistic shots or orientation errors.
Before We Start:
In this post, we'll focus on the first 3 strategies, as they're the most practical for turning horizontal footage into vertical and cover most real-world scenarios. Keep reading, let's walk through 5 of the best tools for the job. Each tool supports different strategies and has its own strengths.
For instance, VideoProc is great for precise cropping and can even enhance the cropped video with AI to improve clarity up to 4K. Some editors support more than one approach—CapCut, for example, lets you crop the frame or fill the extra space with a blurred background when changing the aspect ratio.
The Easily Way to Make Horizontal Videos Vertical
Best for: easiest; fastest; no visible quality loss/distortion/black bar/watermark; AI-quality enhancement.
VideoProc Converter AI is a powerful desktop solution for creators who want to turn landscape videos into 9:16 vertical clips for TikTok, Reels, and Shorts. Its built-in Crop tool lets you remove the left and right sides of the frame to create a full-screen vertical video without black bars. A real-time side-by-side preview allows you to adjust the crop area and see exactly how the final video will look before exporting. For users who prefer to preserve the entire original frame, it can also help make your horizontal video vertical by adding black bars at the top and bottom.
- No Watermark: No resolution limits or watermarks, even in the trial version.
- Precise Cropping: Supports all ratios (16:9, 4:3, 2.35:1) to vertical or square.
- Real-time Preview: Drag the cropping box and check the outcome instantly.
- AI Super Resolution: AI-enhance blurry and low-resolution videos to 4K.
- 47x Faster Speed: Full GPU acceleration handles large 4K files in seconds.

Step-by-Step: Convert a Horizontal Video to Vertical without Black Bars
Step 1: Download and install VideoProc Converter AI . Click Video Converter > + Video and choose source horizontal video(s) for adding to this simple horizontal to vertical video converter. Choose H.264 MP4 as the target format.
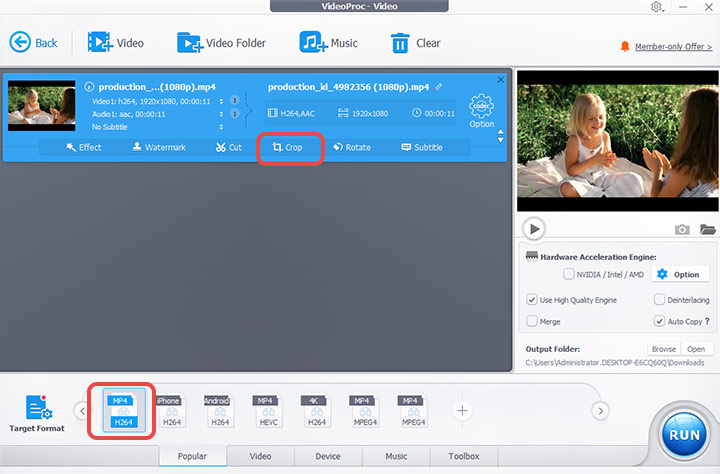
Step 2: Hit Crop. Check the box for Enable Crop. Open the Preset dropdown and select the vertical aspect ratio, for instance, 9:16 (for TikTok) and 3:4 (for Instagram). On the left window, drag the cropping box to center the most important part of your action. Click Done.
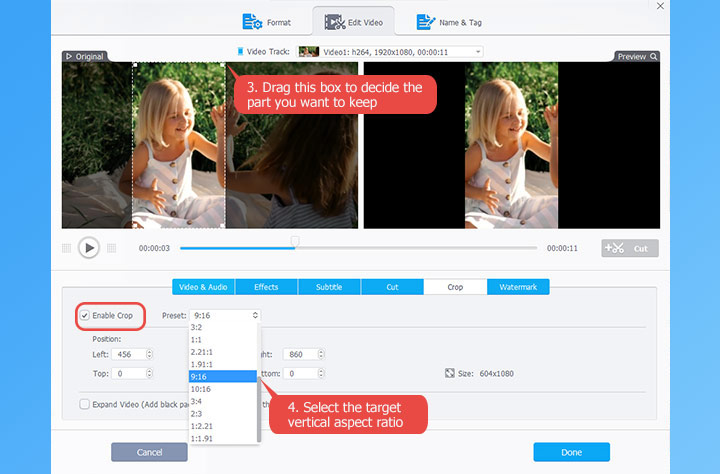
Tips: You can customize the vertical aspect ratio by choosing Free Preset, then dragging the cropping box to your desired ratio.
Step 3: Once you're satisfied with all settings, hit RUN to export your vertical video.
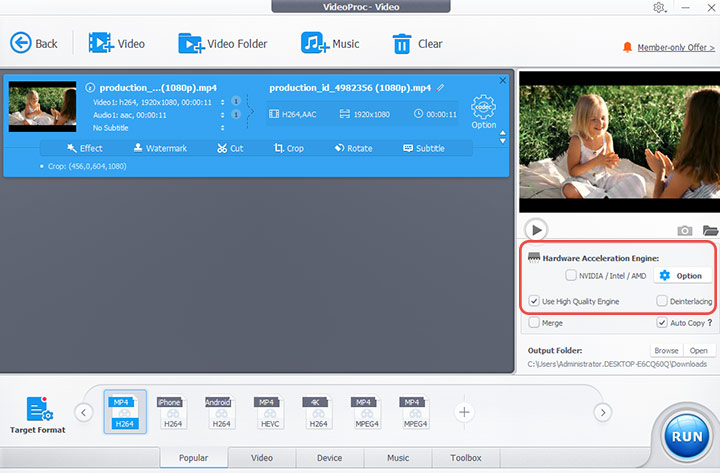
Tips:
- For Best Quality: Check the High Quality Engine box in the right panel.
- For Fastest Speed: Ensure NVIDIA/Intel/AMD hardware acceleration is checked.
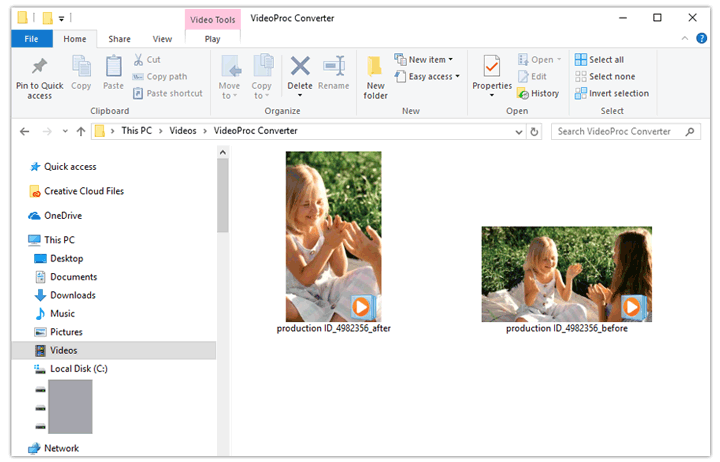
Let's check the exported vertical video. There is no black bars and the quality is amazing!
📢 Pro Tip: Fix "Cropping Blur" with AI Super Resolution
When you crop a horizontal video to vertical, you lose a lot of pixels, which may make the video look "soft" or blurry. If your exported video isn't sharp enough, go back to VideoProc's main menu and use the AI-powered Super Resolution tool. It will intelligently rebuild the missing details, ensuring your cropped vertical video looks like it was shot in native 4K.
Bonus: Make a Horizontal Video Vertical without Cropping
As said, VideoProc Converter AI also supports turning horizontal videos into vertical by adding black bars. Here's how:
Step 1: Download, install, and launch VideoProc Converter AI. Click Video Converter, then import the horizontal video file or files you want to convert.
Step 2: Select H.264 MP4 as the target format. It is widely supported across social media platforms and devices, although you can choose another format or codec if needed.
Step 3: Click the gear icon to open the Format settings panel. Go to Aspect Ratio and select 9:16, or another vertical aspect ratio that suits your needs. Then choose a matching output resolution.
For example, if the original video is 1920 × 1080 in 16:9 and you want to convert it to 9:16, select 1080 × 1920 as the output resolution.
Check Expand Video to preserve the entire original frame without stretching or distorting the image. Because the horizontal video is being fitted inside a vertical canvas, black bars will appear at the top and bottom.
Step 4: Click Done, then hit RUN to export the vertical video.
Crop to Make a Horizontal Video Vertical for Free
Best for: Beginners who want to quickly edit and crop a horizontal video into vertical format.
VideoProc Vlogger is a free video editor available on both desktop and mobile. The mobile version is called VideoProc Editor. It offers a wide range of video editing tools, from basic features such as rotating, trimming, and adding text overlays to more advanced effects like picture-in-picture and green screen. To make a horizontal video vertical, simply use the Crop tool. You can drag the cropping frame to choose exactly which part of the video you want to keep. The real-time preview shows the result instantly, so you can clearly see which areas will remain in the final vertical video.
Step-by-Step: Convert a Horizontal Video to Vertical for Free
Step 1: Launch VideoProc Vlogger and create a new project. Import your video into the Media Library, then drag it onto the Video Track.
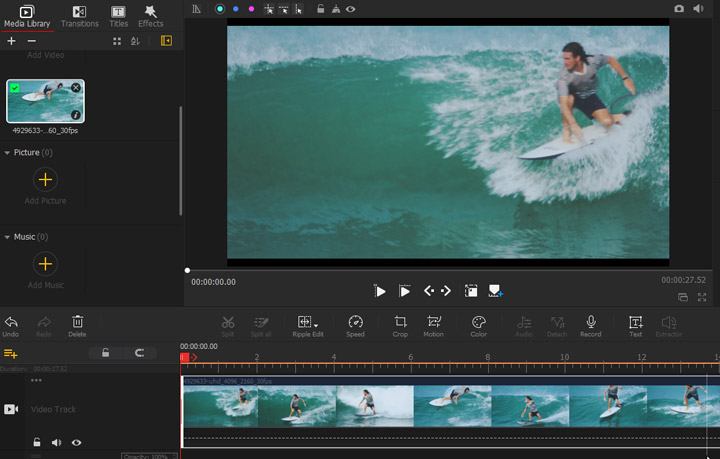
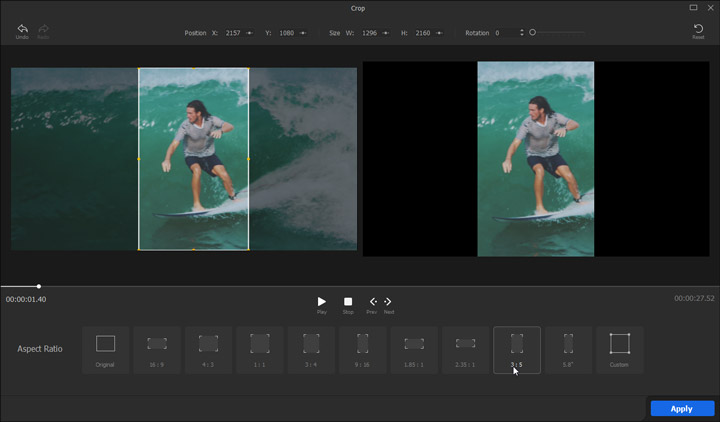
Step 2: Select the video on the timeline and click Crop in the toolbar to open the Crop window. Choose a vertical aspect ratio preset, such as 3:4 or 9:16, or select Custom to set your own ratio.
Step 3: A crop frame with eight yellow control points will appear. Drag the frame to select the part of the video you want to keep, then confirm the changes. Finally, click Export to save the vertical video.
Method 3: Make Horizontal Video Vertical by Auto Re-frame
Best for: Social media creators who want quick AI-powered automation.
CapCut, developed by ByteDance (the company behind TikTok), is a popular video editor on both mobile and desktop, known for its fast, AI-powered tools. One of its most useful features for social media is Auto Reframe, which uses AI to track your subject and automatically convert horizontal footage into a vertical 9:16 format. If you'd prefer not to crop the video, CapCut can also use AI to expand the background instead. Just note that both Auto Reframe and AI Expand are part of the CapCut Pro plan, which costs $89.90 per year. CapCut works on both PC and mobile. Below, we'll use the mobile app as the example.
Step-by-Step: Convert a Horizontal Video to Vertical in CapCat
Step 1: Open CapCut. Start a New Project and import your horizontal video.
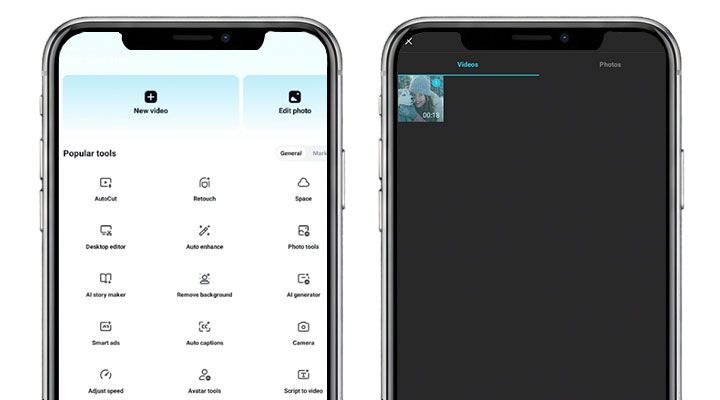
Step 2: Tap the video on the timeline. Find Auto Reframe, select 9:16 or other aspect ratio you need, and tap on the check icon. The AI will automatically keep the subject in the center.
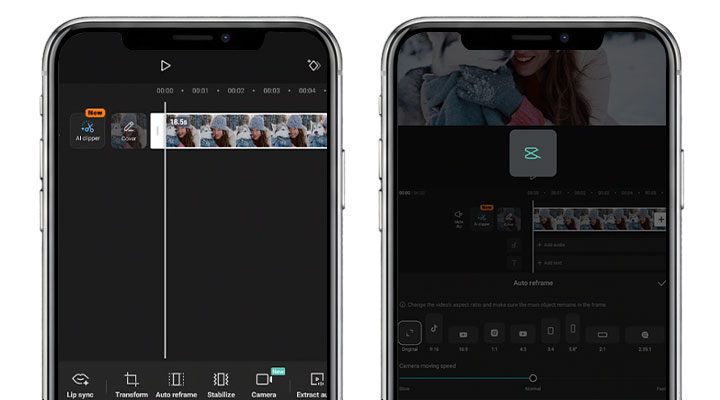
Tips: CapCut also supports expanding the background to make the horizontal video vertical. Simply tap the AI Expand feature in the bottom toolbar. If you're not signed in, CapCut will prompt you to log in first. Then select your desired vertical aspect ratio.
Step 3: Click Export in the top right corner. Choose your settings and save the vertical video.
Method 4: Make Horizontal Video Vertical by Expanding Background
Best for: short video clip with very simple background.
This is a newer way to turn horizontal footage into vertical. Instead of cropping or adding a background, AI background expanders expand the frame by generating new pixels at the top and bottom based on the existing image. They analyze the scene and predicts what the missing areas should look like, then fill them in to match the original video. The main advantage is that your framing stays intact, with nothing cut off and no need for blurred sidebars, so there’s no direct content loss. However, because the added areas are AI-generated, results can vary. It tends to work best with simple backgrounds, while more complex scenes may show slight inconsistencies, unnatural textures, or minor distortions near the expanded edges. There are many AI background expanders available. Below I use AtLabs and show you how to make a horizontal video vertical using it.
Step-by-Step: Convert a Horizontal Video to Vertical with AI Background Expander
Step 1. Open the re-frame tool of AtLabs on your browser. Hit Upload and select your original video for loading to this online horizontal video to vertical converter. Note: The maximum video size you can upload to AtLabs is 100MB and 30 second.
Step 2. Choose 9:16 or any other vertical aspect ratio you want. If needed, you can enter text prompt to guide the VEED generating new pixels.
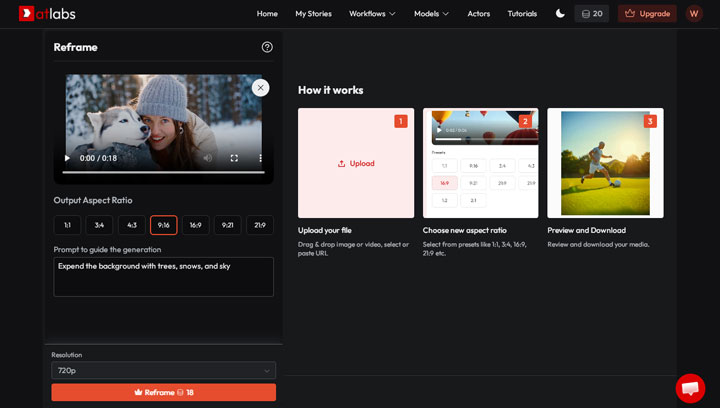
Step 3. Hit Reframe which costs 18 credits. AtLabs starts expanding the background with AI for turning your horizontal video to vertical.
Method 5: Make a Horizontal Video Vertical with iMovie
Many people are looking into can iMovie make videos vertical or how to make a horizontal video vertical in iMovie. Unfortunately, let's face it: iMovie only lets users export landscape videos. This pre-built video editor for both macOS and iOS devices, though boasts some useful editing toolkits, doesn't offer the options to generate 9:16, 4:5, or 3:4 vertical videos. However, if you still want to convert horizontal video to vertical in iMovie, there is a workaround.
Step-by-Step: Convert a Horizontal Video to Vertical in iMovie
Step 1. Open up iMovie. Hit the Plus button in the top left corner, choose Movie, and select No Theme. Afterward, go to Media panel and choose the horizontal video clip that you wish to convert to vertical.
Step 2. Select all the clips in the timeline. Go to the toolbar menu above the preview window to find the cropping tool, and you click on it. Choose the pop-up Rotate the clip clockwise button. By doing this, the horizontal video now turns to be vertical.
Step 3. Press the Share button on the right corner of iMovie. Select File. Set up the proper resolution, compressor, and quality. Choose Next. Now iMovie starts to crop landscape video to vertical and save the outcome on your device.
Method 6: Make a Horizontal Video Vertical with Premiere Pro
Premiere Pro is one of the most renowned video editing programs which is capable of converting horizontal video to vertical, for sure. However, getting it to run without hassle can be hard. As an industry-level tool with a myriad of confusing jargon and dialog boxes, it might cost you hours or days to master the very basic edits features. Let alone, it devours a whopping storage space and computer resources.
Step-by-Step: Convert a Horizontal Video to Vertical in Premiere Pro
Step 1: Launch up Premiere, press New Project on the primary screen. Enter the name and select the file for holding the project file. Press OK to proceed.
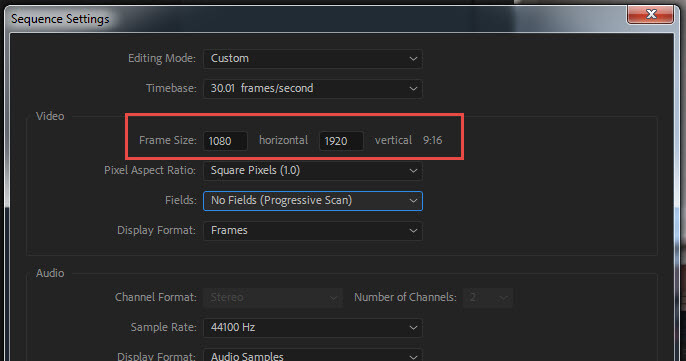
Step 2: Right-click on the Media Pool tab. Hit Import. Select the source horizontal video to import to Premiere. Drag the video to the timeline. Now the sequence settings are available. Press Sequence and Sequence Settings.
Step 3: By changing the value of frame size, we can make a vertical video from horizontal. The common sets for vertical videos are 600P x 750P with the aspect ratio of 4:5; 1080P x 1920P and 360P x 640P with the aspect ratio of 9:16; 600P x 900P with the aspect ratio of 2:3.
Step 4: Select the video on the timeline to enable the Effect Control tab. Now you can use the Position and Scale option to adjust the frames that you want to keep.
Step 5: Press File, and click Media under Export. Select Match Sequence Settings on the shown up Export Settings panel. After that, press Export. Now, Kapwing starts to