Summary: This post introduces 3 perfect online and offline ways to compress QuickTime video. After reading, you may know how to reduce the QuickTime video file size on Mac, Windows, and browsers.
We've all been there, lacking free storage space to store a terabyte of QuickTime movies, cannot send a 1GB of QuickTime video recording to our clients via email, failing to share or post a large QuickTime video on Social Media like Facebook… Luckily, we can easily get rid of these pesky issues by compressing the QuickTime videos. But, how do you go about this? Keep reading to learn the 3 simplest recipes.
How to Compress QuickTime Video on Windows and Mac
To compress QuickTime video files on Windows or Mac, we need a capable QuickTime video compressor. However, among tons of video compressor tools in the market that come with the capability to reduce the size of QuickTime video, which should be your best pick? Well, to minimize your choices, we test 20+ QuickTime video compressors and find out the best one is VideoProc Converter AI. See some of its killer features:
- Effortlessly shrink videos by inputting the target size or dragging a slider
- Customize video size and quality by changing codec, bitrate, resolution, GOP length, etc
- Compresses a QuickTime video from GBs to MBs in seconds with full GPU acceleration tech
- No visible picture quality loss with the adoption of the latest x265/AV1 encoding scheme
- Extra editing tools like trim, cut, split, and crop to reduce Quicktime video size further


Tips: The steps to compress QuickTime movie on Mac and Windows by using VideoProc Converter AI is almost the same. Thus, there I just show you how to reduce QuickTime file size on Mac.
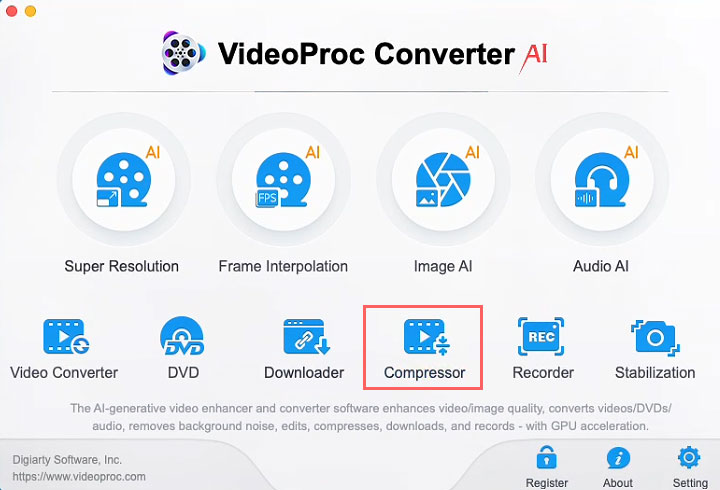
Step 1. Open QuickTime Compressor
Free download and install VideoProc Converter AI on your Windows or Mac computer. Launch it up. Next, you hit Compressor to navigate yourself into the QuickTime video compressor panel.
Step 2. Compress QuickTime Video Files
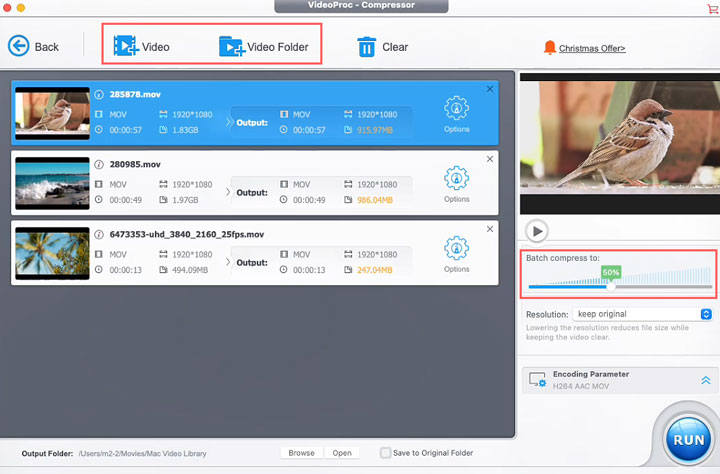
Drag your original QuickTime videos onto the import panel. Then, move the compression slider (ranging from 10% to 100%) to choose how much you want to compress your videos. For example, setting it to 80% means you want to reduce the file size by 20%.
Tips:
- You can also reduce file size by lowering the resolution. For example, downscaling a QuickTime video from 1920×1080 to 1280×720 can cut the file size by more than half.
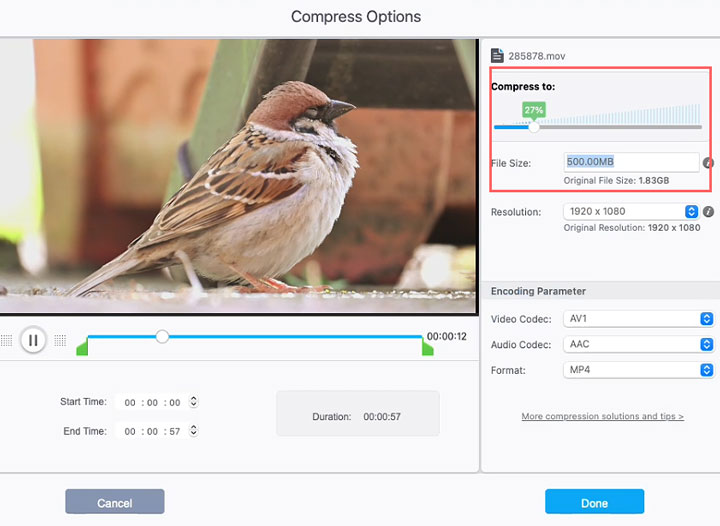
- You can fine-tune the compression for each QuickTime video. To do this, click the Option icon, where you can directly enter the target size, adjust the compression slider to set a new ratio, change the resolution, and make other adjustments.
Step 3. Export the Compressed QuickTime Videos
Hit the RUN button and start compressing your QuickTime Video on Windows or Mac.
Tips:
- It's recommended to keep H.264 as the default codec for the best compatibility. If you want better quality at the same size, AV1 or HEVC are better options, though they are less widely supported—AV1 in particular has limited compatibility.
- If you need more ways to compress QuickTime, check 7 ways to compress videos.
How to Compress QuickTime Video Online
PS2PDF is a great piece of browser-based application that lets you compress QuickTime video online without downloading additional software to the computer or mastering any difficult terminologies.
Step 1. Open up this online QuickTime video compressor on your browser.
Step 2. Hit Add Files, and then you can choose Select From Local Disk, Select From Dropbox, or Select From Google Drive to import the QuickTime video file from your local drive, Dropbox, or Google Drive to the app. Depending on the network condition and the file size, PS2PDF might need minutes to hours to load up the file.
Step 3. Come over to the section of Output Quality and File Size. Move the slider left or right to adjust the compression ratio. In my case, I moved the slider to 50 to reduce my file (45.88MB) to half of its original size.
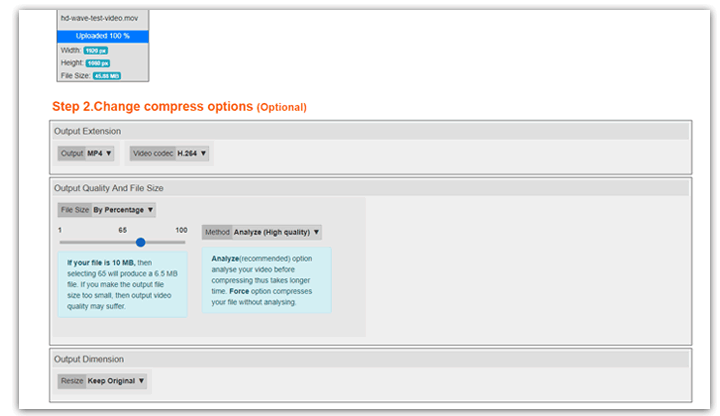
Step 4. Hit Compress Now to compress QuickTime video online with P2SPDF.
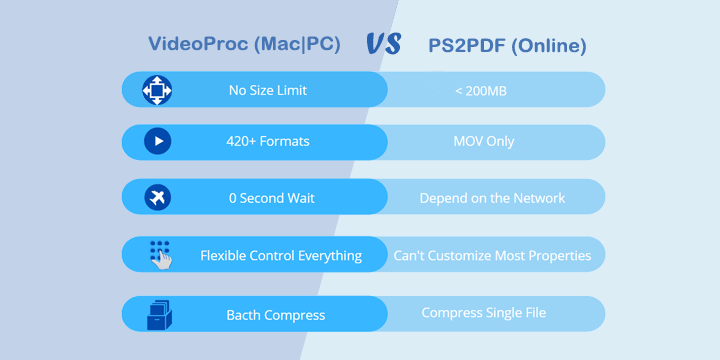
However, we'd steer you to VideoProc Converter AI as the online QuickTime video compressors are for the conversion of small videos only. To take PS2PDF as an example, it doesn't let you compress a QuickTime video with size exceeds 200MB. Ads on the compression page are also quite annoying.
To take PS2PDF as an example, it doesn't let you compress a QuickTime video with a size exceeding 200MB. Ads on the compression page are also quite annoying.
How to Compress QuickTime Video with QuickTime Player
QuickTime player is preinstalled on macOS computers which could be found in the Application folder. It's not like the most other professional QuickTime video compressors in the market that enables you to fiddle with codec, bitrate, and a few more options to shrink the QuickTime video file size while retaining optimal picture quality. On QuickTime player, you can only compress the QuickTime video by exporting the original file in a lower resolution which will cause horrible quality loss unavoidably.
Step 1. Locate QuickTime player in the Application folder. Click it to open it up on your Mac machine.
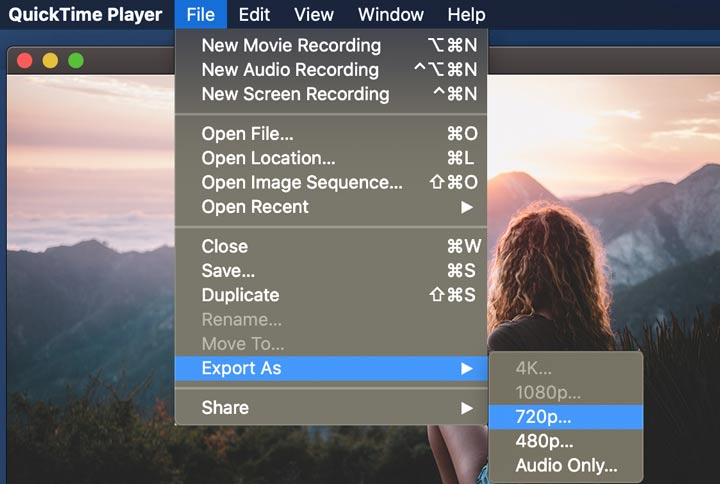
Step 2. Come over to the top menu bar. Hit File to find the Import button. Click this to feed the original large QuickTime video file to QuickTime Player.
Step 3. Navigate to the menu bar and choose File again. Choose Export As from the drop-down menu of File.
Step 4. QuickTime player now offers 5 options (4K, 1080P, 720P, 480P, and audio only) for the export resolution. Select the one that is lower than the original resolution to start compressing QuickTime video for free.
Let's say my original QuickTime is in 1080P, then there I can select 720P and 480P as the export resolution.