You probably have noticed lots of videos on YouTube or Facebook have black bars visible at the top and bottom to make them look cinematic. These cinematic black bars are also called widescreen black bars, letter boxing, or technically, CinemaScope.
So, how to add black bars to video except using a cinematic aspect ratio when shooting? In this blog, we'll show you how to add black bars to the video, regardless of the editing software you use. You'll also find the step-by-step guide.
Core Principles
Filmmakers use aspect ratio to help them in visual storytelling. Most films are shot in an ultrawide aspect ratio like 2:1, 2.35:1 or 21:9. This is not a problem on a movie theater screen. When you're going from the big screen to your TV, laptop, or cell phone with a 16:9 screen, video players will add black bars to the video to fit the widest edges in the frame and fill in the space without cropping or distorting the original size.
So fundamentally, these cinematic bars are relative to the mismatch between your screen and the original ratio of the video. Therefore, regardless of the video editing software you use, the core principles fall into three categories: altering how the video is displayed, adding visual overlays, or modifying the video frame itself.
The general methods are similar across different software programs. We will explain the specific steps based on these three core principles, using VideoProc Vlogger as an example. Here are some of the reasons we chose it:

VideoProc Vlogger - Add Black Bars to Video for Free
- 100% free, no malware, no watermark on output.
- Easy to use, compatible with Windows, macOS, Android, iOS.
- Extensive format support, MOV, MP4, MKV, MXF, AVCHD, ProRes, etc.
- Fast processing speed, low CPU usage with advanced GPU Acceleration.
- Add black bars to video without cropping or using PNG overlay supported.

#1. How to Add Black Bars without Cropping
The main idea of adding black bars without cropping is to change how the video is displayed, not the video itself. Changing the aspect ratio can certainly do this. It's the most efficient and non-destructive method. Your video will adjust itself to any screen it will play on. For example, it makes good use if you have an old TV that stretches anything it plays to fill the 16:9 screen.
Step 1. Import the video with the original aspect ratio.
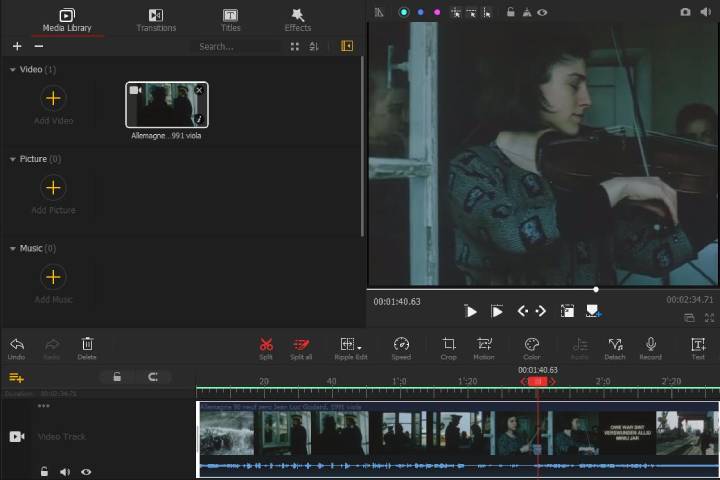
Launch VideoProc Vlogger and create a new project. Then click the + icon on the main interface to add the video to the Media Library. After that, drag the video to the Video Track in the timeline. The video used here is a film with a 4:3 aspect ratio shot in the early years.
Step 2. Reset the aspect ratio for black bars.
Click the gear icon named Change Video Parameters in the toolbar. VideoProc Vlogger offers several common presets in the pop-up window for you to choose from. You can also use a custom video resolution by setting the width and height of the video. Just make sure that the width number is bigger than the original one.
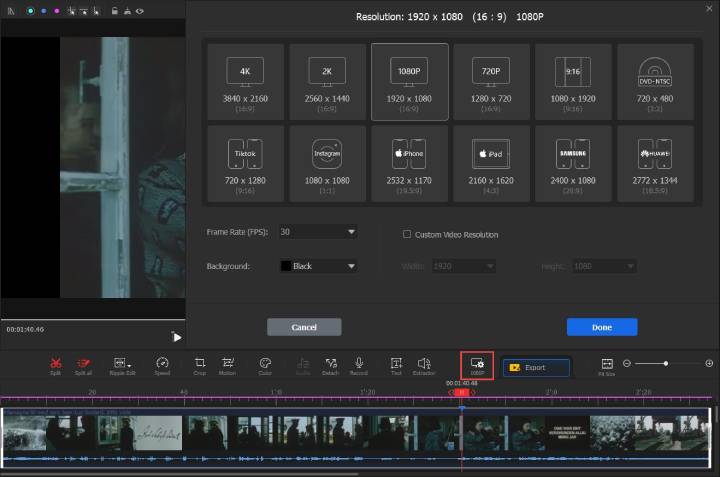
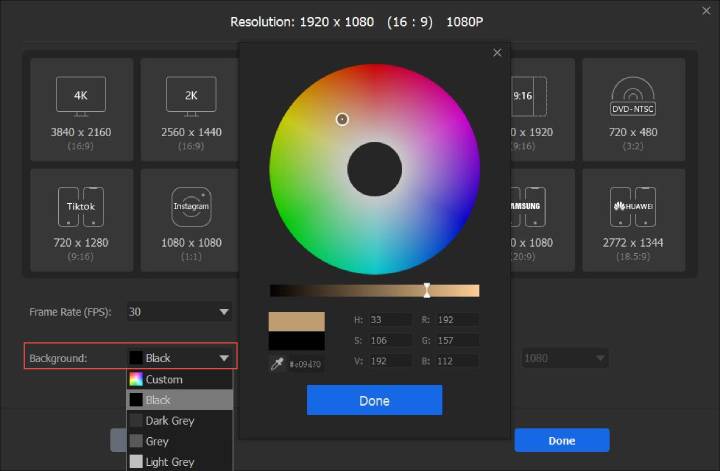
Step 3. Set the background color of your cinematic bars.
Click and expand the Background tab in the pop-up window. You can select a color from Black to White, or choose Custom. VideoProc Vlogger allows you to change the color of the cinematic bars if you'd love to. In this case, we'll select Black.
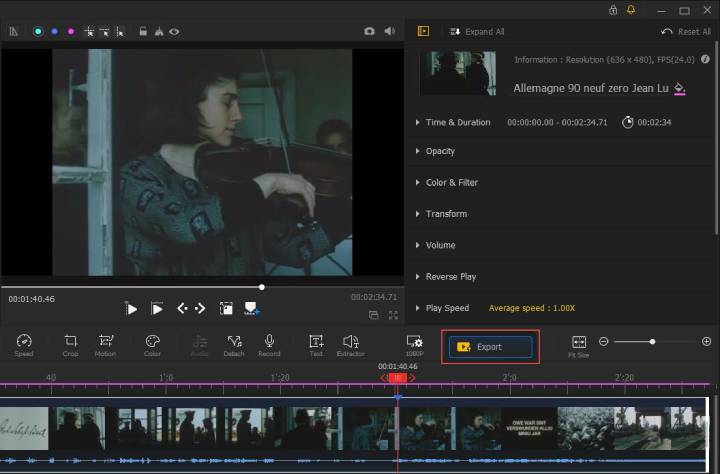
Step 4. Export the video with black bars.
Hit the Export button in the toolbar, and click the Start button to export the video with black bars. Rename the file, set the save path and choose an output format in the pop-up Export Settings window (optional).
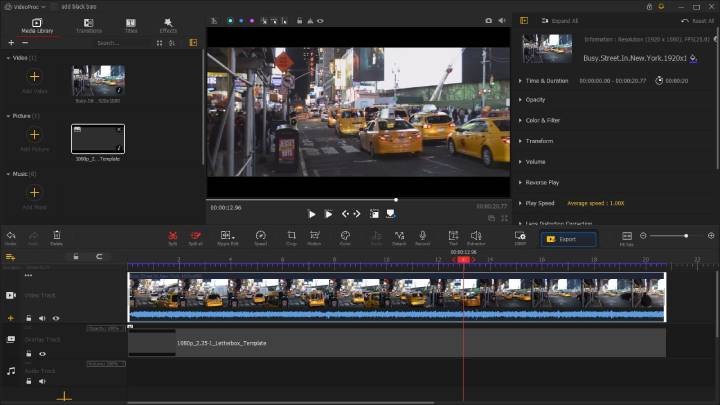
#2. How to Add Black Bars Using Black Bars PNG
What if you already have footage shot in 16:9, and you want to crop it to an aspect ratio of 2:1, 2.35:1 or 21:9? The second method is to add a visual overlay, be it a static image, a graphic mask, or compositing. It's the most universal method and works for any video. Here's how to add black bars to video using black bars PNG.
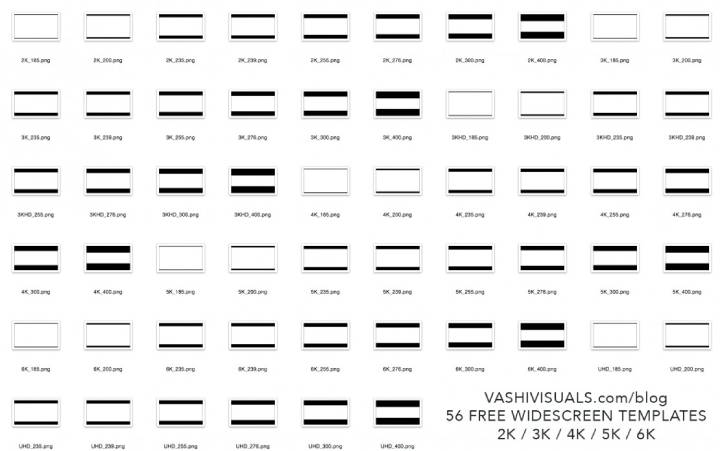
Step 1. Prepare the black bars png file for your video.
Google "black bars PNG" and download a letterbox template. The only thing to note is to choose the one in high resolution instead of low. I would highly recommend VashiVisuals Blog, where you can download black bars PNG with different aspect ratios and resolutions from 720p to 6K. Download the Film Dog Pro's HD Letterbox Template Pack for 720p and 1080p black bars PNG, and VashiVisuals Extreme Widescreen preset package for HD/2K/UHD/3K/4K/5K/6K letterbox templates.
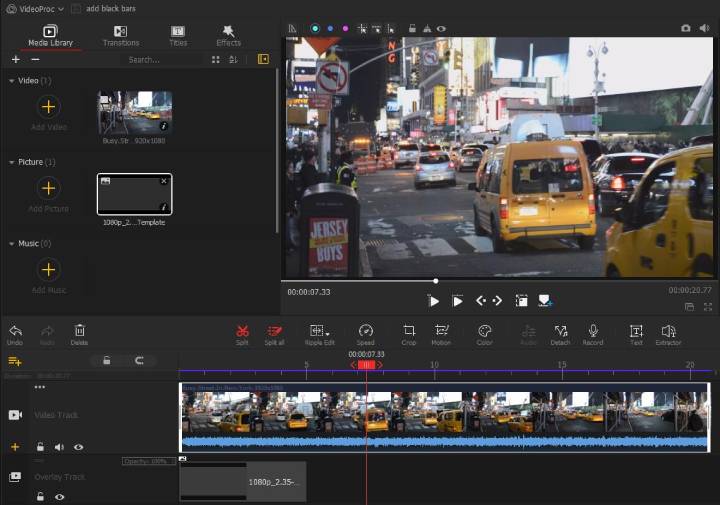
Step 2. Add your video footage and the black bar PNG to the timeline.
Open VideoProc Vlogger and import your video footage to the Media Library. Then drag and drop it to the Video Track in the Timeline. Repeat the above steps and add the black bars PNG to the Overlay Track.
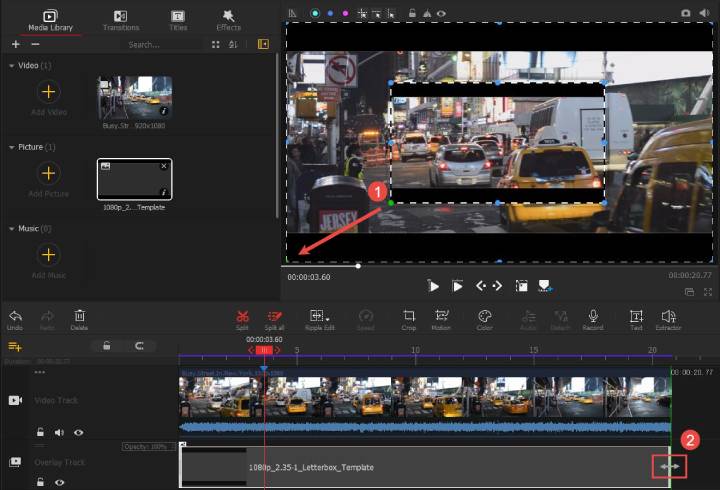
Step 3. Adjust the effect of black bars.
Double click the PNG file in the Preview Window to select it. Drag the template edges to the edges of the video so that the black bars PNG covers the full video.
Hover your mouse over the rightmost edge of the PNG file in the Timeline until the cursor turns to a double-headed arrow. Drag it to the right so that it appears for the whole duration of the video clip.
Step 4. Export the video with black bars.
Click the Export button to save your video clips. Choose an output format and set export parameters in the pop-up window.
#3. How to Add Black Bars by Compressing the Frame
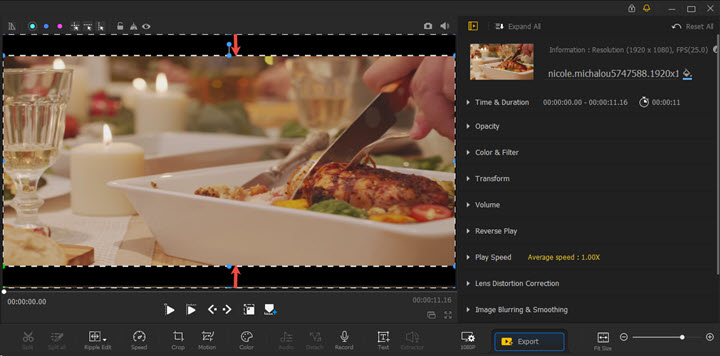
The third method is to modify the video frame itself. If you don't want to modify the resolution or lose certain parts of your frame by cropping, try compressing the image with VideoProc Vlogger. This could get the job done without the image getting squashed.
Step 1. Place your video clip on the Video Track.
Launch VideoProc Vlogger and create a new project that comes with the same resolution as the original footage. Add your video clip to the Media Library and place it on the Video Track in the Timeline.
Step 2. Compress the frame for black bars.
Double click on the screen in the Preview Window to get nine small dots around the video screen.
Select the small dot in the middle of the top edge and drag it down to get the black bar on the top of your footage. Drag the small dot in the middle of the bottom edge upwards to get the black bar below.
Adjust the position of these two small dots to fine-tune the width of the black bars.
Step 3. Export the video with black bars.
Click Export when you finish all your edits. Before that, also feel free to do whatever edits you need with VideoProc Vlogger.
Quick Guide by Tools
How to Add Black Bars in iMovie
iMovie is an entry-level video editing software. Simple and easy to use, it comes free with the Apple system. iMovie offers many basic editing features like dropping clips on the timeline, cropping, color grading, adding transitions, etc. So in iMovie, we can still use a black bar PNG image to overlay over the footage to achieve the cinematic look.

Step 1. Launch iMovie and drag your video footage to the timeline.
Step 2. Download black bars PNG with the same aspect ratio as your footage and place it on top of your video footage.
Step 3. Drag the PNG out to the full length of your entire clip.
Step 4. Select the image layer in the timeline, and click on the Cropping tool on the right side. Choose Fit as the style instead of Ken Burns to avoid the slight movement.
How to Add Black Bars in Premiere Pro
Adobe Premiere Pro is perhaps the best known and most functional non-linear editor. As an industry-standard software, Premiere Pro is suitable for even the most demanding users. Premiere Pro has an unmatched ecosystem of tools to help you edit visually stunning videos. The following steps will show you how to add black bars to video in Premiere Pro by using an adjustment layer and crop effect.
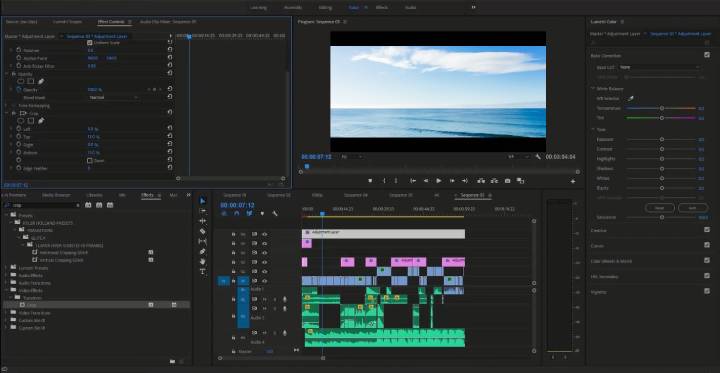
Step 1. Open Premiere Pro and import your video footage into the sequence timeline.
Step 2. Go to the Project panel, click New Item, and select Adjustment Layer. Now with the new adjustment layer created, you'll want to make sure it's set to your sequence settings.
Step 3. Drag the new adjustment layer onto the top over everything. Extend it so that this new black-bar-to-be layer encompasses the entirety of your video footage.
Step 4. Select the new layer in the timeline, then type and search for the Crop option in the Effects Panel. Drag and drop it on the Adjustment Layer you just created.
Step 5. Head to the Effect Controls panel in the source window, and locate the Crop settings, where you'll see Left, Top, Right, and Bottom buttons.
Step 6. Enter a value in the Top and Bottom buttons to add cinematic bars to the video, and Premiere Pro will crop the video based on the values you provide.
Tips:
For the cinematic look, people usually use values between 12 and 18 percent. We recommend using 13 in both Top and Bottom buttons since sometimes people won't shoot that wide enough. You can refer to the video screen to observe the changes and choose any number you like.
You can also adjust the position if the black bars crop off your frame. Select the video clip you want to edit, then grab and drag the Position tab up or down to fit.
How to Add Black Bars in DaVinci Resolve
In DaVinci Resolve, the most efficient and professional method is using the built-in Output Blanking feature to change how the video is displayed. This non-destructive method ensures a clean export and applies the effect to your entire timeline. Follow the steps below to add the film bars to your video.
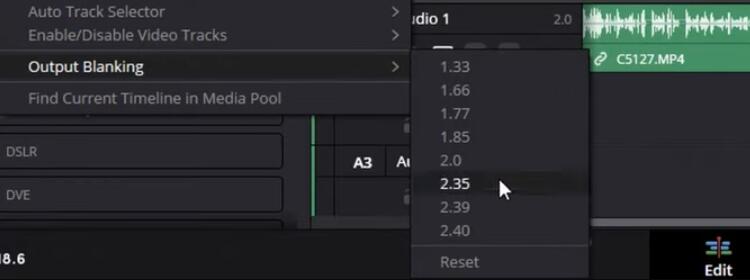
Step 1. Open your Project and navigate to the Edit page.
Step 2. Go to the top menu bar and select Timeline.
Step 3. Scroll down to the bottom of the menu and hover over Output Blanking.
Step 4. Select your desired aspect ratio from the list, such as 2.35, 2.39, or 1.85 for cinematic bars.
Step 5. The black bars will immediately appear in your viewer and will be included in your final rendered file.
How to Add Black Bars in Sony Vegas
Sony Vegas appears more like a pro-level video editor than a consumer one. As one of the most important video editing software, Vegas Pro is used by many professional crews, and advanced video hobbyists, especially YouTubers and vloggers. Follow the steps below to add black bars to video in Sony Vegas. It's easier than you think.
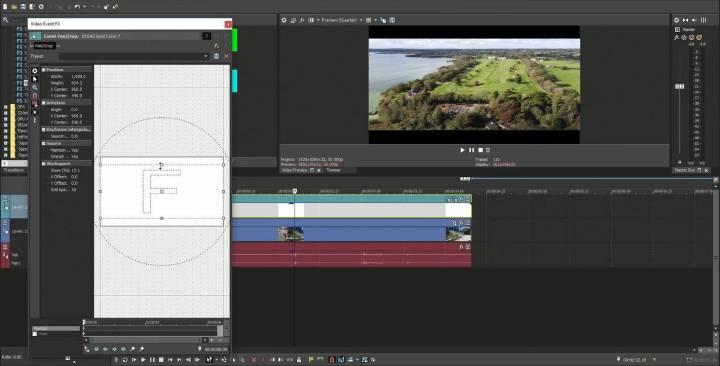
Step 1. Launch the program and add your video clip into Sony Vegas.
Step 2. Select your clip in the timeline and click the Event Pan/Crop button in the upper right corner.
Step 3. Click on the Sync Cursor at the bottom to make sure it's not enabled. Move the marker to the beginning of the keyframe.
Step 4. Uncheck the button named Lock Aspect Ratio in the pop-up Video Event FX window.
Step 5. Click on the top square and drag it down. You can see the black bars appearing in the preview window on the right of the screen.
Other Types of Cinematic Bars
In addition to the classic letterbox effect, there are two other types: pillar boxing and windowboxing. The difference is where the black bars appear in the video.
Letterboxing refers to the black bars appearing on the top and bottom of the content. Pillarboxing is the black bars going on the left and right-hand sides of the content. While window boxing is when the content is framed by margins around the content.
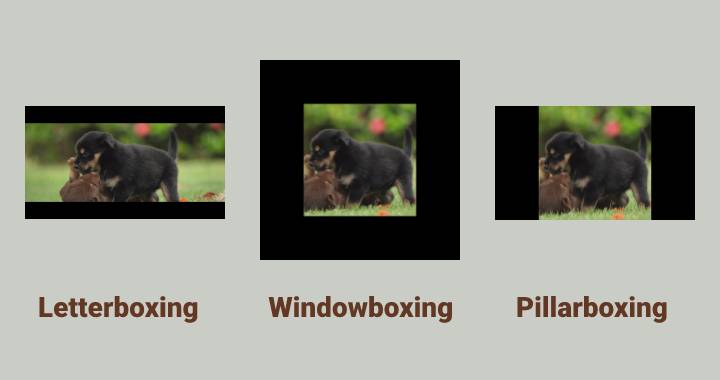
Since there's no difference except where the black bars appear, the method to apply the pillarbox effect is the same as the way of adding letterbox to the video. You can apply pillarbox effect to video by adjusting the aspect ratio or using a black bars PNG.
To add black bars around the video, aka window boxing, read our tutorial on How to Add Border/Frame to Video.
Why Should You Add Black Bars to Video
You may find more and more videos on Facebook and YouTube with black bars, which is almost becoming a trend. But besides that, what else would make you want to add black bars to the video? In other words, we want to make it clear how you can benefit from adding black bars to your video.
For Different Screen Resolutions
One huge advantage is your video footage will adjust itself for different screen resolutions, no matter what device or platform, as long as you add black bars by adjusting the aspect ratio.
There is an opinion that 16:9 is overrated these days, but it's undeniable that 16:9 is probably the most common aspect ratio in a way. So if you are planning on changing the aspect ratio to add black bars, we've got you a list of 16:9 aspect ratios. Use it as a cheat sheet to calculate the required resolutions.
For a Better SNS Video Strategy
Another advantage to adding black bars to video is for a better SNS video strategy, especially when you are a vlogger or YouTuber.
Socialinsider conducted a Facebook video study this year. According to the study, the vertical video is the most used video format and drives the highest level of engagement on Facebook for all profile sizes. That makes sense since most people use smartphones to access Facebook. To explain the result more intuitively, we turn to data and remake a bar graph on the average engagement rate by video format over time.
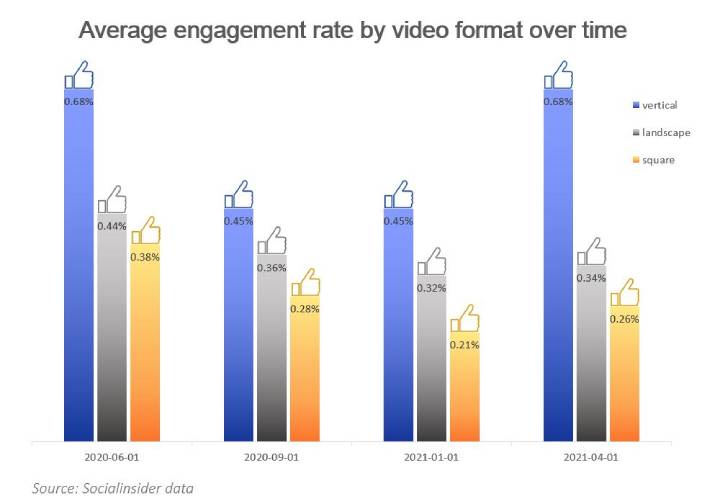
That could be another reason why you should add black bars to video. Adding black bars to your video allows you to repurpose your landscape videos into the vertical format without cropping it, so that you can get as much greater engagement as possible. Even better, the black bars in the video are good places to add text or put a joke. In this way, you can also get a meme video loved by the Internet netizens.
Final Thoughts
We have listed the causes why black bars appear, why you may need black bars in your video and the four best ways to add black bars to your video.
iMovie could be the go-to choice for Mac users since it's preinstalled in macOS. Premiere Pro and Sony Vegas are better for advanced video hobbyists since they are paid software and regarded as alternatives for each other sometimes.
While VideoProc Vlogger may be the best for social media influencers and occasional enthusiasts. It's intuitive and easy to use, yet still versatile and powerful to meet most of your video editing needs. What's better is that you can get it all for free.
Add black bars to your video and get the cinematic look for your travel videos and short films with VideoProc Vlogger.


