
Some audio tracks just won't play in MX Player. Formats like AC3, EAC3, and DTS aren't supported by default, so you might notice videos playing silently or with missing sound.
The easiest way to fix this is by installing a custom codec pack. MX Player custom codecs generally come in two types:
• MX Player EAC3 Codec for a Specific Version For instance, version 1.87.0 has an ARMv8 NEON build. A file like mx_neon64.zip works perfectly for 64-bit ARMv8 devices. Basically, the codec needs to match your device's processor so MX Player can use it properly.
• MX Player AIO Zip (All-In-One): If you're not sure which codec your device needs, there's the All-In-One (AIO) pack. The AIO file contains codecs for every device type, so MX Player can automatically pick the right one. This is super handy for older phones, Intel/x86 tablets, or even PCs.
Later in this post, I'll drop all the MX Player codec (pack) download links and show step-by-step how to install each. I'll also go over a few alternatives, like converting your audio to a supported format or trying a different media player that handles more codecs. By the end, you'll be able to play media files in MX Player with audio encoded in AC3, EAC3, DTS, and other common audio codecs without any issues.
Understand the MX Player (EAC3) Codec Issue
MX Player Pro is widely recognized as a powerful media player, offering features like hardware acceleration for smooth playback, multiple audio and subtitle options, and aspect ratio adjustments. With over a billion downloads and a massive monthly user base, its popularity is undeniable.
However, starting from version 1.7.32, MX Player removed native support for certain audio formats due to licensing restrictions. This affects EAC3, AC3, DTS, and MLP, leaving many videos with these audio tracks either silent or unplayable.
Note: The last officially confirmed versions to support EAC3 were MX Player v1.8.17 and MX Player Pro v1.8.16, both released back in 2017. Even these versions sometimes had trouble with certain AC3 variants, like Dolby Digital Plus (E-AC3) or high-bitrate AC3 files. Formats like DTS, Dolby TrueHD, and FLAC still require a custom codec to work properly.
Fortunately, the MX Player community has created custom codec packs that you can download and install manually. These packs restore support for AC3, DTS, MLP, TrueHD, and other formats. In this post, I’ll show you exactly how to download and install MX Player codec packs so you can enjoy all your videos and audio without any playback issues.
Download MX Player Custom Codec Pack (AIO & Specific Versions)
To download the EAC3 codec for MX Player, you'll need the custom codec zip file. These codecs are built using the FFmpeg library and other components required for MX Player to handle unsupported audio formats.
Option 1. Download MX Player EAC3 Codec for a Specific Version
You can check your device's architecture or the specific codec MX Player recommends. And then download the MX Player custom codec for the specific version.
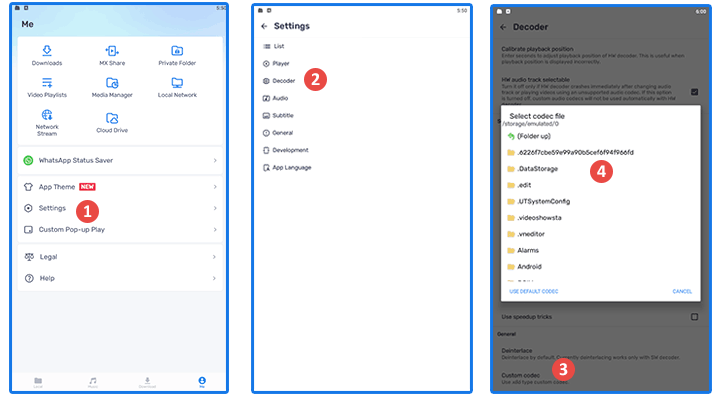
Step 1. Open the MX Player app.
Step 2. Tap the three dots (Menu) in the top-right corner.
Step 3. Go to Settings & Decoder.
Step 4. Scroll down and check the information listed under Custom Codec. Check the recommended codec (e.g., ARMv8 NEON, x86).
Step 5. Download the corresponding MX player codec pack version.
For example, if it prompts you to install the 1.87.0 ARMv8 NEON codec, you should choose neon-1.87.0-build_3.zip for 32-bit devices or neon64-1.87.0-build_3.zip for 64-bit devices.
Tips: Always check the latest recommended codec from MX Player's settings, but note that many older AIO files (like V1.49) are still compatible with the newest MX Player versions (V1.99.1, V2.0.4, and newer).
Option 2. Download MX Player AIO (All Codecs In One file - Recommended)
If you are unsure which version you need, the mx_aio.zip file contains all necessary codecs, and MX Player is usually able to automatically detect and use the correct one for your device.
Note:
The MX Player codec pack version 1.49.0 listed above is known to be compatible with many MX Player versions, including common ones like MX Player 1.85, MX Player 1.86, MX Player 1.87, MX Player 1.89, and often the latest builds.
Install MX Player Custom Codec Zip File
Once you have downloaded the correct MX Player custom codec zip file for fixing EAC3 Codec and other common codec issue on MX Player, follow these steps to install it:
Method 1. Automatic Detection and Installation
This is the simplest method if it works for your device.
Step 1. Save the MX Player custom codec zip file to the internal storage of your device.
Step 2. Open MX Player. If the app detects a compatible codec zip file in your storage, it will prompt you to install it. Simply click OK to proceed.
MX Player will automatically restart with the custom codec installed.
Method 2. Manual Navigation and Installation
If automatic detection fails, you can manually select the codec file.
Step 1. Open MX Player on your smartphone.
Step 2. Go to settings > decoder > general > custom codec. A dialog box will appear for the navigation of the codec pack. Now open the folder in which the codec is installed.
Step 3. Click on the target MX Player codec zip file. The media player will restart. Now, you should have no problem playing EAC3, AC3, and DTS files.
Troubleshoot: MX Player Custom Codec Installation
1. Devices Failing to Detect MX Player Custom Codecs
Problem: Many people encounter difficulties when their devices do not detect the installed MX Player custom codecs. For example, user @USBhost from XDA Forum shared that while he could use the codecs on the S23 Ultra, he faced issues on the Galaxy A54. When he accessed the MX Player Pro settings and selected the custom codec file, an error message appeared: "Can't find the custom codec. Please use version 1.49.0 ARMv8 Neon Codec".
Solution: Unzip the codec file before selecting it in the MX Player Pro settings. While the zip file may not need unzipping according to the publisher, some devices have trouble recognizing the zip format, so unzipping can help resolve the issue.
2. Android TV Not Recognizing Custom Codecs in Download Folder
Problem: Users on Android TV may face problems with the custom codec not being detected even after placing it in the download folder.
Solution: Ensure that MXPlayer and system have the necessary permissions granted for accessing the custom codec file. Choose "Always" permission to ensure consistent access rather than selecting "Only permission" when prompted by the app.
3. AC3 Audio Output Issues After Installing MX Player Codecs
Problem: Some users experience trouble decoding AC3 files on MX Player Pro, leading to audio output only in stereo despite installing custom codecs.
Solution: Disable HW+ and SW decoders in the MX Player Pro settings and enable only the HW decoder. By unchecking other decoder options, users can ensure that the player exclusively uses the HW decoder, resolving the issue of AC3 file decoding and Dolby output.
2 Alternative Ways to Play EAC3 without MX Player Custom Codec
Let's be honest, for many users, the process of downloading and installing the MX Player custom codec can feel quite complicated, especially if you're not very tech-savvy. Aside from the technical steps, even when the MX Player codec pack is successfully installed, playing EAC3 or DTS audio isn't always guaranteed to work flawlessly. We frequently see comments and forum posts from users who still struggle to get the MX Player EAC3 codec functioning correctly despite following the instructions.
For example, users report issues like:
Mx Player Codec Armv7neon apk conflicts with the existing package. - by Waseem4423 from Reddit.
I've downloaded 5 different versions of the codec files, but none of them are showing up in the download folder when I try to add them in MX Player Pro. - by Rakkasan29 from Reddit.
Thankfully, instead of struggling with downloading and installing MX Player custom codec zip files, you have 2 easier and error-free ways to play EAC3/AC3/DTS audio files.
Method 1. Convert EAC3/AC3/DTS to MX Player Compatible Format
With VideoProc Converter AI, converting EAC3, AC3, DTS, and various video/audio files to a codec compatible with MX Player is as easy as a single click. You can adjust video sample rate, bitrate, channel numbers, and other settings. The adoption of High Quality Engine ensures that the conversion maintains picture and sound quality.
Step 1. Download, install, and open VideoProc Converter AI. Click Video Converter. Drag the video files with audio encoded with EAC3, DTS, or other codecs not supported by MX Player to the program.

Step 2. In the Target Format section, choose MP4 Video (H.264 + AAC) as the output format. VideoProc Converter AI offers a wide range of output formats to choose from, so you can also pick any other one that best fits your needs.
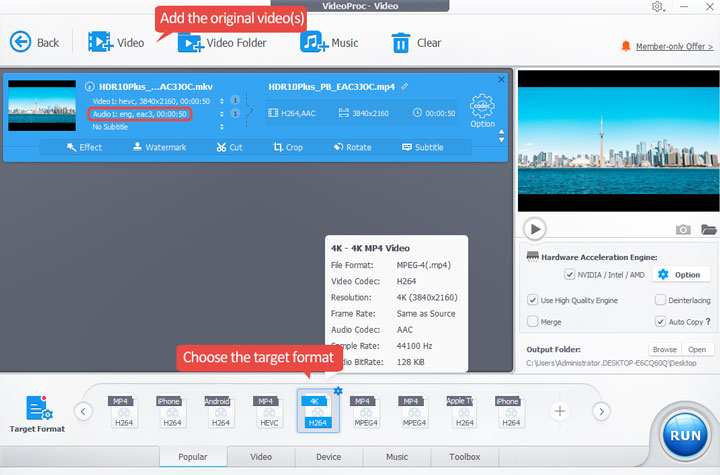
Step 3. Check the option box for High Quality Engine. Select a folder to save the converted file. Enable Hardware Acceleration. Finally, click RUN to export the video.
Method 2. Try a Different Media Player That Supports EAC3/AC3/DTS
While MX Player was once a top choice for playing multiple media files, the landscape has evolved significantly in recent years. As of 2024, there are numerous superior alternative media players available that can handle virtually all types of media files without the need for third-party, unofficial codec packs. One standout example is 5KPlayer, a versatile media player that boasts native support for a wide array of audio formats, including DTS, AC3, and EAC3, as well as hundreds of other popular and rare formats. This extensive compatibility eliminates the hassle of searching for and installing extra codecs.
Moreover, 5KPlayer can make use of the full GPU acceleration tech, allowing you to play 4K/8K video files with high frame rates and bitrates without any choppy or stuttering frames, while also preventing your computer from overheating due to excessive resource usage.