
Capturing screenshots on your Mac is a breeze, but sometimes you may find yourself with an image that contains more than you need. Whether you want to highlight a specific area, remove sensitive information, or simply create a more visually appealing screenshot, cropping is the way to go. In this post, we've put together a step-by-step tutorial that explains how to crop a screenshot on Mac with the best 4 ways to ensure you can share your screenshots with precision and clarity. Read on!
How to Crop a Screenshot on Mac? Jump to the Solution:
- 1. Crop Screenshot on Mac with the Photos App
- 2. Crop Screenshot on Mac using the Preview App
- 3. How to Take a Cropped Screenshot on Mac [2 Ways]
- 4. Crop Screenshot on Mac with VideoProc Vlogger
How to Crop a Screenshot on Mac with the Photos App
The Photos app is a built-in application on Apple devices that allows users to store, search, and edit photos and videos. With its comprehensive toolset, users can easily adjust and crop screenshot on Mac after saving to remove unnecessary elements or focus on specific details. The app offers various cropping options, such as freeform cropping, square cropping, and preset aspect ratios, allowing users to customize their screenshots according to their preferences. In addition, the inclusion of features in the app such as rotation, straightening, and flipping can help further enhance and refine screenshots with ease.
Follow the steps below to crop a screenshot on Mac with the Photos app:
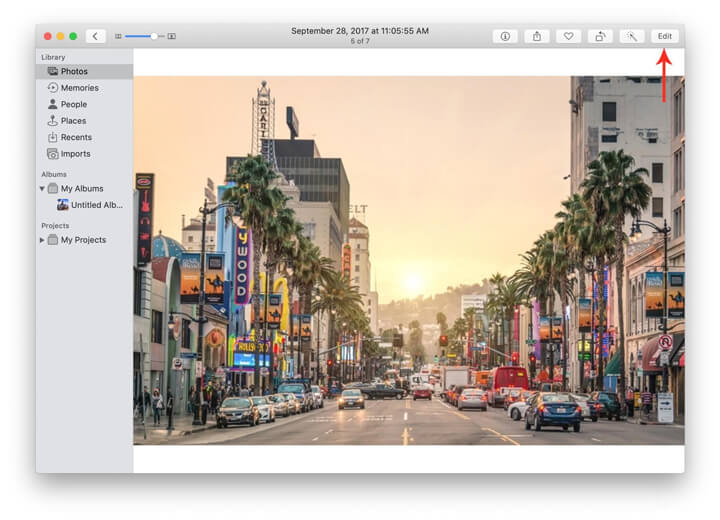
Step 1. Launch the Photos app on your Mac, and select the screenshot you wish to crop.
Step 2. In the top right, click on Edit to enter the edit mode.
Step 3. Click Crop in the toolbar at the top, and there you can crop the screenshot based on your liking:
- Drag the rectangle box to select the area you wish to keep in the screenshot.
- Use the aspect ratio in the sidebar to crop the screenshot to specific proportions.
- Click Auto to automatically crop the screenshot.

Step 4. Once finished, click Done to save the cropped screenshot to Photos.
How to Crop a Screenshot on Mac with the Preview App
Another default app on macOS you can leverage to crop your screenshots after saving is Apple Preview. Designed to view and edit images and PDF files, the app enables you to crop your screenshots by dragging.
Follow the steps below to learn how to crop a screenshot on Mac using the Preview app:
Step 1. Find and select the screenshot you wish to crop on your Mac. Double-click on it, and the image will open in the Preview app by default.
Step 2. Drag the cursor over the image to create a selection box, and select the area you wish to keep. If you can't see the selection tools, go to the View tab at the top menu bar and select Show Markup Toolbar.
Step 3. Once you have made your selection, click on Tools at the top menu bar, and select Crop to crop the screenshot. Alternatively, you can use the shortcut Command + K to do the cropping.

Step 4. Once the screenshot is cropped, click File in the top menu bar, and select Save, or use the shortcut Command + S to save the cropped screenshot.
How to Take a Cropped Screenshot on Mac
1. Take a Cropped Screenshot on Mac Using Shortcuts
If you wish to take a cropped screenshot on Mac, the easiest way is using keyboard shortcuts. Here is how:
- To take a screenshot of the entire Mac screen: use Shift + Command + 3, a thumbnail of the screenshot will appear in the corner of your screen, and you can click on it to crop.
- To take a cropped screenshot of a specific area on your Mac screen: press Shift + Command + 4, and this will change your mouse to a cross-hair cursor. You can then select the portion you wish to keep by clicking and dragging.
- To take a screenshot of an active window: Shift + Command + 4 + Space.
2. Take a Cropped Screenshot on Mac Using the Screenshot Tool Bar
Another way to take a cropped screenshot on Mac is using the built-in screenshot toolbar. To do so:
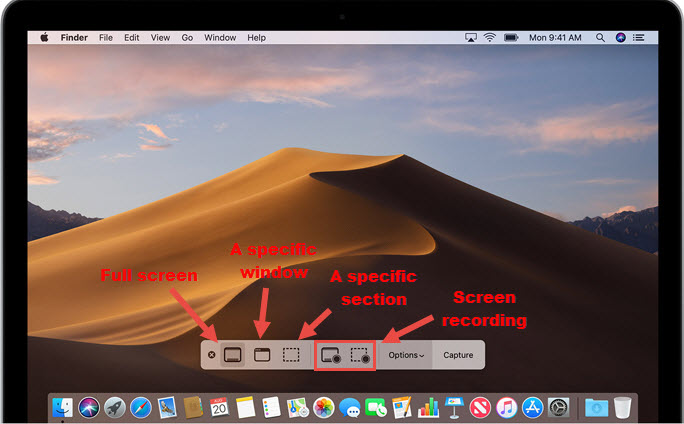
Step 1. On your Mac, press Shift + Command + 5 to open the screenshot toolbar.
Step 2. Once the screenshot toolbar appears, you will see a few screenshot and screen recording options. Respectively, they are:
- Take a screenshot of the entire screen
- Select and capture a specific window.
- Select and capture a custom portion of the screen.
- Record a video of the full or selected portion of your Mac screen.
Choose the desired button based on your needs to screenshot on Mac with crop.
Step 3. Once captured, a thumbnail will appear in the corner, and you can click on it to crop the screenshot.
How to Crop a Screenshot on Mac with VideoProc Vlogger
As one of the best free video editing software, VideoProc Vlogger provides a straightforward and intuitive cropping system that allows users to select the desired area of the image and trim away unwanted portions. Besides, it boasts a comprehensive suite of editing tools, allowing for detailed customization of your screenshots. You can crop, annotate, and embellish your images with text and effects. Besides, you can also fine-tune the image's brightness, contrast, saturation, and hue to enhance its visual appeal.
Step 1. Free download and install VideoProc Vlogger on your Mac computer. Click on the New Project button in the Project window to create a new project.

Step 2. Go to the Media Library, hit the Plus icon, and select the screenshot you wish to crop. You can also use drag and drop to import your screenshot.

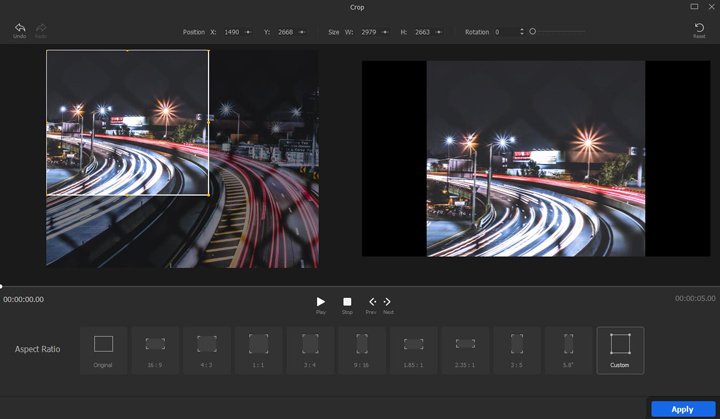
Step 3. Drag the screenshot onto the Timeline, and select it. Then click the Crop tool in the toolbar to enter the Crop window. There you can either use the given aspect ratio to crop the screenshot to a specific proportion or drag the yellow dot in the middle of the four sides of the Crop Frame to crop the screenshot to your desire under the custom mode. You can also move the crop frame to reposition, and adjust the rotation using the rotate slider. Click Apply to apply the action.
Step 4. Once your screenshot is cropped, you can then use the editing tools provided to add text, effects, and more to edit the cropped screenshot.
Step 5. Click Export to export the cropped and edited screenshot to your Mac computer.
Conclusion
In conclusion, cropping a screenshot on Mac is a simple process that can be done using built-in apps, shortcut combos, or other third-party editing software. By following the steps outlined in this blog, you can easily crop your screenshots to remove unwanted elements and focus on the exact area you wish to highlight.


