VideoProc Converter

Best Frame Rate Converter at High Quality

Try It Free
Optimized for 64-bit systems, ensuring optimal performance on graphics drivers newer than the version of Sep.2020.
Learn More
AI Enhancing
  • ON
  • OFF

8 Best Frame Rate Converters for 30/60/120 FPS in 2026

By Joakim Kling | Last Update:
Listed in AI Video Tips

Choosing the right method to change a video's frame rate depends entirely on your objective. Are you solving a technical compatibility issue, or are you trying to change the visual "feel" of the footage? For technical tasks—such as converting Variable Frame Rate (VFR) footage to a Constant Frame Rate (CFR) or matching clips on a 30fps timeline—traditional conversion is the industry standard. This method involves dropping or duplicating existing frames to ensure the video aligns with your project settings without altering the underlying motion.

However, if your goal is to make a 24fps video look "buttery smooth" or to create high-quality slow motion, simply exporting at a higher frame rate isn't enough; that only creates redundant data. Instead, you need frame interpolation. This can be achieved through traditional motion-estimation algorithms (like Optical Flow) or advanced AI models that generate entirely new intermediate frames. To help you navigate these options, we compared a variety of desktop, open-source, and AI-driven tools, covering everything from basic file conforming to high-end motion smoothing.

Best Frame Rate Converter

Best Frame Rate Converters at a Glance

Frame Rate Converter Best For How It Converts FPS AI/Motion Interpolation Platform

VideoProc Converter AI

Best overall

Traditional conversion + AI-generated frames

✔️

Windows, Mac

Topaz Video

Professional AI interpolation

AI-generated intermediate frames

✔️

Windows, Mac

Flowframes

Free AI frame interpolation

RIFE and other interpolation models

✔️

Windows

HandBrake

CFR/VFR conversion and lowering FPS

Frame-rate conforming/resampling

No AI

Windows, Mac, Linux

FFmpeg

Advanced and command-line users

Drop, duplicate, blend, or motion interpolation

Motion interpolation available

Windows, Mac, Linux

SVFI

Anime and advanced interpolation

AI frame interpolation

✔️

Windows

VLC

Occasional basic FPS conversion

Traditional frame-rate conversion

Windows, Mac, Linux

AConvert

Quick online conversion

Traditional conversion

Web

Frame Rate Conversion vs. Frame Interpolation

Understanding how frame rate changes actually work is essential for choosing the right frame rate converter. If you take a 30fps video and convert it to 60fps using a basic converter, the software will likely just double each frame. While the file technicality says "60fps," the motion remains unchanged.

To achieve a different result, you have to choose between several processing methods. For basic tasks like downsampling 60fps to 30fps or stabilizing VFR footage for an edit, frame dropping or duplication is usually the safest bet—it preserves the original frames without adding artificial artifacts.

However, if your goal is to enhance the footage's fluidness, you'll need more sophisticated techniques. Frame blending offers a middle ground by overlapping adjacent frames for a smoother feel, though it can sometimes look blurry. For professional-grade smoothing or slow-motion, the industry standard is interpolation. This ranges from motion-compensated interpolation (often called Optical Flow in editors), which uses vectors to guess movement, to AI-driven models that use neural networks to "draw" entirely new frames.

Ultimately, your choice depends on the "why": use traditional conversion for technical compatibility and workflow efficiency, but look toward interpolation when the visual aesthetic is your top priority.

1. VideoProc Converter AI – Best Overall Frame Rate Converter

Best for: Easy FPS conversion, 30fps-to-60fps interpolation, high-frame-rate video, and batch processing

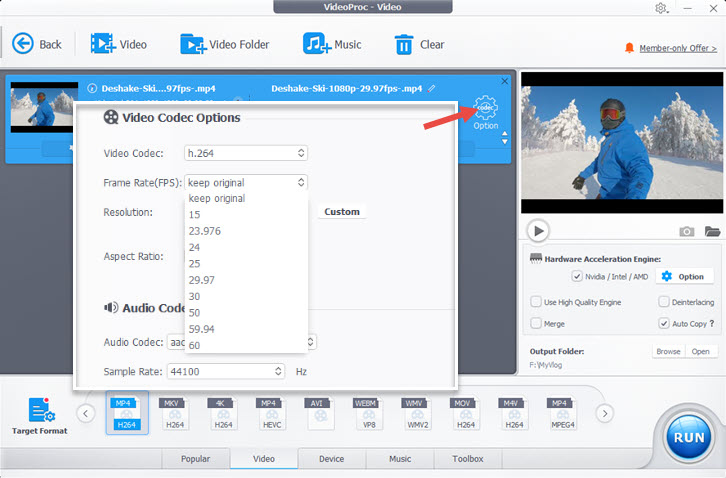
VideoProc Converter AI provides two different ways to change video frame rate: a fast traditional FPS converter and an AI-powered Frame Interpolation tool. This makes it more flexible than converters that only offer one method. The traditional Video Converter module supports commonly used frame rates including 15, 23.976, 24, 25, 29.97, 30, 50, 59.94, and 60fps. It works well when you need to lower the FPS, standardize footage, convert formats, or quickly output a video at another frame rate without heavy AI processing.

For increasing frame rate while actually improving motion smoothness, the Frame Interpolation module can generate new frames between the originals. It supports 2x, 3x, 4x, and 5x interpolation in a single process. For example:

  • 24fps → 48/72/96/120fps
  • 25fps → 50/75/100/125fps
  • 30fps → 60/90/120/150fps
  • 60fps → 120/180/240/300fps

This is particularly useful for low-frame-rate footage, old videos, sports clips, game recordings, animation, and videos intended for smooth slow motion.

How to Change Video Frame Rate Quickly

For people who need to lower their frame rate or standardize VFR footage for editing, you can use the frame rate conversion feature in the Video Converter module to quickly process your files.

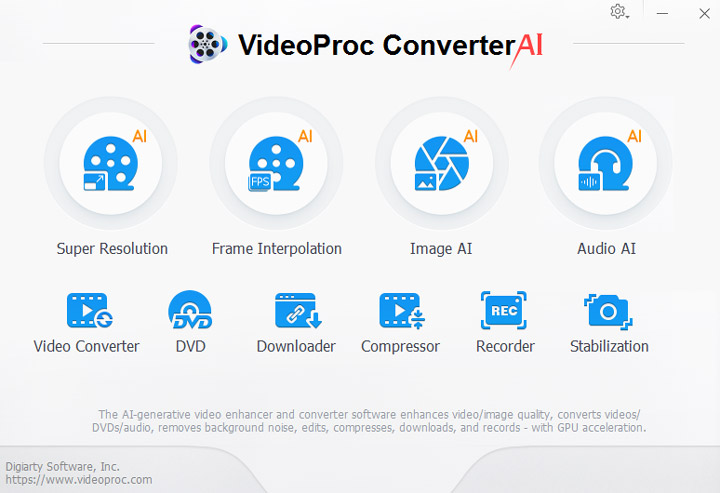
Step 1. Launch this capable frame rate converter and open the Video Converter module.

VideoProc Converter AI Interface

Step 2. Import the video whose frame rate you want to change. Select an output format. If you want to keep the original format, choose the corresponding output profile. For example, for an MP4 H.264 source, you can select an MP4 H.264 profile.

Step 3. Click the gear-shaped Codec Option button. Locate Frame Rate (FPS) and select the desired value. The program displays the source frame rate so you can easily choose an appropriate output FPS. Click Done, choose an output folder, and export the video.

Change Frame Rate with VideoProc Converter AI

How to Convert Frame Rate with AI Frame Interpolation

If you want to increase FPS with even better quality and natural results, use the AI Video Frame Interpolation tool in VideoProc Converter AI. Here are the steps:

Step 1. Go to the Frame Interpolation module from the main UI.

Step 2. Import the video into the working area, and select the multiples: 2x, 3x, 4x, or 5x.
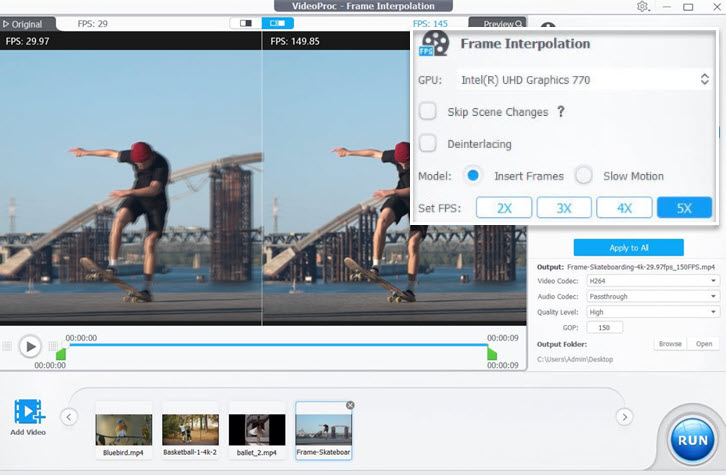
Frame Interpolation - Set Higher FPS

For the no-brainer option, you can leave other parameters to the default value. To fine-tune the parameters, read the official user guide for Video Frame Interpolation tool in VideoProc Converter AI.

Step 3. Choose the output format and click Run to export the video.

Pros

  • Traditional FPS conversion and AI interpolation in one place
  • Easy for beginners
  • Converts both high FPS to low FPS and low FPS to higher FPS
  • 2x–5x AI frame interpolation
  • Supports NVIDIA and AMD hardware acceleration
  • Batch video processing
  • Includes AI-upscaling, stabilization, conversion, compression, and editing tools

Cons

  • It cannot run on your browser

2. Topaz Video – Best Professional AI Frame Rate Converter

Best for: Professional-quality interpolation, restoration, and demanding footage

If image quality is your absolute priority and you have the hardware to back it up, Topaz Video AI is arguably the most powerful frame rate converter available today. Unlike basic tools, its frame interpolation module uses specialized AI models like Apollo and Chronos to synthesize entirely new frames, making it the gold standard for converting 24fps cinema into fluid 60fps.

However, Topaz is a massive investment in both time and money. It carries a steep price tag of $299 for a one-year license, and the system requirements are equally demanding. This isn't a tool for a basic laptop; to get acceptable rendering speeds, you’ll need a high-end workstation with a dedicated GPU (NVIDIA RTX 30/40 series or Apple M-series Silicon) and at least 8GB to 12GB of VRAM. Without a beastly graphics card, the AI-heavy processing can turn a short clip into an overnight render.

How to Change FPS in Topaz Video

Step 1. Launch Topaz Video and drag your source video into the main window. Once the file is loaded, you can check its original resolution and frame rate in the interface before changing any settings.

Step 2. Go to the right side panel and find the Frame Interpolation section. Choose the target frame rate. For example, if your goal is simply to convert regular footage to 120fps, just pick 120fps. This automatically enables Frame Interpolation and uses Chronos Fast by default.

Step 3. Select an AI model according to the type of footage you are processing. For general frame rate conversion, Chronos Fast is a good starting point and is also the default model used by Topaz's 60 FPS preset.

Topaz Video Frame Interpolation

Tips: You can also try other models when necessary. Chronos is designed for general frame interpolation, while Apollo is better suited to more complex or non-linear motion. Apollo Fast can be useful when you want a faster render on longer footage.

Step 4. Move the playhead to a section with fast motion, moving objects, camera pans, fine edges, or overlapping subjects. Then use Render Preview to process a short section before exporting the full video.

Step 5. Open Codec Settings in the upper-right controls panel. Choose the encoder, container, and other output parameters you need. H.264 is the default option and is suitable for many common video exports, while other codecs may be preferable for higher-quality editing or archival workflows.

Step 6. After checking the preview, click Export As if you want to choose a new file name and save location, or use Quick Export to process the video with the current settings and save it to the default output location. Topaz will add the job to the Export Queue, where you can monitor the rendering progress and review the final output after processing is complete.

Pros

  • High-quality AI frame interpolation
  • Multiple models for different motion types
  • Custom output frame rate
  • Built-in 60fps workflows
  • Can combine interpolation with upscaling, restoration, denoising, and deblurring

Cons

  • Resource-intensive
  • More expensive and complex than basic frame rate converters
  • Overkill if you only need to convert 60fps to 30fps

3. Flowframes – Best Free AI Frame Rate Converter

Best for: Windows users looking for AI interpolation without buying a full video enhancement suite

Flowframes is a Windows application designed specifically for video frame interpolation. Rather than simply duplicating frames, it uses AI interpolation models such as RIFE to generate new intermediate frames. Its current version supports 60fps, 120fps, and custom output frame rates and can run locally on compatible NVIDIA, AMD, and Intel GPUs.

This capable frame rate converter is particularly popular among users who want the benefits of RIFE interpolation without running AI models manually from a command line. It also includes practical features such as scene-change detection and frame de-duplication, which are important because interpolation algorithms can otherwise produce strange morphing artifacts across hard cuts.

How to Increase Frame Rate with Flowframes

Step 1. Launch Flowframes and import the video you want to process. After loading the file, check whether the detected source frame rate is correct before changing the interpolation settings.

Step 2. Choose an interpolation model. RIFE is a good starting point for most videos because it offers a practical balance between processing speed and interpolation quality. Flowframes also provides other models and implementations for users who want more control.

Step 3. Set the interpolation factor or target frame rate. For example, select 2x interpolation to convert a 30fps video to 60fps. You can also specify a target FPS when the desired frame rate is not an exact multiple of the source.

Step 4. Enable scene-change detection for videos containing cuts between different shots. This prevents the AI model from trying to generate intermediate frames between two unrelated scenes, which can otherwise cause obvious morphing artifacts.

Step 5. Enable Frame De-Duplication only when necessary. It is particularly useful for anime and other 2D animation containing repeated frames, but it is generally better left disabled for regular camera footage, gameplay, and CG videos.

Step 6. Choose the output format and encoding settings, and make sure the original audio is preserved if needed. You can also adjust GPU and advanced RIFE settings, although the default options are suitable for most users.

Step 7. Start the interpolation. Flowframes will generate new intermediate frames and encode them into the output video. After processing, check fast-motion scenes, scene cuts, thin objects, and overlapping subjects for possible interpolation artifacts.

Flowframes offers much more control than a basic FPS converter, especially for RIFE interpolation, scene-change detection, and animation de-duplication. However, its interface and advanced settings may feel more technical to beginners.

Pros

  • AI frame interpolation
  • Supports RIFE and additional models
  • Custom target FPS
  • Works with NVIDIA, AMD, and compatible Intel GPUs
  • Frame de-duplication and scene-change handling
  • Open-source donationware

Cons

  • Windows only
  • More technical than mainstream video converters
  • Performance varies greatly depending on GPU

4. HandBrake – Best Free Frame Rate Converter

Best for: Free frame-rate normalization, VFR-to-CFR conversion, and reducing high FPS

HandBrake is a free and open-source video transcoder that also works well as a basic frame rate converter. Available on Windows, Mac, and Linux, it is widely used for converting video formats, adjusting encoding settings, and changing the output frame rate without requiring complex editing software.

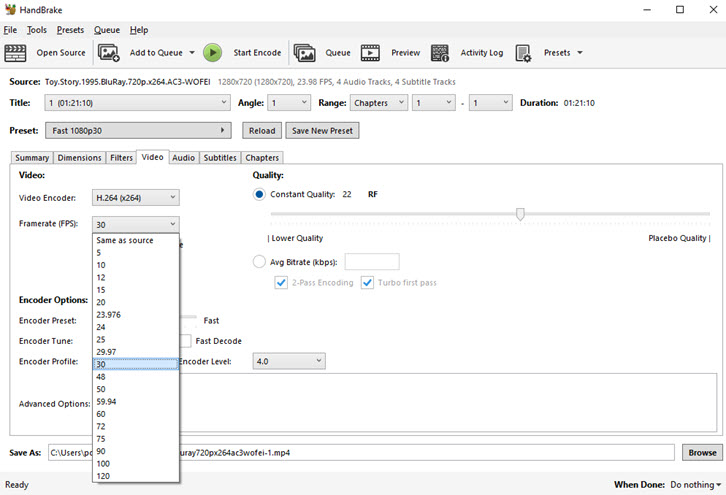
As a frame rate converter, HandBrake gives users control over VFR, CFR, and PFR output, making it particularly suitable for normalizing variable frame rate footage, reducing high-FPS video, or preparing clips for editing and playback compatibility. It supports common frame rates including 23.976, 24, 25, 29.97, 30, 50, 59.94, 60, 100, and 120fps.

However, HandBrake is not designed for AI frame interpolation. While it can output a video at a different FPS, it does not generate motion-aware intermediate frames like dedicated AI frame rate converters. For this reason, HandBrake is better suited to conventional frame rate conversion than to making 24fps or 30fps footage look genuinely smoother at 60fps or higher.

FPS Converter in HandBrake

How to Change Frame Rate in HandBrake

Step 1. Download and launch HandBrake, then import the video you want to process by dragging it into the window or clicking File. HandBrake will scan the source and display its basic video information before you adjust the output settings.

Step 2. Open the Video tab and locate the Framerate (FPS) menu. Select the target frame rate you need, such as 24, 30, 50, or 60fps. For example, you can use HandBrake as a frame rate converter to change 60fps video to 30fps or standardize clips recorded at different frame rates.

Step 3. Choose the appropriate frame-rate mode. Select Same as Source if you want HandBrake to preserve the original frame timing, Constant Framerate when you need a fixed FPS for editing or compatibility, or Peak Framerate when you want to retain variable frame timing while limiting the maximum frame rate.

Step 4. If you need to convert VFR to CFR, select your desired FPS and choose Constant Framerate. This is particularly useful for smartphone videos, screen recordings, and other variable-frame-rate footage that may cause synchronization or editing issues in some video editors.

Step 5. Choose the output format, encoder, quality, and destination folder, then click Start Encode. HandBrake will convert the video using the selected frame rate settings and save the new file to your chosen location.

HandBrake works particularly well for conventional frame rate conversion, such as converting 60fps to 30fps or changing VFR footage to a constant frame rate. However, increasing 24fps or 30fps footage to 60fps in HandBrake does not create motion-aware intermediate frames, so an AI frame rate converter is a better option when smoother motion is the main goal.

Pros

  • Free and open-source frame rate converter
  • Available for Windows, macOS, and Linux
  • Supports VFR, CFR, and Peak Framerate modes
  • Useful for VFR-to-CFR and high-FPS-to-low-FPS conversion
  • Supports batch encoding and extensive video settings

Cons

  • No AI frame interpolation for creating motion-aware intermediate frames
  • Less suitable for making 24fps or 30fps video look genuinely smoother at 60fps or higher

5. FFmpeg – Best Command-Line Frame Rate Converter

Best for: Advanced users, developers, batch processing, and precise frame rate control

FFmpeg is a free and open-source multimedia framework that can also work as a highly flexible frame rate converter on Windows, Mac, and Linux. Unlike most graphical FPS converters, FFmpeg lets you control exactly how the video frame rate is changed through command-line filters, making it especially useful for automation, batch conversion, and custom video workflows.

As a frame rate converter, FFmpeg supports both conventional FPS conversion and motion interpolation. The fps filter can change a video to a specified frame rate by dropping or duplicating frames as needed, which works well for tasks such as converting 60fps to 30fps or standardizing videos to a fixed output FPS.

For users who want smoother high-frame-rate output, FFmpeg also includes the minterpolate filter. It supports frame duplication, frame blending, and motion-compensated interpolation, allowing you to convert low-frame-rate footage such as 24fps or 30fps video to 60fps with newly calculated intermediate frames. However, this motion interpolation is different from neural-network-based AI frame interpolation used by dedicated AI frame rate converters.

How to Change Frame Rate with FFmpeg

Step 1. Go to the official download page of FFmpeg and find the corresponding installer for your specific device.

If you don't know which package is suitable for your computer, read the detailed explanation here which also contains a step-by-step tutorial to install and run FFmpeg.

Step 2. Unzip the file and install it on the system drive folder.
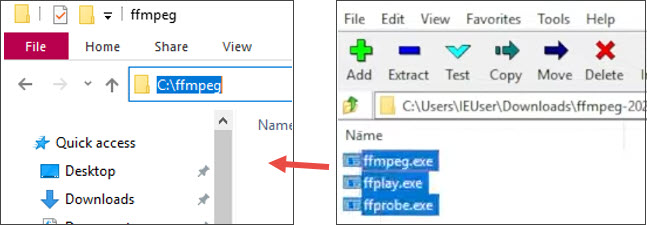
Extract FFmpeg file on Windows

Step 3. Add FFmpeg path to the environment variables in system properties.
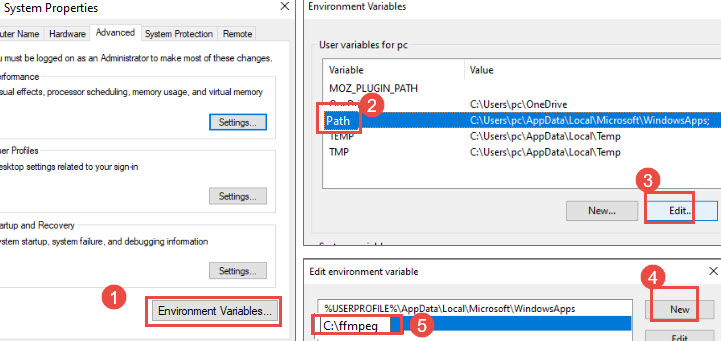
Edit Environment Variables Path

To do so, you need to press the Windows key + S, and type "path" to open up the system properties window, click the Environment Variables button, and hit Path. Copy and paste the path.

Step 4. For a standard FPS conversion, use the fps filter and specify the target frame rate. For example, ffmpeg -i input.mp4 -vf "fps=30" output.mp4 converts the video to 30fps. This method is suitable when you want to reduce frame rate, normalize footage, or create a specific constant output FPS.

Step 5. If you want to increase the video frame rate with motion interpolation, use the minterpolate filter instead. For example, ffmpeg -i input.mp4 -vf "minterpolate=fps=60:mi_mode=mci" output.mp4 converts the source to 60fps using motion-compensated interpolation rather than simply repeating frames. FFmpeg also allows rational frame rates such as 60000/1001 when you need precise values such as 59.94fps.

Step 6. Adjust the interpolation mode if necessary. The minterpolate filter supports dup for frame duplication, blend for blending neighboring frames, and mci for motion-compensated interpolation. For converting 24fps or 30fps footage to smoother 60fps video, mci is generally the more appropriate option among these modes.

Step 7. Run the command and check the converted video after processing. If you use motion interpolation, pay attention to fast movement, scene changes, thin objects, and overlapping subjects, as these areas are more likely to show interpolation artifacts. For batch jobs, the same FFmpeg frame rate converter commands can also be incorporated into scripts to process multiple videos automatically.

Overall, FFmpeg is one of the most versatile free frame rate converters for users who are comfortable with command-line tools. It can handle simple FPS changes, precise frame-rate values, and motion-interpolated conversion without imposing an arbitrary 60fps or 120fps ceiling, but it requires considerably more setup and technical knowledge than a graphical video converter.

Pros

  • Free and open-source frame rate converter
  • Available on Windows, Mac, and Linux
  • Supports standard FPS conversion and motion interpolation
  • Precise control over target frame rate and conversion method
  • Excellent for batch processing, scripts, and automated workflows
  • No fixed 60fps or 120fps output limit imposed by the tool itself

Cons

  • Command-line interface has a steeper learning curve
  • Motion interpolation can be slow on high-resolution or long videos
  • No neural-network-based AI frame interpolation built into the standard workflow
  • Less convenient than one-click frame rate converters for beginners

6. SVFI – Best AI Frame Rate Converter for Anime

Best for: Anime, animation, high-FPS conversion, and advanced AI frame interpolation

SVFI, short for Squirrel Video Frame Interpolation, is a dedicated AI frame rate converter designed to turn low-frame-rate videos into smoother high-FPS footage. Available on Windows through Steam, it uses frame interpolation models to generate new intermediate frames rather than simply duplicating existing ones.

Compared with a conventional FPS converter, SVFI gives users much more control over frame interpolation. You can increase video frame rate by selecting an interpolation ratio or directly entering a custom Output FPS such as 60fps or 120fps. This makes it particularly useful for anime, animation, game footage, and users who want more control over AI interpolation quality and GPU processing.

SVFI also supports MP4, MKV, and MOV output and can preserve the original audio and subtitles. Its advanced options make it more flexible than a basic frame rate converter, although the interface and GPU requirements may feel more technical to beginners.

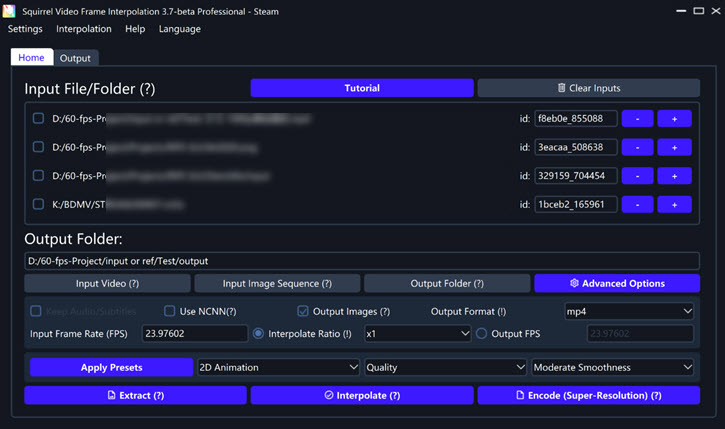
SVFI Squirrel Frame Rate Converter

How to Change Video Frame Rate in SVFI

Step 1. Visit the official SVFI page on Steam. If Steam is not installed on your Windows computer yet, download and install the Steam client first.

Step 2. Sign in to your Steam account, add SVFI to your library, and install the frame rate converter on your computer. Once the installation is complete, launch SVFI directly from your Steam Library.

Step 3. In the SVFI main interface, click Input Video File to add the video whose frame rate you want to change. You can also drag the source video directly into the program. SVFI will automatically detect and display the original video FPS.

Step 4. Set the output folder and choose an output format such as MP4, MKV, or MOV. MP4 provides the widest compatibility, while MKV is useful when you need to preserve more audio or subtitle tracks.

Step 5. Set the target frame rate using Interpolate Ratio or Output FPS. For example, if the source video is 30fps and you want to convert it to 60fps, select a 2x Interpolate Ratio. You can also enter 60, 120, or another custom value directly in the Output FPS field.

Step 6. Check whether you want to preserve the original audio and subtitles, then review the interpolation settings. For most users, the default settings are sufficient for basic AI frame rate conversion.

Step 7. Click Interpolate to start changing the video frame rate. SVFI will generate intermediate frames and create a new high-frame-rate video using the selected output FPS.

SVFI is one of the more capable AI frame rate converters for anime and advanced interpolation workflows, especially when converting 24fps or 30fps footage to 60fps, 120fps, or a custom FPS. However, its extensive settings make it less beginner-friendly than a general-purpose video converter.

Pros

  • Dedicated AI frame rate converter
  • Supports custom 60fps, 120fps, and other output frame rates
  • Advanced interpolation model and quality controls
  • Well suited to anime and animation
  • Can preserve audio and subtitles

Cons

  • Primarily designed for Windows
  • More complicated than basic FPS converters
  • AI frame interpolation can require significant GPU resources

7. VLC – Best Basic Free Frame Rate Converter

Best for: Simple FPS changes with a free media player

VLC Media Player is primarily known as a free video player, but its transcoding features also allow it to work as a basic frame rate converter on Windows, Mac, and Linux. Users can re-encode a video while specifying a different output FPS, making VLC useful for occasional frame rate conversion without installing another application.

VLC is best suited to conventional FPS changes rather than motion enhancement. It can change the output frame rate during transcoding, but it does not use AI frame interpolation to generate realistic intermediate frames. Therefore, it makes more sense for basic frame rate adjustment than for turning 24fps or 30fps footage into genuinely smoother 60fps video.

One advantage is convenience: if VLC is already installed, you can check a video's original codec and other information under Tools > Codec Information and then use Convert/Save to create a new version with different encoding settings.

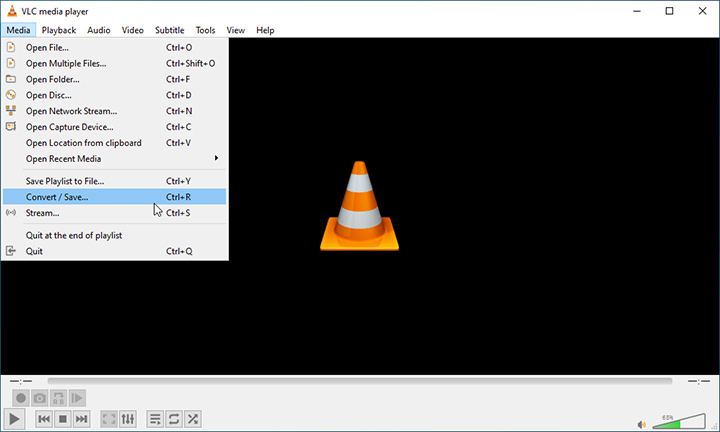
Convert and Save Option in VLC

How to Change Video Frame Rate in VLC

Step 1. Launch VLC and go to Media > Convert/Save. Click Add to import the video you want to process, then click Convert/Save again to open the conversion settings.

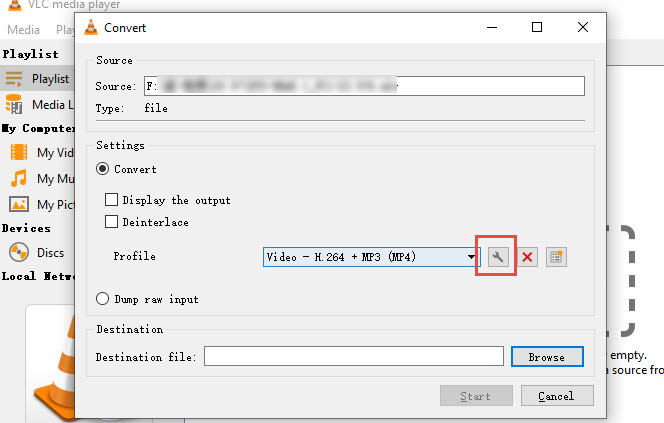
Step 2. Choose an output profile that matches the video format and codec you want to use. Click the profile-editing button if you need to customize the video codec, bitrate, resolution, or frame rate instead of using the default profile settings.

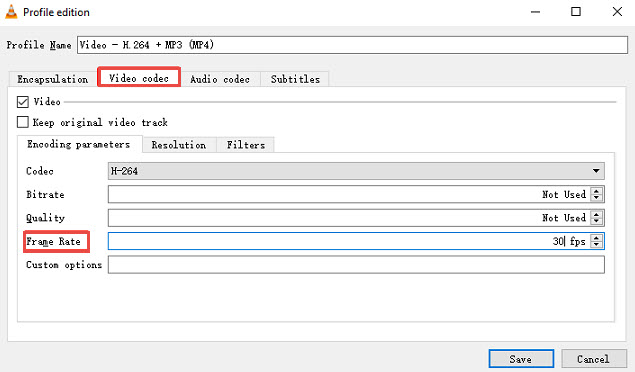
Step 3. Open the Video Codec settings and specify the desired output FPS. VLC's transcoding system supports setting a frame rate during video encoding, allowing you to create an output such as 24fps, 30fps, or another target frame rate.

Edit Selected Profile in VLC

Step 4. Choose the destination file name and output location. Check the selected format and codec before starting, since VLC is re-encoding the video rather than simply changing its frame-rate metadata.

Step 5. Click Start to begin the frame rate conversion. Once the new file is created, play it in VLC and open Codec Information again if you want to verify the output video properties.

VLC is a convenient free frame rate converter for occasional FPS changes, but it lacks dedicated interpolation controls and AI-generated frames. For high-quality 30fps-to-60fps conversion, an AI frame rate converter is usually a better choice.

Pros

  • Free and open source
  • Available on Windows, Mac, and Linux
  • Can change FPS while transcoding video
  • Convenient if VLC is already installed

Cons

  • Not designed specifically as a frame rate converter
  • No AI frame interpolation
  • Limited control compared with dedicated FPS converters

8. AConvert – Best Online Frame Rate Converter for Small Videos

Best for: Quick online FPS conversion without installing software

AConvert is a browser-based video converter that can also work as a simple online frame rate converter. It lets users change video frame rate together with the output format, resolution, bitrate, aspect ratio, and audio settings directly from a web browser.

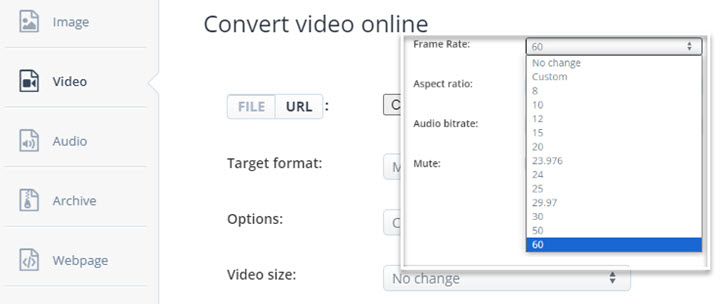
The Frame Rate option includes preset values as well as a Custom field, so you can specify the target FPS when converting a video. AConvert accepts local files and online video URLs, making it convenient when you only need a quick FPS conversion and do not want to install desktop software. The current online converter accepts source files up to 200MB.

However, AConvert is a traditional online FPS converter rather than an AI frame interpolation tool. Increasing a low-FPS video to a higher output frame rate does not provide the same motion-aware intermediate frames generated by dedicated AI frame rate converters.

Aconvert

How to Change Video Frame Rate Online with AConvert

Step 1. Open AConvert's online video converter and click Choose Files to upload the source video. You can also select URL if the video is available online. Keep in mind that uploaded video or audio files can currently be up to 200MB.

Step 2. Select the target video format, such as MP4, MOV, MKV, WebM, or another supported format. If you only want to change the frame rate, choose an output format that is the same as or compatible with the source video.

Step 3. Find the Frame Rate option and choose a preset FPS or select Custom to enter the frame rate you want. You can also change video size, bitrate, aspect ratio, and audio settings during the same conversion.

Frame rate changer in Aconvert

Step 4. Review the conversion settings and start processing the video. Since AConvert works online, the total processing time also depends on the size of the source file, your upload speed, and server availability.

Step 5. After the conversion is complete, check the result in the Conversion Results section and save the converted video to your device.

AConvert is a useful online frame rate converter for small files and occasional FPS changes, especially when software installation is not an option. For large, private, or high-resolution videos, however, a desktop frame rate converter is generally faster and avoids the need to upload the source file.

Pros

  • Online frame rate converter with no installation
  • Supports custom frame rate settings
  • Can adjust format, resolution, bitrate, and FPS together
  • Works directly in a web browser

Cons

  • 200MB source file limit
  • No AI frame interpolation
  • Less practical for large or high-resolution videos
  • Requires uploading the source video

Which Frame Rate Converter Should You Choose

The right frame rate converter depends mainly on whether you want to simply change the output FPS or actually make motion smoother. For basic frame rate conversion, such as changing 60fps or 120fps footage to 30fps, converting VFR to CFR, or standardizing clips for editing, tools like HandBrake, FFmpeg, VLC, and VideoProc Converter AI are usually sufficient.

If you want to increase a 24fps or 30fps video to 60fps or 120fps and make the motion look noticeably smoother, choose a frame rate converter with frame interpolation. VideoProc Converter AI is the easiest all-in-one option, while Topaz Video is better suited to more advanced AI processing. Flowframes and SVFI offer more control over interpolation models, and FFmpeg is a good choice for users who prefer command-line processing.

For slow-motion video, AI frame interpolation is also preferable because it creates additional intermediate frames before the footage is slowed down. If your only goal is compatibility, FPS reduction, or VFR-to-CFR conversion, however, AI processing is usually unnecessary.

Which Frame Rate Converter Should You Use

FAQs About Frame Rate Conversion

1. Does increasing FPS improve video quality?

Not automatically. If a converter simply duplicates frames, a 30fps video exported at 60fps will contain more frames per second but not necessarily more motion information.

AI or motion interpolation can create new intermediate frames and make motion appear smoother, but it cannot perfectly reconstruct information that was never captured. Challenging motion may still create visual artifacts.

2. Can I convert 30fps to 60fps?

Yes. Almost any video converter can technically output a 30fps source as a 60fps file. But if you want the result to look smoother, use frame interpolation rather than simple frame duplication.

For example, VideoProc Converter AI, Topaz Video, Flowframes, and SVFI generate intermediate frames, while FFmpeg can perform motion-compensated interpolation through minterpolate.

3. Can HandBrake increase video FPS?

HandBrake can conform an output video to a selected constant frame rate, including rates higher than the source rate. However, it does not use an AI frame interpolation model to synthesize realistic intermediate motion. Therefore, it is better suited to CFR/VFR management, compatibility, transcoding, and frame-rate reduction than to visually enhancing a low-frame-rate video.

4. Can FFmpeg interpolate frames?

Yes. In addition to its regular fps filter, FFmpeg includes minterpolate, which supports duplicated frames, blended frames, and motion-compensated interpolation.

5. Is 60fps always better than 30fps?

No. 60fps generally provides smoother motion, which can be useful for sports, gameplay, action footage, and certain slow-motion workflows. However, 24fps, 25fps, and 30fps remain appropriate for many types of video. Higher FPS also increases the number of frames that must be encoded, processed, stored, and delivered. The best frame rate depends on the source material and intended viewing experience.

6. What is the difference between CFR and VFR?

CFR, or Constant Frame Rate, keeps one fixed frame rate throughout the entire video. VFR, or Variable Frame Rate, allows frame timing to vary during playback. VFR can improve recording or compression efficiency, but certain editing workflows work more reliably with CFR. HandBrake provides specific VFR, CFR, and Peak Frame Rate controls for this purpose.

Final Thoughts

There is no single best frame rate converter for every situation.

If you only need to reduce FPS or standardize frame timing, a traditional converter such as HandBrake or FFmpeg may be all you need.

If you want to increase the FPS and make motion genuinely smoother, choose a tool that supports frame interpolation.

For users who want both workflows in one application, VideoProc Converter AI is the most balanced choice because it includes a traditional frame rate converter for quick conversions and an AI Frame Interpolation module for generating smoother high-FPS footage.

For professional AI processing, Topaz Video offers more specialized interpolation models. Flowframes is an attractive option for Windows users who want a dedicated AI interpolation tool, while FFmpeg gives advanced users the greatest command-line control.

Ultimately, the key is not simply choosing the converter with the highest FPS number. The more important question is how the software creates those additional frames.

About The Author

Joakim Kling Twitter

Joakim Kling is the associate editor at Digiarty VideoProc, where he delves into the world of AI with a passion for exploring its potential to revolutionize productivity. Blogger by day and sref code hunter at night, Joakim spends 7 hours daily experimenting with the latest AI generators and LLMs.

Home > Media Converter > Best Frame Rate Converters

Digiarty Software, established in 2006, pioneers multimedia innovation with AI-powered and GPU-accelerated solutions. With the mission to "Art Up Your Digital Life", Digiarty provides AI video/image enhancement, editing, conversion, and more solutions. VideoProc under Digiarty has attracted 5.2 million users from 180+ countries.

Any third-party product names and trademarks used on this website, including but not limited to Apple, are property of their respective owners.

X