
PowerPoint is great to give a presentation, whether for school or work. And it's a good idea to make your PPT available in the form of a video afterward once you deliver your presentation.
Sometimes PowerPoint can be difficult to share when the recipient doesn't have the software installed. While on the contrary, converting PowerPoint to video will make it possible to view on any device and help maintain your presentation in its entirety. In addition, the video format can help reach a wider audience when uploading to video platforms such as YouTube.
So keep reading our guide on how to convert PowerPoint to MP4 with audio for free in 2024.

Convert PowerPoint to MP4 in Office 2010 and Later
Due to the different software versions, there will be slight differences in specific steps. However, the location of the main functions has not changed much. Turning PowerPoint into video is a built-in feature in PowerPoint 2010 and later versions. Here are the steps for how to convert PowerPoint 2010 to MP4 video.
Step 1. Save all needed content in your PowerPoint.
Open the PowerPoint presentation file that needs to convert. Make sure to save all your recent work by clicking the Save button in the upper left corner.
Step 2. Go to the built-in Create a video function.
- PowerPoint 2010: File Menu > Save & Send > Create a video;
- PowerPoint 2013 and later: File Menu > Export > Create a Video.
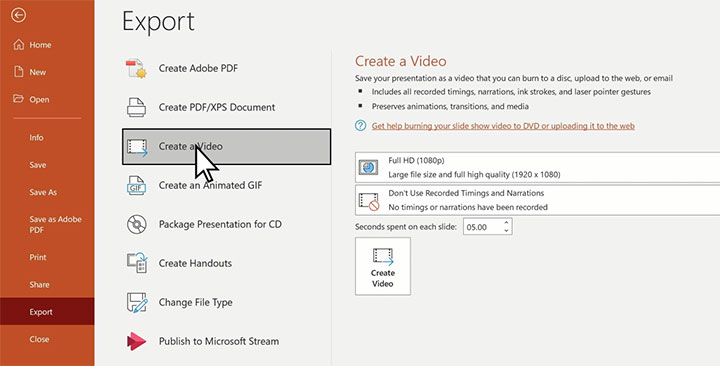
Step 3. Customize the output video quality.
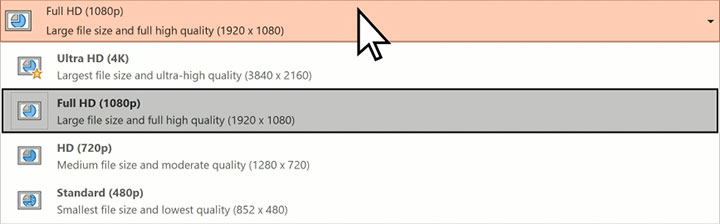
Click and expand the first drop-down list to select the video quality. Video quality is related to the resolution of the exported video. Higher resolution means better video quality, and a larger file size too.
PowerPoint 2010 supports exporting with a maximum resolution of 1280x720, while the maximum resolution supported by PowerPoint 2013 is 1920x1080. PowerPoint 2016 - 2019 and Office 365 support Ultra HD (4K) video under Windows 10/11.
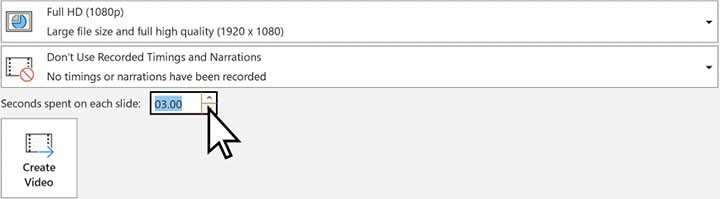
Step 4. Set narration and timings.
Click and expand the second drop-down list. Here you can choose whether to use Recorded Timings and Narrations.
- Don't Use Record Timings and Narrations: The duration of each slide within the video will use the duration you specify in the Seconds spent on each slide box (5 seconds by default). No narration will be used in the video.
- Use Recorded Timings and Narrations: This will ensure the output video with audio that uses recorded and timed narration and pointer movements. Slides without timing settings will use the default time.
Step 5. Click Create Video.
Click the Create Video button. Set the file name and save path in the pop-up window, and then press Save to start converting PPT to video with sound and animations. The conversion process depends on the length of the video and the complexity of the presentation. You can see it in the status bar.
Convert PowerPoint 2007 to MP4
PowerPoint 2007 and earlier versions don't support exporting presentations as MP4 directly. But PowerPoint makes it easy to export image files of each individual slide. So you can easily make a PowerPoint presentation a video using these image files with a free PPT to MP4 converter.
VideoProc Vlogger - PPT to MP4 Converter Free Download with No Watermark
- Free PPT movie maker with no watermark.
- Able to convert PPT to MP4 with audio.
- Convert powerpoint to MP4, MKV, and other video formats.
- Capable of adding transitions and animations to PowerPoint.
- Compatible with both Windows and macOS.

Step 1. Save PowerPoint as image files.
Open PowerPoint, go to File Menu (Office button for some versions) > Save As. Choose JPEG File Interchange Format (*.jpg) in the Save as type drop-down list. Click Save and choose to export Every Slide in the next pop-up window. Then select OK. In this way, you'll get a folder containing all the slides in your presentation where you specified.

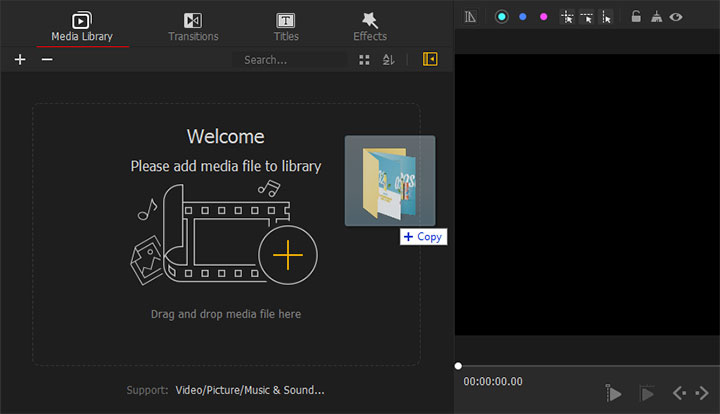
Step 2. Import the slides to VideoProc Vlogger.
Launch VideoProc Vlogger and drag the folder with all your slides to its interface. Then drag and drop them to the Video Track in the Timeline.
Step 3. Reorganize and adjust the duration of each slide.
Arrange each slide on the Timeline in the order of appearance by dragging. In VideoProc Vlogger, the duration of each slide is set to 5 seconds by default. But you can use the following three methods to adjust the duration according to your needs. Make sure to give enough time for the audience based on the content of each slide.
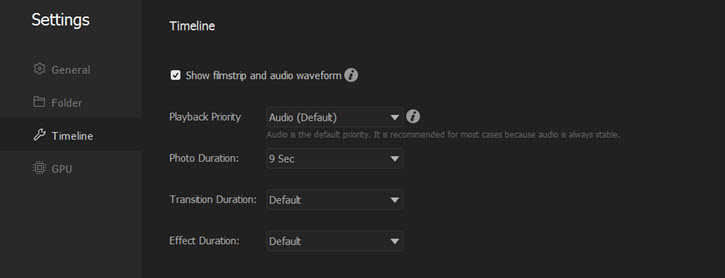
Method 1. Go to VideoProc Menu > Settings > Timeline > Photo Duration. Here you can choose from 1 to 10 seconds in the drop-down list or select Custom and enter the duration you need. This will make each slide appear for a uniform amount of time unless you set individual timings.
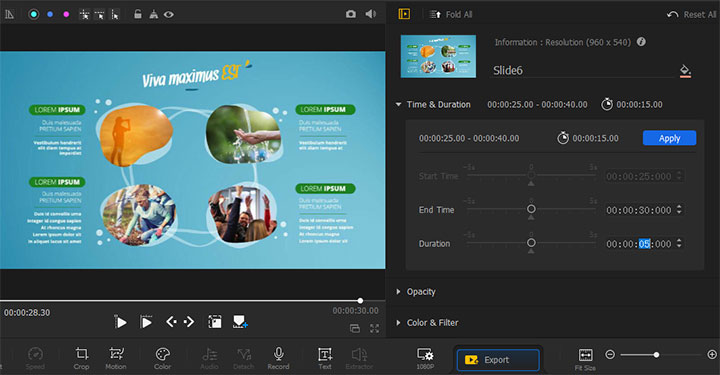
Method 2. Select a slide and head to the Time & Duration tab in the Inspector on the right side of the Preview Window. Enter the value in the box next to the Duration option. In this way, you can set the duration of each slide individually.
Method 3. Hover your mouse over the rightmost edge of one slide in the Timeline until the cursor turns to a double-headed arrow. Drag it to the right to extend the duration, and vice versa to shorten. Do the same to other slides, so that you can easily customize the duration individually.

Step 4. Add transitions and animations to the video.
You'll have to add transitions and animations all over again since none of them are saved when you export the PowerPoint as JPEG files.
Click the Transitions Panel in the top left corner. Pick one you like and drag it to the space between two slides in the Timeline. Then you can edit the effects of the transition in the Inspector Panel.
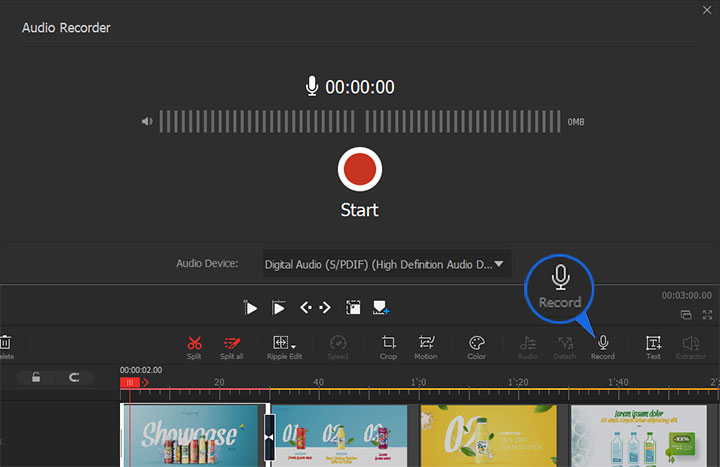
Step 5. Voice over your PowerPoint.
Narration helps a lot for the audience to understand your presentation. VideoProc Vlogger helps narrate your PowerPoint more conveniently.
Move the red Playhead to where you want to start the narration and click the Record button in the Toolbar. Select the Audio Device and hit Start to voice over your PowerPoint.
Step 6. Export the slides as MP4.
Once you finish the edits, click the Export button in the Toolbar and choose MP4 as output format in the pop-up window. Be sure to tick the option of Enable hardware acceleration for encoding in Export Settings. This will make the conversion process even faster.

Convert PowerPoint to MP4 on Mac
If you are using PowerPoint for Microsoft 365, PowerPoint 2021, 2019, and 2011 for Mac, you can easily save your presentation as MP4 within PowerPoint. The basic steps are similar to those of the Windows version.
- PowerPoint 2011 for Mac: File menu > Save as Movie.
- Office 365 and PowerPoint 2019 for Mac: File > Export. Choose MP4 in the File Format list.
For PowerPoint versions that don't support saving in video format, PowerPoint 2016 for Mac, for example, you can save your presentation as image files, then use VideoProc Vlogger to make a slideshow. Refer to the steps above of converting PowerPoint 2007 and earlier to MP4.
Note:
Some PowerPoint versions for Mac cannot support converting your presentation to MP4 very well. For example, transitions may play differently in MP4 than they do in PowerPoint, and animation effects don't play in a movie at all. In PowerPoint for Mac 2011, narration won't be saved when you convert PowerPoint to MP4.
Convert PPT to MP4 Online
If the PowerPoint version you are using does not support saving as MP4, and you don't want to download any software, online PPT converters are also a good choice.
There are some common shortcomings for online PPT to video converters. For example, there are limitations on the file size you upload, and you can't set parameters such as duration of each slide, transition effects, etc. For files that exceed the limit, you may have to buy a plan. The conversion process depends on your network environment and may fail due to unknown reasons.
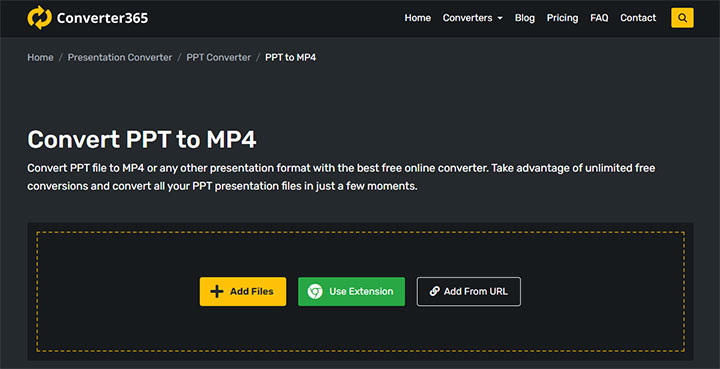
However, they are very easy to use and no software download is required. Follow the steps below to convert PPT to MP4 online with Converter365.
Step 1. Head to Converter365 in your browser.
Step 2. Click Add Files to load your PowerPoint presentation.
Step 3. Hit the Start conversion button to start uploading and converting.
Step 4. Download your converted MP4 presentation files.
Sum Up
If you are using a newer version of PowerPoint, you can save the presentation as MP4 within the PowerPoint by following the above steps.
If the Office version you are using does not support saving as MP4, VideoProc Vlogger could be your best choice to convert PowerPoint to MP4 with audio for free.


