In-page Navigation
Speed Ramp in VideoProc Vlogger
Manipulating the speed of different segments of your video is helpful to focus your audiences on something specifics, creating tension and suspense and making your video look more cinematic. The effortless way to achieve this goal is to create variable speed changes via the speed ramping tool of VideoProc Vlogger. In this lesson, you are going to learn all the essentials of the variable speed changes.
Free download VideoProc Vlogger to edit videos and add smooth speed ramps to your storytelling.
Watch video tutorial on how to do speed ramping with VideoProc Vlogger, or read text instructions below.
What Is Variable Speed Change
Changing the speed of some scenes in one clip dynamically during the playback is called a variable speed change. For example, a clip starts in fast motion, gradually slows down to regular speed, and then progressively speeds up to the regular speed again. If you are a professional video editor, then no doubt you've used the variable speed change effect or at least heard about it before. Beginners? A lot of action films use variable speed changes Thus, you've definitely seen it somewhere before even though you might not have recognized it.
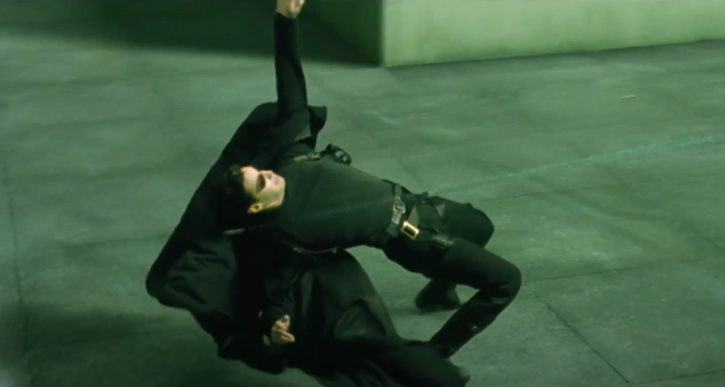
A very famous example of this is when in 'Matrix': Neo dodges bullets in slow motion. The induvial movements of Neo flailing and leaning back as well as the bullet trajectory are all visible to audiences. You can also find the application of the variable speed changes in travel vlogs, skateboard tutorials, highlight reels, commercial ads, and social media videos for amplifying the particular mood and tone of the video.
 Variable Speed Change VS Constant Speed Change
Both the variable speed change and constant speed change effects allow you to alter the speed of different segments in one clip, by different amounts. But, the process and outcome are different.
• Make a variable speed change: Apply the speed ramping tool to ramp down a video from normal to slow motion, or the opposite ramp up a video from slow motion to normal or even faster. The speed of a clip changes over time and the transition between different speed segments is smooth and neatly.
• Make a constant speed change: Cut the clip into multiple segments and then speed up or slow down each segment. You can increase the video speed to 72x or faster, or decrease the speed to 1/72x or slower. The major drawback of this method is the speed changes happen instantaneously which might result in a jarring and destructive viewing experience.
Speed Ramping Tool in VideoProc Vlogger
VideoProc Vlogger lets you ramp the speed via the Bezier curve (both linear and quadratic Bezier curves are supported), making the variable speed adjustments in your video looked more natural and professional.
• VideoProc Vlogger simplifies the speed ramping process greatly by offering 14 Bezier presets and removing the unnecessary configure options that might slow you down or tangle you into knots.
Beginners can create epic sport b-roll videos, quick but in-depth kickflip tutorials, or any thumb-stopping content for social media within a simple click. Experienced users can alter the curvature, position, or the duration of the ramp, or create new ramp effects without hassles.
 Note
NoteA handful of industry-level video editing software also offers the speed-revamping tool, but the majorities only let you add time revamping manually and in a complicated manner. With them, one has to add keyframes for the speed ramping, adjust the speed for each segment, select the keyframes and then manipulate the Bezier curve to smooth the speed change…
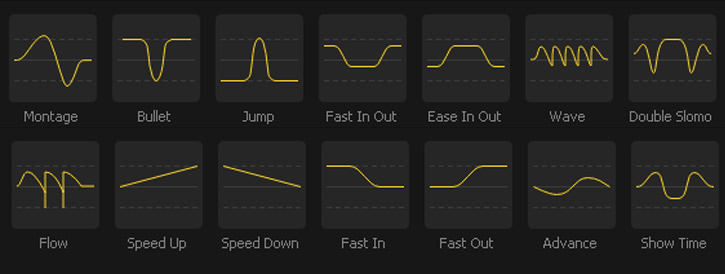
14 Bezier Curve Presets
After importing the source clips to Timeline, hit Speed. You'll find 14 Bezier curve presets on the pop-up Speed Editor window. Select one among them. VideoProc Vlogger will then detect the scenes in the video clips and automatically apply the chosen Bezier curve to create the wanted speed ramp effect.
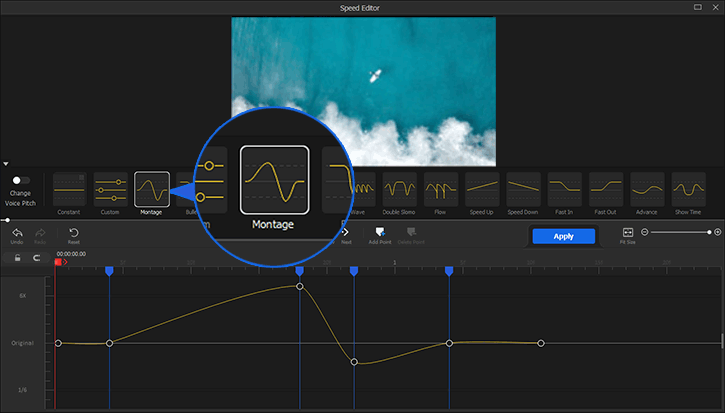
1. Montage
Slowly increase the video speed until it's 5.5 times faster than the original, then quickly slow down the video until the speed reaches 1/3 times of the original, then again slowly fast up the video until the speed return to normal.
Use the Montage curve to make videos with lots of motions, such as festival videos and dance party recording, looked cinematic.
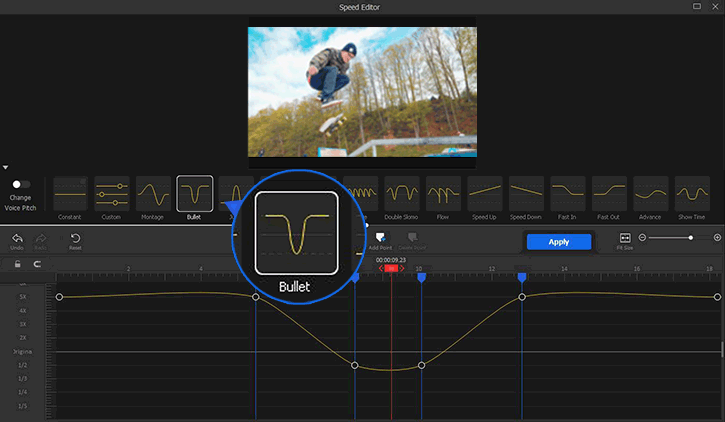
2. Bullet
Slow down the scenes that show the highlights of the video and make the rest scenes 4 times faster than the original.
Use the Bullet curve to make the details of some quick movements, such as the moment Ben Simmons is scoring the layup, snow is falling to oak leaves, a bullet is going through a wall, and a skater is forcing the board bounces up, are visible for the audiences. So they don't miss the point.
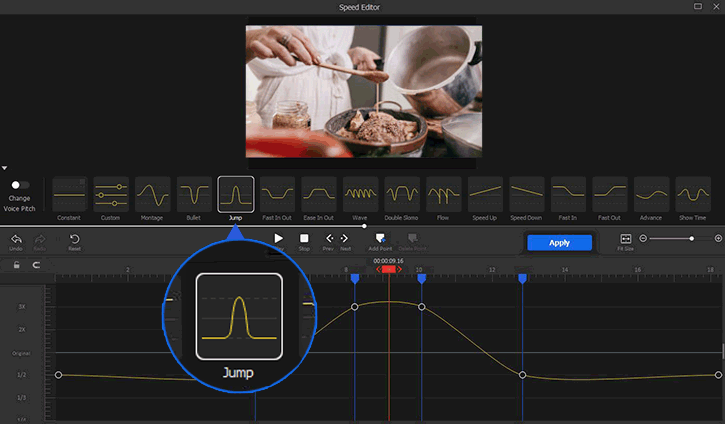
3. Jump
Speed down the key moments a little bit and speed up the rest.
Use the Jump curve to speed up some necessary but verbose motions, such as the complete process of unboxing in a review video and cutting up the lettuce in a cooking tutorial, so the audiences can get engaged even a video comes with plenty of repetitive moments.
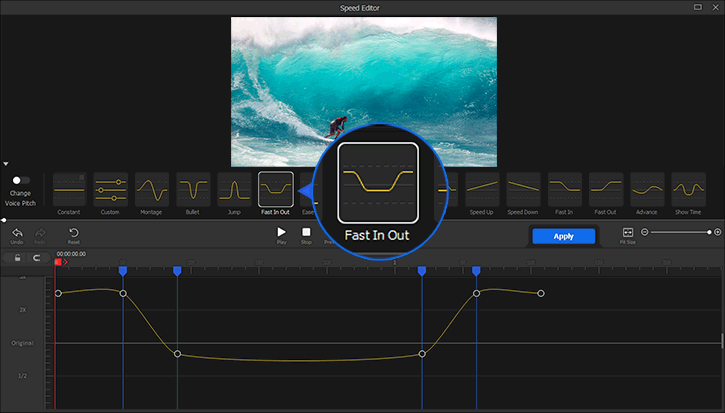
4. Fast In Out
Speed up the intro and outro segments of the video and slightly slow down the middle part.
Use the Fast In Out curve in travel vlogs, product promotional videos, or any other sort of videos that require a fast and seamless transition between two different scenes.
5. Ease In Out
Speed down the intro and outro segments of the video and slightly speed up the middle part.
Use the Ease In Out curve in drone footages, music party mixes, casual iPhone recordings, or other videos that contain two different scenes recorded by similar angles.

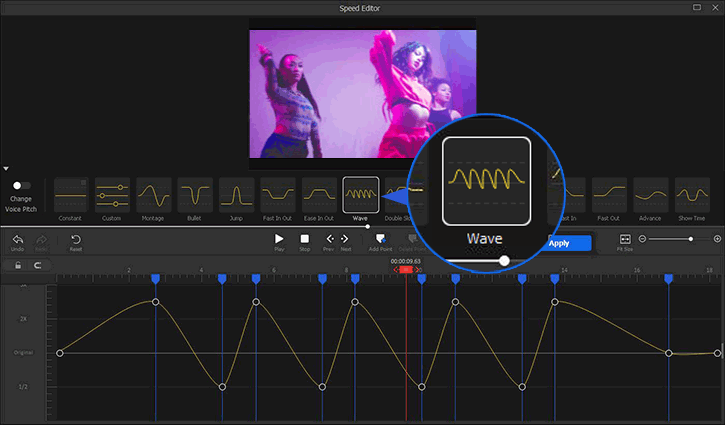
6. Wave
Slow down the highlight moments while speeding up the rest.
Use the Wave curve to draw attention from audiences to a few specific parts of a TikTok dance, a travel vlog, a festival recap, a GoPro scuba diving recording, an NBA highlight reels, or anything others, to create tension or conflict. You are also recommended to use the wave curve to make TikTok dance memes in the style of "Aaron smith-Dancing" or "the less I know the better & sexy back", matching your movements with the BMP of the song while still keeping the continuity.
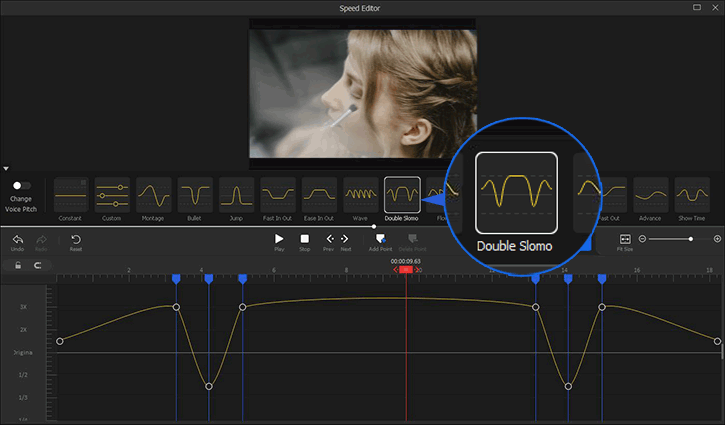
7. Double Slomo
Slow down the two highlight moments and speed up the rest.
Use the Double Slomo effect in instruction videos about dancing, running, making up, game walkthrough and DIY crafts, etc. By slowing down the important actions and fasting up the things that the audiences don't necessarily get close to, you can make the videos clear and concise.
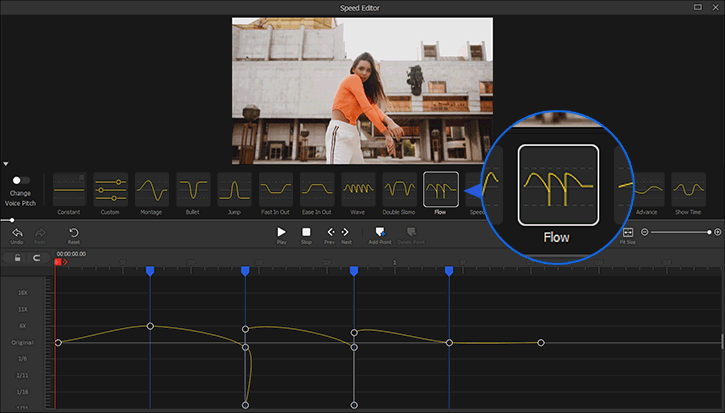
8. Flow
The video speed ramps up to 6 times the original value. After that, the speed slowly decreases and the video playback speed turns to slow-motion from fast motion. When the speed is reduced to 1/2.5 times the original, the video suddenly changes to fast motion, and then gradually speeds down again. The Flow curve applies a similar speed change effect to emphasize the other two key moments in your video.
Use the Flow effect and a few other effects like overlay, rotate, shake, and fade to polish your dance videos that come with catchy or upbeat background music, such as indie rock, electronica, and hip-hop song, can make you appear more sexy and attractive.
9. Speed Up
Slowly increase the video speed until it's 4 times faster than the original.
Use the Speed Up curve to seamlessly combine two or more clips that come with similar motions throughout.
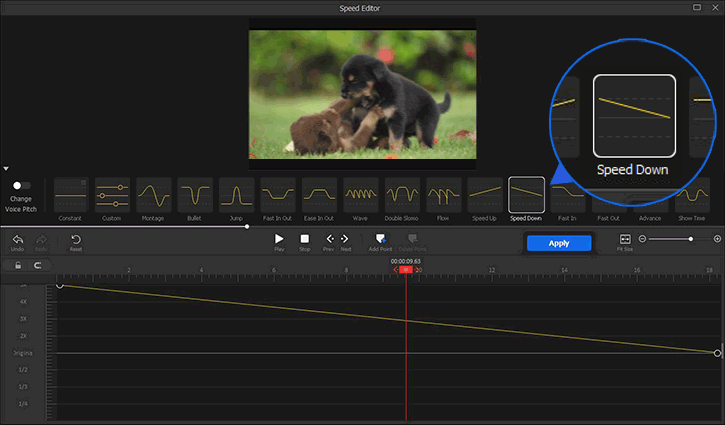
10. Speed Down
Slow down the video speed from fast motion to normal.
Use the Slow Down curve to spice the daily recordings, such as Oreo falling to milk, crowd walking across the street, wind moving the branches and leaves, and little puppies playing with each other.
11. Fast In
Speed up the video at first and then ramp the video speed down from fast motion to original.
Use the Fast In curve to fast navigate the audience to the latter half of the video.
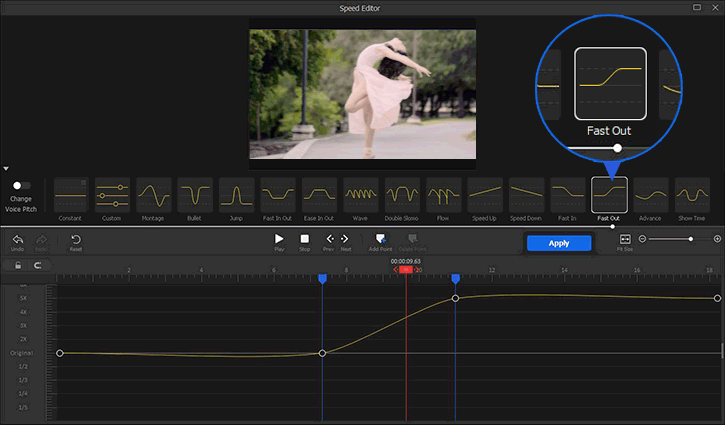
12. Fast Out
Slowly speed up the middle part of the video to 4 times faster than the original. The latter half of the video will play at this speed rate.
Use the Fast Out curve in videos that you wish to add the fast forward effect. For example, a woman is jogging in the park and the pirouette in a ballet performance.
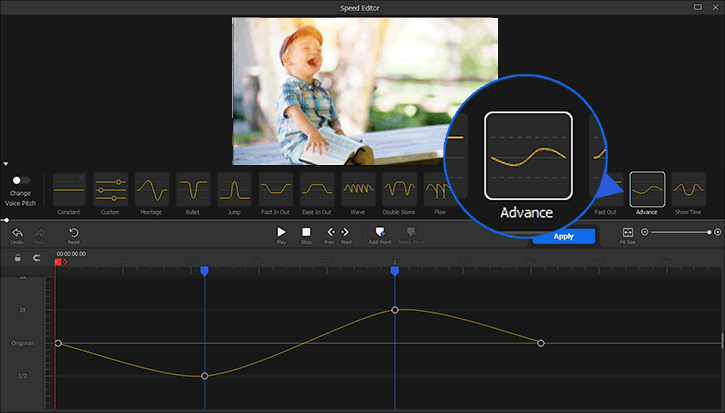
13. Advance
Slowly decrease the video speed until it's half of the original, progressively increase the speed to 2 times the original, and then ramp it down. When the video reaches the end, the speed rate returns to the original.
Use the Advance curve in a video can help you nicely flow one scene or one object and another together. You can also use the Advance curve in the footage recorded or edited with camera movement effects ( zoom, pan, tilt, or other) to make a scene perfectly follow your internal rhythm.
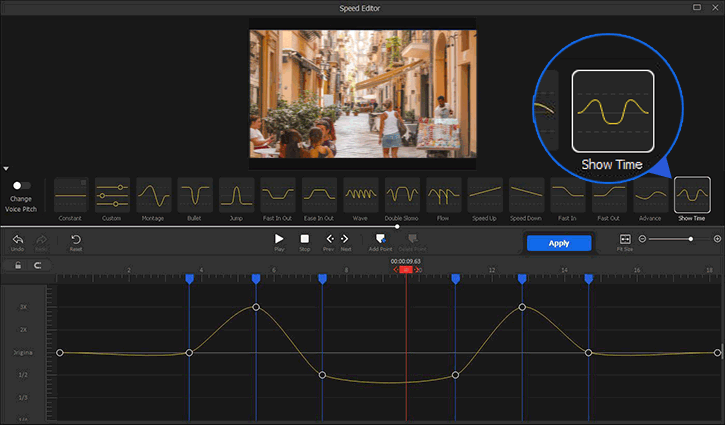
14. Show Time
Slow down the highlight moments and speed up the segments adjacent to that.
Use the Show Time curve when you need to direct the audience's attention to the specific moments. For example, a technique jump on the skateboard, the dramatic last-minute goal in a football game, a beautiful Italy street you were walking through, and the head-turn and smile of a cute girl in the crowds. Before and after the slow-motion scenes, the video accelerates at speed change rates from positive to negative. This can efficiently trigger the different emotions between the scenes you want to emphasize and the rest. Thus, the Show Time curve also comes in handy when you need to create a sense of drama.
How to Do Speed Revamping in VideoProc Vlogger
By moving the Bezier curve handles or adjusting the speed points, you can customize the speed ramping settings without hassles.
Step 0 Create a new project
Open VideoProc Vlogger. Complete the general settings on the pop-up Project panel to create a new project. Import the videos that are needed in the project to Media Library. Drag videos onto the timeline tracks.
Step 1 Locate Speed Editor
Hit Speed underneath the preview window to launch up the Speed Editor window. Herein, you can,
- Apply a preset speed ramp effect: Choose a Bezier curve preset. Hit Apply to apply the selected ramp effect. You can also customize the ramp effect, based on a selected preset.
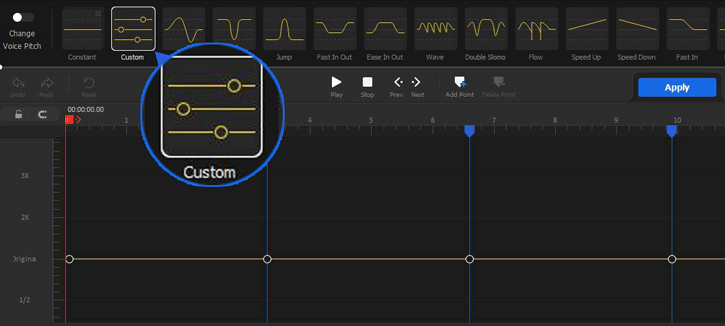
- Create a different speed ramp effect: Hit Custom.
- Scroll your mouse up or down to get more speed change values (ranging from 1/32X to 32X).
Step 2 Manage speed points
By default, VideoProc Vlogger adds a few speed points on the working video, splicing up the video into several speed sections. You can add more speed points as well as delete or reposition the existing speed points easily and flexibly.
- Add speed points. Option 1. Move the playhead to the desired starting or the endpoint of a speed ramp and hit Add Point. The speed point is added onto the existing bezier curve. Option 2. Right-click on the timeline and press Add Point. The speed point is inserting into the mouse pointer position.
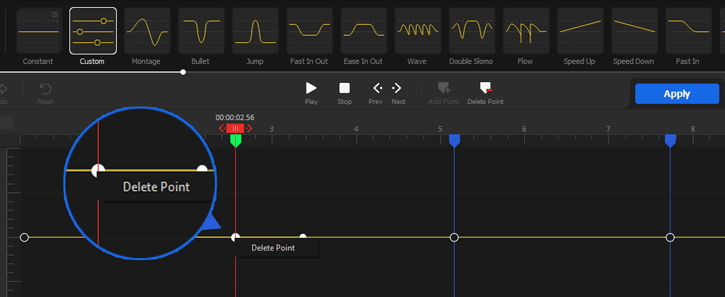
- Delete a speed point. Option 1. Right-click the target speed point and select Delete Point. Option 2. Click on the speed point and press Delete Point on the toolbar.
- Reposition a speed point. Select the target speed point. Move the shown-up green marker left or right.
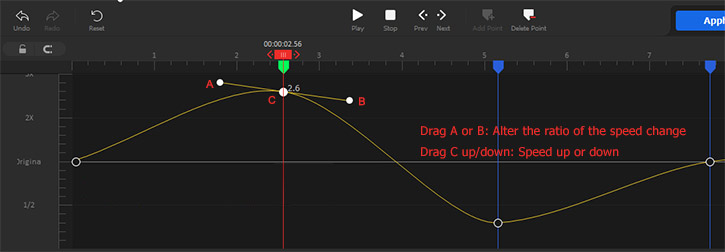
Step 3 Adjust the speed
Drag the speed point up or down to increase or decrease the playback speed.
Drag the left or right handle of the selected speed point to adjust the speed change ratio, creating a more desired "ramp" feel.
 Editing Tips
By default, the change in the video speed won't alter the audio pitch. If you need to change the audio pitch, toggle on the Change Voice Pitch option.
Step 4 Use speed ramping
Hit Play to preview the selected speed ramp effect. Once you are satisfied with the result, hit Apply.
- To pause the preview, press the pause button. To preview the video from the start, press the Stop button first and then hit the Play button.
- To preview the video frame by frame, press the Prev or the Next button.
Free download VideoProc Vlogger to elevate your storytelling by adding variable speed change effects.
Related Guides:
- > Create Picture in Picture Video in VideoProc Vlogger
- > Create Split Screen Video in VideoProc Vlogger
- > Export Project in VideoProc Vlogger
For more guides of VideoProc Vlogger, please visit this page >
If you have any question, please email us or visit ![]()
![]()
![]()
Is this page helpful?
