Tutorial: Edit 4K Videos Smoothly on Any Computer
If you've used Kdenlive, Shotcut, DaVinci Resolve, Premiere Pro other free or pro-level video editing software to edit 4K videos, then many chances you've encountered problems like choppy, freeze, 100% CPU usage. However, don't blame your editing software or computer cause handling the massive amount of data of 4K videos is a challenge for a long time.
To take a 10 minute of 60FPS 4K video as an example, the total amount of pixels of this short piece of video is around 3 hundred billion. And when we apply changes like color correction, the 4K video editor needs to apply the changes to every single frame of the 4K video. Worse more, the majority of 4K videos are encoded in high compressed codecs like HEVC and H.264. Those need lots of computer resources to decode and encode for applying the edits.
That's why 4K video editing is quite taxing on any devices, especially the low-spec ones. But, luckily, there is an easy way to alleviate the pain, use VideoProc Vlogger - a free yet robust video editor designed especially for 4K videos on both high end and slow computers.
Click the following download links for different platforms to download VideoProc Vlogger on your PC or Mac.
- - For Windows 7 and higher: VideoProc .exe setup file
- - For Mac OS X 10.11 and higher: macOS .dmg setup file
- - For more detailed system requirements
How to Edit 4K Video on Slow Computer – VideoProc Vlogger
Thanks to a systematic algorithm controller, VideoProc Vlogger can use different image scaling algorithms according to the sizes of the output frame. When starting out rendering, it can automatically detect the scaling mode and select the most efficient scaling approach. It will also evaluate the individual frames and apply the most time-saving and quality-preserving algorithm for the frame.
Unlike CPUs that carry out one instruction at a time, GPUs can execute multiple tasks simultaneously. Taking these into consideration, VideoProc Vlogger is developed to be a GPU-oriented video editor. It takes advantage of the GPU to handle the huge amount of the visual elements in the 4K videos. Better yet, it supports full GPU acceleration tech. That can speed up the video encoding, processing, and decoding process.
Now, let's get into how to edit 4K video with VideoProc Vlogger.
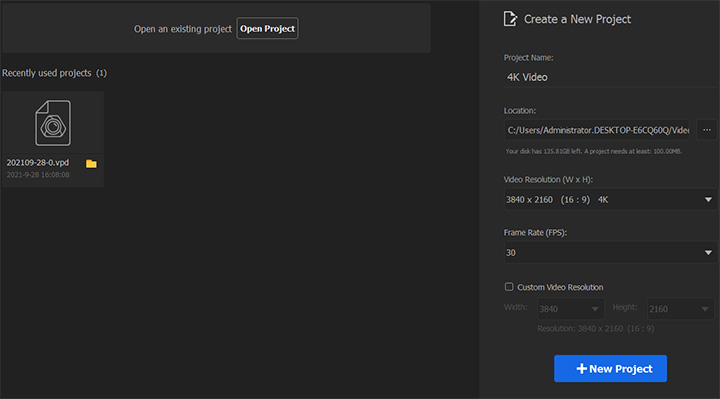
Step 1: Create a 4K Project
Launch up VideoProc Vlogger. Enter the new project name and assign a new project location. Select 3840 x 2160 (16:9) 4K on the Video Resolution menu. By default, the program creates the project at 30fps which is the most commonly used frame rate. What's worth noting is GoPro, DJI, and many 4K capable cameras shoot 4K videos at a high frame rate.
To ensure you can edit high frame rate videos without affecting the original speed, this capable video editor allows you to choose a high frame rate like 60FPS or 120FPS for the project.
Step 2: Import 4K Videos
No bother with creating proxy media or downgrading resolution like what you have to do with other video editors, VideoProc Vlogger allows you to drag to add the 4K video files or the folders that hold 4K videos from the local disc onto Media Library. After that, drag the video files or folders onto Video Track.
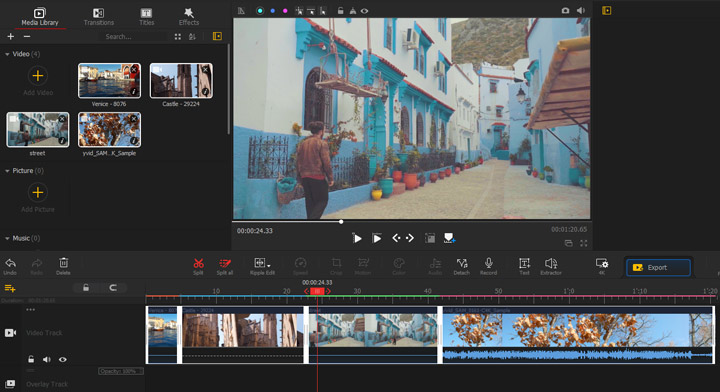
This GPU-oriented 4K video editor is capable of reading, editing, rendering, and exporting large videos without lag or slowing down your computer.
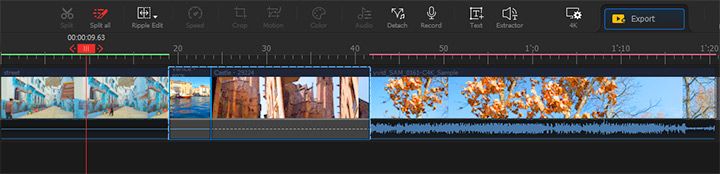
Step 3: Rough Cut 4K Videos
Once we get an assembly by adding the 4K videos to the timeline, we can start the rough-cut process. And this involves trimming and reorganizing the 4K videos.
• Trim 4K Videos
Select the target 4K video clip and drag its edge to where you want the clip ends or starts. This will shorten the original video clip length. You can also drag the edge to lengthen the trimmed clip for recovering the entire or part of the removed segment. Moreover, you can use the Split and Delete tool to get rid of unnecessary segments from the middle part of a video clip.

• Reorganize 4K Videos
Select the target 4K video clip on Video Track. If you need to select multiple 4K video clips, press Ctrl on the keyboard and then click on the target clips. Afterward, drag to move the clip(s) to the new point for reordering them.
Step 3: Refine 4K Videos
After setting the broad strokes of the story in the rough cut stage, we can start to alter the color, adjust the video speed, and add extra elements like transitions, texts, effects, and music. Let's select the target 4K video clip in the first place and then add the wanted adjustments or elements.
VideoProc Vlogger supported the real-time render. That is to say, you can preview the outcome for every change in time. What's more, the real-time render won't bring any burden to your CPU. You are not going to suffer from the stutter or slow playback even you are running a less robust machine.
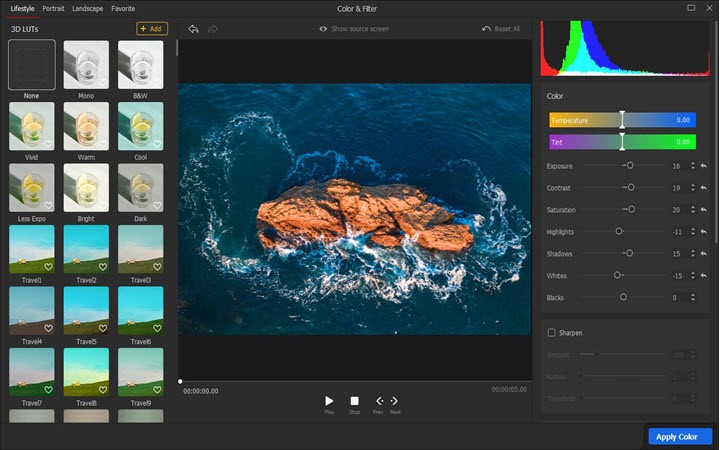
• Color Grade 4K Videos
Select the Color button under the preview window. On the pop-up new panel, you can find 90+ stylish 3D LUTs presets. To add a loved LUT, simply click on it. Drag the Intensity slider located on the right side of the panel to adjust the intensity of the applied LUT. Herein, you can also adjust the parameters of hue, temperature, contrast, and dozens of other options to color grade your videos.
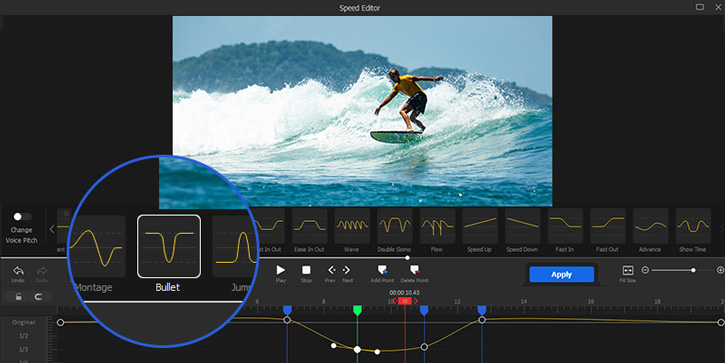
• Speed Adjustment
Choose the Ripple Edit button and then choose Time Stretch. Next, you can drag the edges of the 4K video clip to shorten or length the duration for increasing or decreasing the playback speed. One of the most shining points of VideoProc Vlogger is it allows us to add the variable speed change to the video by manipulating the curve. In addition, it presets 14 variable speed change effects. With this feature, everyone can make the professional-looking time remap 4K videos without learning curves.
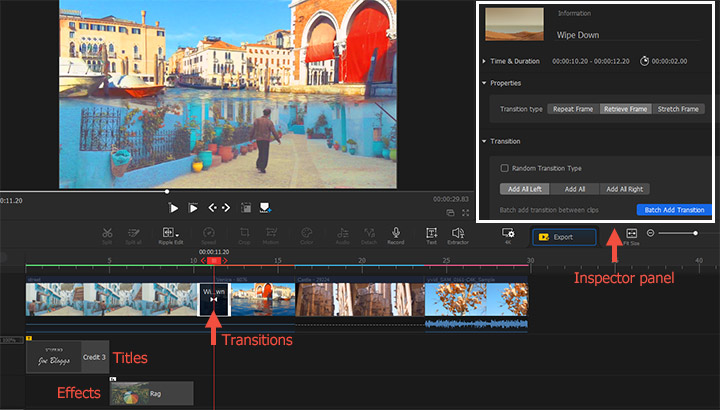
• Add Transitions, Text, or Effects
Go to the top of the Media Library panel. You can then click on the Transitions, Titles, or Effects button to open up the relevant panel for making the edits.
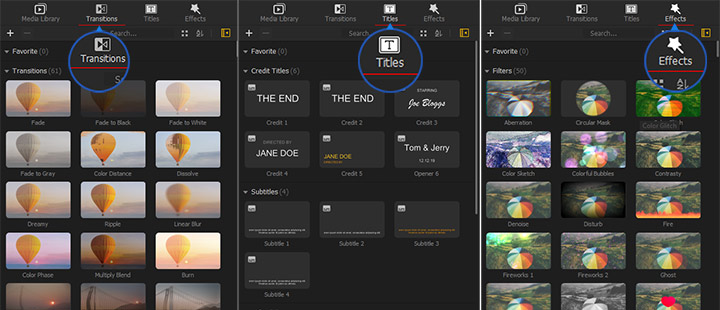
The ways to apply these elements are almost the same. Drag the title template onto Overlay Track. Drag the effect preset to Effect Track. To add a transition, drag the transition preset in-between two 4K videos clips. You can then adjust the applied transition, title, or effect on the Inspector panel located on the right of the preview window.
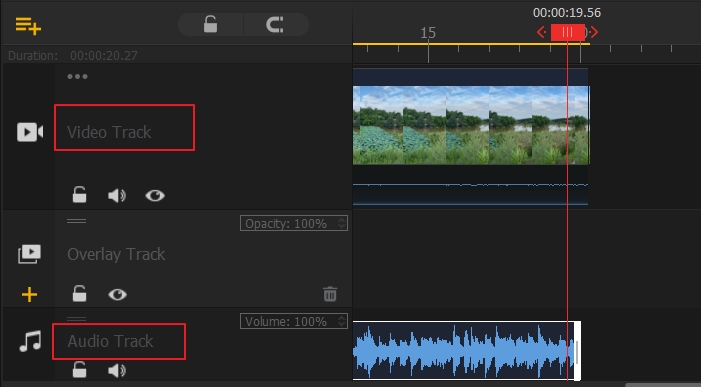
• Add Music or Overlay
Add the audio or picture/video file to Media Library. Drag the audio that you'd like to use the background music onto Audio Track. Drag the picture/video file that you'd like to use as the overlay onto Overlay Track. That's it.
Surely, there are lots more you can do to edit 4K videos in VideoProc Vlogger. For instance, you use the Crop feature located under the preview window to reframe the 4K videos, apply the presets offered by the Motion feature to imitate the camera movement visual effect, etc.
Step 5: Export the 4K Video
Click on Export to enter the Export panel. Enter the file name under the File Name menu, select the three-dot button of the Save to menu to assign the folder for holding the output 4K video. If you are a newbie, or you need an output with a perfect balance between picture quality and size, simply click on Start.
• If you need a better picture quality, select High/ 4 /5 as the quality level or check the box of High Quality Engine.
• If you need a smaller file size, then selecting Low/1/2 as the quality level can meet your demand.
• To speak of the video codec, you can choose AVC (H.264) AVC (H.264) is a widely compatible video codec that is the best option for streaming and share. However, HEVC(H.265) is a better option if you need a smaller file size with good picture quality.
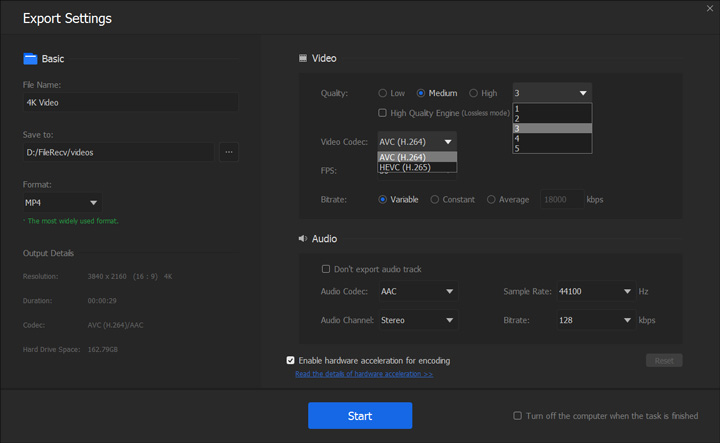
You might already notice, the option of Enable hardware acceleration for encoding is enabled. It's for speeding up the export process by utilizing the level-3 GPU acceleration tech.
Let's free Download VideoProc Vlogger to Edit 4K Videos