
I often convert 4K to 1080p. For years, we've been sold the 4K dream. 'Resolution is king', say Sony, Canon, Blackmagic. On paper, more pixels mean sharper images and easier cropping, but in practice, 4K eats up storage, slows your computer, and is often overkill.
That's why knowing how to convert 4K video to 1080p is still an essential skill in 2026. Whether you're trying to fix a stuttering timeline, make footage easier to share on social media, or save your client's battery life, the right method can be the difference between a crisp, professional-looking video and a blurry mess. The good news is you can convert 4K to 1080p from GoPros, DJI drones, iPhones, or almost any camera quickly and without losing quality, as long as you use a capable 4K to 1080p converter.
Quick Comparison: Which 4K to 1080p Converter to Choose
With so many 4K to 1080p converters out there, though, it's hard to know which tools actually work...or work best for us. To figure it out, I spent the past few months testing a wide range of 4K-to-1080p converters, including desktop software, open-source 4K to 1080p tools, and online services. After trying dozens, I curated four that stood out for different use cases. The table below summarizes each 4K to 1080p converter's strengths, weaknesses, and ideal use cases, helping you quickly decide which tool best fits your needs.
| Method | Speed | CPU Usage | Quality | Ease of Use | Best For... |
|---|---|---|---|---|---|
~3 min |
Low (GPU-Accel) |
High + AI |
Easy |
Fast batch conversion & AI enhancing |
|
~5 min |
High |
High |
Moderate |
Tech-savvy users & free open-source needs |
|
~7 min |
Medium |
Medium |
Easy |
Quick conversion without extra installs |
|
~3 min (+Up/Down) |
Low |
Medium |
Very Easy |
Small files & one-time use (No install) |
My Testing Background
Testing Environment: I used a mid-range PC (Intel i5, 16GB RAM) to ensure the results represent what most users will experience. I tested each tool using a 10-minute 4K (60FPS) HEVC clip from a DJI drone.
During testing, I evaluated several key factors, including conversion speed, CPU usage, output quality (such as detail preservation, color accuracy, and visual artifacts), ease of use, and any limitations like format compatibility or reliance on network connectivity.
4 Methods to Convert 4K Video to 1080p (Using Different Tools)
1. Use HandBrake: The Best Free 4K to 1080p Converter (Open Source)
- Tested Output Quality: Good; offers high-quality encoding presets (x264, x265).
- Tested Speed: Moderate to Fast (supports Hardware Acceleration like Intel QSV and NVIDIA NVENC).
- Ease of use: Moderate; the interface is packed with settings but has easy presets.
HandBrake is a solid free option for converting 4K videos to 1080p. As an open-source tool, it's widely adopted and provides extensive control over encoding parameters, which appeals to users who prefer a more hands-on approach.
In my 4K to 1080p tests, it worked consistently, though it does put a noticeable load on the system. One thing to keep in mind is the limited output formats. HandBrake only exports to MP4, MKV, and WebM, so if you need formats like MOV, AVI, or ProRes, it won't cover those.
As for performance, hardware acceleration is available (like NVENC or Intel QSV), but in practice it didn't make a huge difference for me. Most of the processing still relied heavily on the CPU. During conversion, CPU usage often went above 90%, which made it hard to run other tasks at the same time. It's not the fastest option, but considering it's free and delivers solid 1080p quality, the speed is reasonable.
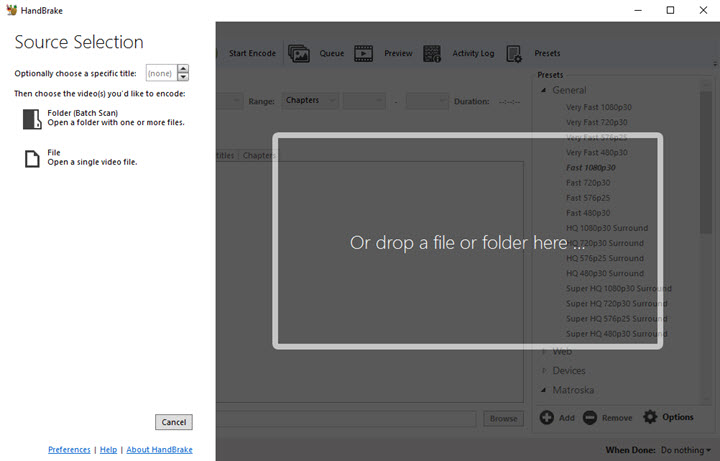
Step 1. Launch HandBrake and click the Open Source button or simply drag and drop your 4K video/folder into the interface. Since HandBrake supports batch queuing, you can add multiple 4K files at once.
Step 2. Go to the Presets menu and select a 1080p output preset. You can get started with Fast 1080p30. This automatically configures the basic settings for a 1080p output.
Tips: Presets are a convenient starting point, but they don't always match your source video perfectly. You may still need to adjust settings like frame rate, resolution, or quality depending on your footage. For example, if your source is 60fps, choose a preset that preserves the original frame rate (e.g., 1080p60) or manually set Framerate to &Same as source&.
Step 3. Switch to the Dimensions tab. Ensure the output resolution is set to 1920×1080. HandBrake typically handles aspect ratio automatically with the default anamorphic setting. Check that the scaled size shows 1920x1080. HandBrake's "Auto" anamorphic setting usually handles the aspect ratio correctly, preventing your 1080p output from looking stretched or squashed.
Step 4. Go to the Video tab. This is the most critical step for a professional result:
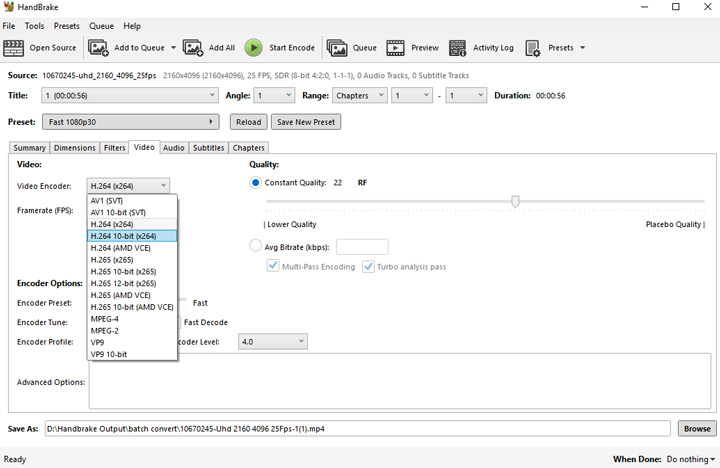
- Video Codec: Choose H.264 (x264) for maximum compatibility or H.265 (x265) for better compression.
- Hardware Encoder: You can select H.264 (Nvidia NVENC) or Intel QSV if available. In my testing, even with hardware encoding enabled, CPU usage remained high while GPU utilization was limited. This may vary depending on your system and settings.
- Constant Quality: Set RF between 20 and 22 for a good balance between quality and file size. Lower values (e.g., 18–20) preserve more detail at the cost of larger files.
Step 5. In the Summary tab, choose your output container: MP4, MKV, or WebM. At the bottom, click Browse to set the destination folder. Finally, hit the green Start Encode button.
Pros:
- 100% Free and open-source with no watermarks or hidden costs.
- Highly customizable encoding settings (Constant Quality vs. Average Bitrate).
- Excellent batch queuing system for processing large 4K libraries overnight.
- Deeply trusted by the tech community for clean, artifact-free downscaling.
Cons:
- Extremely high CPU demand: Can slow down your entire system during conversion.
- Limited output support: Strictly restricted to MP4, MKV, and WebM.
- The UI is cluttered with technical jargon, making it intimidating for beginners.
- Lacks basic editing tools like trimming or merging clips.
My Takeaway: HandBrake is the best free way to convert 4K video to 1080p if you have a powerful processor and don't mind a steep learning curve. It's perfect for purists who want to fine-tune x264/x265 settings, but the lack of format variety and high resource consumption make it less ideal for quick, casual edits.
2. Use VideoProc Converter AI (The Fastest 4K to 1080p Converter)
- Tested Output Quality: Videos retained sharpness, smooth motion; no visible artifacts.
- Tested Speed: CPU ~2%, GPU-accelerated conversion extremely fast.
- Ease of use: Presets make conversion intuitive for non-experts.
In my tests, VideoProc Converter AI handled downscaling 4K videos to 1080p without noticeable quality loss. Its motion-adaptive pixel scaling kept details sharp and motion smooth, even in fast-moving scenes. I also tried using AI Super Resolution after downscaling. It is supposed to improve clarity and reduce noise, grain, and blur while keeping the original details natural. In my tests, it worked exactly as promised.
This 4K to 1080p converter supports over 370 formats, so it handled 4K and 8K footage from all kinds of cameras, including GoPro, DJI, iPhone, and DSLRs, without any issues. HDR and high-bitrate, high-FPS videos ran smoothly, and the preset output profiles made picking the right settings easy. On my setup, the level-3 hardware acceleration allowed 4K to 1080p conversion at about seven times faster than real time.

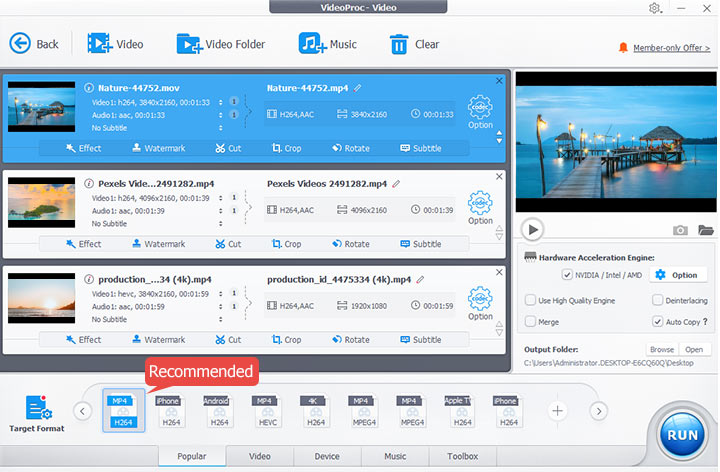
Step 1. Download, install, and run VideoProc Converter AI. Click Video Converter, hit +Video, and then choose the original 4K footage for adding to this 4K video editor.
Step 2. At the bottom, choose your target format. MP4 H.264 is recommended for its wide compatibility, high compression efficiency, and good video quality. If your format isn't listed, click ‘Target Format' to access over 420 options for different devices and platforms.
Step 3. Click the blue gear and find the resolution setting options. Choose 1920x1080 as the output resolution.
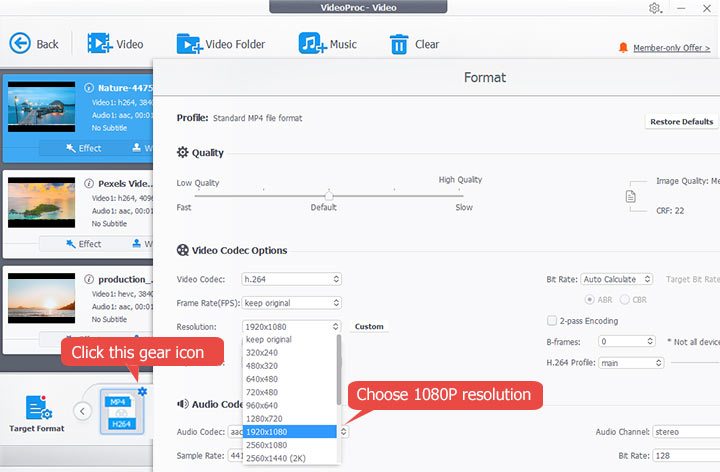
Step 4. Click Use High Quality Engine and hit Run to start converting 4K to 1080p without perceivable quality loss.
Pros:
- Lightweight in size. 2% CPU usage. Run smoothly on less robust computers
- Convert 1080p videos from 4K UHD/DCI, iPhone/GoPro/DJI HEVC 4K
- No visible quality loss with the motion-adaptive pixel scaling algorithm
- Hyper fast conversion speed, powered by the level-3 GPU acceleration tech
- Also the best DVD ripper, video downloader, video compressor, and video editor
- AI-driven: Improve overall clarity and fixe noise, blurriness, and other quality issues
Cons:
- It only runs locally.
- Free users can only convert videos shorter than five minutes.
My Takeaway: VideoProc Converter AI makes fast, high-quality 4K to 1080p downscaling easy for beginners. With its level-3 GPU acceleration and AI enhancements, my conversions were faster and sharper than I expected, so I highly recommend it to anyone needing to convert 4K to 1080p.
3. Use VLC Media Player: A Convenient 4K to 1080p Converter
- Tested Output Quality: Decent 1080p downscale, minor artifacts on HEVC footage.
- Tested Speed: CPU usage low, conversion slower on large files.
- Ease of use: Simple for basic users, but settings are not beginner-friendly.
VLC Media Player is not just a handy tool for playing 4K videos. It can be also used to downscale and compress 4K video to 1080p. As an open-source 4K to 1080p downscaler, it is totally free without any limitation or watermarks.
It works great for most videos as well as audios with a wide range of supported formats like MPEG-2, DivX, H.264, MKV, WebM, and WMV. But a headache problem is that VLC Media Player lacks the support for H.265 (also known as HEVC) and VP9 codec, which most 4K videos are encoded with. On top of that, the short of hardware acceleration gives this 4K to 1080p converter relatively weak performance in speed. Despite the cons, it is a handy free 4K to 1080p downscaler that is worthy of you trying. Take a look at how to convert from 4K to 1080p via VLC media player.

Step 1. If you haven't installed VLC, download it from the official website and install it. Open VLC once installation is complete. Click Media in the top menu bar, then select Convert/Save…. This opens the dialog where you can choose the video(s) you want to downscale from 4K to 1080p.
Step 2. Click Add in the Convert/Save dialog and select your 4K file. Suppose you didn't see your 4K file, then it means VLC doesn't compatible with the codec used by that file. In this case, you need to turn to other method listed in this post.
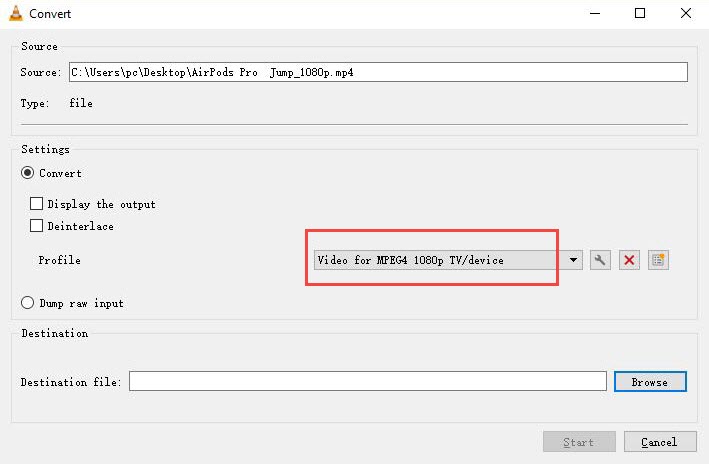
Step 3. Click Convert/Save, then under Profile, select a 1080p option. VLC provides several built-in H.264 profiles at 1920×1080, which balance quality and compatibility. Advanced users can customize profiles to adjust codec, bitrate, resolution, and audio settings.
Step 4. Click Browse to choose where the converted video will be saved, and give it a descriptive file name. lick Start to begin converting your 4K video to 1080p. Conversion speed depends on your system and the video's resolution, bitrate, and format.
Pros:
- Completely free, no watermarks or trial limitations.
- Lightweight and low CPU usage; runs on older PCs.
- Basic conversion is quick and straightforward.
- Cross-platform support (Windows, macOS, Linux).
Cons:
- Limited support for H.265/VP9; some 4K files may fail.
- No AI enhancements or advanced editing tools.
- Interface can feel unintuitive for beginners.
- Occasional black screen or partial output requiring retries.
My Takeaway: VLC is a free, lightweight option that works well for casual downscaling, but its limited codec support and slower performance can be frustrating for advanced users or those working with HEVC/VP9 videos.
4. Use HDconvert: The Easiest 4K to 1080p Converter Online
- Tested Output Quality: Standard 1080p output fine for casual use.
- Tested Speed: Fast for small files, slow for large; network is bottleneck.
- Ease of use: Very simple, no learning curve.
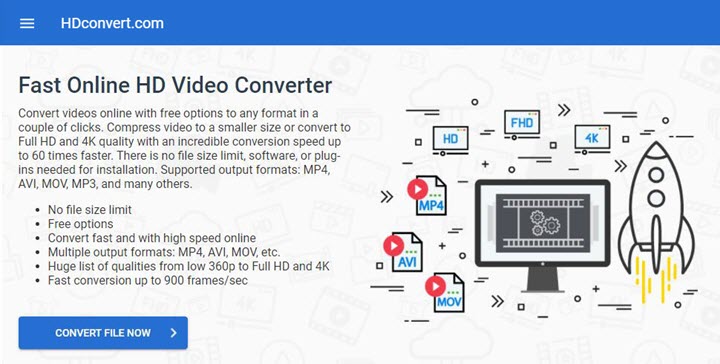
For those who are after a quick in-and-out solution to convert 4K to HD quality footage, a decent online 4K video converter could lend you a hand. Among the numerous options available, HDconvert surpasses others with its great ability to scale down video to HD size in high picture quality and at turbo speed. Additionally, its simple and intuitive interface streamlines the conversion process for users.
Give a caution, while HDconvert is a leading online 4K to 1080p converter, it is not without its limitations. It only exports MP4, 1080p, H264, 6.0MBit/s and supports only limited import formats. Apart from that, this online 4K to 1080p converter heavily relies on network conditions, which can lead to issues such as slow uploading times and conversion failures.
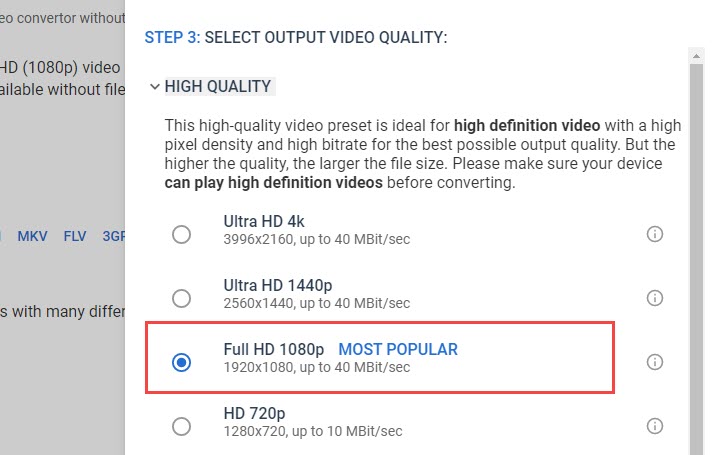
Step 1. Click 1080p as the output file size.
Step 2. Click Browse to enter the source file. Wait for seconds or minutes. If the source media is large in its size, the process might take a little longer.
Note that a stable and fast network is needed or we may fail to upload the footage.
Step 3. Click File to find the converted file which is also our target video. Click Download to save it on our PC.
If you are not a premium member, the output file would come with a watermark. The converting speed is fast, but the uploading and downloading process is a little sluggish. Another annoying thing is that there are ads for unknown apps popping up now and then.
Pros:
- No installation needed; works from any browser.
- Simple, intuitive interface.
- Quick conversion for small to medium files under stable network.
- Decent output quality for standard MP4 H.264.
- Convenient for on-the-go or occasional users.
Cons:
- Limited formats: only MP4 1080p H.264.
- Free tier adds watermark; premium required for clean output.
- Large files upload/download slow; network-dependent.
- No editing or AI enhancements.
- Occasional ads/pop-ups in free version.
My Takeaway: HDconvert is great for casual users needing a quick, no-installation solution. Not suitable for professionals or large projects due to format limits, watermarks, and network dependency, but convenient for small, occasional conversions.
Why Should You Downscale 4K to 1080p
Cameras like the Sony A7S III or A7R V record videos in 4K at 10-bit 4:2:2, producing very large files. Even short clips can reach hundreds of megabytes. Handling so many pixels is demanding, and many computers, including high-end ones, can struggle to play or edit these files smoothly.
Part of the challenge comes from the sheer resolution, and part comes from the codec. H.265 (HEVC) compresses the footage efficiently for storage, but it requires your system to process every frame in real time. Combined, high resolution and compressed data can lead to stuttering timelines, slow exports, or even crashes during editing. Converting 4K footage to 1080p or using 1080p proxy files reduces this workload, making editing smoother and more reliable.
There's another bonus. When you downscale 4K (3840p×2160p) to 1080p (1920p×1080p), each group of four pixels is combined into one, a process called supersampling. This reduces noise and improves color accuracy. Downscaled 1080p footage often looks cleaner and retains more detail than native 1080p, especially when graded from Log profiles. In other words, downscaling 4K to 1080p preserves much of the 4K sensor's benefits without the heavy processing requirements.
Conclusion
It would be a long way to go before 4K going ubiquitous. Before that, converting 4K video to 1080p is the easiest approach for us to relish a 4K-like visual experience. While in selecting the right 4K to 1080p converter, always keep in mind that what you choose depends on your own requirements. But overall, as a newbie, VideoProc Converter AI is a magnificent tool to try as it is fast, simple, stable and versatile.