Did you know that you can find satanic messages embedded in those squeaky-clean pop songs? All you must do is to reverse the audio or add a rewind effect to the sound file. And this is a very straightforward process that can be coupled with a proper audio reverser. However, with many options available in the market, it becomes difficult to take the end call.
If you have been trying to zero in on the perfect audio reverser to play the file backward, then you have come to the right place. There we are going to discuss the best available audio reversers for reversing audio online, on iPhone, and computer.
Part 1: Reverse Audio Online [with Tutorial]
You can benefit a lot from online audio reversers if you need to reverse audio occasionally and don't want to install any third-party software on your computer or iPhones. Let's look at three of the best online destinations this year which can cater to your audio reversal needs.
| 3PM | AudioTrimmer | Audioalter | |
|---|---|---|---|
Input formats |
mp3, wmv, ogg | mp3, wav, wma, ogg, m4r, 3gp, aif, amr, flac, aac, m4a | mp3, wav, ogg, flac |
Is it easy to use |
 |
|
|
Playback speed |
0.5 - 2.0 times | standard time | 0.5 - 2 times |
Max file size |
20MB | 10MB | 20MB |
Additional features |
available in English and German language | offers reverse effects such as noise risers or reverse cymbals | create 3D/8D audio, boost up bass levels, convert audio. |
#1. AudioTrimmer
AudioTrimmer is the most compatible online audio reverser tool in our lists. It can play audios in MP3, WAV, WMA, OGG, M4R, 3GPP, AIF, AMR, FLAC, AAC, M4A formats backward. The drawback is it only allows you to reverse audio file under 10MB and the output file codec has to be MP3. There is no access to customize the audio playback speed, quality, and other personal settings. Worse more? There are plenty of pop-up ads that may lead you to unsafe sites.
#2. 3PM
The maximum file size you can add to 3PM is 20MB and the supported file formats are MP3, OGG, and WAV. It allows you to change the speed of the reversed sound (speed ranges from 0.5x to 2x). Just like AudioTrimmer, one of the biggest loopholes of 3PM online tool is that it has a fully automated process which doesn't allow adjustment. Thus, your potential becomes limited.
#3. Audioalter
Audioalter, according to us, is the number one option when it comes to online audio reversal. Though its reverse feature is similar like AudioTrimmer. Under the audio reverse tab, you upload 20MB (maximum) MP3, WAV, OGG, or FLAC audio file, and then it will do the rest automatically. But, you can then reload the reversed audio to Audioalter for making advanced adjustments. This completely free-of-cost audio reverser software stacks in immense possibilities in terms of audio equalization, conversion, speeding up or slowing down, pitch shifting, bass boost, audio trimming, volume change, removing vocals. Better yet, it enables you to take the above job done in one click. It even lets you create a 3D or 8D sound effect.
Tutorial: How to Reverse Audio Online?
The steps to reverse audio with different web-based applications are almost the same. Therefore, here we just demonstrate how to reverse small audio file online by using Audioalter.

Part 2: Reverse Audio on PC and Mac [with Tutorial]
One of the biggest lacunas of online tools is that you cannot avail the same without a stable internet connection. This brings us to the second part of our discussion, i.e. desktop software. Generally, there are two types of desktop software that can be utilized to edit audio: advanced video editor like Davinci Resolve, and professional audio editor.
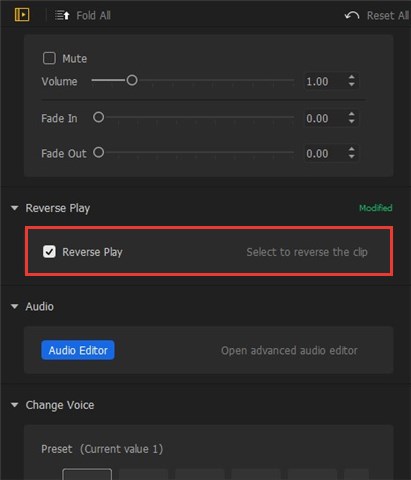
#1. VideoProc Vlogger
VideoProc Vlogger is a non-linear video editing application, and also is good at the audio file editing. To reverse the audio file, VideoProc Vlogger can promise you finish it within several clicks. And here is how.
Step 1. Download and install VideoProc Vlogger on your Windows or Mac computer, if you have not yet.

Step 2. Launch this application and first create a project.
Step 3. Then you will be in the main editing page, where you just click on the +Music button to import the audio file which you are going to process.
Step 4. Drag your audio file into the Audio Track below and click on it.
Step 5. Then jump to the right side of the interface, scroll down, and then please find the Reverse Play option. Check the Reverse Play box and the audio file would be reversed automatically. Click on the Export button to start processing.
#2. Audacity
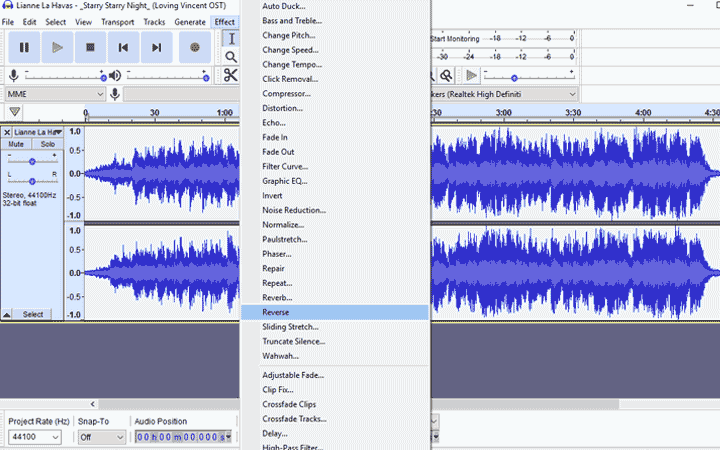
Audacity is an open-source audio editor that goes compatible with Windows, Mac, and Linux OS. It can serve as your go-to choice for starting with podcasting, music recording and audio reversing. Why? It is capable of reversing, repeating reverse, removing, reverbing, inserting, and slow down sound speed, just name a few. You can also bank on Audacity to analyze the frequency spectrum of the sounds. This free and full-featured audio editor comes with a simple interface that supports the drag and drop operation to reverse the audios in three clicks.
As for input formats, Audacity offers you wide options. All standards and prevalent audios are supported. The only annoying thing is you may need to install MP3 and FFmpeg library to your computer manually. With Audacity, you can have complete control for the output file size and quality as it allows you to customize the audio format, bit rate rate mode, quality, variable speed, and channel mode.
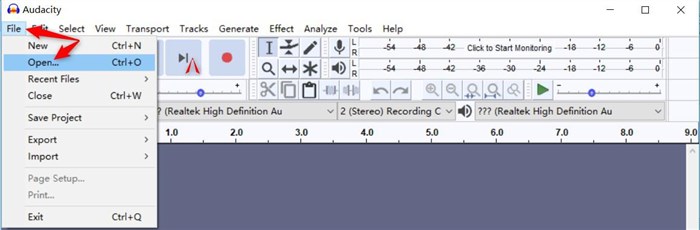
Tutorial: How to Reverse Audio on Windows and Mac?
Audacity stands out as the best choice among the three above-mentioned desktop audio reversers in respect of ease of use, as well as the price tag. Let us dive in the steps to reverse audio using Audacity:
#3. Logic Pro X
As one of the most comprehensive DMI in the market, Logic Pro X has a high price tag: $199.99. Honestly speaking, reversing audio with Logic Ro X is like using a hammer to kill a fly. But advanced users, for instance, musician and artist who want to mine a reversed audio for creative inspiration and need to cope with many audio post-editing work, bound to feel delighted with the bevy of editing toolkits and effect plug-ins offered and supported by Logic Pro X.
Logic Pro X has minimum system requirements of 4GB RAM, OS X 10.8.4 or later and 64-bit Audio Units. It comes with an intuitive interface that is in line with the operating habits of most people. The reversing of the whole audio file is easy like walking in the park. However, it needs many redundant steps if there is a need to reverse some certain parts of the audios.
#4. REAPER
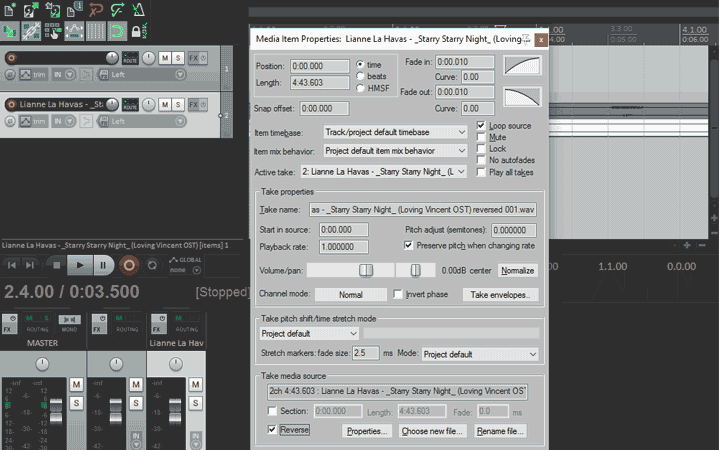
REAPER is a one-stop yet still affordable digital audio production software that runs on Windows and OS X. It brings you a flexible and robust toolset to record, edit, process, and mix audios. I have to admit that I've read some tutorials before reversing audio with REAPER. Its interface is too brief for me. Many important options are hidden.
I have tried 2 methods. 1) Reverse in Item Properties to reverse audio without creating a new copy. 2) Go to item and reverse item as new take. Both work fine. REAPER can export the reserved audio as WAV, AIFF, FLAC, OGG and MP3 sound file. With it, you are free to decide the output quality and other properties. However, you need to have basic knowledge about the terminologies of audio editing to get the desired outcome.
Reverse Video on Your iPhone [with Tutorial]
Now that you have gained a clear understanding of the best online tools and desktop software, let us now take a brief look at the best 3 backward player apps on iPhone.
| Reverse Music Player | Music Speed Changer | Music Editor | |
|---|---|---|---|
Input formats |
wav, mp3, ogg, flac | all standard audio codecs | aac, m4a, and etc. |
Export file format |
wav, ogg, flac | mp3, wav | mp3, wmv, aac, m4a |
Is it easy to use |
|
|
|
Playback speed |
0.25 - 4 times | 0.1 - 5times | 0.5 - 2times |
Additional functions |
|
|
|
Reverse Music Player can be ranked as the easiest reverser for phones. It's not as versatile as the other two options on the list, but it does the audio reversing job very well. With it, you can reverse audio from and to many popular formats including WAV, OGG, and FLAC. Besides, it enables you to set the pitch octaves from -1 to +1, and you are spoiled with two methods to change tempo and pitch at any moment.
How to Reverse Audio on your iPhone?
Final Words
To achieve unexpected results by playing audio effects or songs backward, try out the audio reversers we have listed above and get ready to immerse deep in the world of audio entertainment.


