
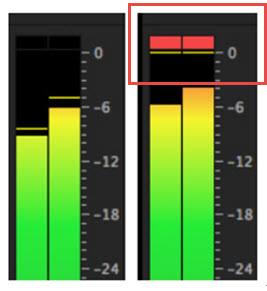
Audio normalization can boost your audio to a target level by altering the amplitude of the overall recording by the same amount, while at the same time ensuring that the peak won't exceed 0dB to avoid clipping and distortion.
Now this might sound abstract to you. Let's try another way to get the gist.
We measure things in real life from ground up, like how tall you are or how many floors there are in a building. In digital audio, however, things are measured from ceiling down. Now the ceiling is 0dB, below you have -1dB, -2dB, etc.
Most audio editing software come baked with audio normalizing tools, with which you can adjust the volume to a standard level, ensuring that the loudest part won't hit through the ceiling.
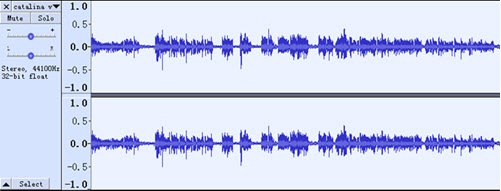
Here is a screenshot of sound waves before normalizing:
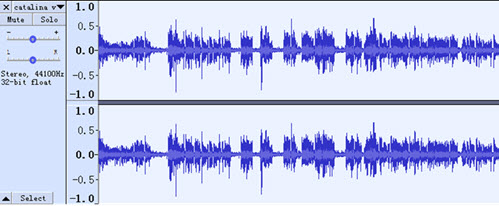
After normalizing, it looks like this:
Abbreviations you will meet in this post:
dB: short for decibels. An audio signal is measured in decibels.
dBFS: Decibles relative to Full Scale. Full Scale = 0dB, and you can consider it as the ceiling of your room. If anything tends to go above the ceiling, it will be chopped off, resulting in audio distortion or clipping. dBFS is usually written as dB, as in 0bB, -3dB, -10 dB, etc.
Rules of thumb: Audio levels must not exceed 0dB before exporting. If normalization is the last step, you can set it to 0dB, though -3dB to -6dB is recommended.
Bonus Tips: If you're an audiophile chasing crystal-clear sound, the Audio AI feature in VideoProc Converter AI can clean up background noise, hissing, wind, and other audio issues.
What Does Normalizing Audio Do
Why you need to normalize audio? What does this function do? There are 2 main situations when you want to normalize:
1. Boost volume to the maximum without clipping:
- This is the most common case when you have a single audio clip. Normalizing help you to increase its volume proportionally right up to 0dB (-6dB to -3dB is recommended), resulting in a louder sound without changing the dynamic range of the original file.
- It is not necessarily a change to the maximum though. You can boost the volume to a target value, as long as it sounds louder, while at the same time not exceeding 0dB, thus avoid audio clipping.
2. Match volumes of multiple audio files
- When you merge several audio files into one, you might find each of them was recorded in different loudness. It could be very disturbing for the audience when the sound suddenly goes up or down. With normalizing tool, now you can set the volume level of each clip to an identical value, -3dB for instance.
- A step further, let's say you have both voiceovers, intros & outros in the sound design, you can normalize voiceovers to -3db, and background music (intros & outros) to another level below -3dB.
For beginners, this could be the end of the story, as normalizing is only a matter of several clicks in audio editing software. However, the audio files you meet in reality have this and that problems. For instance, the audio file you have is soft in general, while there is only one sudden spike. If you normalize the audio according to the peak volume, there is less room left for the soft sound to boost. In this case, you will need to use a limiter in the first place, and then the normalizing tool. We cover more explanations in the later part of this post.
How to Normalize Video in Premiere Pro
As you may already know, the quickest way to adjust volume is to drag up and down that rubber hand inside the audio clip. The problem is, this might result in a peak going above 0dB, and that's where normalizing comes in.
To normalize audio in Premiere Pro:
Step 1. Select audio clips in Premiere Pro.
Step 2. Right click > Audio Gain (or simply type G on your keyboard).
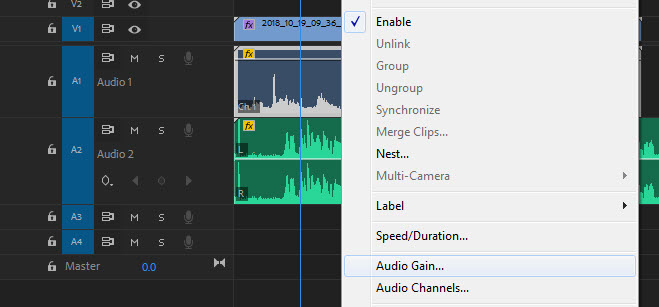
Step 3. Select Normalize Max Peaks to or Normalize All Peaks to based on your situation. See detailed explanation below.
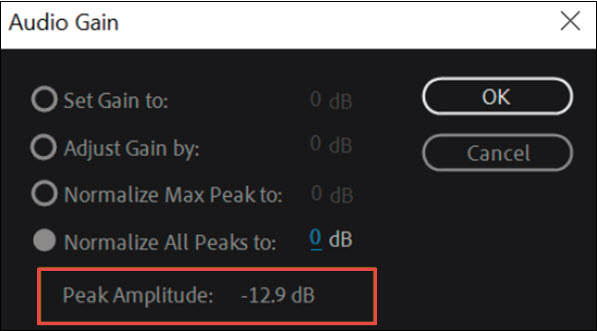
If you only have one audio clip, there is no difference between normalize max peak and normalize all peaks. These two options are handy when you have several audio clips in the timeline. Since audio normalization applies a constant amount of gain to boost the volume, it won't change the dynamic range of your audio. In other words, the altering of the amount of gain are in proportion, if you select:
- Normalize Max Peak to. This will find the loudest peak among all your clips, boost the gain of the loudest peak to -3dB or any value you set, and also alters the rest of the clips by the same amount of gain. To illustrate, if your max peak used to be -12.9 dB, and the value you set is -3dB, it will adjust gain by +9.9 dB for all the clips. Yet, you don't need to do all the math here, as you only need to set the value as -3dB, and Premiere Pro will figure out the rest.
As you can see, this method shares the same dilemma we discussed in the previous part. If almost all the clips sound soft, with only a few sudden spikes, there won't be much gain applied to the overall audio level. That's why we have another option:
- Normalize All Peaks to. This will find the loudest peak in each clip, and boost all the clips by different amount of gain (and of course same amount within each clip) so that the peaks in each clip all reach the specified decibel. Let's say clip I have a loudest peak being -5 dB, clip II -6dB, clip III -7dB; setting normalize all peaks to -3dB, it will alter the gain in clip I by +2dB, clip II +3dB, clip III +4d, so that all the clips peak at -3dB.
How to Normalize Audio in Premiere Audition
So the idea is the same as you normalize audio in Premiere Pro. You can create new files in Premiere Audio, or edit audio files via the dynamic link to open Audition within Premiere Pro.
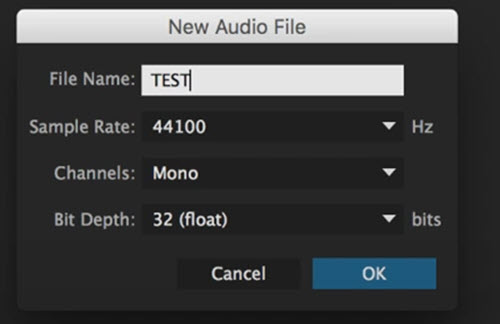
Step 1. Launch Premiere Audition and create new audio file.
Step 2. Record your audio file.
Step 3. Go to Window > Amplitude Statistics.
Here you can read off statistics such as current peak amplitude, TPA, RMS amplitude. You can use these as reference before adjusting the value.

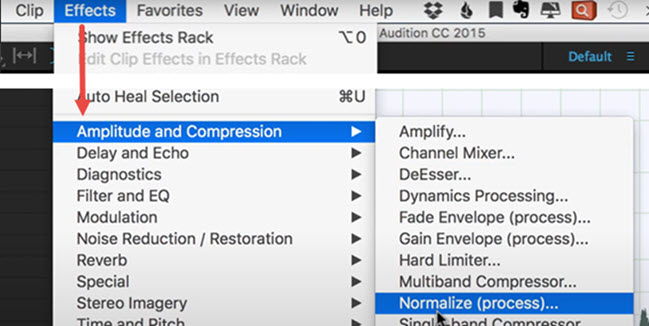
Step 4. Click Effects > Amplitude and compression > Normalize (process)…
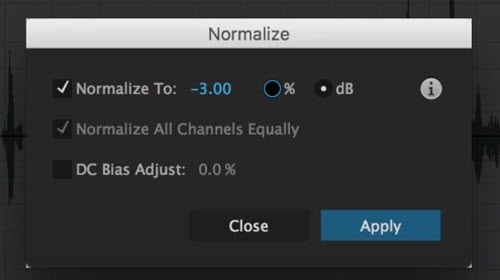
Step 5. Enter the value to Normalize To. Tick dB as you might be confused by the percentage option.
How to Normalize Audio in Audacity
As the most popular free audio editing software, Audacity boasts of robust features that are otherwise charged in paid tools. You can use Audacity's normalize effect to boost volume without changing the dynamic range.
When you shouldn't use normalization in Audacity?
If you have multiple tracks to deal with, yet there are differences in peak levels on purpose, it is a bad idea to normalize any of them. If you want to keep the proportional balance between them, the optimal way is to select all the clips and Amplify them to a same amount of gain.
Assuming you have already import or record audio in Audacity, follow these steps:
Step 1. Go to Effect > Normalize from menu.
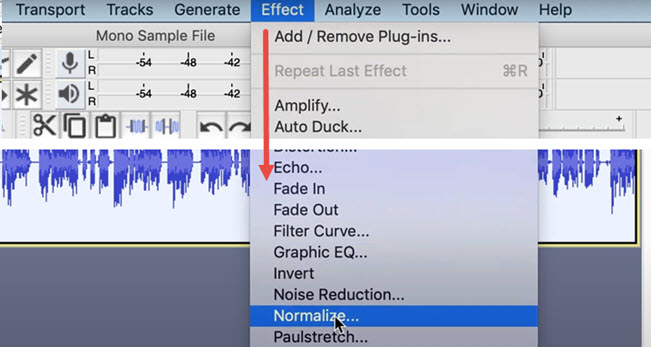
Step 2. Tick normalize peak amplitude to the target value (-3dB to -6dB recommended).
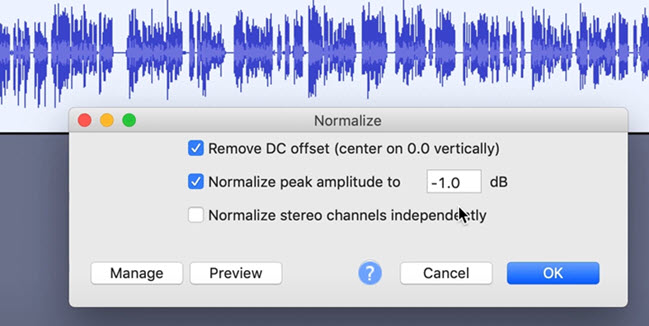
Step 3. You can click the Preview option to listen to a 6-second playback.
For instance, if you set the value at -3dB, it will guarantee that the loudest part won't go beyond -3.0 dB. Otherwise, your audio might get chopped off, resulting in unpleasant clipping and distortion.
This is the simplest way to understand normalization. However, things could get more complex. It has to do with how you measure the loudness.
Understanding Normalization: How We Are Measuring the Volume
Again, the example of sudden spikes in an audio file: imagine you have a recording of soft piano with occasional drum hits. If you go with peak normalization, the drum hits leave us less amount (the headroom) to boost to the -3dB, and the rest of the instruments might be too soft. If the audio is measured by the average loudness, then you can boost those soft music arrangements too. That's why we have RMS (root-mean-square), a mathematical calculation to measure the average decibels of a signal over a period of time, as opposed to peak measurement.
In this example, we can see that when dealing with normalization, we have to discriminate between how the loudness is measured:
- Peak volume measurement
- RMS volume measurement
Our brain judge loudness in terms of overall levels, not peak levels. And how it perceives the loudness is so complex, and any mathematic calculation is only an approach to represent that perception, with pitfalls and flaws. Organizations such as EBU and ITU then introduced other factors in the algorithm to analyze loudness, and today we have LUFS (loudness Units Full Scale) and LKFS (Loudness, K-weighted, relative to Full Scale).
Also read: What Is LUFS, and Why Should I Care >>
For that momentary peak, normalization is not enough to achieve a desired result. That's why you will be using compressors and limiters. That is out of the scope of this post, but the basic idea can be illustrated by the following example:
Suppose our audio file is:
- RMS -19dB
- Peak -8dB
Now we want to boost its volume, and as the peak cannot exceed -3dB (TV standard), so:
- we can normalize peak to -3dB
And as normalization won't change dynamic range, so:
- RMS would be -14dB (simple math).
With compressor and limiters, you can keep the peak at -3dB, while bring RMS up, louder than -14dB. That's what normalization can't do.
Normalization Cheat Sheet for Beginners
Music arrangement has more to do with how you want the production to be, with your taste and skills considered. Still, you can follow what most people do in the industry, and that would be:
- Music RMS = -16dB (peak up to -3dB).
- Voice/Speech RMS = -12dB (peak up to -3dB).
Here are other value sets for your reference:
- Classical CDs in the 90s have an average RMS at -21dB.
- Most Hollywood movie production settled at -20dB or -24dBLKFS for the final mixing track.
- Audio distortion or clipping occur when the sample audio reaches -8dB in mobile phone speaker.
- Spotify submissions is specified as streaming at -14LUFS - I (integrated), peak up to - 1RMS.
- Apple Music = -16 LUFS.
- YouTube = -13 LUFS.
- TIDAL = -16 LUFS.


