
Trying to fit big audio files – like audiobooks – onto a device with limited space, such as a cloud-based audio player? Need to squeeze more audio tracks onto a CD? Sending large audio files to collaborators or clients while ensuring quality isn't lost? Or perhaps creating smaller, more manageable copies of a large volume of audio files for backup or distribution?
Effectively compressing audio files can be a life saver. And thankfully, the process is often easier than you think. In this post, we'll show you exactly how to compress audio files using handy yet powerful online and desktop audio compression tools.
Understanding Audio File Compression
Before we dive into the step-by-step guides on how to compress audio files, let's quickly cover some fundamental concepts. Understanding these basics will help you choose the right settings later on to achieve your desired balance of file size and quality. These are the key factors that influence audio file size and compression:
1. Audio Codecs
The choices of audio codec dramatically affect the final audio file size. Usually converting audio to MP3, AAC, other other lossy audio codec can help save the file size a lot.
| Type | Compression Type | File Size & Quality | Examples | Best Use Cases |
|---|---|---|---|---|
Uncompressed Audio |
None; Largest files |
Highest quality |
WAV, AIFF, AU, PCM |
Professional editing, mastering, archiving |
Lossless Compression |
Compressed; |
No quality loss |
FLAC, ALAC, APE, WMA Lossless |
Backups, hi-fi listening, collecting high-quality audio |
Lossy Compression |
Compressed; |
Slight or noticeable quality loss |
MP3, AAC, OGG, Opus, Vorbis, M4A, WMA |
Streaming, sharing, portable devices |
2. Bitrate (kbps)
Bitrate determines the amount of audio data used each second. Reducing it is the simplest method to shrink audio file sizes, though this will typically result in a decrease in audio quality. For reference, the table below illustrates the relationship between sample rate and file size, using a 10-minute stereo WAV file as an example.
| Bitrate (kbps) | Audio Quality | Approx. File Size | Use Case |
|---|---|---|---|
320 kbps |
Excellent (near CD) |
~140 MB |
Music archiving, high-quality audio |
192 kbps |
Good (transparent for most) |
~84 MB |
General music listening, audiobooks |
128 kbps |
Decent (slight loss) |
~56 MB |
Podcasts, voice recordings |
64 kbps |
Noticeable quality loss |
~28 MB |
Speech-only content, bandwidth-saving |
3. Sample Rate (kHz)
Sample rate dictates the level of detail captured in the audio. For the majority of applications, very high sample rates are often unnecessary, and reducing them can significantly decrease file size. The table below illustrates this relationship between sample rate and file size, using a 10-minute stereo WAV file as an example.
| Sample Rate (kHz) | Bit Depth | File Format | Approx. File Size | Notes |
|---|---|---|---|---|
96 kHz |
24-bit |
WAV (uncompressed) |
~330 MB |
Studio-level quality, not needed for playback |
48 kHz |
16-bit |
WAV (uncompressed) |
~110 MB |
Video audio standard |
44.1 kHz |
16-bit |
WAV (uncompressed) |
~100 MB |
Standard CD quality |
48 kHz |
n/a (compressed) |
MP3 @ 192 kbps |
~14 MB |
Great balance for music & spoken audio |
How to Compress an Audio File using VideoProc Converter AI
VideoProc Converter stands out as an efficient, AI-powered tool for compressing audio files on both Windows and macOS. Thanks to its extensive support for over 370 audio and video formats, it can handle virtually any audio file you have – from uncompressed WAV and PCM to lossless FLAC and ALAC. You can easily convert these to popular lossy formats like MP3, AAC, and OGG, or even other lossless options if needed. The software provides intuitive controls for reducing file size by adjusting key audio encoding parameters such as bitrate and sample rate.
Beyond standard audio compression, it also includes an AI-driven noise removal feature, perfect for eliminating unwanted background noise from recordings and ensuring crystal-clear sound. But VideoProc Converter AI is more than just an audio compressor; it's a comprehensive digital toolbox. It enables you to enhance video and images, convert video formats, download online videos and music files, and much more, all within one application.
Step 1. Import Your Large Audio File(s)
Download and install VideoProc Converter AI. Click Video Converter and drag and drop the audio file into the working area.

Tips: After the audio is imported, you can click the information icon next to the file name to check its Media Info. Note down the bit rate of the audio file. It could be something like 320 kb/s, 256 kb/s, etc.
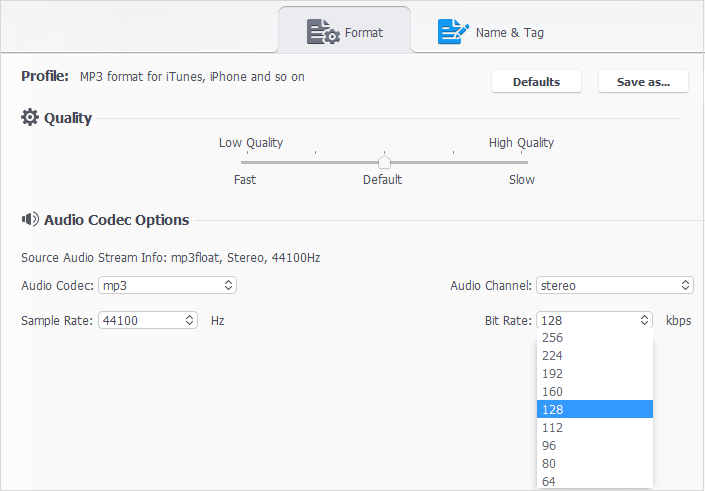
Step 2. Choose MP3 for Output
Click the Music tab, and choose a codec. MP3 and AAC are both popular options due to their efficient compression and good sound quality at lower bitrates.

Step 3. (Optional) Adjust More Settings
Click the gear icon next to the format to open a new panel. Here, you can lower the bitrate and sample rate.
Bitrate (kbps): Lowering this directly reduces file size (see the Bitrate vs. File Size: Quality Trade-off table). For most general listening, aiming for 128-192 kbps strikes a good balance between size and quality. Remember, higher bitrates retain more audio quality but result in larger files.
Sample Rate (kHz): This setting impacts the detail and richness of the audio. 44.1kHz is the standard for CD-quality music. While reducing it saves space, it can noticeably affect sound richness (refer to the Sample Rate & Bitrate Guidelines table). For the best music experience, sticking to 44.1kHz is often recommended.
 Bitrate vs. File Size: Understand the Quality Trade-off
We tested compression on a 6 MB MP3 file (44.1kHz, 320 kbps). As you can see, reducing the bitrate helps shrink the audio file significantly. For general use, 128–192 kbps usually offers a good balance between size and sound.
| Bitrate (kbps) | Audio Quality | Approx. File Size | Use Case |
|---|---|---|---|
320 kbps |
Excellent (near CD) |
~140 MB |
Music archiving, high-quality audio |
192 kbps |
Good (transparent for most) |
~84 MB |
General music listening, audiobooks |
128 kbps |
Decent (slight loss) |
~56 MB |
Podcasts, voice recordings |
64 kbps |
Noticeable quality loss |
~28 MB |
Speech-only content, bandwidth-saving |
Step 4. Compress Your Audio Files
Once you're happy with the settings, click Done. Choose your output folder. Hit Run to start the compression.
Sample Rate & Bitrate: Guidelines for Optimal Audio Quality
If you're also adjusting the sample rate, the table below provides a helpful reference. While a deep understanding isn't necessary for simply compressing music, knowing what you're modifying can be beneficial. Generally, for most audio files, aiming for a sample rate of 44.1 kHz and a bitrate between 128–192 kbps will result in a smaller file with good sound quality.
| Info | Sample Rate | Bitrate | Output File Size |
|---|---|---|---|
Original File |
44.1kHz |
320 kb/s |
6 MB |
Test 1 |
44.1kHz |
256 kb/s |
4.8 MB |
Test 2 |
44.1kHz |
224 kb/s |
4.2 MB |
Test 3 |
44.1kHz |
192 kb/s |
3.6 MB |
Test 4 |
44.1kHz |
160 kb/s |
3 MB |
Test 5 |
44.1kHz |
128 kb/s |
2.4 MB |
How to Compress an Audio File in VLC
If you have VLC installed on the computer as a media play, you can also use it as a basic compressor. Though VLC provides less opitons than VideoProc Converter AI in audio compressing, and more steps, it can be handy when you only want to compress several files.
If you prefer to batch compress audio file in one task, you can go back to the first method using VideoProc Converter AI.
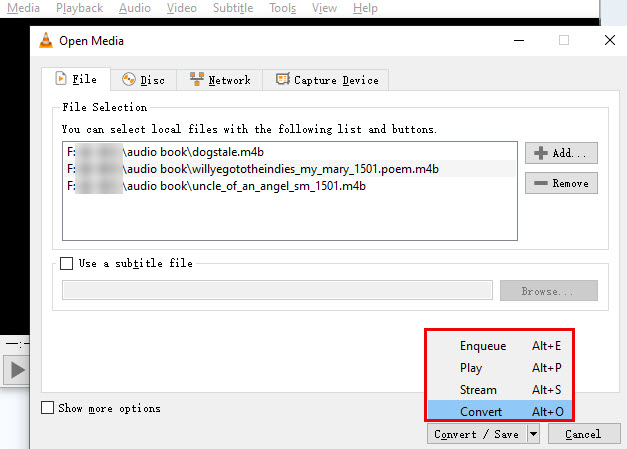
Step 1. Open the Convert/Save Panel
Launch VLC and go to Menu > Media > Convert/Save. In the File Selection, add the audio file you want to compress.
Step 2. Choose the Target Format
Click Covnert/Save button. In the newly pop-up Convert window, managing audio compressing settings. In the profile, select Audio-MP3.
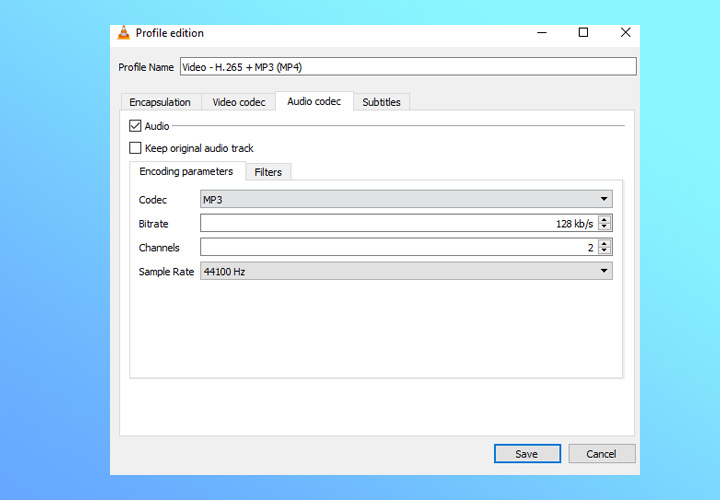
Step 3. Adjust the Audio Encoding Settings
Click the wrench icon. Click Audio and adjust the sample rate. You can select 8000 Hz, 11025 Hz, 22050 Hz, 44100 Hz, and 48000 Hz in VLC. Since you want to compress the audio into a smaller size, you can go with frequencies under 44100 Hz. You can leave the bit rate as 128 kb/s.
Note:
Our VLC tests on a 6 MB audio file (44.1 kHz, 320 kb/s) demonstrate that the final bitrate after compression is influenced by the sample rate, even when a specific bitrate is set in the audio codec. For instance, compressing with a 11.025 kHz sample rate resulted in an actual bitrate of 65 kb/s, despite the target bitrate being 128 kb/s.
| Info | Sample Rate | Bitrate | Output File Size |
|---|---|---|---|
Original File |
44.1 kHz |
320 kb/s |
6 MB |
Test 1 |
22.05 kHz |
128 kb/s |
2.4 MB |
Test 2 |
11.025 kHz |
64 kb/s (128 kb/s in settings) |
1.2 MB |
Test 3 |
8000 Hz |
64 kb/s (128 kb/s in settings) |
1.19 MB |
From Test 2 and Test 3 you can see, for this particular audio file, there is no need to compress to 8000 Hz, since VLC gives you a similar output file size and bit rate as compress to 11.025 kHz.
Step 4. Export the Compressed Audio File
Click Save to save the profile settings. Click Browse to designate the output folder. Hit Start to compress the audio file.
Method 3: How to Compress Audio Files Online
Online audio compressors allow you to compress audio directly within your browser, accessible from virtually any device with an internet connection. They are good picks for those who prefer not to install software, or need a quick solution for a small file. Below I'll demonstrate how to compress audio online via Xconvert audio compressor. But, the general process for all online audio compressor is similar.
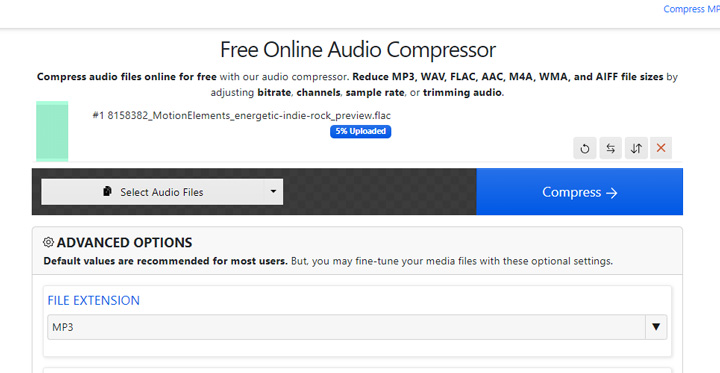
Step 1. Upload Your Audio File
Open Xconvert audio compressor with your browser. Click Select audio files and choose the audio file you wish to compress from your computer or device.
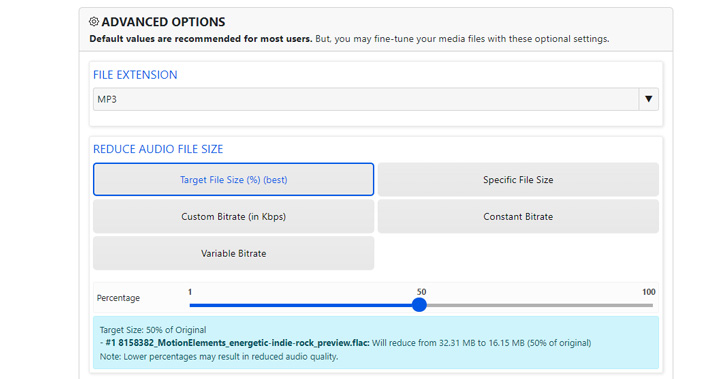
Step 2. Select the Target Size
Choose your desired output format (e.g., MP3, AAC). After that, you can set the target file size. Xconvert lets you directly specify the output audio size and compression ratio. In my case, I choose Target File Size (%) and drag the slider to 50%.
Step 3. Adjust More Settings
If necessary, you can also adjust the sample rate and audio channel settings. However, be cautious when changing the audio channel (e.g., from stereo to mono), as this is not recommended unless a noticeable drop in audio quality is acceptable.
Step 4. Start Compressing an Audio Online
Click the Compress button to start the audio compression process. Once the compression is complete, you can click Download to save the outcome.


