Get Started Editing
Import Media
You can import media - videos, pictures, and audio - from your computer or a connected device like iPhone and GoPro. It lets you drag and drop media files in a variety of formats into the project you've created quickly and non-destructively so that you can edit videos without changing the originals.
Let's download, install, and run VideoProc Vlogger. Follow the steps below to import media to the program.
Watch video tutorial to learn how to import media to Media Library in VideoProc Vlogger, or read text instructions below.
Import Media to Media Library
Step 0Create a new project
Launch VideoProc Vlogger. When a project panel pops up, complete the settings of Project Name, Location, Video Resolution, and Frame to create a new project.
Step 1Add media to Media Library
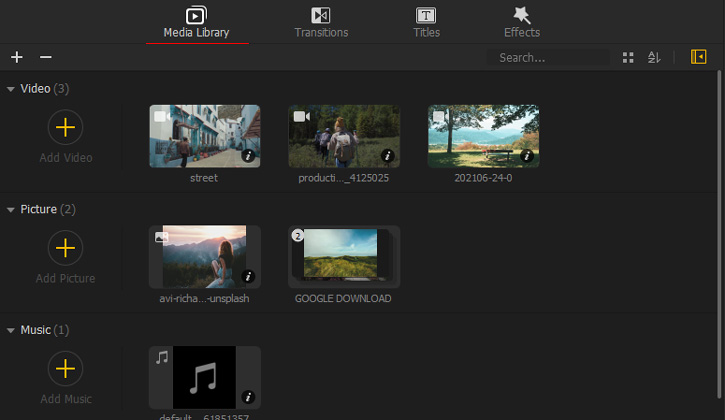
There are three easy ways to add media (include video, picture, music, and text) to Media Library.
• Drag and drop the media files or folders from the computer disk to Media Library.
• Hit the plus icon on the top left of Media Library. Hit Add File/Add Folder to select the files/folders.
• Hit the big plus button on Media Library, double click the target files.
After adding files to Media Library, hit New Video, New Picture, or New Music to add more files.
Directly importing the media from iOS, Android, GoPro, DJI, or any other camcorder or digital camera to the media library is an effortless process in VideoProc Vlogger. However, you're suggested to back up the media files from your portable device to the computer and then import them to the software to enjoy a blazing fast import speed.
 Tips
TipsVideoProc Vlogger puts no constraints on the imported media file types. It allows you to import,
- 4K/8K videos in HEVC, HDR 10bit, H.264, VP8, VP9 format, and more.
- Audios in OGG, FLAC, MP3, AAC, WMV format, and more.
- Pictures in HEIC, HEIF Unique, Apple ProRaw, PNG, GIF format, and more.
- A few text files, including the ASS/SRT subtitle files and lyrics.
- Check the full list of the supported input file formats.
Step 2 Manage the media files
VideoProc Vlogger will automatically detect the file types of the imported videos and save them into Video, Picture, and Music bin accordingly. You can also do one or many of the following for fast managing media files.
- Enter the name of the source files on the search bar of Media Library to fast locate a clip.
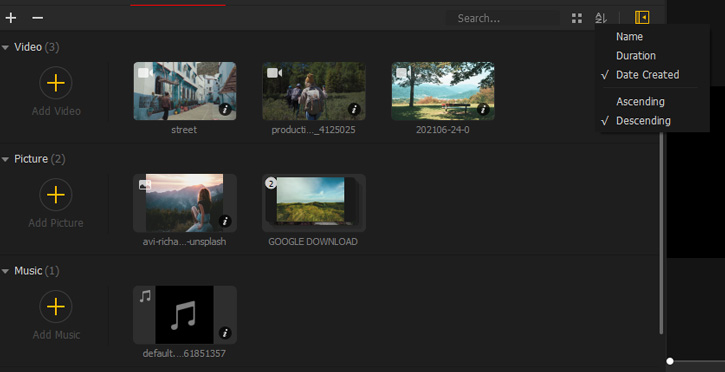
- Hit the four-dot icon, and then use the slider to adjust the thumbnail size..
- Hit the A to Z icon. Select Name, Duration, Date Created to sort the files by name, duration, or the created date in ascending or descending order.
- To delete a clip, hit the delete icon on the top right of the clip's thumbnail or right-click the clip > Delete.
- Hit the minus icon, select Delete Unused Files to batch delete unused files in Media Library.
 Delete the Unwanted Media in Batch
• Batch delete the selected files in a bin
- Press the Shift key and select the first and last media at the ends of the entire range you want to select, or press the Ctrl key and then hit each media that you want to delete or drag the mouse across multiple items to select the target media.
- Hit the minus button on the top left corner of the media library and choose Delete selected files.
• Batch delete all items in a bin
- Hit one item in the Video, Picture, or Music bin. Next, press CTR + A on the keyboard.
- Press the minus button and choose Delete selected files.
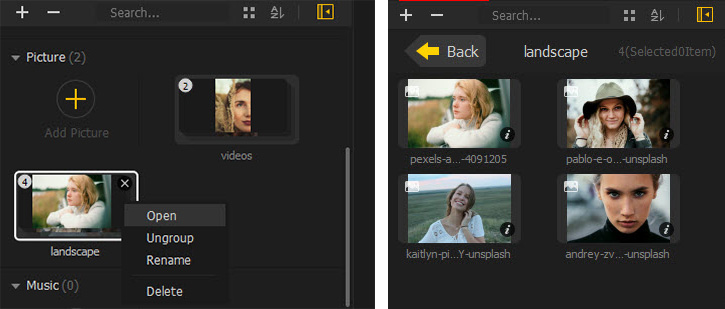
VideoProc Vlogger will divide the picture files into different groups according to aspect ratios when importing multiple pictures to Media Library at once. You can double click the group or right-click on the target group > Open to check the pictures under a group. Herein, you can press Back to exit the group or press the delete icon of the target picture to delete a picture from the group.
 Manage the Picture Groups
- To add more pictures to a group, press and hold Ctrl on the keyboard, select the target pictures and the target group, right-click the mouse and hit Group. Alternatively, open up the group and then drag and drop the picture files from the computer to that group.
- To group pictures, press and hold Ctrl on the keyboard, select the target pictures, right-click the mouse, and hit Group.
- To merge groups, press and hold Ctrl on the keyboard, select the groups that you'd like to merge. Next, right-click the mouse, and hit Merge.
- To rename a group, right-click the target group, select Rename, enter the new name. Press Enter.
- To cancel a group, right-click on the target group, and hit Ungroup. Note: This won't remove the picture files from Media Library.
- To delete a group, press the delete icon of the target group. Note: This will remove the picture files from Media Library.
Step 3Review the media
You can preview a clip as well as check its metadata on the media library.
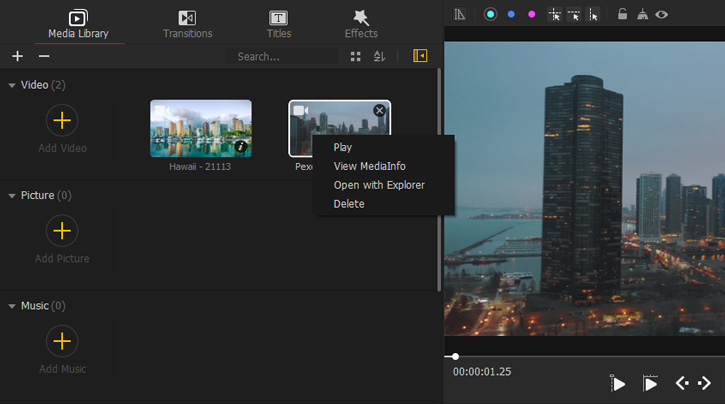
- To preview a clip, double-click its thumbnail. Alternatively, right-click the file and hit Play.
- To check the media information, hit the small i button on the bottom right of its thumbnail. Alternatively, right-click the clip and choose View MediaInfo.
- To view and open the clip with Windows File Explorer, right-click the clip and hit Open with Explorer.
Add Clips to Timeline
Step 1Add and delete a track
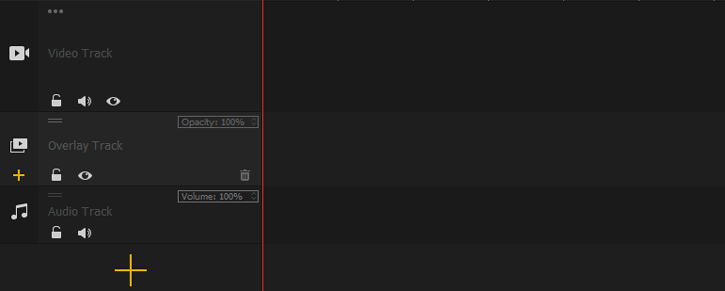
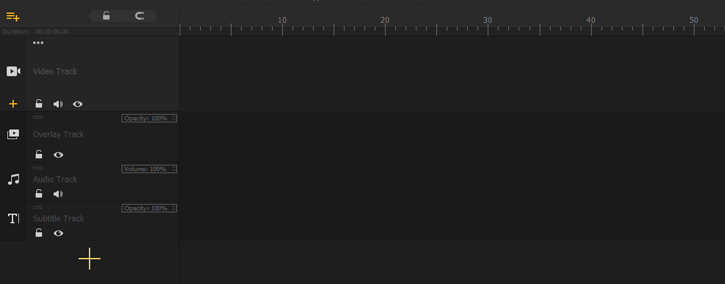
Usually, VideoProc Vlogger shows 5 tracks on the timeline: Video Track, Overlay Track, Audio Track, Effect Track, and Subtitle Track. When running the software on a small screen, only 3 tracks including Main Track and Audio Track are visible. Surely, you can delete the unnecessary tracks or add more tracks.
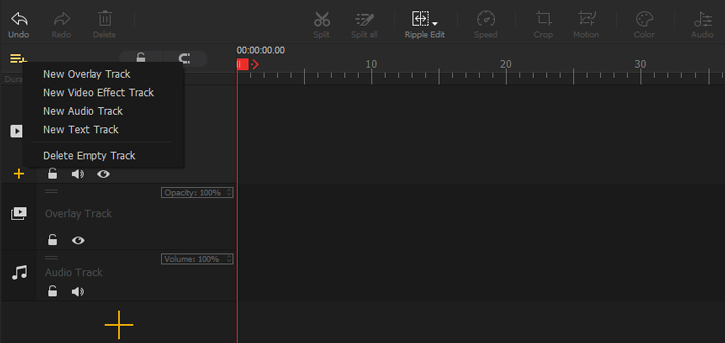
Add a track
Press the plus button on the left top of the timeline, choose New Overlay Track, New Video Effect Track, New Audio Track, or New Text Track to add more timeline tracks. Alternatively, select a track, hit the appeared orange plus icon, and then choose the type of track that you want to create.
Delete a track
Select the track that you want to delete and then hit the trash bin icon.
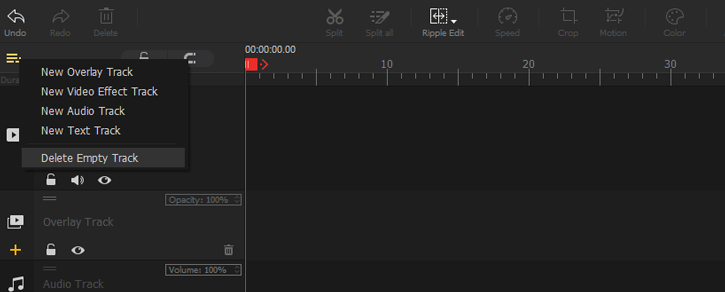
Delete empty tracks
Hit the three horizontal lines with the plus icon on the top of the Timeline control panel. After that, hit Delete Empty Track.
 Tips
TipsIn VideoProc Vlogger, you can add 999+ timeline tracks.
Step 2Drag clips onto Tracks
Simply drag the clips from the media bin onto the right timeline tracks. As said, there are five different tracks. Which track should you drag the clip onto?
- Drag the pictures and videos that you want to use as the main material to Video Track.
- If you have some pictures or videos that you wish to display on the top of the main material, drag them onto Overlay Track. The clips on this track are muted, so they won't disturb the audio from Video Track.
- All effects you've added to the clips will display in Effect Track.
- Drag the audio clips onto the Audio Track. You can drag a video onto this track if you need only the audio.
- Drag the text or subtitle file onto Subtitle Track.
 Tips
TipsYou can select multiple media clips under the Video, Picture, or the Audio bin and drag them onto a timeline track in batch. To select multiple media clips, there are 3 different ways.
- Click on a media clip and press Ctrl + A to select all media clips under a Video, Picture, or a Audio bin.
- Press and hold the Shift key and choose the first and the last clip under a Video, Picture, or a Audio bin. All media clips in between will be selected.
- Press and hold the Ctrl key and then click the media clips under a Video, Picture, or a Audio bin.
You can directly drag a picture group onto the Video Track or Overlay Track. All the picture files under that group will appear on the timeline track in order.
Free download and run VideoProc Vlogger. Follow the above steps to import media for making appeal videos.
Related Guides:
- > Preview a Project
- > Create a Video Quickly with VideoProc Vlogger in 7 Minutes
- > Create Slideshow Video
- > Cut and Split in VideoProc Vlogger
- > Copy, Paste, and Delete
For more guides of VideoProc Vlogger, please visit this page >
If you have any question, please email us or visit ![]()
![]()
![]()
Is this page helpful?
