
Clear audio is just as important as sharp visuals in any video. Whether you are creating content for YouTube, recording a tutorial, or filming a personal project, poor sound quality can distract your audience and diminish your message. Fortunately, enhancing audio doesn't have to be complicated. With the right tools and techniques, you can significantly improve the sound in your videos, making them more engaging and professional.
This guide will introduce common audio issues, how to enhance audio in a video using video quality enhancers, and tips to ensure better audio quality from the start. Let's dive in and make your videos sound as great as they look.
Common Audio Problems in Videos
Even with great visuals, poor audio can ruin your video. Here are some common audio issues you might encounter:
- Background Noise: Unwanted sounds like traffic, wind, or air conditioning can distract your audience. These noises often sneak into recordings, especially when filming outdoors or in uncontrolled environments.
- Echo and Reverb: Recording in large or empty rooms can cause echoes or reverb, making speech hard to understand. This happens when sound bounces off walls and surfaces before reaching the microphone.
- Distorted Audio: Recording at high volume levels can lead to distortion, where the audio sounds fuzzy or clipped. This often occurs when the microphone input is too sensitive or the subject is too close to the mic.
- Inconsistent Volume Levels: Variations in audio levels can make some parts of your video too loud and others too quiet. This inconsistency forces viewers to adjust their volume frequently, leading to a poor viewing experience.
- Unbalanced Audio Mix: When background music overpowers dialogue, or sound effects are too loud, it creates an unbalanced mix. This makes it difficult for viewers to focus on the main content of your video.
Understanding these common issues is the first step toward improving your video's audio quality.
How to Enhance Audio in a Video with AI
VideoProc Converter AI provides a versatile AI audio enhancer designed to enhance audio in your video effortlessly. It combines advanced AI technology with user-friendly features, making it suitable for both beginners and experienced editors.
The AI Noise Suppression automatically detects and removes background noise, largely simplifying the process. This is very practical for those who want decent results without needing advanced audio editing skills. Plus, it supports batch processing. You can easily handle multiple recordings for podcasts, vlogs, webinars, or interviews simultaneously.

VideoProc Converter AI - AI background noise removal
- AI automatic detect & remove background noise for clear sound quality
- Remove unwanted hum and hiss, fans, air conditioner, or other noises
- AI volume booster to easily increase or decrease audio levels
- Support 370+ codecs and 420+ formats, MP4, MOV, MKV, FLAC, MP3, AAC…
- Batch process multiple video and audio files simultaneously

Steps on How to Enhance Audio on a Video
After downloading and installing VideoProc Converter AI on your device, you can follow the steps below to remove background noise from your video and audio files with AI.
Step 1: Import your video and enable AI noise suppression
Launch the software and go to the Audio AI module. Drag and drop your videos to the program. Select the check-box of Noise Suppression and select an AI model.

Step 2: Remove background noise in your video
Adjust the Noise Attenuation Limit to change the level of noise suppression. The further to the right the slider is, the greater the value, the more noise reduction you'll get. Set to 6-12 for little noise reduction and 18-24 for medium reduction.
Set the Post-Filter Threshold to control how much additional noise is removed after the initial noise suppression process. A lower threshold (0.01-0.02) provides lighter filtering, while a higher threshold (0.03-0.05) applies stronger filtering.

Step 3: Adjust the volume booster if needed
Use the Volume Control slider to adjust the value of Gain if the volume is lower than expected.
Step 4: Export the enhanced videos
Set the codec and quality level according to your needs. Click RUN to enhance the audio in your video.

Tips to Enhance Audio in a Video
Enhancing audio during the editing process is crucial for producing professional-quality videos. Here are some practical tips to improve your video's sound.
- Apply Equalization: Use EQ to balance the frequency levels in your audio. For instance, reducing low frequencies can eliminate rumble, while boosting mid frequencies can enhance clarity.
- Normalize Audio Levels: Normalization adjusts the overall volume to a standard level, ensuring consistency across different clips.
- Synchronize Audio and Video: Ensure that the audio aligns perfectly with the video to maintain lip-sync and overall coherence.
- Use Audio Transitions: Apply fade-in and fade-out effects to smooth out the beginning and end of audio clips, preventing abrupt starts or stops.
Implementing these tips can significantly improve the audio quality of your videos, leading to a more professional and engaging viewer experience.
Tips to Prepare Recording for Better Audio Quality
Achieving high-quality audio starts before you hit the record button. By preparing properly, you can minimize issues and reduce the need for extensive editing later. Here are some practical tips to help you get the best audio from the start.
1. Choose the Right Recording Environment
Select a quiet space with minimal background noise. Rooms with soft furnishings like carpets and curtains can help absorb sound and reduce echo. Avoid areas near noisy appliances or open windows.
2. Use a Quality Microphone
Invest in a good microphone that suits your recording needs. For example, the Shure SM7B is renowned for its clear sound quality. Alternatively, the Focusrite Scarlett 2i2 offers both USB and XLR connections, providing flexibility for various recording setups.
3. Position Your Microphone Correctly
Place the microphone close to the sound source, typically 6 to 12 inches away. Use a pop filter to reduce plosive sounds caused by hard consonants. Ensure the microphone is stable to avoid handling noise.
4. Monitor Audio Levels
Use headphones to monitor your audio in real-time. This helps you catch issues like background noise, clipping, or distortion as they occur. Aim for consistent audio levels to ensure clarity throughout the recording.
5. Test Your Equipment
Before starting your main recording, do a test run. This allows you to check for any technical issues and make necessary adjustments. Testing helps prevent problems that could compromise your final audio quality.
How to Enhance Audio in Premiere Pro
Adobe Premiere Pro offers powerful tools to improve your video's audio quality. Whether you are dealing with background noise, uneven levels, or unclear dialogue, Premiere Pro provides features to help you achieve professional sound. This may require some learning curve and trial and error, but it also brings more room for maneuver. Here's how to enhance audio in Premiere Pro with the Essential Sound panel.
- Enable the Essential Sound panel by checking it under Window > Essential Sound.
- Select the audio clip in your sequence.
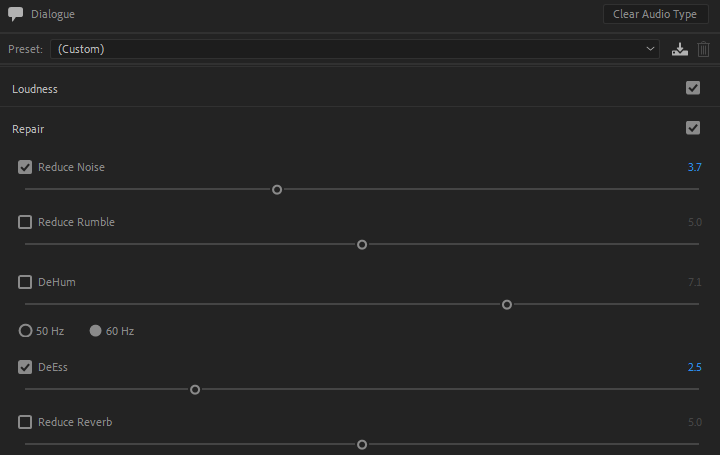
- Label your audio as Dialogue, Music, SFX, or Ambience to access specific settings.
- Click to expand Unify Loudness and click Auto Match.
- Expand the Repair section and select the check-box for Reduce Noise.
- Move the slider to adjust the level of the noise reduction between 0 through 10 as you play back the audio clip.
- Compress or expand the dynamic range, adjust the frequency response using the corresponding sliders.
By utilizing these tools and techniques, you can significantly enhance the audio quality of your videos in Adobe Premiere Pro.
 Note: Read our detailed guide on how to remove background noise in Premiere Pro.
Conclusion
That's all about how to enhance audio in a video. It's essential for delivering a professional and engaging experience to your audience.
VideoProc Converter AI stands out as a comprehensive solution for audio enhancement. Its AI features, such as noise suppression, volume booster, and fade effects, make it accessible for users of all skill levels. Additionally, its capabilities extend beyond audio, offering video upscaling, stabilization, and format conversion, all optimized with Level-3 Hardware Acceleration for efficient processing.
Feel free to download a free trial and explore its features to see how it fits your needs.


