In-page Navigation
Color Grade Picture Like a Pro
The colors of pictures can affect not just how they look but also what the mood they can convey. In VideoProc Vlogger, you have over 60 LUTs filters for fast enhancing your pictures. All the necessary setting options for the advanced image and the video color editing are also included, allowing you to edit picture color like a pro.
Let's download, install and run VideoProc Vlogger. Follow the steps to start advanced image editing.
Color Editor
After creating a project, importing the picture clips to Media Library, and draging these clips to Video Track or Overlay Track, you can select the target image clip to correct the color of an image by adjusting the exposure, contrast, and saturation. To get more advanced image editing options, hit Color Editor. Herein, you can find over 60 awesome 3D LUTs filters and well as plenty of easy-to-adjust options used for improving the picture.
3D LUTs Cinematic Filter
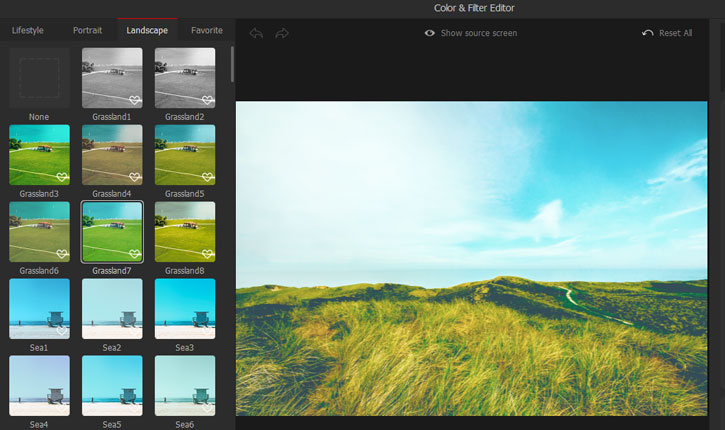
Select the loved LUTs filter from the giving options to fast improve your picture to the next level.
- For travel, food, retro, and cinematic pictures, use the lifestyle filter.
- For low light, bright, and portrait pictures, use the portrait filter.
- For sea, grassland, and alike landscape pictures, use the landscape filter.
- If necessary, drag the slider of Intensity under LUT Intensity left to adjust the filter strength, making the select filter less overpowering.
 Editing Tips
You can hit the heart icon of a filter to mark it as the loved filter. In this way, you are able to fast locate the loved filters under the Favorite meu for the next time you need to add filters to images.
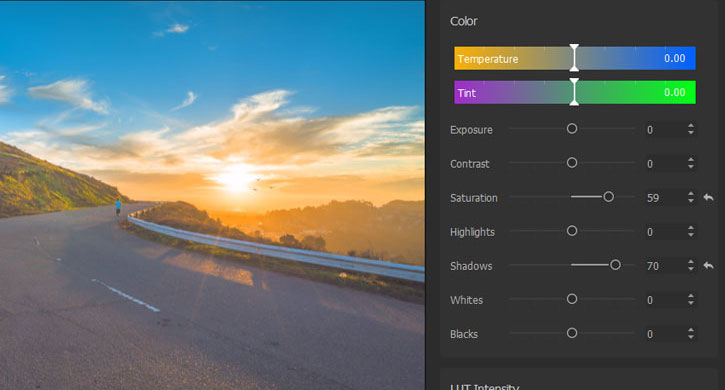
Temperature
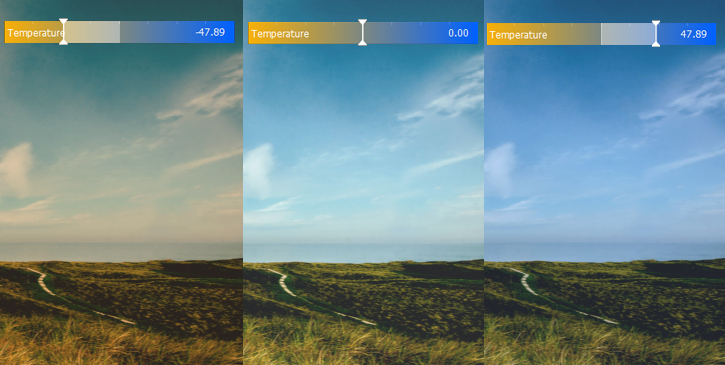
Drag the Temperature slider left to add the yellow color or right to add the blue color for making the picture seem warmer or colder.
A warm tone gives warm and harmonious feelings, reminding people of the sun, flame, blood, and other intentions. It usually creates a warm, bright, positive, and peaceful atmosphere.
A cold tone gives a calm, cool, and cold feeling, reminding people of ice, blue sky, dawn, and other intentions. It usually creates a fresh, melancholy, and quiet atmosphere.
The neuter tone gives a kind of peaceful, comfortable, and stable feeling. It usually creates a rational, neutral and harmonious scene atmosphere.
Tint
Tint is often used with the Temperature option to adjust the white balance and set the mood of the picture. Drag the Tint slider to add tints of different hues to a picture.
Exposure
Adjust the picture that is captured under insufficient or excessive light. Drag the Exposure slider right to increase the brightness. On the contrary, reducing the exposure by dragging the slider left.
Contrast
Drag the Contrast slider right to make the dark areas of the picture seem darker and the light area seem lighter. Drag the Contrast slider left to decrease the difference between the dark and light areas.
Highlights
Decrease or increase the brightness of the brightest areas of the picture while the rest areas are unaffected. Imagine you have a landscape picture, with the bright sky and the dark road. You can use the highlights slider to adjust the sky brightness while not changing the road color.
Shadows
Adjust the darkest areas of the picture while the rest areas are unaffected. Imagine you have a landscape picture, with the bright sky and dark road. You can use the shadow slider to adjust the color of the road only.
Whites
Drag the White slider left or right to change the overall brightness of a picture along with the white point.
Blacks
Drag the black slider left or right to change the overall brightness of a picture along with the black point.
Sharpen
Compensate the contour of the image, enhance the edge of the image, and grayscale jump part, so that the image becomes clear. Select Sharpen and then you can:
- Drag the Amount slider right to make the image appear more sharp and crisp.
- Drag the Radius slider right to adjust the sharpening range of a pixel.
- Drag the threshold slider right left or right to sharpen more or fewer pixels.
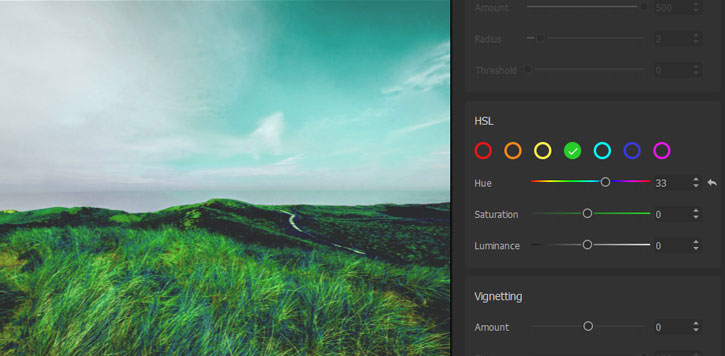
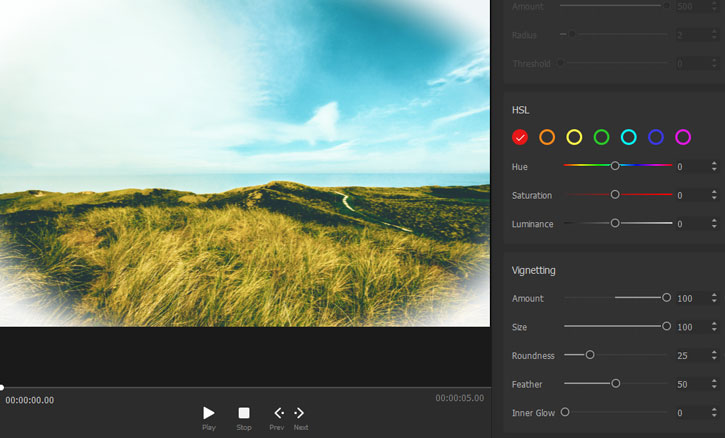
HSL
HSL refers to Hue, Saturation, and Luminance. It’s for adjusting the individual color ranges (red, orange, yellow, green, light blue, and more) in your video. Select the color that you want to adjust, and then change the Hue, Saturation, Luminance value.
- Hue: You can change the hue to turn red to blue, yellow to cyan…
- Saturation: Pictures with high saturation usually look vivid.
- Luminance: Also named lightness, it alters the brightness of the chosen color range.
Vignette
Darkening or desaturation of tones at the edges of an image compared with the center of the image. The hazy soft light effect gives a dreamlike visual feeling.
- Drag the slider of Amount to darken or lighten the vignette.
- Drag the Size left or right to reduce or increase the size of the vignette.
- Drag the slider of Roundness right to change the unaffected range from oval to round.
- Drag the slider of Feather to make the vignette more or less pronounced.
- Drag the slider of Inner Glow right to bright the area surrounded by the vignette effect.
 Editing Tips
All the adjustments are visible on the histogram and Preview Window. And you can recall the previous operation by clicking the arrow. Or reset all the color editing corrections by clicking the Reset all button.
Denoise Image
On the Inspector Panel located on the main editing window, Hit Enable Image Denoising and then drag the slider of Deviation, Coefficient, and Edge Threshold to remove the unwanted noise from the picture.

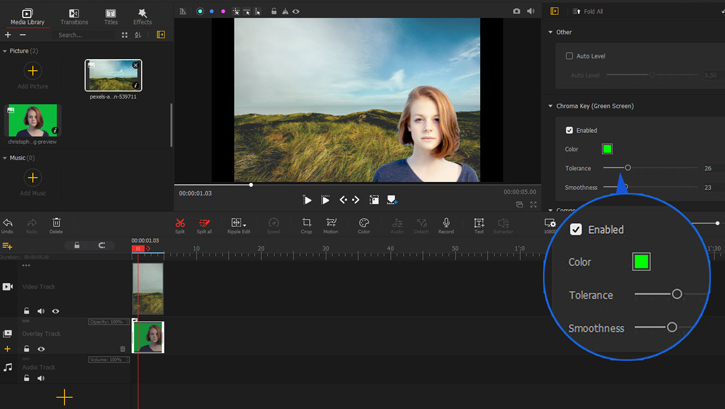
Chroma Key (Green Screen)
The Chroma Key feature can be used to replace the background with another scene. Select Enabled under Chroma Key (Green Screen). By default, the green background is removed. You can also hit the green rectangle to select another color. For instance, choose red to let VideoProc Vlogger remove the red background on the picture.
To get a more crispy green-screen effect, drag the slider of Tolerance and Smoothness.
How to Color Grade Picture Like a Pro in VideoProc Vlogger
Step 0Run VideoProc Vlogger and Import the Image
Install and run VideoProc Vlogger, complete the general setting to create a project, and then hit the plus button to import the original image to Media Library. Drag the picture to Video Track or Overlay Track.
Step 1Color Grade Image in the Inspector Panel
Select the image on the timeline track. Come over to the Inspector panel. Drag the slider of Exposure, Contrast, and Saturation to make simple edits in color. If necessary, select the Image Denoising tool or the Chroma Key tool to fix the image noises or removing the green scences.
Step 2Color Grade Image in Color Editor
Hit Color Editor to enter the Color Editor window. There you can select the loved 3D LUTs filters and make custom settings to correct your image. After that, hit Apply Color to go back to the main interface.
Step 3Export the Image
Hit the camera icone on the top of the preview window to save the outcome picture on the local disk.
Now free download VideoProc Vlogger. Follow above steps to make your photos look professional.
Related Guides
Is this page helpful?
