
 VideoProc Converter

 New AI features are available

There's nothing quite like the excitement of finally digitizing an old family tape, followed by the immediate disappointment of playing it on a 65-inch 4K TV. What looked charming on a bulky 90s CRT tube suddenly turns into a blurry, noisy, interlaced mess on modern screens.
Digitizing saves your footage from physically rotting away, but it doesn't fix the picture. That's where AI VHS restoration comes in. By using a modern AI VHS upscaler, you can scrub away analog static, fix jagged interlacing lines, and upscale your old VHS to 4K or 1080p. It won’t magically recreate details that were never captured in the first place, but it will make your favorite memories clean, sharp, and actually enjoyable to watch again.
What You Really Need: VHS Capture Device, Hardware Upscaler, or AI VHS Upscaler
That depends on what you want to do. If you simply want to play a VHS tape on a modern TV, use an analog-to-HDMI converter or hardware upscaler to make the VCR signal compatible with the display. If you want to preserve a physical tape as a digital file, you need a VHS capture device. If you already have a digitized VHS file and want to reduce noise, remove interlacing artifacts, improve clarity, or upscale it to 1080p or 4K, use an AI VHS upscaler.
In short, a hardware VHS upscaler handles live playback, a capture device records the tape, and AI VHS restoration improves the captured file. Digitization alone preserves the footage but does not improve its picture quality.
Can You Upscale VHS to 4K
Yes. Modern AI VHS restoration can turn a soft, noisy VHS capture into a much clearer 4K output, and newer generative models can produce a dramatic improvement. Conventional upscalers mainly enlarge the frame and refine visible detail. Diffusion-based models such as SeedVR2 and Topaz Starlight go further, using learned visual priors and information across frames to reconstruct faces, textures, and edges that are barely visible in the source. In my tests, even heavily blurred footage became significantly clearer and more watchable.
For most VHS footage, the model still has enough recognizable shapes, motion, and facial structure to guide the reconstruction. The result can therefore look sharp and natural while remaining close to the original. Noticeable distortion becomes a greater risk mainly when the source is extremely blurred, compressed, or damaged and contains too little information to constrain the model. In those extreme cases, AI must infer more of the missing detail from patterns learned during training. A restored face may still look convincing, but subtle features such as the eyes, skin texture, hairline, or wrinkles may not exactly match the real person.
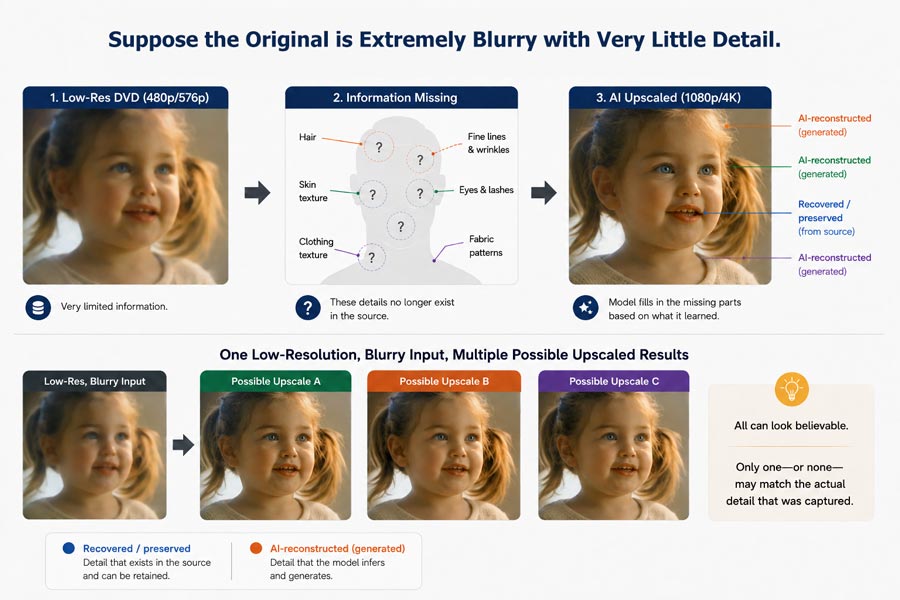
This does not reduce the practical value of converting VHS to 4K. For most home videos, the improvement in clarity can be substantial, especially when viewed on a large modern display. Preview the most degraded section before processing the full tape, keep the original digitized capture, and choose the restoration approach based on your priority. A conservative enhancement model is better when exact likeness matters, while a generative model can deliver a stronger visual improvement when watchability is the main goal.
The Two AI VHS Upscalers That Performed Best in Our Tests
A lot of video enhancers promise miraculous one-click fixes, but few can handle the messy reality of analog tape. After running dozens of digitized clips through the most popular software on the market, we found only two tools that consistently deliver: VideoProc Converter AI and Topaz Video. Both are capable, but they suit very different workflows:
Topaz Video AI is the top pick for maximum detail recovery. When working with heavily degraded clips, its Starlight models do an impressive job reconstructing clean edges and natural textures from blurry frames. That said, you will have to accept demanding hardware requirements, slow export times, and a significantly higher price tag ($299 per year).
VideoProc Converter AI is the best all-around choice for speed, price, and ease of use. In our benchmarks, it processed footage significantly faster than Topaz Video while cleanly removing tape fuzz, analog grain, and jagged interlacing lines.
Test PC: Intel Core i5-11400F, 16GB RAM, NVIDIA GeForce RTX 3060, Windows 11.
Test Clips: I used several digitized VHS clips, including TV programs, cartoons, and movie footage downloaded from Archive.org. Examples include:
- Clip 1: TV program footage, 86.87MB, 6min 14s, 720×576. View on Archive.org
- Clip 2: Cartoon footage, 28.41MB, 6min 54s, 480×360. View on Archive.org
- Clip 3: Movie footage, 25.52MB, 4min 29s, 640×480. View on Archive.org
AI VHS Restoration: How to Restore and Upscale VHS Videos to 4K
First Things First: Digitize Your VHS Tapes
Before using an AI VHS upscaler, you first need to convert your VHS tapes into digital video files, such as MP4, MOV, or AVI. AI upscaling software cannot process physical VHS tapes directly.
- Already have digitized VHS files? Great—skip to Method 1 below.
- Still working with physical tapes? You'll need a VCR and a capture device first. See our Step-by-Step Digitization Guide at the end of this article.
Method 1. Restore and Upscale VHS Videos to 4K with VideoProc
If you want a faster and more straightforward way to upscale VHS footage, VideoProc Converter AI is a good place to start. It combines AI upscaling with deinterlacing, stabilization, frame interpolation, color adjustment, editing, and compression in one program, so you can handle most of the restoration workflow without switching between multiple tools. It runs locally on your computer and uses hardware acceleration to speed up processing. Depending on the condition of your source footage, you can upscale VHS videos to 1080p or 4K while also reducing blur, noise, interlacing artifacts, and other common VHS issues. Check some of its highlight features:
- Upscale VHS video from 480P to 1080P/4K with restored details.
- Automatically fix noise, grain, blur, pixelation, and other artifacts from VHS videos.
- Increase frame rates from 25-30fps to 120/240fps for smoother playback.
- Eliminate shake in your footage with a single click, without visible quality loss.
- Deinterlace, adjust color, and apply more adjustments to elevate your VHS videos.
- Rich extra features. AI-enhance image/audio, record screen, compress videos, etc.

Step 1. Import Your VHS Videos
Download and install VideoProc Converter AI. Launch the program and click on the Super Resolution button on the main interface. Drag your digitized VHS video files from your computer into the program for import.
Step 2. Upscale & Enhance Your VHS Videos
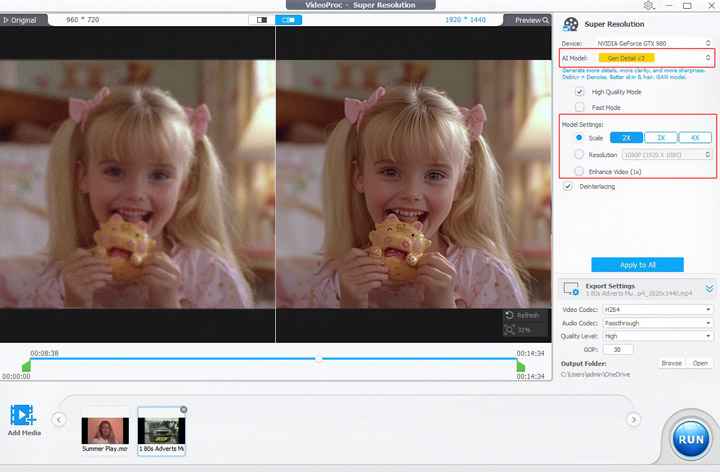
Choose the Upscale model. Select your target resolution, such as 1080p or 4K. You can also manually adjust the resolution by entering the width and height in pixels or by choosing the upscale ratio.
💡 Tips:
You can preview additional frames to see whether the current model and upscale ratio are the best fit for your VHS footage.
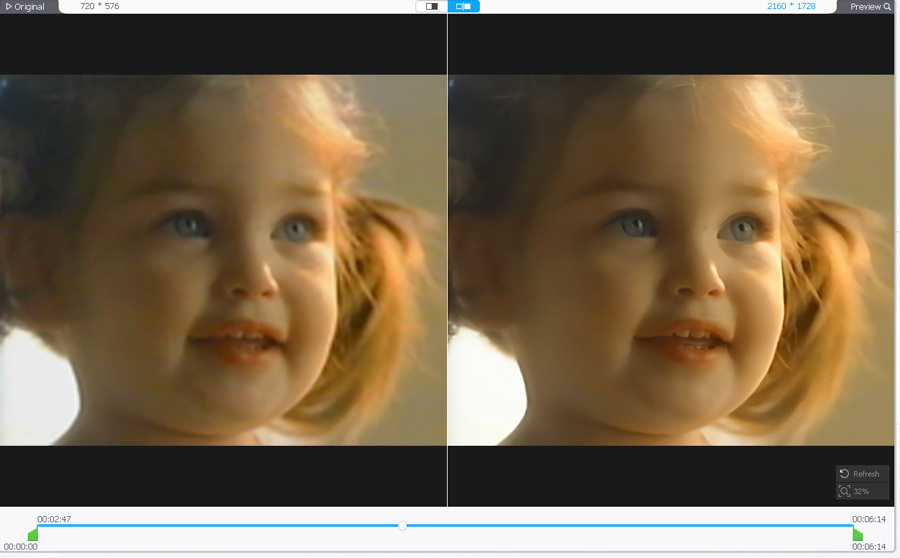
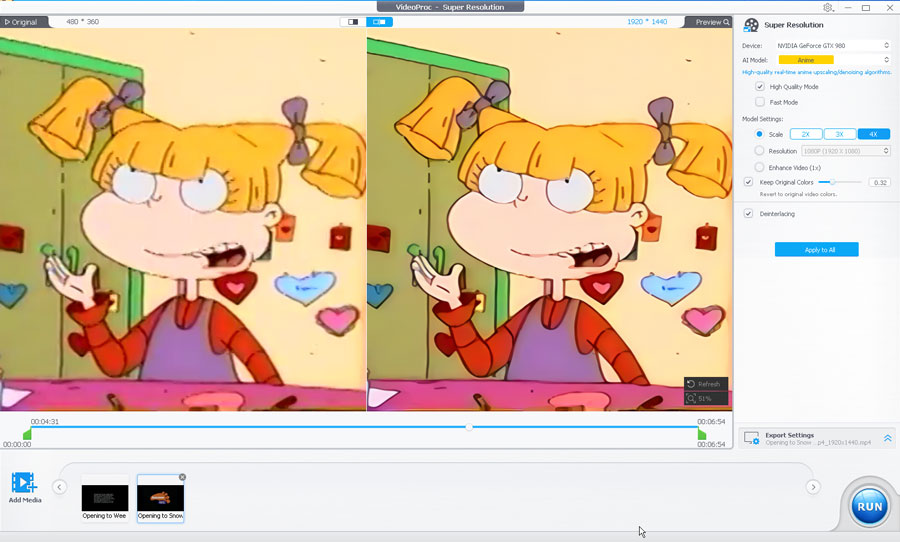
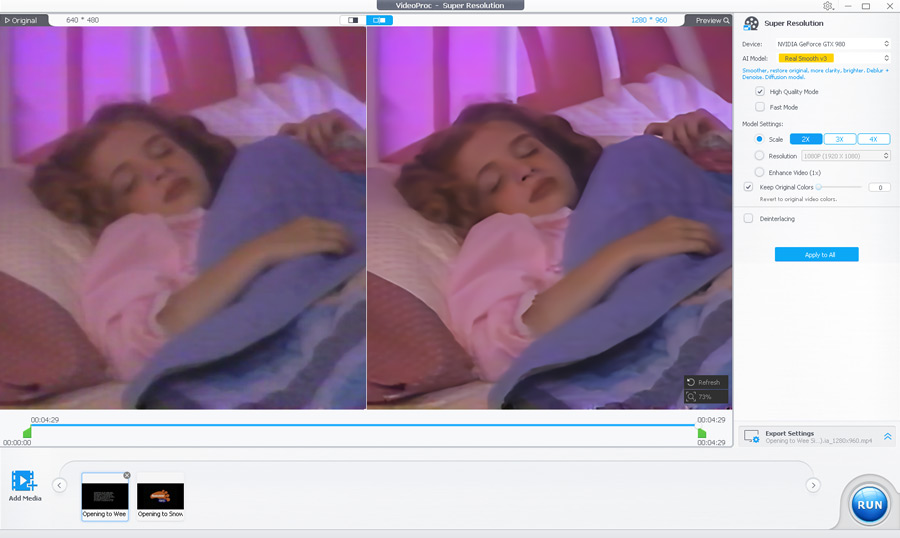
For most video types, we recommend Gen Detail v3, especially for footage with fine details such as hair or fur. If your VHS footage contains anime, cartoons, or generally simpler visuals, Anime and Real Smooth v3 are also great options. Check out the before-and-after comparisons below to see how VideoProc Converter AI upscales different types of VHS footage using suitable AI models and upscale ratios.
[1] Upscale VHS Footage with Anime at 2×
[2] Upscale VHS Footage with Real Smooth v3 at 3×
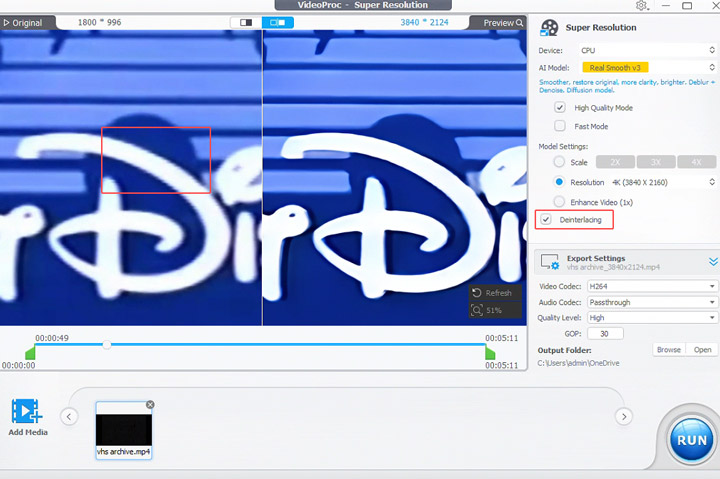
Step 3 (Optional). Deinterlace Your VHS Footage
If your VHS footage shows horizontal "combing" artifacts, especially during motion, it may be interlaced. Simply check the Deinterlacing box to remove these artifacts and produce cleaner, smoother-looking frames.
Step 4. Export the Upscaled VHS Footage
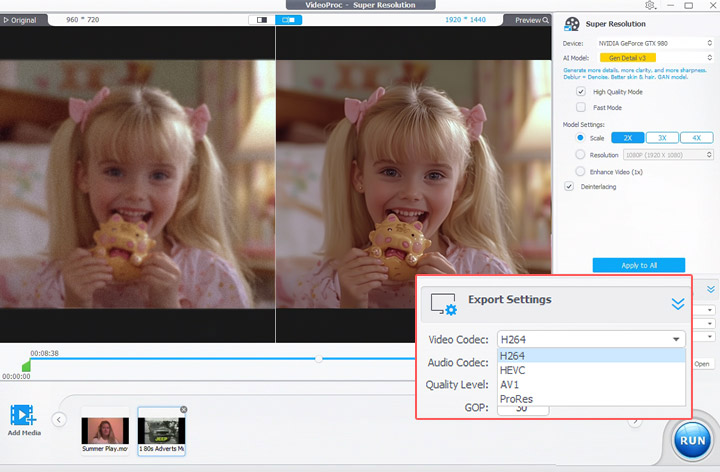
Select the target format. H.264 MP4 is recommended for broad compatibility and good quality. For smaller file sizes, you can choose HEVC or AV1, both of which offer better compression efficiency than H.264. Keep in mind that AV1 may have more limited compatibility on older devices. Click RUN to start enhancing and upscaling VHS footage to 1080p or 4K.
Beyond Pixels: Advanced Techniques for a Perfect VHS Upscale
To achieve a more modern look, VHS upscaling involves more than just increasing resolution. Motion, stability, and color all need to be addressed to fully restore the viewing experience.
[1] Make VHS Motion Smoother with Frame Interpolation
Older VHS footage can sometimes look less fluid after digitization, especially during fast motion. Frame interpolation can generate additional frames to create smoother playback, such as converting 30fps footage to 60fps.
[2] Stabilizing Shaky VHS Footage
Many VHS recordings, especially home videos like weddings or family trips, suffer from handheld shake and tracking instability. AI stabilization analyzes motion across frames to reduce jitter while preserving the original feel of the footage.
[3] Better Color and Brightness
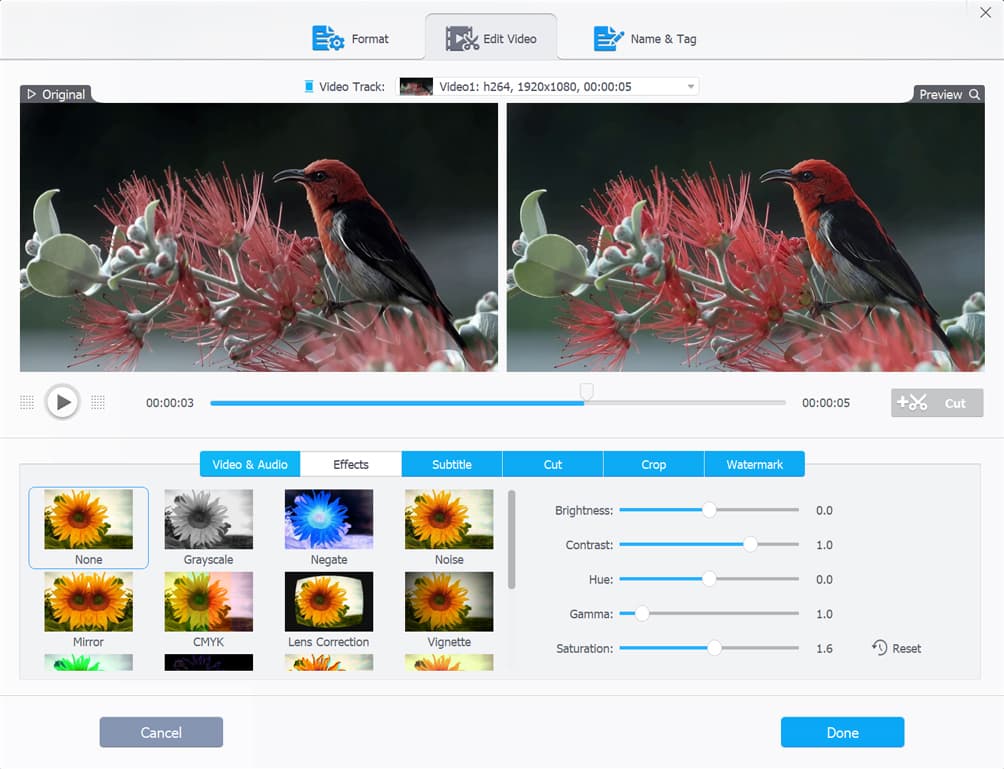
Aging VHS footage often looks faded, washed out, or poorly balanced after digitization. VideoProc Converter AI's color adjustment tools can help fine-tune brightness, contrast, saturation, and color balance for a more natural-looking result.
Method 2. Restore VHS Video with Another VHS Upscaler
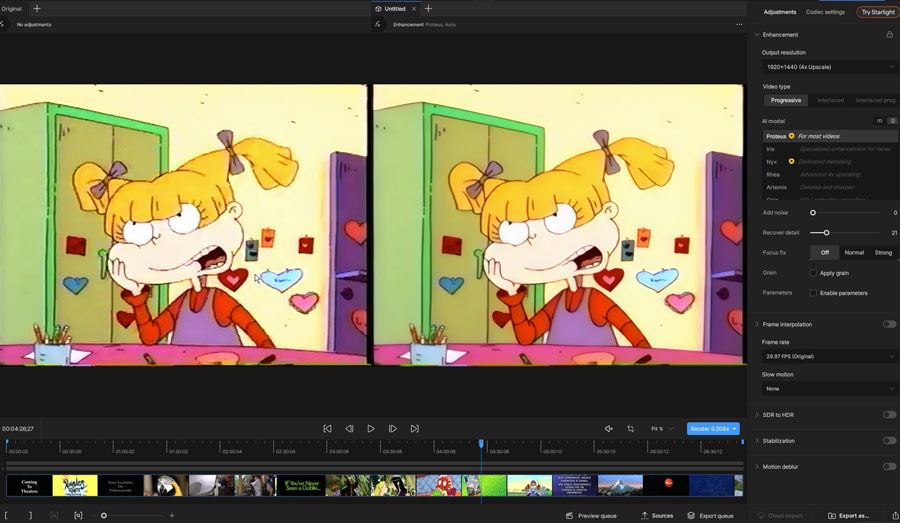
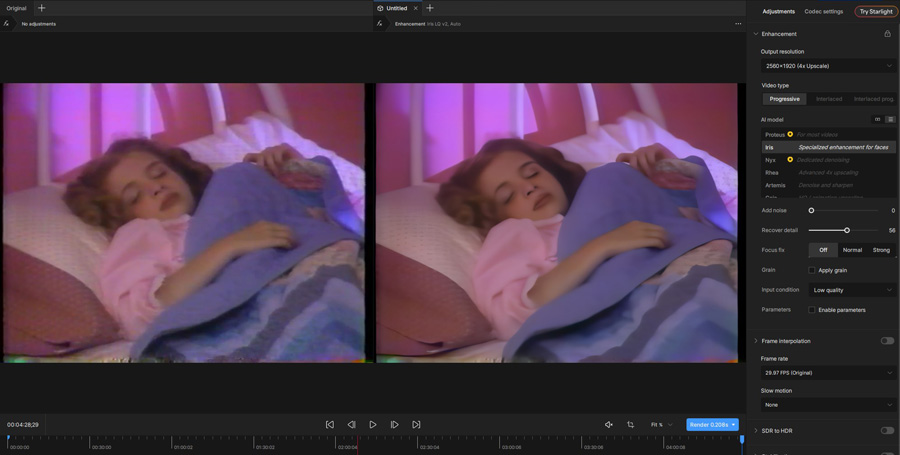
Topaz Video Topaz Video AI is a well-known tool for AI VHS restoration. It functions as a specialized VHS upscaler, using a library of models to address the noise, motion blur, and interlacing artifacts common in analog recordings. When converting VHS footage to 4K, Topaz Video relies on models like Proteus for general sharpening and Iris for rebuilding facial details that have become indistinct. For more heavily degraded footage, the newer Starlight models provide a more aggressive level of restoration to stabilize and clean up the image. However, as mentioned earlier, GAN-based and generative restoration models can produce very sharp and convincing results, but some of the added detail may be reconstructed rather than recovered from the original source. In other words, a clearer-looking face, hair texture, or fabric pattern does not necessarily mean those details exactly match what was captured in the original VHS footage.
This VHS upscaler costs $299 USD per year. If you also want to enhance scanned photos, you'll need to purchase Topaz Photo for an additional $199 USD/year. Another limitation is that Topaz Video doesn't offer tools for quick edits or compression, so if you need those features, you'll need another solution.
Step 1. Purchase Topaz Video AI
To start, purchase this VHS upscaler for $299 USD (one year license) from the official website. After purchase, download and install the latest version compatible with your operating system (Windows or Mac).
Step 2. Add Your VHS Video
Once installed, open Topaz Video AI and click Add Project. Locate your digitized VHS video, select it, and click Open to import your footage into the software.
Step 3. Set the Target Resolution
Go to the Output Resolution section. The original resolution will be displayed here. Set your desired resolution (e.g., 1920x1080p or 4K). From the discussions in the Topaz community, upscaling to around 2x the original resolution tends to provide the best results, giving you enhanced quality without looking artificial.
Step 4. Choose the AI Model
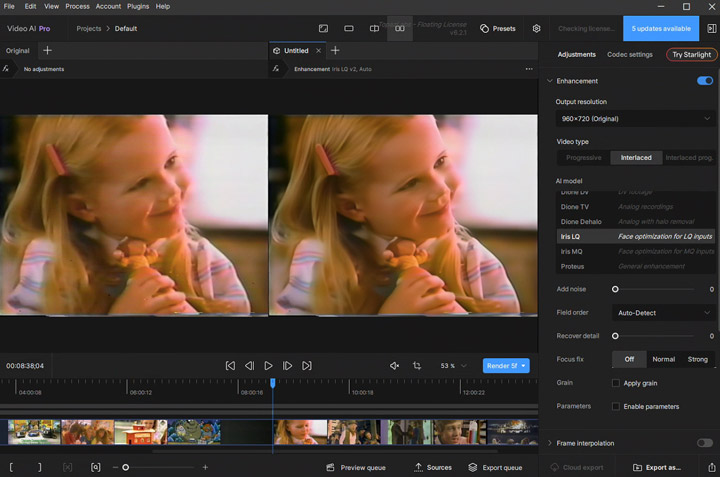
Select the video type that best matches your footage. If your digitized VHS video contains visible interlacing, choose the Interlaced option. Next, select an AI model. There is no single model that works best for every VHS recording, so it is worth testing a short section before processing the entire video. You can use Render 5s in the preview window to quickly compare the enhanced result with the original.
Step 5. Adjust Other Enhancement Settings
Adjust the available enhancement controls based on the condition of your footage. For example, I slightly increased Recover Detail to bring back more visible texture while avoiding an overly sharp or artificial look.
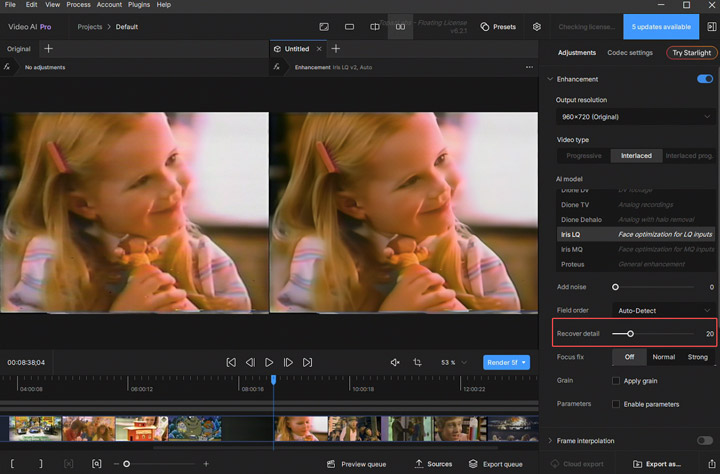
The best settings depend heavily on the source, so preview a few representative scenes—especially faces, hair, text, and moving objects, before starting the full render.
[1] Upscale VHS Cartoon Footage by 4× with Proteus
[2] Upscale VHS Home Video Footage by 4× with Iris
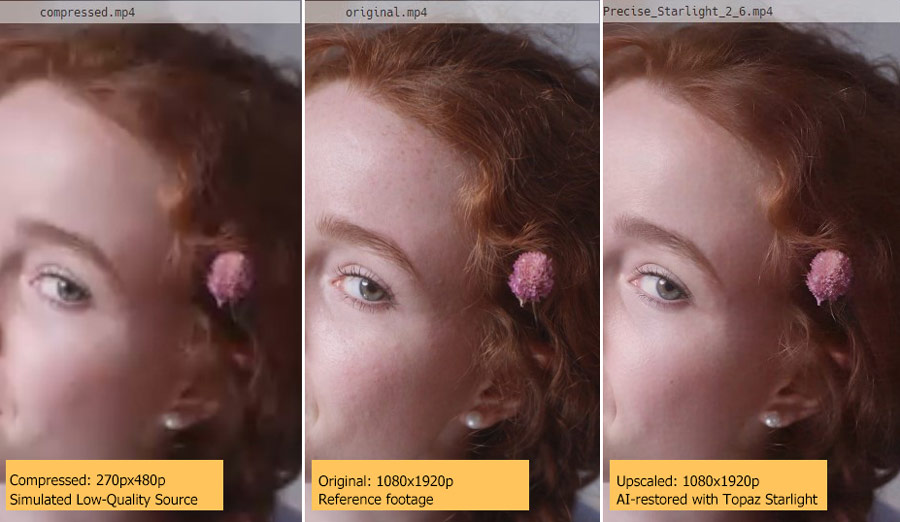
For more severely degraded VHS footage, the Starlight series is also worth considering. In my tests, Starlight Precise 2.6 recovered noticeably more apparent detail, but sharper does not always mean more faithful. To test this, I downscaled a 1080×1920 video to 270×480, then restored it back to 1080×1920 with Starlight Precise 2.6. The result looked impressively sharp, but fine facial, hair, and texture details still differed from the untouched original. In other words, some detail was plausibly reconstructed rather than perfectly recovered.
Step 6. Apply Additional AI Features
Depending on the condition of your VHS footage, you can also apply Frame Interpolation to make motion smoother or Stabilization to reduce camera shake and jitter. These features are optional, so only enable them when the footage actually needs them. Applying multiple AI processes at once can significantly increase rendering time.
Step 7. Export the Enhanced VHS Video
When you're satisfied with the preview, choose your export settings and output location, then click Export to start processing the video.
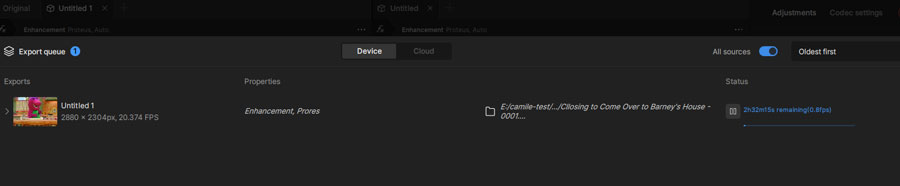
Be prepared for a potentially long render, especially when using a high upscale ratio. In my test, a 6-minute-14-second VHS video took 3 hours and 6 minutes to export with Proteus at 4× upscale. Topaz initially estimated that the render would take a little over 2 hours, but the actual processing time ended up being roughly an hour longer.
Before Upscaling VHS to 4K: Digitize Your VHS Tapes
What You'll Need:
- A Working VCR. Essential for playing your VHS tapes. Make sure it's clean and functioning well to avoid damage and ensure smooth playback.
- Video Capture Device. This device connects your VCR to your computer and converts the video and audio signals into digital format. You can use a simple USB capture stick (e.g., Elgato Video Capture) or an internal capture card.
- A computer with enough storage to save the large video files.
- Capture Software. Often bundled with your capture device, this software records the incoming video stream. Popular choices include OBS Studio (free and versatile), VLC Media Player (can capture, though less intuitive for this purpose), or the proprietary software that comes with your capture card. VideoProc Converter AI also offers a "Screen Recorder" for capturing video from external devices.
- Composite Cables. Standard yellow (video), white (left audio), and red (right audio) cables to connect your VCR to the capture device.
How to Digitize Your VHS Tapes
Step 1. Connect your VCR's RCA or S-Video output cables to your video capture device, then connect the capture device to your computer (typically via USB). Install any necessary drivers.
Step 2. Select your capture device as the input source and designate an output folder for the digitized files. Insert the VHS tape into your VCR and cue it to the desired starting point.
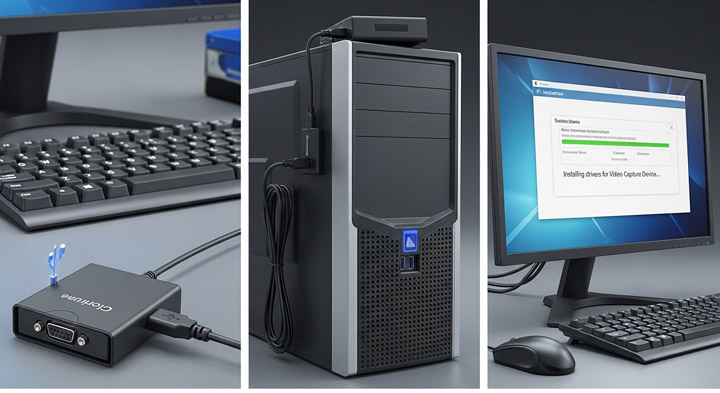
Step 3. Install and open your video capture software. Within your capture software (e.g., VideoProc Converter AI's "Recorder" module), confirm the capture device is selected and adjust recording settings like output format and quality.
Step 4. Initiate the recording process in your software, then play the VHS tape on your VCR. Monitor the real-time capture to ensure it's proceeding as expected.
Step 5. Once the tape finishes or the segment ends, stop the recording within your software, then stop the VCR. The digitized file will save to your chosen folder.
FAQs
1. What exactly is AI VHS restoration?
AI VHS restoration involves improving the visual and audio quality of digitized VHS recordings. This process addresses common issues inherent to the analog format, such as low resolution, color fading, video noise (grain, static), interlacing artifacts, and instability. The goal is to make old footage look clearer, more vibrant, and more enjoyable on contemporary high-definition screens.
2. Can AI truly improve the quality of old VHS tapes?
Yes, AI can significantly improve the quality of old VHS tapes. Traditional methods often struggle with the complex imperfections of analog video. AI algorithms, trained on large datasets, can analyze each frame to identify and reduce issues like noise, blur, and low resolution. They can reconstruct missing details and correct colors in ways that manual editing or older software cannot, resulting in a noticeably enhanced viewing experience.
3. Will Upscaling a VHS Make it Look Exactly Like a Modern 4K Movie
Honestly? No. AI cannot create details that were never there. However, it can intelligently reconstruct textures and sharpen edges while removing that &cloudy& analog noise. The result is a video that looks &cleaned up& and high-definition—far surpassing the original grainy, muddy look of the raw tape. It won't be a Hollywood blockbuster, but it will finally look clear and vibrant on your 65-inch 4K TV instead of a blurry mess.
4. How long does the AI restoration and upscaling process take?
The processing time varies depending on factors like video length, original quality, applied AI features (e.g., upscaling, denoising, deinterlacing, stabilization), and your computer's CPU/GPU. Short clips may take minutes, while full-length movies could take several hours or overnight on a powerful machine.
5. What kind of software or hardware do I need for AI VHS restoration?
You need dedicated AI video enhancement software, ideally with GPU acceleration. A modern graphics card (e.g., NVIDIA, AMD) is recommended for faster processing. While some basic tools can run on CPU alone, a powerful GPU greatly reduces processing time. The software typically offers features like AI upscaling, denoising, deinterlacing, and color correction.
6. Is it worth the effort to restore and upscale old VHS tapes?
For many, it is absolutely worthwhile. VHS tapes hold irreplaceable memories that degrade over time. Digitizing them is the first step in preservation, and AI restoration breathes new life into these memories. Enhanced quality makes old footage enjoyable on modern screens and ensures its clarity for future generations.
7. My video looks like it has "horizontal lines" moving. Can AI fix that?
Yes. It's usually caused by interlaced video, which is common in older VHS recordings and broadcast formats. Modern displays don't handle interlacing the same way, which is why you see those moving horizontal lines. Most AI video restoration tools include a deinterlacing feature. When enabled, the software converts interlaced footage into progressive video, which significantly reduces or removes those lines.