You don't need a shaky camera to ruin a good shot. When your camera shakes more than you intended, even a great shot can look amateurish. Sometimes it's a casual handheld clip, sometimes it's a walking shot that feels fine in the moment, and sometimes it's just bad luck. Either way, shaky footage pulls attention away from your story fast.
The good news? Adobe Premiere Pro gives you solid tools to stabilize a video, and when you understand how they work and choose the right workflow, you can fix most shaky clips in minutes. In this guide, we'll see how to stabilize a video in Premiere Pro, explain when it works best, and show you a few smart alternatives when it doesn't.
When Premiere Pro Stabilization Works
Video stabilization software works by analyzing motion in your footage, then applying the opposite movement to cancel it out. To hide the resulting gaps at the edges, the image is cropped and slightly zoomed in. That's the trade-off. Smoother footage usually means losing a bit of frame.
Where Premiere Pro does well:
- Handheld shots with light to moderate shake
- Walking footage with consistent motion
- Action clips where you want smoother, not perfectly locked shots
Where it struggles:
- Heavy motion blur
- Very dark or low-detail footage
- Scenes with strong foreground motion and background movement at the same time
If your clip falls into the first group, you are in good shape. Light shake and micro-jitter usually clean up nicely, but extreme jostle or heavy motion blur may not be fully recoverable.
Prep Your Clip for Better Results
This step takes two minutes and can save you ten later.
First, duplicate your clip or work non-destructively. Nesting the clip or duplicating it on the timeline makes it easy to compare before and after.
Second, trim the clip down. Warp Stabilizer works best when it only analyzes the part that actually shakes. Long clips with calm sections waste processing time and sometimes confuse the analysis.
Finally, decide whether you want a smoother handheld look that keeps motion, or a locked-off shot that feels like it was filmed on a tripod? That decision affects the settings you'll use next.
How to Stabilize a Video in Premiere Pro
Warp Stabilizer is a powerful effect that analyzes your footage and corrects camera shake automatically. It's built into Premiere Pro, requires no plugins, and handles the majority of shaky video you'll run into. It's not perfect, but it's fast and surprisingly effective when used correctly.
- Import the shaky footage into your Project panel and drag the video clip onto the timeline.
- Trim the shaky section. Focus only on the part that needs stabilization.
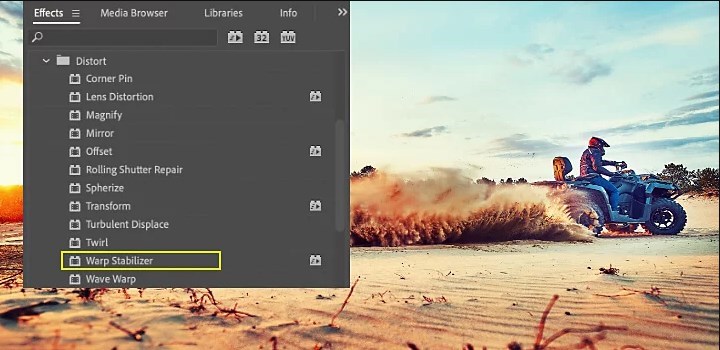
- Go to Effects > Video Effects > Distort > Warp Stabilizer, then drag it onto the clip.
- Let Premiere analyze the footage. Once analysis finishes, Premiere automatically applies stabilization.
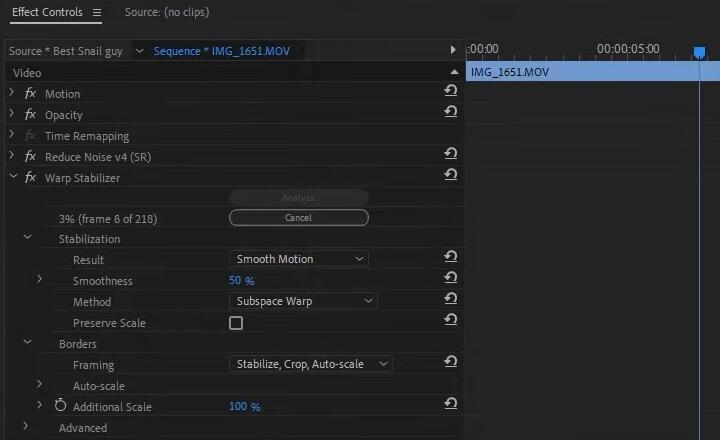
Key Warp Stabilizer Settings
When Warp Stabilizer finishes the process, you can play back your clip and preview the stabilized result in the Program Monitor. If it feels too floaty or introduces distortions, there are some parameters in the Effect Controls panel you can tweak to get the best result.
- Smooth Motion vs No Motion: The Result menu lets you choose whether to smooth out the camera movement or eliminate it entirely.
- Smoothness Percentage: This controls how strongly the effect smooths the camera shake. A higher Smoothness value makes the footage more stable but at the cost of more cropping and potential distortion, whereas a lower value retains more of the original motion for a natural feel.
- Method (Stabilization Algorithm):
- Position: only shifts the clip in X/Y space to counteract shake (basic stabilization using location data).
- Position, Scale, Rotation: adjusts the X/Y position, zoom (scale), and angle (rotation) of the frame to stabilize.
- Perspective: performs a perspective warp corner-pinning the entire frame.
- Subspace Warp (default): warps different parts of the image separately to account for motion in different regions.
- Framing (Handling Borders): When the image is stabilized, the edges of the frame will move because the effect essentially shifts or rotates the video to compensate for shake. Warp Stabilizer needs to decide how to deal with those moving edges or blank spaces that appear.
- Stabilize Only: No cropping or scaling. This will show the raw stabilised frame with black edges.
- Stabilize, Crop: It stabilizes the footage and automatically crops out the moving edges, but does not scale up the result.
- Stabilize, Crop, Auto-scale (default): This stabilizes the footage, crops the moving edges, and then scales the footage up just enough to fill the frame.
- Stabilize, Synthesize Edges: This is an advanced option where Premiere attempts to fill the empty edges by synthesizing pixels from surrounding frames.
- Advanced options worth knowing:
- Detailed Analysis can help with difficult footage, but it's slower.
- Rolling Shutter Reduction helps with the jello look common in phone and DSLR video.
As you adjust these settings, watch the playback or the Program Monitor to judge the effect. After fine-tuning, you should have a nicely stabilized clip. At this point, you can continue editing your project or simply export the stabilized video.
Workaround: Manual Stabilization with Tracking
Warp Stabilizer sometimes picks the wrong thing to stabilize. Imagine a static background with a tree blowing in the wind. Premiere might lock onto the moving leaves instead of the background, causing odd warping. The workaround is clever but simple.
- Add a temporary mask over the moving object using a crop or opacity mask.
- Track the mask if needed so it follows the object.
- Right-click the clip and choose Nest.
- Apply Warp Stabilizer to the nested clip. Premiere now analyzes the masked version, ignoring the distracting motion.
- Disable or remove the mask after stabilization.
How to Stabilize a Video In After Effects
Sometimes, Premiere Pro just isn't enough. If your shot has complex motion or the Warp Stabilizer keeps producing artifacts, sending the clip to After Effects can help. You can stabilize your shaky video using Warp Stabilizer VFX or manual tracking.
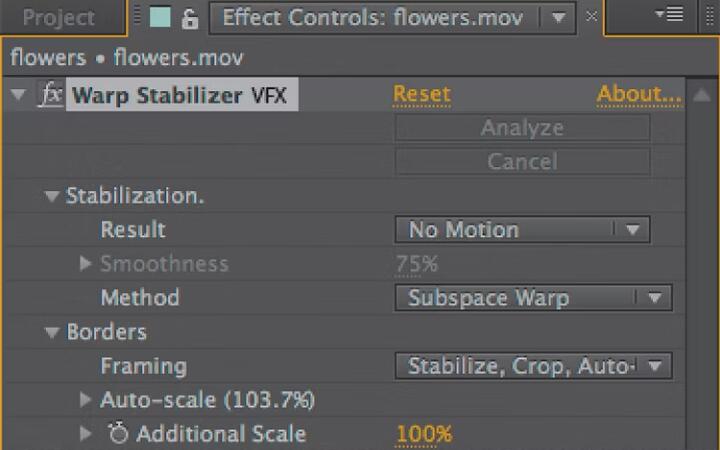
Warp Stabilizer VFX
After Effects uses the same core algorithm for the Warp Stabilizer VFX effect as Premiere Pro, but offers more control, especially for edge handling and analysis depth. The VFX suffix just indicates it's the version in After Effects.
From Premiere Pro, right-click the clip and select Replace with After Effects Composition. Apply stabilization in After Effects, save, and the result updates automatically in Premiere.
Manual Stabilization with Tracking
For ultimate precision, After Effects lets you stabilize by tracking specific points. Using the Tracker panel, you can track the position, rotation, and scale of a feature and invert that motion to stabilize the shot.
This method keeps a chosen feature locked while allowing other parts to move freely. It's ideal when you need to stabilize around a particular subject or remove only vertical or horizontal shake. Manual tracking requires more time and familiarity with AE, but it can salvage clips that confuse automatic stabilizers.
Stabilize Shaky Video with AI Video Stabilizer
Artificial-intelligence tools are making huge strides in video processing. VideoProc Converter AI offers an AI Stabilization feature designed for quick, automated improvement.
Instead of relying purely on classic motion tracking, the AI Stabilization tool uses artificial intelligence to analyze frames to find trackable points and calculate a smooth camera path between them. This approach allows the software to handle complex motion and large displacements while preserving the original resolution and quality.
You can tailor the result by adjusting the cropping ratio, stabilization intensity, and border color. Real-time previews, batch processing, and GPU acceleration help you test settings quickly and process multiple clips.

AI video stabilizers often produce smoother results with less cropping than traditional algorithms. This makes it a good option when you need a quick, automated fix or when Premiere's Warp Stabilizer introduces too much zoom. It's particularly useful for footage captured with phones, GoPros, or drones.
Prevent Shaky Footage Next Time
While post-production tools are great, the best solution is to minimize shake during filming so you need less stabilization later. Here are some tips and equipment suggestions to get more stable footage at the source:
- Use a tripod or monopod to keep the camera on a stable support
- Try a gimbal or Steadicam
- Enable in-camera stabilization like OIS or IBIS
- Add some weight or use a heavier rig to dampen quick shakes and minor tremors
This way, you'll get footage that is much more stable from the start. It not only makes your videos look better before any editing, but it also gives post-production stabilizers an easier job.
Conclusion
Premiere Pro gives you powerful tools to turn shaky clips into smooth, professional shots. The built-in Warp Stabilizer is quick and effective to stabilize a video in Premiere Pro. When foreground motion confuses the algorithm, masking and nesting can direct the stabilizer to the right area. And you can always use AI video stabilizer as an effortless alternative.
Feel free to download VideoProc Converter AI and have a try. Once you understand what the software is doing behind the scenes, you'll spend less time fighting settings and more time finishing projects.


