


As a YouTube creator, you know that video quality plays a crucial role in the success of your channel. With a competitive and saturated market, it's important to stand out and deliver high-quality content that captivates your audience. As a viewer, no one wants to put up with blurry video quality. However, achieving top-notch video quality can sometimes be a challenge.
In this complete guide, we'll explain how to improve YouTube video quality, for both content creators and viewers, from production to playback. Let's dive in!

How YouTube Processes and Displays Videos
YouTube processes over 500 hours of video content every minute. Given this massive volume of data, it is no secret that YouTube will compress and re-encode uploaded videos. This practice serves a dual purpose: it reduces waiting times for uploaders while simultaneously saving server space and bandwidth.
On the other hand, YouTube also employs adaptive streaming technology. When people watch a video, the platform dynamically adjusts the video quality in real-time based on the viewer's internet speed and device performance.
Consequently, taking these two factors into account, there could be a quality gap between the video the uploader uploads and the video the viewer actually sees, which is why you may want to improve YouTube video quality.
And in the following contents, we will explore how to narrow this gap, that is, how to improve YouTube video quality, from both the content creation and playback perspectives.
For Creators: How to Improve YouTube Video Upload Quality
Improving YouTube video quality generally falls into two categories: production and exporting. The former is what you do before and during filming, while the latter involves how you save and upload your video file.
Exporting: Adjust YouTube Video Export Settings
#1. Codec and Format
Formats and codecs work together to determine the quality, size, and compatibility of your YouTube videos. Different formats and codecs have varying levels of compression, which affects video quality and file size.
YouTube accepts videos in a wide variety of codecs and formats. However, from an uploading perspective, the best video format for YouTube is MP4 with an H.264 codec and AAC audio. This combination offers a good balance between video quality and file size, ensuring optimal viewing for your audience. It is widely supported by devices and browsers, making it accessible to a larger audience.
However, if your original video is not MP4 with H.264 codec, there is no need to worry. You can simply set the render settings within your video editor, whether you are using Premiere Pro, FCP, or CapCut. If the video has already been exported, you can also use video converters to transcode it to the appropriate format.

VideoProc Converter AI - Video Converter Free Download
- Automatically apply YouTube's recommended settings using pre-configured profiles
- Support 420+ input/output formats and codecs for optimal compatibility
- Process up to 47x faster with full GPU acceleration, often using only 2% CPU
- All-in-one: AI tools, compress, quick edits, download, record, DVD backup, etc.

#2. Resolution
Resolution refers to the number of pixels in each dimension of your video. The higher the resolution, the more detailed and clearer your video will appear. In the context of YouTube, there are a subtle relationship between resolution and codec.
When you upload a video, YouTube compresses it. However, YouTube may use different compression codecs depending on the video's size and your channel's size. By default, smaller channels uploading in 1080p get assigned the AVC (H.264) codec, which applies aggressive compression and can make your footage look blocky or pixelated, especially in high-motion scenes.
To avoid this, you want the superior VP9 or AV1 codec. To force YouTube to give you this better codec, export your video in 1440p (2K) or 4K, even if you only filmed it in 1080p. Upscaling your 1080p timeline to 1440p before exporting guarantees that YouTube will process your video with VP9 or AV1. When your viewers watch that video in 1080p, it will look noticeably sharper and cleaner than if you had just uploaded a native 1080p file.
VideoProc Converter AI - AI Video Enhancer & Upscaler
- Upscale video resolution by 1x to 4x, up to 4K clarity for YouTube
- Automatically denoise, deblur, upscale, and add more life-like details
- Apply different AI models to different types of videos
- Export H.264, HEVC, ProRes, and AV1 video codecs in common containers
- More AI tools: Frame Interpolation, Stabilization, Face Restoration, etc.
#3. Bitrate
Bitrate is the amount of data that is processed per second in a video file. It directly affects the quality of your video, as well as the file size. A higher bitrate generally results in better video quality, but it also means a larger file size.
To maintain optimal video quality, YouTube provides suggested bitrates for different resolutions:
- 1080p: 8 Mbps for 24-30 fps, 12 Mbps for 48-60 fps
- 1440p (2K): 16 Mbps for 24-30 fps, 24 Mbps for 48-60 fps
- 4K: 35-45 Mbps for 24-30 fps, 53-68 Mbps for 48-60 fps
These bitrates ensure that your videos look good across different devices and internet speeds. However, keep in mind that the actual bitrates used by YouTube may vary depending on the complexity of your video and the available bandwidth.
 Pro Tip: If your editing software allows it, use Two-Pass Encoding (often labeled as VBR 2-pass). It takes twice as long to export, but it analyzes your video first to distribute the data more efficiently, keeping crisp details in fast-moving scenes. If you are uploading in HDR, bump these bitrates up by about 20% to 25%.
#4. Frame Rate
Frame rate determines how many frames, or individual images, are displayed per second in your video. YouTube supports all standard frame rates, but the golden rule is that never export at a higher frame rate than you filmed. Ideally, you should export using the exact frame rate of your recorded frame rate.
#5. Aspect Ratio
Aspect ratio refers to the width and height of your video frame. The most commonly used ones on YouTube are 16:9 and 4:3.
YouTube's video player is dynamic, meaning it will automatically adjust its shape to fit whatever aspect ratio you upload without adding black bars—if you upload it correctly. Here's a quick checklist before exporting:
- Ensure your timeline or sequence settings match your recorded aspect ratio.
- Set your export aspect ratio based on where the video will live (Long-form = 16:9, Shorts = 9:16).
Uploading: Quick Tips on Settings
#1. Visibility
When you first publish a video, YouTube makes the Standard Definition (SD) version available immediately so people can watch it right away. The HD, 1440p, and 4K versions take much longer to process on their servers.
When you are on the final screen of the YouTube Studio upload window, do not select Public right away. Instead, choose either the Unlisted or Schedule option.
Look for the little blue resolution icons next to the video thumbnai in the "Content" tab of your YouTube Studio. Wait until the HD or 4K icon stops blinking and turns solid blue. Once it is solid, that resolution is locked in and ready. Then you can safely make the video Public.
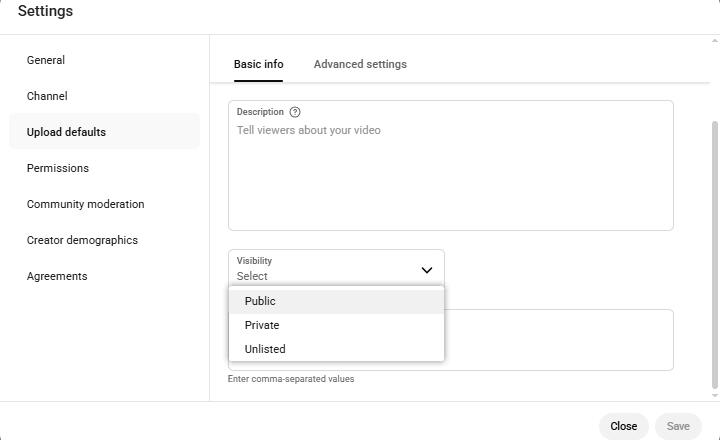
#2. Video quality enhancements
YouTube offers settings designed to enhance the viewer experience, such as boosting image clarity and adjusting volume levels. If you are comfortable allowing YouTube to apply these enhancements, you can enable these settings within YouTube Studio.
- Sign in to YouTube Studio on your computer.
- Go to Settings > Channel > Advanced settings.
- Active Let YouTube enhance visual quality or Let YouTube enhance audio quality.
- Click Save to apply.
Production: Before and During Filming
#1. Lighting
Good lighting can enhance the overall look of your videos, making them more visually appealing to viewers. Invest in affordable lighting options like ring lights or softboxes to ensure that your face is well-lit and shadows are minimized.
#2. Audio Quality
If your audio is crisp and clear, viewers will actually perceive the video quality to be higher.
Built-in camera or smartphone microphones often capture unwanted background noise or produce muffled audio. Consequently, you may need to utilize post-production techniques to remove this noise from your video.
By investing in a dedicated microphone, you can significantly improve the clarity and crispness of your audio, resulting in a more professional and enjoyable viewer experience. Shotgun mics are highly directional and capture audio from the front while minimizing background noise. They're perfect for vlogs and interviews where you need to capture clear audio from a distance. Lapel mics, also known as lavalier mics, are small, clip-on microphones that you can attach to your clothing. They're great for tutorials and presentations where you need hands-free audio and close-up sound capture.
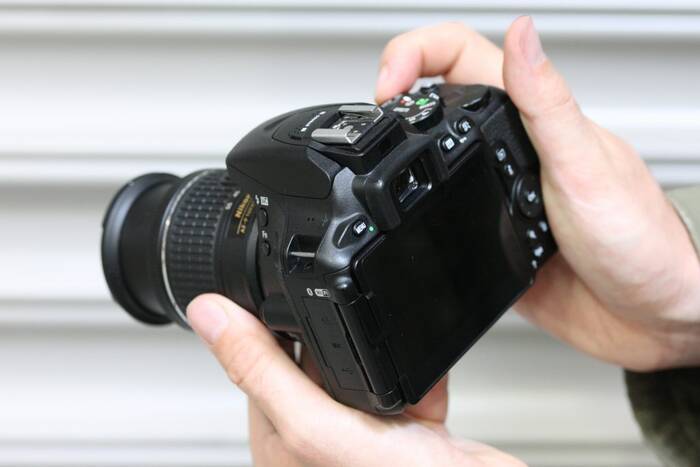
#3. Camera
DSLRs are a popular choice for their high-quality video capabilities, interchangeable lenses, and manual controls. They offer superior image quality and depth of field control, making them ideal for professional-looking videos. However, they can be bulky and expensive.
If you're just starting out or on a budget, smartphones can be a great alternative. Smartphones have become increasingly powerful and can capture impressive video footage with the right apps and accessories. Plus, they're convenient and portable, making them perfect for on-the-go shooting.
Use a tripod or stabilization. Excessive, jittery motion forces the compression algorithm to work harder, causing pixelation.
For Viewers: How to Improve YouTube Video Playback Quality
If videos you are watching consistently look blurry or pixelated, YouTube is likely dialing back the resolution to save data or accommodate a slower internet connection.
Improve the Quality of Your Current Video
- Click the Settings Icon in the video player.
- Select Quality.
- If it's set to "Auto," directly select the highest available resolution like 1080p, 1440p, or 2160p (4K).
Improve the Quality for All Videos
You can adjust the default quality for all videos you watch within the mobile app.
- Tap your Profile Picture > Settings.
- Select Video quality preferences.
- You can set your default preference for both Mobile Networks and Wi-Fi to Higher picture quality.
- If prompted, select the desired resolution quality for all videos.
Conclusion
Improving the quality of your YouTube videos is a continuous process that requires time, effort, and dedication. By following the steps and tips outlined in this guide, you'll be well on your way to delivering high-quality content that resonates with your audience. Remember to stay true to your unique style and keep experimenting to find what works best for you.


