In-page Navigation
Using Audio Equalizer in VideoProc Vlogger
VideoProc Vlogger offers a 10-band graphic equalizer to help you to optimize the sound. Beginners can use the built-in presets to 1-click adjust the EQ, and advanced users can drag the sliders for customized settings.
Free download VideoProc Vlogger to edit the video and fine-tune the audio with the built-in equalizer.
Watch video tutorial on how to use Audio Equalizer in VideoProc Vlogger, or read text instructions below.
What Is an Equalizer
An equalizer (EQ) is an audio filter to increase or reduce the volume of certain frequencies.
Humans can perceive sounds in a frequency range from about 20 Hz to 20 kHz, with individual differences. If we divide that frequency spectrum into a group of ranges, or the frequency band, we will have bass, midrange and high end (also known as treble) frequencies.
 Tips
TipsFor instance, if you want the vocals to be more clear and articulate, you can boost the treble frequency range; if you prefer the music to sound "heavier", you can drag the slider up to increase the gain.
Interface and Controls
Graphic equalizers are available in a number of sizes, each offering a fixed number of frequency bands.
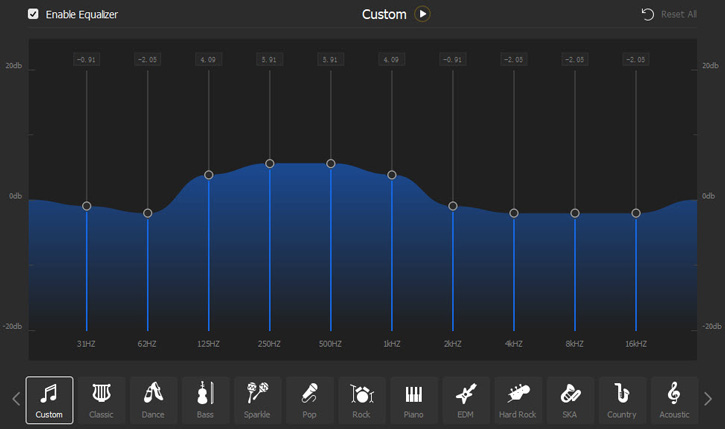
VideoProc Vlogger uses a 10-band Graphic Equalizer in the built-in audio editor. The frequency runs through the horizontal axis, and amplitude (volume) runs through the vertical axis, from -20 dB to 20 dB. It can help you to alter the color of the audio, and optimize your sound.
- Each slider adjusts the volume of a specific range of frequencies, with the frequency centered on the slider being boosted or attenuated the most.
- When the equalizer controls stay at the 0 level, it is the neutral position, or the flat EQ.
- To boost a certain frequency, drag the slider up; to attenuate it, drag the slider down, by a maximum of 20 dB.
- You can also enter the number of decibels (dB) to boost or cut from the frequency band.
For beginners, there are 14 types of presets EQ that you can use in 1-click.
For advanced users, you can customize the EQ by dragging the sliders on certain frequencies.
EQ Presets in VideoProc Vlogger
There are 14 EQ presets in VideoProc Vlogger, namely, Classic, Dance, Bass, Sparkle, Pop, Rock, Piano, EDM, Hard Rock, SKA, Country, Acoustic, Folk, R&B.

These presets are the predetermined volume adjustment for frequencies based on audio genre. When you select a preset, the frequency sliders will move up or down to boost or cut the volume in dB, resulting in a graphic pattern that is generally considered typical for a certain type of audio or music genre.
Access the Equalizer in VideoProc Vlogger
Adjust the EQ for the Entire Audio Clip
The Equalizer can be accessed in Audio Editor from both the tools bar and the Inspector Panel.
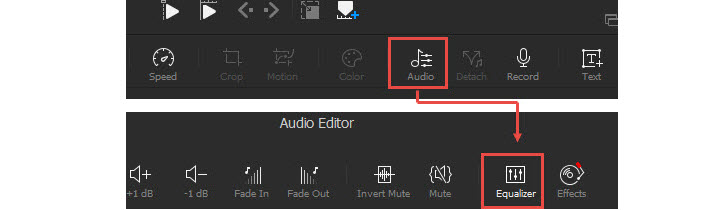
Step 1 Click on an audio clip, and hit the Audio icon on the tools bar.
Step 2 In the newly opened Audio Editor window, and click the Equalizer icon.
Step 3 Play the audio, and use the EQ presets or manually drag the sliders for a custom EQ setting.
TipsWhen you are switching between the EQ presets, or manually dragging the sliders, you can hear the changes in real-time.
You can repeat toggling on and off the Enable Equalizer option to compare the current settings with the original audio.
That preview won't change the audio clip on the audio track, unless you hit the Apply button in the Audio Editor window.
Adjust the EQ for the Selected Portion of the Audio Clip
If you want to adjust the EQ for a selected section of the audio clip, follow the steps below.
Step 1 Select the desired section in the Audio Editor by dragging your mouse. The selected section will be highlighted.

Step 2 Click Effects > Equalizer. You shall see an 8-band EQ.
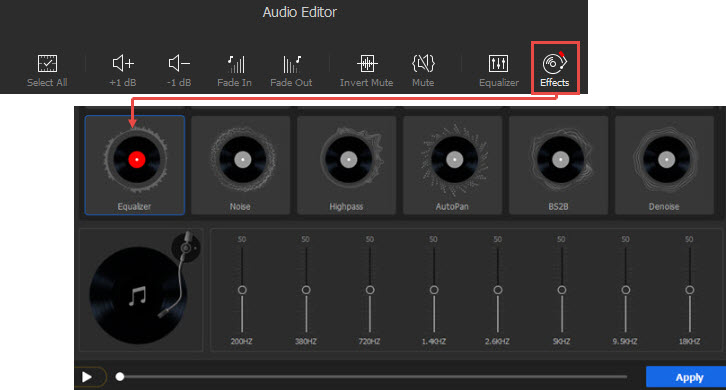
Step 3 Drag the sliders and hit Apply.
Alternatively, you can split the audio into several clips on the timeline, and using the 10-band equalizer to adjust the part you want.
How to Use the Equalizer
Using the Presets
The quickest way is to use the presets and find one you like. You can stick to that preset setting, or make minor adjustments based on the preset, so that you don't have to start from scratch every time.
- VideoProc Vlogger offers real-time preview, you can hit the play button, listen to the audio and switch between the presets to find the desired setting.
- You can toggle on and off the Enable Equalizer, to compare how it sounds with and without the EQ settings.
- You can drag the slider in a preset, which brings you to the custom settings.
- You can experiment with the sliders freely, and Click Reset All to abort the changes and leave the audio unchanged.
Manually Changing the EQ
The ultimate goal for EQ adjustment is to optimize the sound and make it as perfect as possible to your taste. Besides reducing rumbling sound and sibilant, there are artistic concerns.
For your reference, here is a list of frequency ranges for vocals and instruments:
- Female vocals: 150 Hz-1.6 kHz
- Male vocals: 60 Hz-500 Hz
- Cello: 63 Hz-630 Hz
- Cymbals: 200 Hz-10 kHz
- Flute: 250 Hz-2.5 kHz
- Guitar: 70 Hz-1.1 kHz
- Kick drum: 60 Hz-4 kHz
- Organ: 20 Hz-7 kHz
- Piano: 25 Hz-4.5 kHz
- Saxophone: 100 Hz-1k Hz
Get Rid of the Rumbling and Boomy Noise
Dealing with the sub bass and bass range can achieve brilliance and clarity of the audio. If there is too little energy in these ranges, the audio sounds weak and thin, if there is too much, you will hear the rumbling and boomy sound.
- Using the EQ, you can take away anything under 40 to 60 Hz.
- For female vocals, you can drag the slider down for frequencies below 200 Hz. On the 10 band graphic EQ, you can push the slide down on 125 Hz.
- If the voice sounds "muddy", you can drag the slider downward in the 300-400 Hz range. On the 10 band graphic EQ, drag the slider down on the 250 Hz slider.
Add Energy in Vocals
If the voice is too thin, and you want to add some energy, try to adjust the range of 125 Hz to 1 kHz. Because the vowel sounds such as "a", "e", "u" fall in the area of 125 Hz to 1 kHz.
Deal with the Sibilant
Sibilants are those strong "s" and "z" sounds. It falls into the frequency range of 5-7 kHz. For male voice, the sibilants tend to hide in the 3-5 kHz, and for female voice, 5-8 kHz. If you feel there are too much sizzles, you can cut around that range to reduce the sibilant sound.
Highlight an Instrument
If there are certain instrumental sounds you want to emphasize, you can search in the frequency range of that instrument, go through a trial-and-error process by dialing up the sliders, and find the control point that's closest to that range.
For instance, the frequency of guitar usually hides in the 70 Hz-1.1 kHz range, you can boost the 125 Hz in search of the guitar, and go on trying the 250 Hz, 500 Hz, 1 kHz.
Optimize the Sound by Reducing Instead of Boosting
As you can see from above, when you are in search of a sound, you go boosting the sliders in certain ranges, until you find the range you need.
Once you find that range, the best practice is to bring that slider to the neutral position, and reduce the signal in other ranges. Because boosting the volume is more likely to add distortions to the audio, and can add artificial and robotic sounds to the original audio track.
Free download VideoProc Vlogger to edit the video and fine-tune the audio to sound professional.
Related Guides:
- > Introduction to Audio Editor
- > Detach Audio from Video
- > Mute Audio
- > Reduce Background Noise of Video & Audio
- > Record Voiceover and Change Voice
- > Adjust Audio Speed without Changing Pitch
- > Add Filters to Audio
- > Using Audio Analyzer
- > Volume Fade In and Out
For more guides of VideoProc Vlogger, please visit this page >
If you have any question, please email us or visit ![]()
![]()
![]()
Is this page helpful?
