In-page Navigation
What is Keyframe | Add Keyframes in VideoProc Vlogger
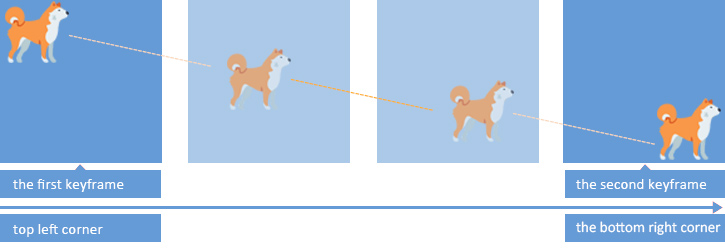
When creating an animation effect, you'll need to add two timeline markers at least, one for signifying the start point of the movement and the other for the end point. These timeline marks are keyframes.
Understanding Keyframes
The first keyframe defines the state (position, scale, speed, ratio, or more information) of an object at the initial frame of the change. The next keyframe defines the state of an object at the end frame of the change. As the timeline progresses from the first keyframe to the next, your editing software can automatically add changes or effects to the clip in-between the keyframes based on the changes between two points.
In this way, you can create movements, transition, or other amazing visual effects.
For instance, you want to crop a video with a moving crop area and fixed size. You can place a keyframe at the point where you want the cropping to begin and choose the initial cropping area, and then place another keyframe at the point where you want the cropping to end and choose the end cropping area.

NLE editing software like VideoProc Vlogger would automatically calculate where the cropping box should be placed at different time points in between two keyframes, so it can move the cropping range to the desired location in the allotted time.
What Can You Do with Keyframes
Keyframes are everywhere in video post-production. Creative content creators work with keyframes to create animations, visual effects, transitions, or other sort of effects in their storytelling. For example,
• Create smooth and flow speed controls. Place a keyframe at the point where the speed change starts and place another keyframe at the point where the speed change ends or a new speed change starts. The video can gradually speed up or speed down without sudden jumps.
• Change the frame size progressively. Add keyframes to the place where the frame size changes. You can crate impressive transition effects like crop opening or closing.
• Animate the still elements. Bring your still pictures to life by setting keyframes for scale, speed, frame & ratio and other motion properties.
• Simulate camera movements such as push in, tilts, and handheld shakes. Drive the attention of the audiences to a moving object or a particular area by keyframing scale and position.
• Create cool visual effects. By working with keyframes and a few other advanced editing toolkits to create awesome visual effects, for instance, bouncing titles, transparent gradient, and picture-in-picture swapping.
Free install VideoProc Vlogger and create astounding visual effects with keyframes
How to Add Keyframes in VideoProc Vlogger
In VideoProc Vlogger, you can take advantages of the keyframe feature in motion to animate the scale, position, speed, frame & ratio effects with zero learning curve. In addition, you can add keyframes in speed effect to create smooth transition between two different speed segments.
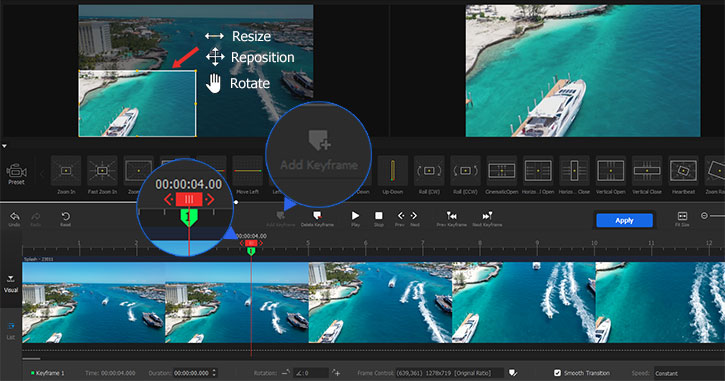
Add Keyframes in Motion
Step 0 Open up VideoProc Vlogger. Complete the general settings to create a new project. Press the plus button to import the original video clips or still images to the program. Drag them onto Video Track.
Step 1 Hit Motion to enter Motion Editor. Move the playhead over the position where the animation or the change starts. Hit Add Keyframe.
Step 2 Change the scale, position, rotate, and crop parameters to decide how the start of an animation or change looks like.
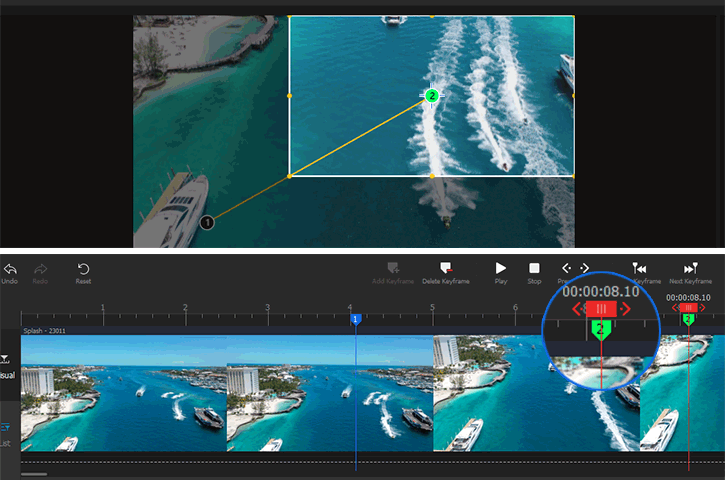
Step 3 Move the playhead to the next place and hit Add Keyframe to add your second keyframes. Just repeat this steps to add as many keyframes as you want. Suppose you add only two keyframes in one clip, then you should place the keyframe over the position where the animation or the change ends.
Step 4 Adjust those parameters that you've already altered in step 2 to decide how the end of an animation or change looks like. By doing this, you can create a natural flow in between two state.
Add Keyframes in Speed Editor
Step 1 After importing videos to the Video Track, hit Speed to open up the build-in Speed Editor.
Step 2 Move the playhead on the timeline over the place where you want to add a keyframe. Hit Add Point. This is the first keyframe you've created.
Step 3 Drag the speed point up or down to increase or decrease the speed. This decides how fast the video plays at the start point of a speed change.

Step 4 Move the playhead to the next position where you want to add a keyframe. Hit Add Point.

Step 5 Once again, you need to drag the second keyframe (speed point) up or down to adjust the speed. This decides how fast the video plays at the endpoint of a speed change.
Now you've already created an advanced speed change effects, namely the playback speed of your video will change over time.
Let's download and run VideoProc Vlogger. Follow above steps to enhance effects on your storytelling.
Related Guides:
- > Add Variable Speed Changes to Video
- > Using Motion Editor in VideoProc Vlogger
- > Advanced Color Editing
- > Change Project Resolution
- > Fast Export Project
For more guides of VideoProc Vlogger, please visit this page >
If you have any question, please email us or visit ![]()
![]()
![]()
Is this page helpful?
