What is masking in video editing? Video mask is a general processing method on popular video post-production software for graphic processing, video editing, and VFX/molding/animation video generating. After masking the video, you can apply the effects to one or multiple particular areas. In this post, you are going to know 5 creative ways to use masking for video creating as well as how to use video masking in common video editing software.
5 Creative Uses of Video Masking
Remove Objects from a Video with Masking
Mask enables you to cut out an irregular shape from any place of the video. There are several ways to get things done. A very common workflow on most editing software is outlining a particular object with mask tool, inverting the mask, and then duplicating the source clip on your timeline. After that, you can change the position of the first layer to get rid of the unwanted objects.
Make Isolated Color Grading with Masking
Sometimes, you just want to perform the color grading for a specific area, for instance, you want to constrain the affected frames when changing the hue, or correcting a particular color in a small range. You can simply isolate the target subject by marking it before applying any adjustments to the color.
Create Animated Transition Effects with Masking
To make a stand-out video with a personal touch, you may need to create some customized transitions instead of adding ready-make ones. With masking and editing features offered by different editing programs, you have many ways to make creative and animated transition effects. Two good examples with the mask utility are the door reveal and screen tore transition effects.
Create the Cool Text Effect with Masking
There are many ways to generate impressive text effects on prevalent editing software. And mask effect can make the text in your looked more professional. For example, you can create a shape mask for displaying letter by letter, add some opacity masks for making text reveal to the background of a moving object, and more.
Track a Moving Object
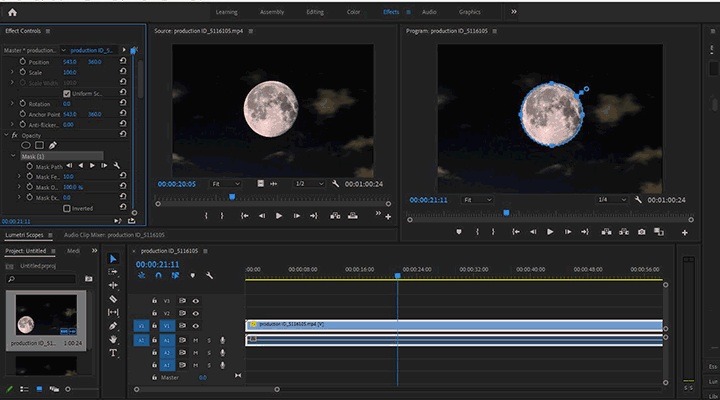
On aside from masking a still object to make isolated color correction, remove unnecessary frames, you are enabled to mask and track moving subject. You can keyframe the mask that moves with the scene manually. Premiere, After Effects, DaVinci Resolve, and some industry-level editing software come with the feature of motion tracking.
They allow you to apply a track motion to a mask. That is to say, you can keep the mask track a moving object automatically. This hack is widely used for blurring faces, getting rid of a moving unwanted element, changing color for an animated object, etc.
How to Make an Ellipse/Rectangle/Free Form Mask in Premiere Pro
To take advantages of masking to create clone effects, seamless transitions, or other creative effects, you do not need to have a professional video masking software as almost all advanced video editing software is designed with the masking feature. In the following part, I'm going to show you how to make different shape of mask by using Premiere Pro. After reading, there should be no problem for you to make a mask with DaVinci Resolve, Kdenlive, or any other video editing software, since the ways to apply video masking with different tools are similar.
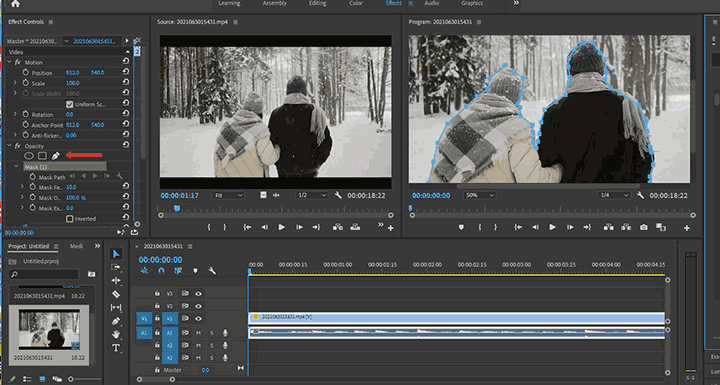
You should first select the clip that you wish to apply the masking to. Next, come over to the Effect panel. Herein, you can:
1. Select ellipse-shape pen tool to create an ellipse-shaped mask.
2. Go with the rectangle-shape tool to create a rectangle-shaped mask.
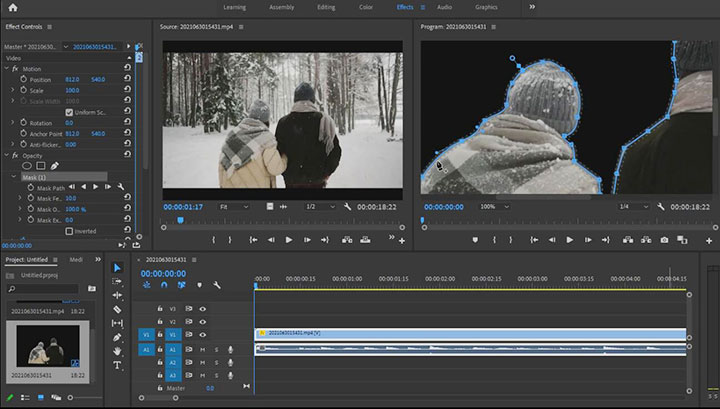
3. Select the Pen tool to create a complicated and free form mask. Move your cursor to any of the corner points of the object, and start to draw. Each click makes up a vertex point in the shape, and every two points are joined with a straight line. By adding up many points, the object can be outlined roughly.
4. If you need to create a curved Bezier path, press the Alt key while placing the cursor over a point. The cursor will turn to a pointer shape. Click the mouse and release it to get two knobs. Drag them to create and amend the curved path.
Note. To finish the drawing, you need to click on the initial point. If you need to modify the masks you have created, follow the below steps:
- Drag the cursor to resize or rotate the mask.
- Drag a mask handle to change the shape.
- Place the cursor to the edges of the mask. Once you find a + icon appears, you can click to add a new point.
- To remove an existing point, move the cursor to that point and press Ctrl on Windows or CMD on Mac. Once the + icon appears, click that point.
How to Mask a Video in One Click
Honestly speaking, it's tough for beginners to use the pen tool or shape tool to mask video whether you are using the mentioned Premiere or other free video editing software. Is there any easier way to apply the video masking effect? The answer is absolute.
To take the easy-to-use video editor – VideoProc Vlogger as an example, you can use the Overlay and the blend feature to mask video inside the text, make a portion of the video black and white, and or create other basic video masking effects. Below, I'm gonna show you the simple steps to use VideoProc Vlogger for creating the text masking effect.

Preparation Work. Download and install VideoProc Vlogger on your Windows or Mac computer. Then make a picture with white background and black text with a program like Microsoft PowerPoint
To create the picture in PowerPoint: Click on the Design size and choose One screen show 16:9. Then, enter the text and adjust its size and bold. After that click on File > Save As to save the slider as a JPG file.
1. Launch up and choose + New Project. Drag the JPG file and the source video files onto the Media Library. Afterward, drag the video files onto Video Track. Drag the JPG file onto Overlay Track.
2. Select the JPG file on the timeline. Use the dotted line on the preview window to adjust its size and position.
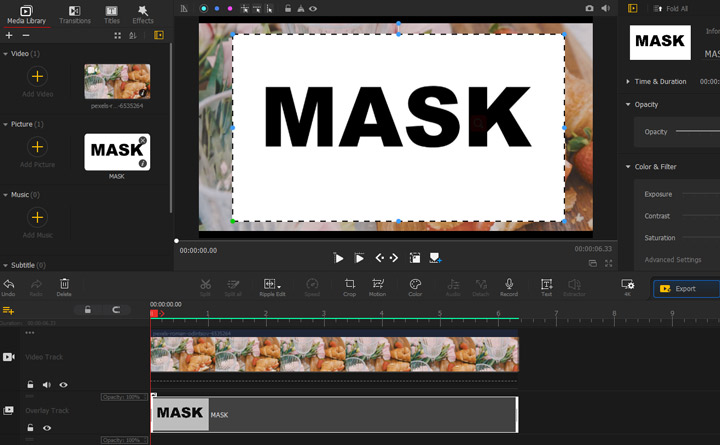
3. Navigate to the Inspector pane and hit the Subtract button under the Compositing menu.
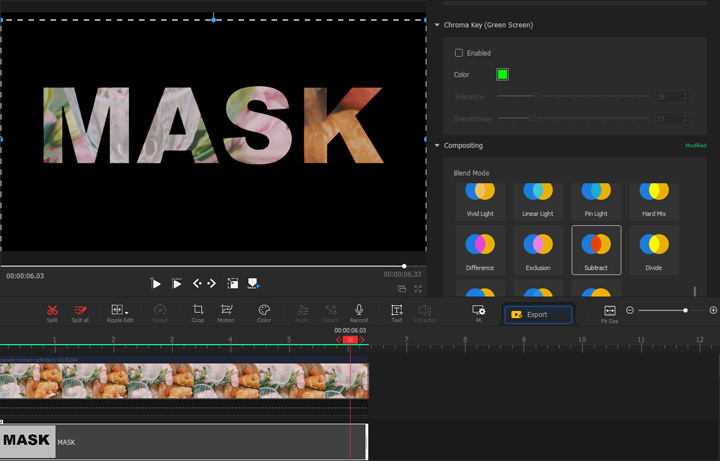
4. Click on Export and hit Start to export the video with the text masking effect.
Create a Mask: FAQs
1. Mask tool not working properly in Premiere Pro.
If the outline you drew doesn't match what's being masked by Premiere Pro, then you need to check out the adjustment layer. Do make sure it is in the same resolution with the video clip.
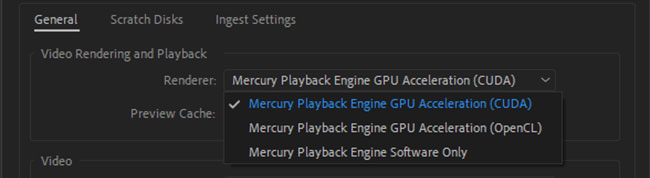
Suppose the issue still exists, you can try out to enable the Mercury Playback Engine GPU acceleration (CUDA/OpenGL). To get there, come over to file on the top menu bar, select Project Settings > General > Render, and then select the proper renderer option.
2. Mask tools not appearing on Premiere Pro CS5/CS6.
Premiere CS6 and CS5 don't come with 3 mask tools (ellipse, rectangle, and pen) like recent versions. However, you can still get similar features including invert by making use of Garbage Matte.
- Step 1: Drag the Garbage Matte effect to the video on your timeline.
- Step 2: Set the desired shape.
- Step 3: Utilize the Curve and Feather options to amend the edges.
3. Mask tool not working or working properly in Premiere Pro.
Updating the Premiere Pro and graphics card, and using the opacity mask tool should be able to address your issue.


