
Summary: This post shares how to make Davinci Resolve run faster and smoother in 10 paid and free ways. After reading, you may know how to fix DaVinci Resolve laggy, choppy, and slow issues.
The majority of programs that serve to edit video are demanding on your computer resources. Our favorite DaVinci Resolve is the leader as far as resources hog is concerned. You might feel this very keenly when working with VFX compositing, color grading, motion tracking, and other advanced special effects. Worse still, most videos we edit in DaVinci Resolve come in 4K UHD encoded by high-compression codecs like H.264/AVC and H.265/HEVC which are notorious for not being friendly for post-production.
However, we all want to keep things smooth and hate wasting precious time waiting for DaVinci Resolve to decode, encode, and render our project. That's why we bring this post for you. Herein, you're going to learn some easy ways to get the most out of DaVinci Resolve and make it run faster on your machine.
Method 1. Improve Your System
If we are running DaVinci Resolve on an old or less-powerful computer, there are fat chances that the CPU and Memory usage blast up to 95% or higher as soon as we launch up the software, before the edits really start. To make things go right, we should absolutely make our computer meet the minimum system requirements of DaVinci Resolve. For example, we should have at least 8GB of RAM for basic 720P edits. If we want to edit 4K or 1080P videos smoothly, then we should have at least 32GB or 16GB of RAM. See more information about the minimum system requirements of DaVinci Resolve 17 below.
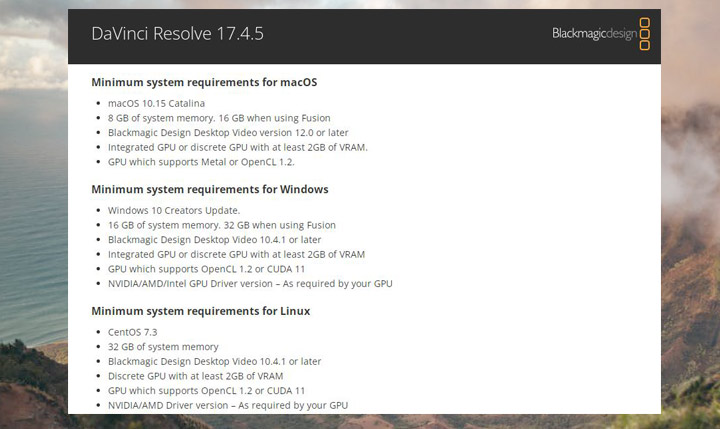
Bear in mind the system requirements list covers only the very basics of what hardware is required to run DaVinci Resolve, not what hardware will give a satisfactory user experience. So does this mean we have to make big investments in building a high-end PC to make DaVinci Resolve run faster? Absolutely not. Keep reading, we've shared many free ways to help you optimize DaVinci Resolve performance.
If you're a beginner or your project doesn't involve complicated VFX compositing, we recommend you to use a system-friendly alternative to DaVinci Resolve - VideoProc Vlogger. This 100% free of charge video editor supports level-3 GPU acceleration tech and has a really low system requirement (1GB RAM, Windows GHz Intel® or AMD® processor, 512MB GPU VRAM, or higher OpenGL 3.3). With VideoProc Vlogger, everyone can create professional-looking videos smoothly with no lag on virtually any computer.
Method 2. Buy DaVinci Resolve Studio
DaVinci Resolve can make use of the GPU for processing video. However, to speak of making the most out of your GPU, only the paid Studio version can get you there. DaVinci Resolve limits you to use one GPU and only the Mac version supports GPU acceleration for decoding. However, the paid DaVinci Resolve Studio can make multiple GPUs to encode and decode H.264 and H.265 codecs, greatly fasting up the editing process, lowering stress on the CPU, and offering much better playback and editing performance.

Method 3. Decrease Timeline Resolution
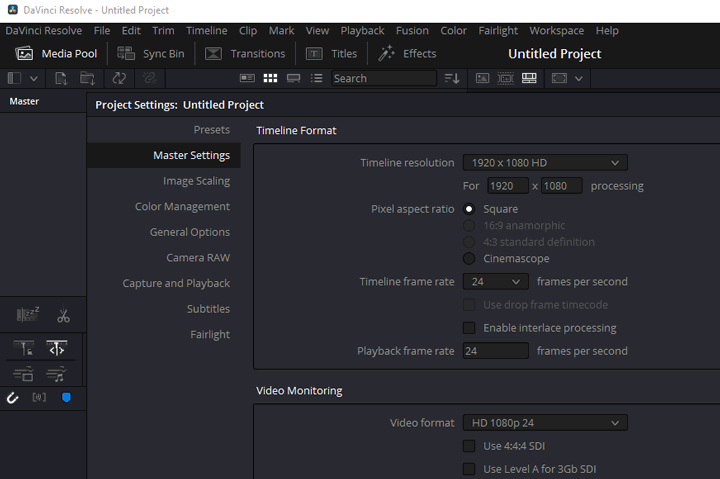
Though 4K and 8K videos are everywhere, it doesn't mean we have to adhere to the original resolution when editing or color grading our videos. In DaVinci Resolve, we can set the timeline resolution to 1080P or 720P. After completing the editing process, simply switch to the original resolution to get the high-quality output in 4K or 8K. To change the timeline resolution, here're two easy ways:
Option 1
- Move to the top menu bar, select File, and choose Project Settings to open the Project Settings panel.
- Select the target timeline resolution under the Timeline Resolution panel.
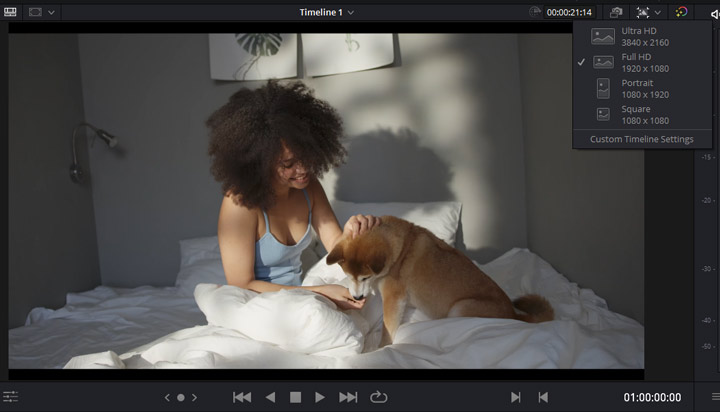
Option 2
- Navigate to the top right corner of the Cut tab to find the Timeline Resolution button.
- Choose the target resolution from the given options. Alternatively, choose 'Customize Project Settings' to set the wanted resolutions.
Method 4. Timeline Proxy Mode
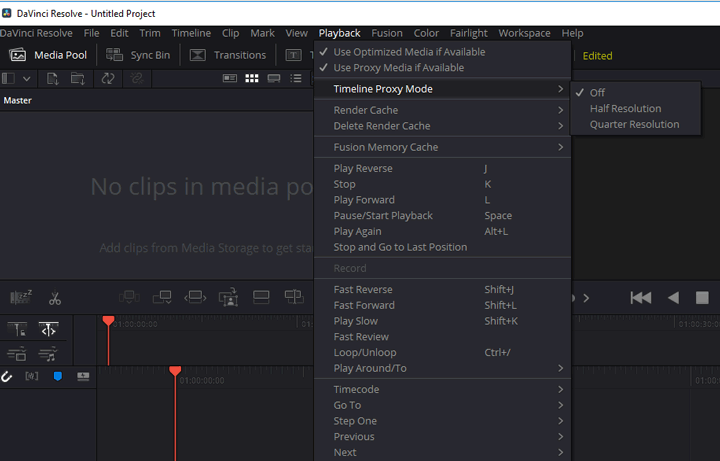
Don't confuse the timeline proxy mode of DaVinci Resolve with the proxy mode of Premiere Pro and many other video editors. The timeline proxy mode won't generate new media files, it just lets users downscale the playback resolution to haft or a quarter of the original timeline resolution. By choosing a low timeline resolution and enabling the timeline proxy mode, we can stop the stuttering of playback efficiently. Here's how you can enable the timeline proxy mode to make DaVinci Resole run faster:
- Go to the top menu bar to find Playback and select it.
- Choose Timeline Proxy Mode and select Half Resolution or Quarter Resolution.
Method 5. Enable Render Cache
Heavy video effects may put a heavy strain on real-time preview, often rendering choppy playback and drop frame. As more edits and effects we add to our project, more intense processing power is required for DaVinci Resolve to preview the real-time effect smoothly. Enabling Render Cache is for fixing this issue.
Under a render cache mode, DaVinci Resolve can take advantage of idle time to cache or pre-render the timeline you've created with texts, colors, and other heavy effects to an editing-friendly media in the background for improving playback performance, helping us get timeline smooth scrubbing and playback. We can tell the render process by the color of the bar on the timeline. A red render bar indicates an un-rendered section. A blue render bar indicates a rendered section. Here's how to enable render cache:
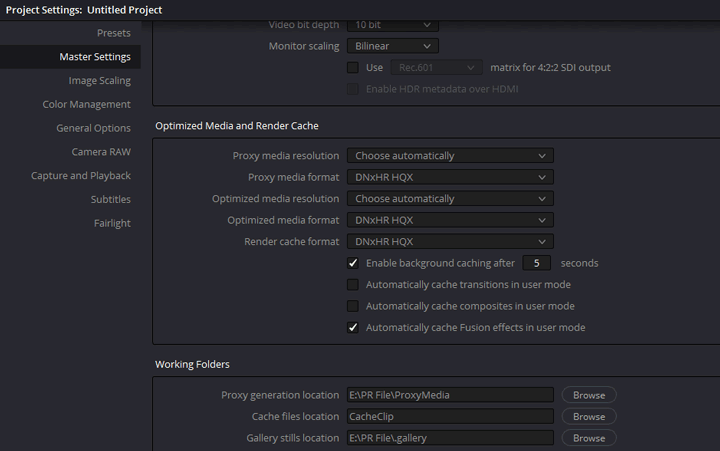
- Press Shift and 9 to open the Project Settings panel.
- Scroll down under the Master Settings section to find Optimize Media and Render Cache.
- Select the needed cache format and the needed render mode.
There are mainly two different render cache modes:
- Smart: DaVinci Resolve can render clips that beyond your GPU's capabilities to play in real-time automatically. But users can also select certain clips to render.
- User: Render the sections that you right-click on and select Render Cache Fusion Output. It also renders the transition, composites, and Fusion effects if the related options are selected under Master Settings.
Method 6. Use Optimized Media
DaVinci Resolve can automatically convert source media files to optimized media with editing-friendly resolution and format. It can switch between the original media files and the optimized ones when needed to improve the overall editing performance. Creating optimized media won't change the final quality of the export as DaVinci Resolve uses the original media files for the final render. Here's how to create optimized media to make DaVinci Resolve run faster:
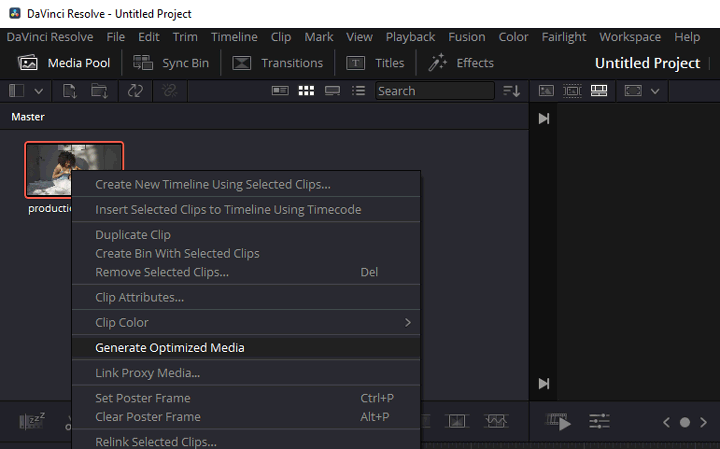
- Go to the Edit or the Media tab of DaVinci Resolve. Navigate to the Media Pool.
- Select the clips that you like to create the optimized media for.
- Right-click your mouse and choose Generate Optimized Media.
Method 7. Render in Place
The Render Cache mode is helpful to make the smooth playback for the entire timeline. However, sometimes we might have only one or some clips that cannot play smoothly due to the application of color grading or other effects. In this case, render in place can make our life easier. Enabling the Render in Place feature will make DaVinci Resolve render the selected effects-heavy clips and apply all the effects to the chosen clips. After that, it replaces the original clip with the rendered version for achieving smooth playback. Here's how to enable render in place to make DaVinci Resolve run faster:
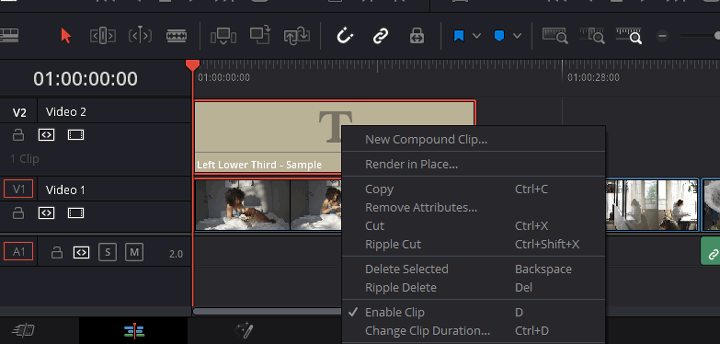
- On the Edit tab, right-click the target click, and choose Render in Place.
- Choose the format and codec you want to render the clip to and then choose Render.
Method 8. Manual GPU Selection
This doesn't work all the time, but we do see many get a huge improvement in performance by choosing GPU OpenCL or CUDA manually instead of using Auto. As said, DaVinci Resolve constrains us to harness the processing power of one single GPU. Surely, we want it to use the most robust graphics card rather than a weak integrated GPU. However, when keeping it on auto selection, DaVinci Resolve sometimes makes mistakes and uses the wrong GPU. Hence, it's possible to make DaVinci Resolve run faster by selecting the target graphics card manually. Here's how:
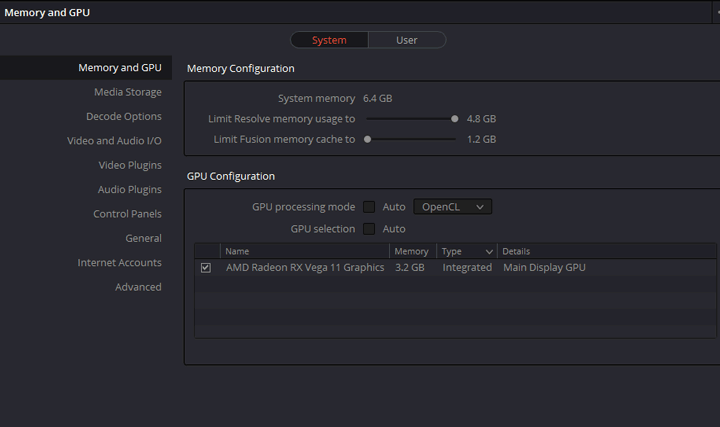
- Click on DaVinci Resolve on the top menu bar, choose Preference, and hit Memory and GPU.
- Under the GPU configuration section, uncheck the options of Auto GPU processing mode.
- Choose OpenCL if you're using the AMD graphics card. Choose CUDA if you're using the NVIDIA graphics card.
Method 9. Change Cache Location
By default, DaVinci Resolve stores the render cache files to the boot drive. It works fine in some cases. However, we recommend you to store them on an external drive - preferably an SSD with fast read/write speed and plenty of storage space.
By doing so, we can have good playback performance even when using high-quality cache codecs. In addition, we don't have to delete the cache files often to avoid the choppy or crashes caused by the overlarge cache files anymore. To store render cache on an external drive, here's how:
- Click on DaVinci Resolve and choose Media Storage.
- Choose the target drive for holding the render cache file.
- Note: The first media storage location in the list is for storing the cache files.

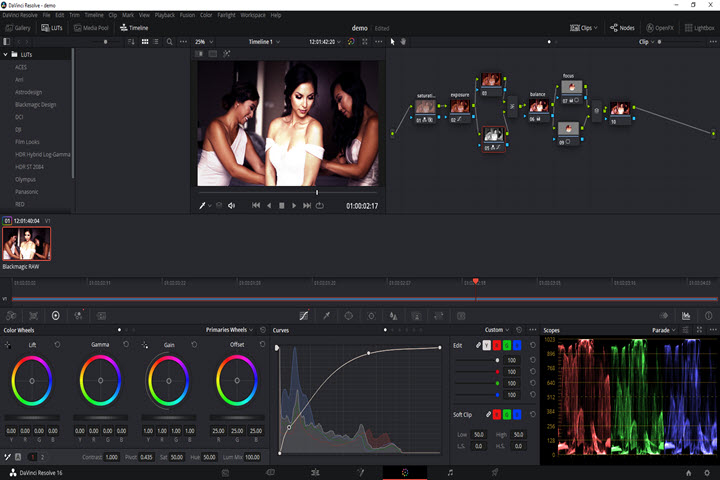
Method 10. Close the Scopes
Disabling the scopes sometimes brings noticeable improvements in the real-time preview performance. This is because generating scopes consume both CPU and GPU resources. However, give a caution, this trick doesn't work for a project with many changes in color.
That's about it. Hopefully, these 10 tricks can help you optimize the performance of DaVinci Resolve.
Method 11. Use a Lightweight and System Friendly Alternative
We do have many tricks to make DaVinci Resolve run faster. However, let's face it, it's not possible to bring drastic improvements in the performance of DaVinci Resolve with just some "free tricks". It's tough for not just DaVinci Resolve but all resource-intensive video editors to run smoothly on an old or slow computer.
Now what if we're looking for a smooth like butter video editing experience but don't want to make a big hole in the pocket to pay for a high-end computer? Use VideoProc Vlogger – the lightweight and resource-friendly alternative of DaVinci Resolve can make your life easier.

It can edit videos smoothly without lag or stuttering even on my old Window 7 laptop. Then how about its capabilities in video editing? From the basic ripple edit, split, and crop to the advanced speed ramp, motion crop, and auto music beat detection, this free piece of video editing software gives us almost everything we want for creating jaw-dropping videos.
Explore more features of VideoProc Vlogger!


