In-page Navigation
Using Timeline in VideoProc Vlogger
Timeline is the place you add video clips, arrange their orders, edit and combine them with audio, text, effects and other elements.
VideoProc Vlogger comes with a magnetic timeline, designed in a way to enhance your video editing efficiency, save time, and be more precise.
To get started, free download VideoProc Vlogger to create and edit your video.
Watch the video tutorial on how to use the Timeline in VideoProc Vlogger, or read text instructions below.
1. Timeline Basics
1.1 Timeline
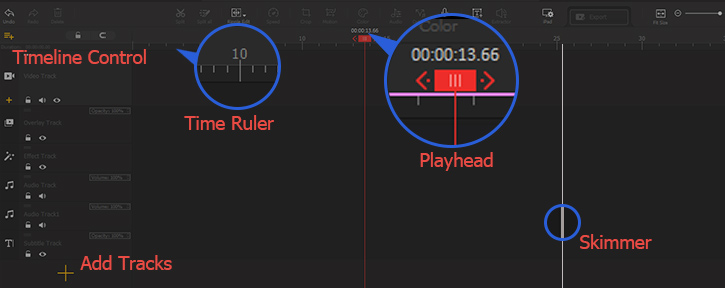
The timeline takes up the bottom half of the interface, including the timeline control panel (left-sided panel), tracks, time ruler, playhead, skimmer, and accompanying toggles and controls.
When you play the video on the timeline, it displays the content from left to the right, starting from 00:00:00 to the end of the last element on the track.
To add elements to the track, you can import media files and drag them from the Media Library to the Timeline.
1.2 Track Types
You can add 999 tracks in VideoProc Vlogger, and in fact, you can add unlimited numbers of tracks should your computer resources permit.

When you create a new project and enter into the workspace, there are 5 types of tracks by default:
Video Track: Add video clips and pictures from the Media Library, or add credits title from the Titles panel. The credits title will be displayed as a scene in the video.
Overlay Track: Add video clips and images from the Media Library or add credits title from the Titles Panel. The credits title will be displayed as a transparent overlay on top of the content on the Video Track.
Note:
- Elements on the Overlay Track will appear on top of the Video Track.
- For multiple Overlay Tracks, elements on the bottom-most Overlay Track will stay on the top-most place in the Preview window.
 Use cases:
- Create a Picture in Picture video by placing the smaller video in the overlay track;
- Add logos to a video by adding the logo picture in the Overlay Track;
- Create Split Screen Effects (Video Collages) by adding multiple overlay tracks, and dragging videos to each track; or make Side-by-Side videos with one video clip added to the Video Track, and another video added to the Overlay Track.
Effect Track: Add ready-to-use effects from the Effects Panel, such as VCR, Old TV, Rain Screen effects.
Audio Track: Add songs, sound effects, background music, ringtones and any audio file you like.
Subtitle Track: Add text by clicking the Text icon from the tools bar, add Title templates from the Title Panel, or imported subtitles and lyrics from the Title Panel.
Note that the Credit Titles can only be added to the Video Track and the Overlay Track.
1.3 Playhead
The Playhead represents the current position (the frame) being displayed in the Preview Windows. It is the red rectangle head with vertical lines that moves along the Time Ruler on the timeline.
When you click on the clip, it will take your playhead to that spot, and correspondingly, the Preview window will display all the visual elements occurring at that time, including a frame of the video track, overlay track, and how it looks like when there are effects and color filters added.
1.4 Time Ruler
The Time Ruler indicates the time and frame of the timeline.

For instance:
- 1'20 stands for 1 minute 20 seconds;
- 30':0 stands for 30 minutes;
- 1:20'30 means 1 hour 20 minutes and 30 seconds;
When you enlarge the timeline, you shall see
- 1, 2, 3, 4, 5…40 represents 1, 2, 3, 4, 5… 40 seconds;
When you further zoom in on the timeline, you shall see
- 5f, 10f, 15f…25f and so on, which means the 5th frame, the 10th frame, etc.
1.5 Timecode
The numbers above the playhead is the timecode, indicating the current time of the video. It is identical to the timecode in the Preview Window.
As you can see, VideoProc Vlogger allows frame-by-frame editing that is precise and straightforward.
1.6 Skimmer
The skimmer is the gray vertical line that shows up when you hover the mouse over the timeline.
Use cases:Play a clip without changing the position of the playhead:
In some situations, you might want the playhead to stay still, while previewing the content of another clip or another position within the same clip. To do so, hover the skimmer to the position you want a preview, right-click on the clip and hit Play Clip.
2. Timeline Controls and Navigation
2.1 Add or Delete Tracks
You can click on the + icon to add overlay track, Effect track, Audio Track and Subtitle Track. VideoProc Vlogger support 999 tracks.
Click the trash bin icon on the timeline control panel to delete a track. You can revert the deletion by pressing Ctrl+Z.
2.2 Zoom & Scroll on Timeline
Zoom in and out on the Timeline
You can enlarge the timeline to see more frames within the visible part of the timeline window.

- Hover your mouse on the time ruler, press drag it to the right/left to enlarge/shrink the timeline. The mouse turns into a double-head arrow when you are dragging on the time ruler.
- You can also click the + and – icon on the top right corner above the timeline.
- Or Press Ctrl + Mouse Scroll to enlarge the timeline
Frame by Frame Navigation
When you zoom in on the timeline to the maximum, you can move the playhead frame-by-frame. The playhead snaps to the lines on the time ruler, each line corresponds to a frame.
Besides enlarging the timeline, you can also click the left and right arrow icon in the Preview Window to move the playhead frame-by-frame.
Fit Size ![]()
Quickly change the timeline view by fitting the timeline contents into the available window size.
It is a nice way to enhance editing efficiency by zooming into a single clip. For instance:
- When you zoomed out so far that all the clips stacks on the left side of the timeline, you can click the Fit Size icon to zoom in on the clip.
- When you add a picture, it could be too short to navigate compared to other video clips. You can click Fit Size to enlarge its timeline view.
Scroll in the timeline
- Scroll horizontally: press the mouse and drag left and right, or drag the horizontal scroll bar.
- Scroll vertically: use mouse scroll or drag the vertical scroll bar.
When you have hours of video clips on the enlarged timeline, besides scrolling, you can drag the status bar of the Preview Window's player to quickly navigate to the time position you prefer.
2.3 Toggle Controls
Toggle Lock icon ![]() to prevent changes
to prevent changes
When you click the lock icon on the timeline control panel, you can lock the corresponding track. The diagonal line pattern means the track is locked.
Use Case:
• When you have multiple tracks and a busy timeline, and you want to make sure a media file will not be added to a certain track by accident, then you can lock that track.
• When you want to split all the audio tracks without splitting the video track above, you can lock the video track.
Toggle Eye icon ![]() to hide the content
to hide the content
Use Case:
• When you have too many elements on the screen, you may forget which track an element stays on. You can toggle on and off the track to spot the element.
• When you have multiple tracks with layover assets, the frame you want to edit may stay below other frames. You can toggle the Eye icon to temporarily hide those tracks, so that you can see the content below.
• Export the video without a certain track. For instance, you might want to export a video with and without titles. You can toggle the eye icon on corresponding tracks to export two versions.
Toggle Sound icon ![]() to mute the audio of an entire track
to mute the audio of an entire track
Use case:
• When you have multiple audio clips on different audio tracks, you can toggle the sound on and off for comparison and editing.
• When you want to export a video without the sound of a certain audio track, you can mute that track, instead of deleting that track.
Toggle Magnet ![]() icon
icon
When the Magnet icon is enabled, there will be a reference line when you drag clips on the overlay track.
For instance, when you drag clip 1 to clip 2, the reference line shows up as the smart guide, so that you can snap clip 1 to clip 2, without leaving a gap in between.
2.4 Opacity Slider
Opacity Slider can be found on the Overlay Track and the Subtitle track. You can change the opacity of the entire track.
If you want to change the opacity of a certain video file or image on the overlay track, you can adjust its opacity in the Inspector Panel under the Compositing section.
2.5 Move Tracks Up and Down
Moving tracks up and down can be handy when you what to move everything on a track a layer down or up.
To move the tracks, grab the double-line icon ![]() and drag it.
and drag it.
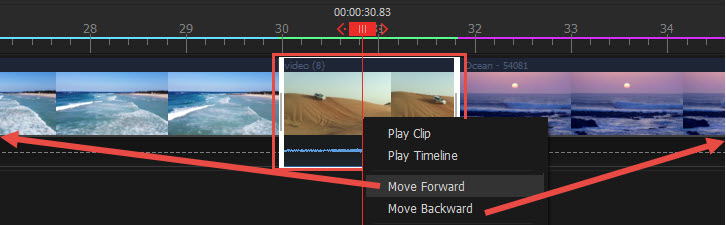
2.6 Move Back & Forward
Generally, you can drag the clip back and forward to rearrange its order on the track.
When one clip takes up the current timeline view, and you want to enhance editing efficiency, you don't need to zoom out on the timeline to rearrange the clip.
Instead, you can Right Click on that clip, and select Move Backward, or Move Forward.
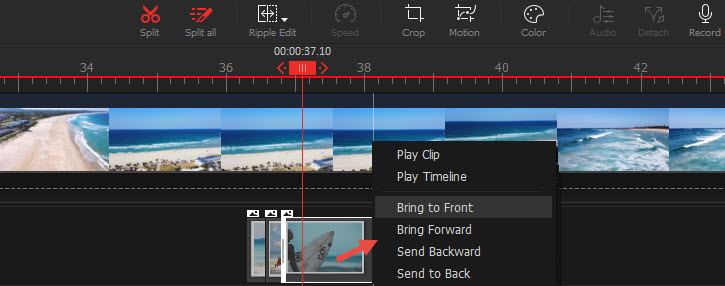
2.7 Adjust Clips Layers
If you overlap several clips on the same track, you can adjust which layer each stays in relation to another.
- Bring to Front/Send to Back: move the selected clip to the very top or bottom of the stacking clips in the preview window.
- Bring Forward/ Send Backward: move the selected clip a one level up or down of the stacking clips in the preview window.
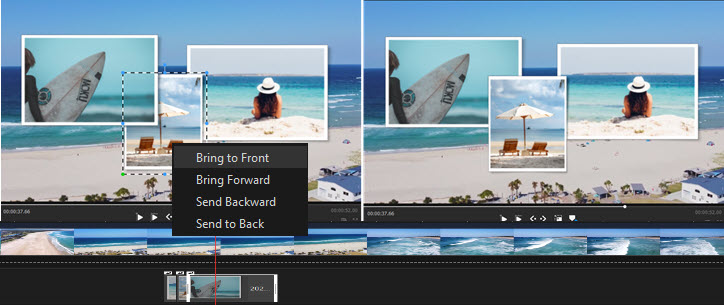
You can right-click on the stacking clip or right-click on a clip in the preview window, both will call out the menu to adjust layer hierarchy.
2.8 Color Tag the Clips 
The colors on the time ruler correspond to the color tag of the video on the Video Track.
It is designed to help you better organize the clips on the timeline. For instance, you can assign one color to A-rolls and another color to B-rolls.
3. Edit on Timeline

3.1 Split Video 
You can split video, audio, and image on the timeline. Read the detailed guide on Cut and Split the Video.
3.2 Ripple Delete
Ripple Delete applies to the clips on Overlay Tracks. It deletes the clip or the gap and leaves no gap between two clips.

Let's say you split one clip into 3 clips, and you want to delete clip 2 in the middle.
- If you Delete clip 2, there will be a gap on the overlay track.
- If you Ripple Delete clip 2, the subsequent clip will snap to clip 1.
Right Click on the clip and hit Ripple Delete. You can use Ripple Delete or Delete flexibly in specific scenarios.
3.3 Ripple Edit 
A ripple edit will move the subsequent clips along when you trim the previous clip, so that no gap leaves between the two clips.
In VideoProc Vlogger, since the Video Track is magnetic, when you trim the clip, the following clips will move along. In that sense, you have applied a ripple edit.
Guide:
1. Make sure Ripple Edit is selected on the Tools Bar.
2. Click on a clip, and drag the edge on a clip and move it to the left to trim.
Note: You can also drag the edge to the right to recover previously trimmed content. The subsequent clips will move along to the right by the same amount.
3.4 Time Stretch 
Time Stretch is one way to change the speed of the video.
Guide:
- Make sure to switch Ripple Edit to Time Stretch on the Timeline.
- Click on a clip, drag its edge, and move it to the left to speed up a clip, or to the right to slow down a clip.
You can check the applied speed in the Inspector panel.
3.5 Add/Delete Markers
In VideoProc Vlogger, you can add markers to timeline or add markers to a clip.
Add Markers to Clip
The clip marker moves with the clip, and it is ideal to signify an important point within the clip, such as a particular action, a cue to add sound effects to the corresponding scene, etc.
- Right-click on the clip, and hit Add Marker to Clip.
Add Markers to Timeline ![]()
The timeline marker stays on the time ruler, and won't move along with the clip. It is ideal to use as a reference to cut to the beat, signify a particular time, etc.
For instance, as a vlogger, you might want your Opening Title "My Vlog" to pop up on the 30th seconds. You can add a timeline marker at 00:00:03, and snap the Title to the marker. When you are creating a series of vlog videos, you can make sure the title always appears at that time.
- If you want to add markers to the timeline at the position of the playhead, click the Add Marker to Timeline icon in the Preview Window.
- If you want to add markers to the timeline at the position of the skimmer, without moving the playhead, hover the skimmer to the desired spot on the clip, right-click and hit Add Marker to Timeline.
Delete Timeline/Clip Markers
Right click on a marker, and hit Delete This Marker.
- If you want to delete all markers from the timeline, right click on a timeline marker and hit Delete All Markers in Timeline
- If you want to delete all markers from the click, right-click on a clip marker and hit Delete All Markers in Clip.
3.6 Detach Audio & Reload Audio
After importing media files, you can detach the audio from the video.
Guide:
- Drag video to the Video Track.
- Right-click on the video clip, and select Detach audio.
- The audio in that video will be detached and moved to the Audio Track.
You can right-click on that clip and select Reload Audio. The audio that have been detached to the audio track won't be affected.
Click the button below to free download VideoProc Vlogger and start your first video project easily.
Related Guides:
- > Create a Video Quickly in 5 Minutes
- > Interface Introduction
- > Preference Settings
- > Add Transitions in Video
For more guides of VideoProc Vlogger, please visit this page >
If you have any question, please email us or visit ![]()
![]()
![]()
Is this page helpful?
