We’ve all been there: you shoot a breathtaking 4K masterpiece on your high-end smartphone or mirrorless camera, only to have it look like a grainy, pixelated mess once it hits the Instagram feed.
The internet is full of "perfect export settings" and technical charts, but if you’ve actually tested them, as many of us have, you’ve likely realized that 4K, 1080p, or even 720p often end up looking remarkably similar after the upload. To be clear, this doesn't mean settings are useless; choosing the right codec, frame rate, and bitrate is essential for a clean file. However, technical specs alone aren't a guarantee for that "4K crispy quality" because, at the end of the day, you are at the mercy of Instagram’s compression.
Does Instagram Support 4K
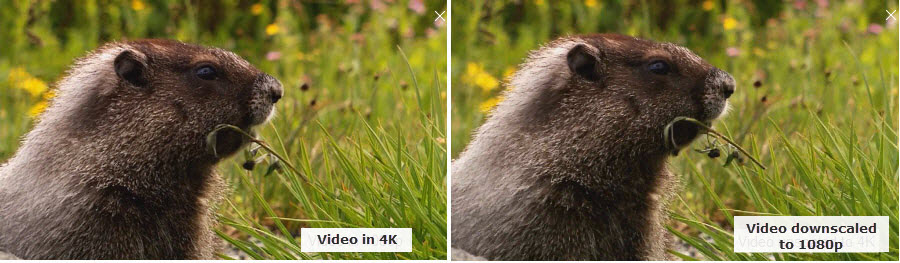
Instagram allows you to upload 4K videos, but the platform downscales playback to 1080p. This means you can start with a 4K source to preserve detail and reduce quality loss from compression, but viewers will only see the video at a maximum of 1080p.
So why do some videos look so much sharper than others? It often comes down to how much "work" you leave for Instagram to do. If you upload a massive, unoptimized 4K file, Instagram’s servers will aggressively hack away at the data to make it streamable. This "brute force" compression is usually what causes the smearing and loss of detail. The goal isn't to force 4K onto the platform, but to provide a file that is so well-optimized that Instagram doesn't feel the need to crush it.
Best Export Settings for Uploading 4K Videos to Instagram
After testing various resolutions, sizes, and formats, these are the settings that worked best for Instagram uploads:
- File size: Keep videos under 5 MB for the sharpest result.
- Format: MP4 with H.264 is the safest. MOV works, but MP4 is more consistent.
- Resolution: Uploading original 4K preserves the most detail.
- Aspect Ratio: 9x16 for Reels & Stories; 4x5 for Feed.
- Frame Rate: 30 fps is standard; 60 fps works for fast motion but may not survive compression.
- Bitrate: 5–8 Mbps is enough for clean quality without huge files.
- Audio: AAC at 128–256 kbps is sufficient; clarity matters more than ultra-high specs.
How I Put 4K Video Upload to Instagram to the Test
I tried every trick in the internet to see if I could "trick"t the system into skipping re-encoding. This includes:
- Trim the length to under 2 seconds and size under 5MBs.
- Downscale the resolution to 1080p.
- Turn the frame rate to 30fps.
- ...
The result? Instagram re-encodes every upload, so some quality loss is inevitable—there’s no file size or resolution that can completely bypass its processing.
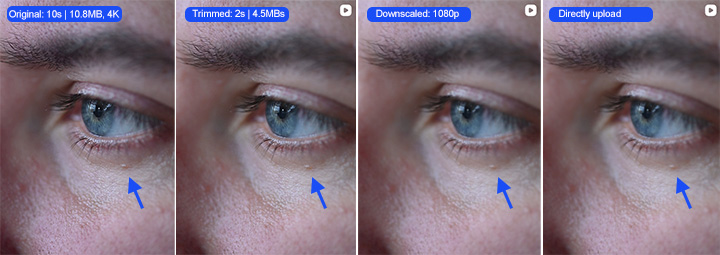
However, export settings still matter: in my tests, 4K videos compressed to under 5 MB generally retained the best visual quality. Using a higher-resolution source (like 4K) helps preserve detail, but if the file is too large in size, Instagram’s re-encoding can make it appear blurrier. While results varied slightly across clips, the overall pattern was clear: high-resolution source + moderate file size (<5 MB) usually gives the sharpest outcome.
How to Upload a 4K Video to Instagram
To Upload a 4K Video to Instagram Feed Post:
Step 1. Tap the + (Create) icon at the top right. Select Post.
Step 2. Pick your video or record a new one.
Step 3. Edit it, add captions, tags, location, and other options, then tap Share.
To Upload a 4K video to Instagram Story:
Step 1. Tap your profile avatar at the top left or swipe right from the feed.
Step 2. Record a video by holding the capture button or swipe up to select from your gallery.
Step 3. Add stickers, text, or effects, then tap Share To > Your Story or select specific contacts.
To Upload a 4K Video to Instagram Reels:
Step 1. Tap the + (Create) icon, then select Reel, or swipe right and choose Reels at the bottom.
Step 2. Record or select a video from your library. Edit with music, effects, text, or transitions. Tap the arrow icon to preview.
Step 3. Add captions, hashtags, or location, then tap Share.
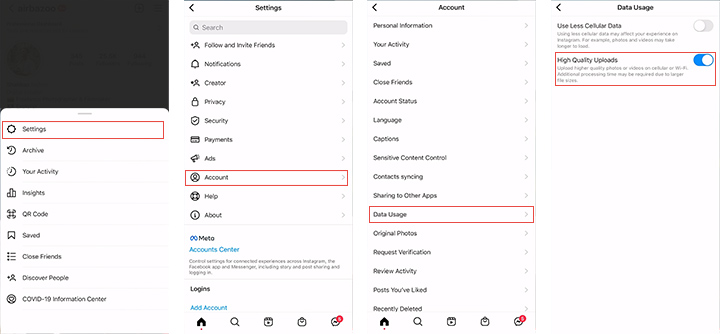
How to Turn on High Quality Uploads on Instagram
Instagram actually has a hidden setting that directly affects video quality, and it’s off by default. To make sure your Reels and Stories upload in the best possible quality, turn on High-Quality Uploads. Once this is on, Instagram will upload your videos at the highest quality allowed, reducing compression artifacts and preserving more detail. Here’s how to enable it:
Step 1. Go to Settings and tap Account.
Step 2. Choose Data Usage and then enable High-Quality Uploads.
How to Optimize 4K Videos for Instagram Uploads
VideoProc Converter AI is a powerful tool for optimizing 4K videos for Instagram while maintaining excellent quality. Its built-in video compressor allows you to reduce file size automatically, even for multiple videos at once, without losing visible detail. At the same time, you can adjust encoding settings such as format, frame rate, bitrate, audio, and aspect ratio to match Instagram’s requirements. It also includes editing tools for trimming, cutting, or cropping footage, making it easy to optimize any video, whether it is high-frame-rate GoPro footage or a large 4K clip, while keeping the final file size under control. Additionally, it includes an AI upscale and enhance feature, which can intelligently improve lower-resolution videos and further refine 4K footage. This reduces blur, noise, and compression artifacts, ensuring your videos start with the best possible clarity before Instagram applies its own re-encoding.
Enough said, let's download VideoProc Converter AI and take a look at the steps to be followed for undertaking the optimization:

Step 1. Download, install, and run VideoProc Converter AI. Hit Compressor. Drag and drop the source video file(s) to it.
Step 2. Move the compression slider to set a compression ratio. For example, moving it to 80% keeps each video at 80% of its original size. The estimated sizes update in real time.

Tips:
You can fine turn each video easily. Just hit the gear icon and then you can trim the unwanted segment, input the desired size directly, adjust the codec, etc.
Step 3. Hit RUN to start exporting the 4K videos that has been compressed.
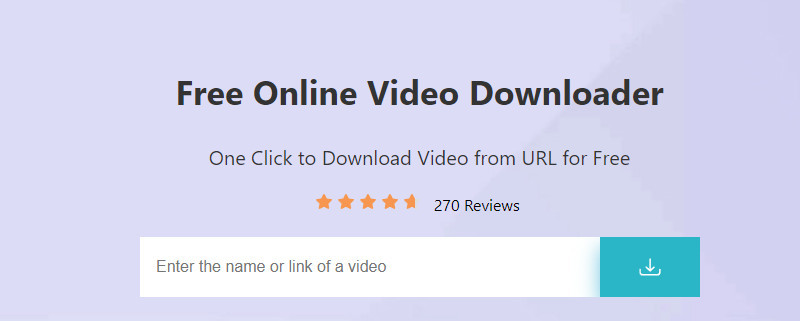
Download Video Online Free for Uploading to Instagram
If you want to download a video (even a live video) for uploading to Instagram, you can use AceThinker Free Video Downloader Online, a smart online app that lets you download videos from numerous video sharing websites like YouTube, Vimeo, Instagram, Facebook, TED, Rumble, Reddit, Flickr and more. Simply copy and paste the URL of the video you want to save and you can download it effortlessly in a few seconds.
Conclusion
Millions of contents get uploaded over Instagram on a daily basis. This creates the requirement of a humongous data center which could keep all the data intact in its original form. Keeping such things in mind, Instagram compresses every single video for making optimum utilization of the limited storage space and bandwidth. You can tackle this problem by transferring your original footage to your PC for tapping into the raw power of your system and utilizing its large display to unleash your fullest potential. This also creates the requirement of a potent 4K video processing software and that is exactly where VideoProc Converter AI comes in to your rescue.
You can take the example of the two frames where the first one is 4K converted to 1080p and second one is 4K content uploaded directly over Instagram. You can make out the difference in the quality of these two frames by looking closely at the level of contrast and saturation.
Tips: We have also prepared a similar topic for YouTube, so if you are also looking for this, please refer to this guide.