When recording audio from computer, some users may find the result audio with internal sound, only microphone sound, or the file is complete silence.
The tricky part is, the system audio need to be routed as the input for the recording software. Some recorders does it with 1-click, so that beginner users can easily record the computer audio. Other software may require you to manage virtual audio device settings, or mess with system sound settings.
Once you are all set, you can record computer audio, such as those online streaming, podcasts, YouTube, gaming, and whatever sound from a specific app.
For the easiest solution, let's start with Method 1.
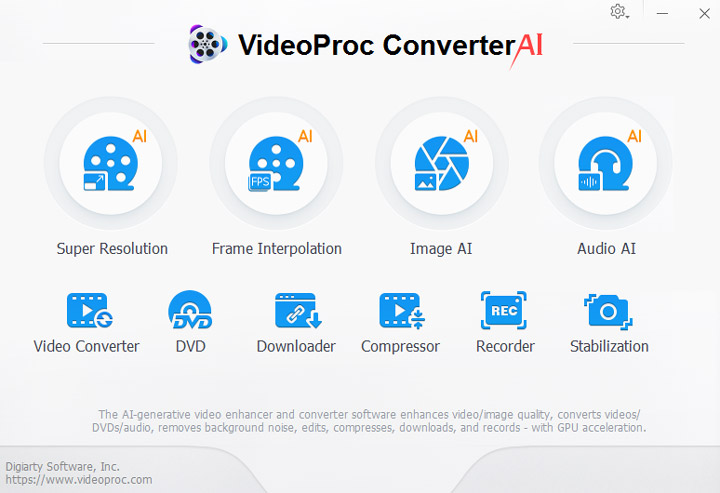
1. How to Record Audio from Computer with VideoProc Converter AI
If you want to record what you hear, such as system sounds, audio playing on your computer, voice from microphone, or anything audio, you will find VideoProc Converter AI an overall best choice.
The best thing is, you can opt to record system sound only, record microphone sound only, or record mic and system sound simultaneously. This combinations gives you the best flexibility for various audio recording scenarios.
VideoProc Converter AI is an all-in-one and high-quality software. It is also baked with handy features to record videos and webcam, capture screens, edit videos, merge audio clips, download songs and videos from 1000+ sites, rip DVDs, etc.

Step 1. After downloading and installing VideoProc Converter AI, go to the "Recorder" from its home screen.
Step 2. On the Recorder window, choose "Audio Recorder" on the top.
Then choose to tick system sound and/or microphone on the middle bottom. You can click on the drop-down list to choose a device for recording.
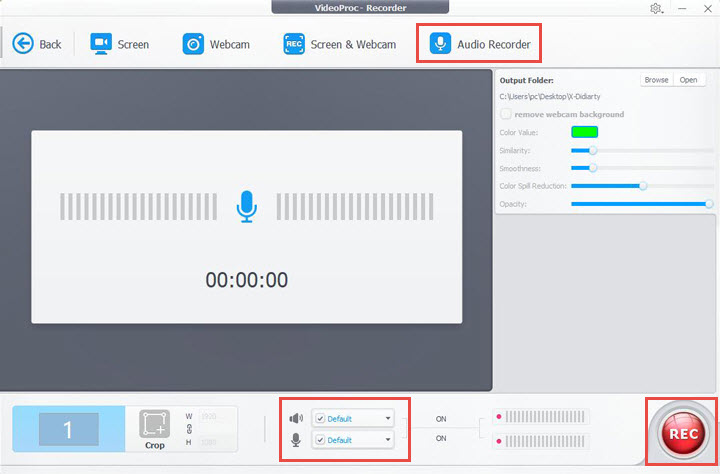
Step 3. Start recording the audio from computer.
- Hitting the REC button, and now you are play any sound or audio that you want to record from the computer.
- When it's done, hit REC button again to stop recording.
- Once you stopped recording, VideoProc Converter AI will automatically save the file. You can click the folder to view recording.
Supported OS: Windows 7/8/8.1/9/10/11 (32bit/64bit), macOS 10.13 and newer versions.
Best for: Non-techie person to easily record sound coming from the computer.
Rating: 4.8 (9.6)  by One Hour Professor.
Pricing: Free trial available (7-day free access with full features, no limitations). Full license starting from $34.95 (Cheaper than rivals with similar feature set).
2. How to Record Audio from Computer with Audacity
Audacity is a popular free DAW software with audio recorder built-in. There is no 1-click option to record audio from computer, but you can tweak with WASAPI and loop back settings to nail down the job. Below are detailed steps with screenshots.
Step 1. Download the latest version of Audacity from its official site and install it.
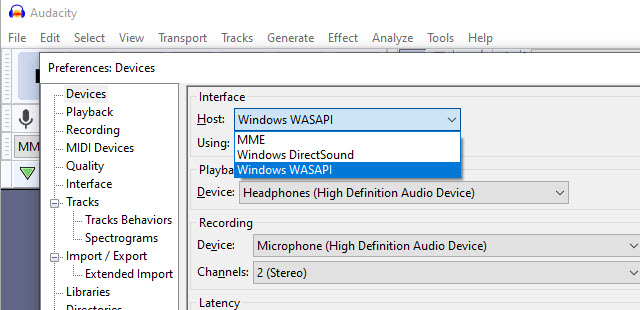
Step 2. Choose Windows WASAPI as audio host.
The setting is available in Edit > Preferences > Devices.
You can press the shortcut key Ctrl+P to open up the Preferences window.
Step 3. Select a loop back device under the recording settings.
Right under the Host setting that we've just managed, you shall find a Recording – Device setting. Choose a loopback device, such as headphones [your headphone brand] (loopback), Speakers (loopback), etc.
Step 4. Click the Record button to test the recording.
- Record and pause, then playback to see if it works. You shall notice there are sound waves fluctuating as the sound volume changes.
- When everything is all set, you can remove that testing clip, and formally start to record audio from computer.
To delete the clips: press and drag your mouse to select the unwanted clips, and hit the Delete button on your keyboard. You can press down Ctrl+A to select all the clips and hit the Delete button.
Step 5. Export the recorded computer audio.
Click File > Export > Export as MP3. You can also export as OGG or WAV.
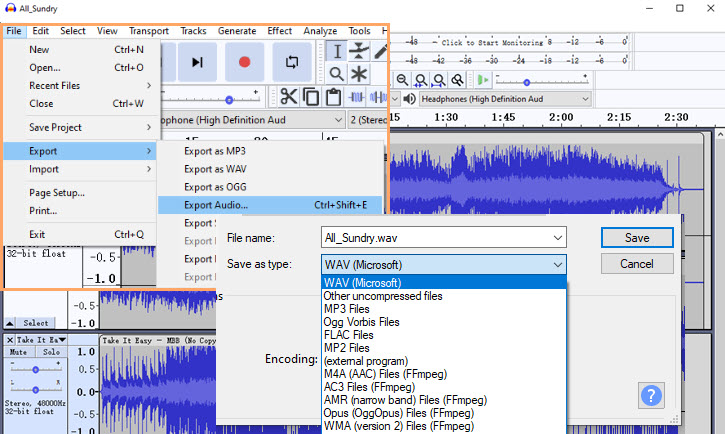
Step 6. Manage export settings.
In the pop-up window, select the output path, bitrate mode (preset, variable, average, or constant), quality, channel mode (Joint Stereo, Stereo, or Force export to mono). Hit Save.
If you want other audio formats that's not included in the Audacity recording format, after exporting, you can use one of these free Audio Converter tools to transcode the audio format.
Supported OS: Windows, macOS, Linux, Unix
Best for: Audio editing with audio recording features
Rating: 4.5  by Software Advice
Pricing: Free, open source. Depending on your version, you may need to manually download additional codec for MP3 format.
3. How to Record Computer Audio with Voice Recorder
Voice Recorder is another choice if you want to record computer audio quickly with lightweight app. However, if you want to record everything that's coming from the computer, this app will fail you. It has limited select for the audio input, mainly from microphone. If you prefer to record internal audio from computer, with more customizable settings, use other methods in this blog.

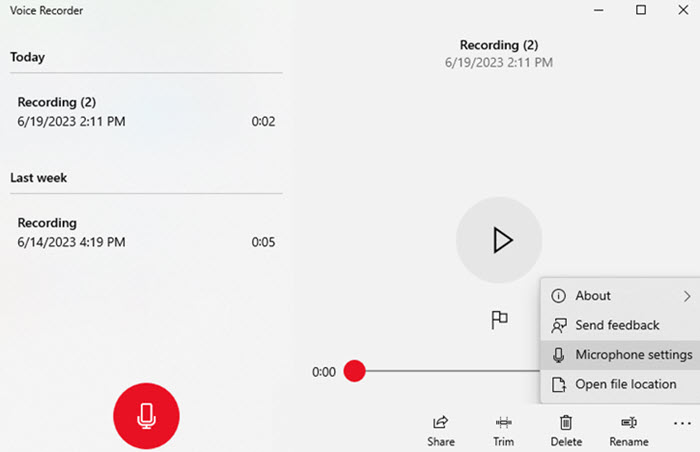
Step 1. Go to the Windows Start and search for Voice Recorder.
Step 2. Launch it and grant microphone access when prompted.
Step 3. Tweak microphone settings by clicking the three-dot icon.
Step 4. Click the Red button to start recording audio.
Supported OS: Windows
Best for: A quick recording of computer audio which comes from the microphone.
Pricing: Free, pre-installed with the system
4. How to Record Computer Audio with Wavosaur
Wavosaur is a portable free audio editing software that works on Windows computers. As most audio editors, the recording option is an essential feature built-in. You can use Wavosaur to record computer audio - what you hear in audio output. The trick is, you need to configure some settings to route the output as an input for Wavosaur to record.
The configuration requires some computer knowledge, and can be time-consuming. For the non-techie person, it is recommended to follow Method 1 above.
Step 1. Enable Stereo Mix in Windows Sound settings.
- Go to the Windows Start menu and search for the Control Panel to open it.
- Click Hardware and Sound > Sound > Recording.
- Right-click to enable the Stereo Mix device.

If you don't see the Stereo Mix device, right-click and hit Show Disabled Devices, Show Disconnected Devices. If the Stereo Mix device is missing, you can try these troubleshoot tips to restore missing Stereo Mix (but it requires some technically know-how skill, and can be time consuming. Plus, there are chances that your device simple don't support it).
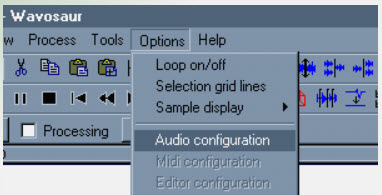
Step 2. Open up Wavosaur, and select Audio Configuration from Options on the menu bar.
Step 3. Select Stereo Mix from the Audio In tab in Wavosaur.
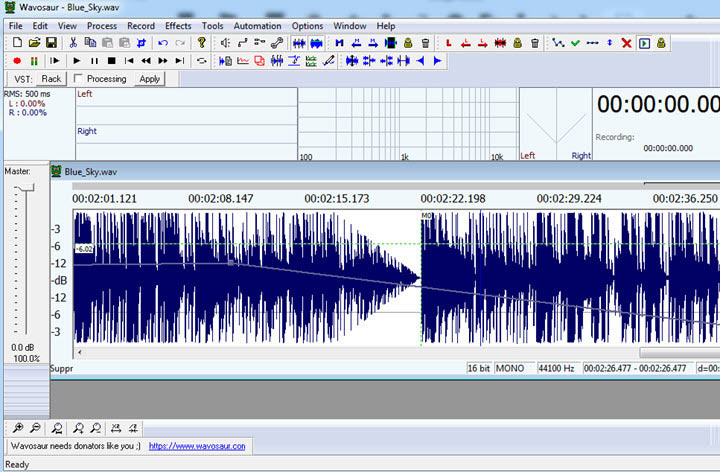
Step 4. Open up the wave form for the input signal, so that you know the input recording is working.
In Wavosaur, this option is named as the input oscilloscope. It can be enabled in Menu > Tools > Input oscilloscope.
Step 5. Click the Record button to start record computer sound.
If the display of input oscilloscope (the option we enabled in Step 4) is flat when you click the recording button, it means no sound is being recorded. You need to check the audio input settings.
Supported OS: Windows (32bit/64bit)
Best for: Techie person who want to record audio from computer, and who may also want to apply some editings to the audio.
Rating: 4.0  by PCWorld Stuff
Pricing: Free, donationware
5. How to Record Computer Audio with FL Studio and Virtual Audio
If you already have Digital Audio Workstations Software (DAW) installed on the computer, you can use a virtual audio device to route the audio into DAW, and record any audio that's playing on the computer. To better demonstrate the steps, for DAW, we will use FL Studio, and for Virtual Audio Device, VB-CABLE.
If you are not a frequent user of DAW, this method is less suitable than other methods. Assuming you already have a working copy of DAW such as FL studio, follow the steps below to record audio from the computer.
Step 1. Download VB-CABLE Virtual Audio Device from its official site: https://vb-audio.com/Cable/
It works for both Windows and Mac computers.

Step 2. Choose CABLE Input (VB-Audio Virtual Cable) from the sound setting.
The sound setting is at the bottom right corner. Click on it, and hit the arrow icon to expand the settings.
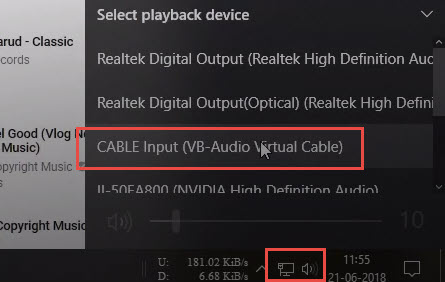
You can also right-click on the speaker icon, and hit Open Sound Settings.
In the advanced sound options, click App Volume and Device preferences.
Then choose a specific app and set its output to CABLE Input (VB-Audio Virtual Cable).
For instance, if the computer audio you want to record is from YouTube, then you will need to set output of the Google Chrome app (or other browser, depending on where the YouTube is playing).
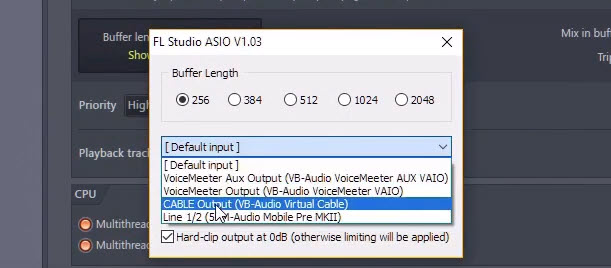
Step 3. Open up FL Studio, in audio settings, open the ASIO panel.
Step 4. Choose CABLE Output (VB-Audio Virtual Cable) as the input for FL Studio.
Step 5. Record audio in FL Studio: Play the audio you want to record, and hit the Rec button to start recording the audio from computer.
Now VB-Audio Virtual Cable will take whatever you have set to monitoring (in step 2), and route it as the input for FL Studio to record.
Note: Remember to set the speakers or headphone as the output inside the I/O settings of FL Studio.
Supported OS: VB-CABLE: Windows (32bit/64bit), macOS 64 bits; FL Studio: Windows: 7, 8, 10, 11, or Mac 10.11 or later.
Best for: Advanced users who already have DAW software.
Pricing: VB-CABLE is free donationware. Assuming user already have purchased a specific DAW software, so the price is not listed here for DAW.
Wrap Up
Among all the available methods, which one works best for my specific scenario?
If you also have other video and audio processing needs, you can check each tool's feature set, so that you don't need to download many tools for different use case.
For instance, besides recording internal system audio, if you also need to record screen, convert incompatible audio/video format, VideoProc Converter AI in Method 1 is the overall best choice – and the simplest one. You don't need to install virtual audio device additionally.
If you want advanced audio editing after recording audio from computer, Audacity is a nice bet. Wavosaur also works similarly as Audacity, but it is less actively maintained as Audacity.
If you want to quickly record audio on computer as voiceovers, the default Voice Recorder in Windows 10/11 is the simplest choice.
To record internal audio on Mac or Windows, VideoProc Converter AI is the easiest option, because you don't need to manually manage system audio device settings.


