
How to record internal audio on Mac? No matter you are gamers, music lovers, podcast creators, or general users trying to record audio only or audio and video, you will find the following 4 ways catering your needs. Below are some specific scenarios:
- Record internal audio such as from games, media players, and system sounds
- Record the audio while also being able to playback the file through speakers
- Mute the output, and silently record the internal audio in the background
- Find ways that support M1/M2 Apple silicon chips, and Intel Macs too
Some audio recorders below allow you to record internal audio directly, while others may require you to install virtual audio devices to route the sound between apps on Mac. Let's check out the detailed steps.
1. Record Internal Audio on Mac with VideoProc Converter AI
If you want to record audio on Mac internally without installing Soundflower, VideoProc Converter AI offers the all-in-one solution. VideoProc Converter AI is a popular choice to record video and audio, with internal sound, system sound, microphone, Bluetooth earphone sound and everything you need.
It is also built-in with video and audio toolkits, including utilities to edit, download, record, compress, and convert media files. 470+ output formats supported.
Steps to record internal audio on Mac:
Step 1. Download VideoProc Converter AI for Mac, install the dmg file and launch it.

Step 2. Go to the Recorder module from the home screen.
Step 3. Click the Desktop icon at the top, and toggle on System Sounds to record internal audio on Mac.
If you also want the environment sounds to be recorded, click to turn on the built-in Microphone.
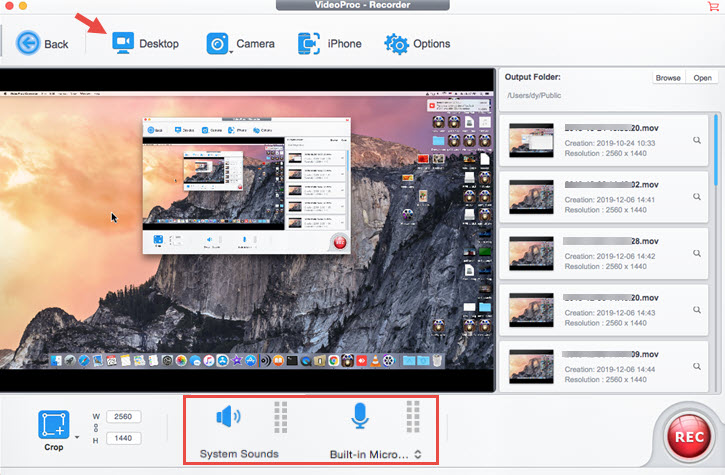
Step 4. Hit REC to start recording, and hit again to Stop.
Step 5. Click the folder icon of the recorded file to open its file location.
Step 6. Go to the Video Module in VideoProc Converter AI, drag and drop that file from step 5, and select MP3 as the target format under the Music tab.
Then you can click RUN and in a few seconds, you will get an MP3 file that is the recording of internal audio on Mac.
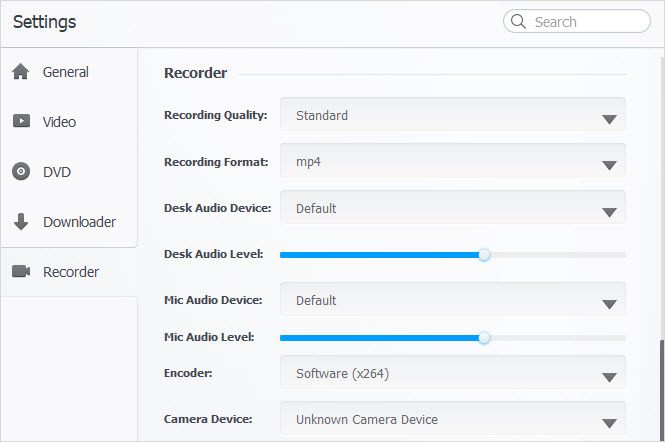
Tips: You can adjust recording quality, volume level, and more in the Settings. You can also use the Audio Recorder to capture your voice.
2. How to Record Internal Audio on Mac with QuickTime Player and Soundflower
Besides using QuickTime to play songs and movies, you can also utilize it to record video or audio on Mac. In order to record internal audio on Mac, you also need to install Soundflower, a utility to route the internal sound as the input for QuickTime to record.
In the steps below, we will also need to set up the virtual multi-output audio device using the built-in Audio MIDI Setup app in Mac. By so doing, we will be able to record both the system internal sound, and those from the microphone at the same time.
If you find it difficult to set up, and wonder how to record internal audio on Mac without Soundflower, you can return to method 1, which is quicker and easier.
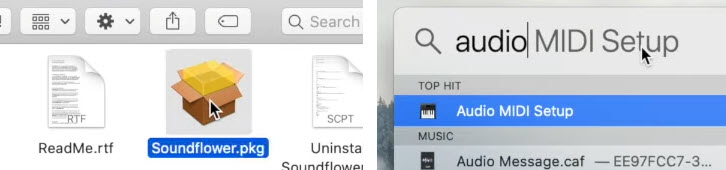
Step 1. Download and install Soundflower for Mac.
You can download the app from its GitHub page. On that page, you will see a list of codes and other stuff. Don't worry, you can find the "Go to File" button, or hit the link in the "Releases" section. Then download its latest signed version to your Mac.
Note: Some users complained that Soundflower does not work for Apple M1 and M2 chips. It works only on Intel Macs. If that is your case, you can use the BlackHole app as an alternative to Soundflower, or refer to other methods in this article.
Step 2. Use the Spotlight search feature (cmd+space) in Mac, and enter Audio MIDI Setup.
Step 3. Create Aggregate Device.
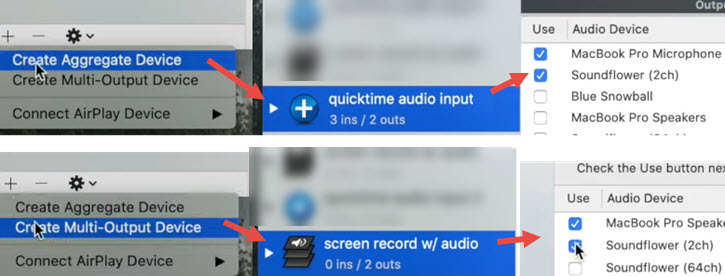
Enter a custom name. For instance, you can type in "quicktime audio input". Then make sure to tick both Soundflower (2ch) and your microphone device (either the Default Mac microphone, or whatever external mic you would like to use).
Step 4. Create Multi-Output Device.
Set a custom name for it too, such as "screen record with audio". Then select Soundflower (2ch) and the speaker you have.
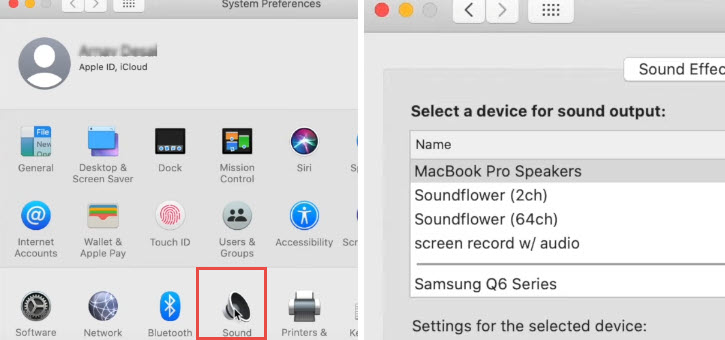
Step 5. Go to Apple Menu > System Preference > Sound to select a device for sound output.
Here we need to select that output device created in Step 4: screen record with audio.
Step 6. Open QuickTime Player, and go to Menu > File > New Audio Recording.
The shortcut key for audio recording is Control+Option(Alt)+Cmd+N.
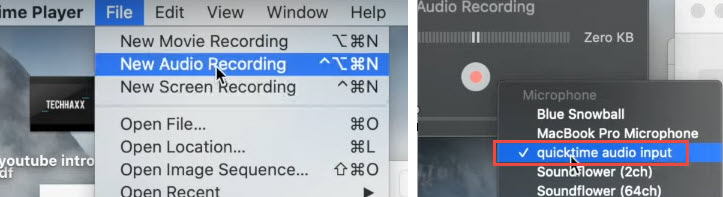
Step 7. In QuickTime Player, select that custom input we created in step 3
Step 8. Hit the record button to record internal audio on Mac with QuickTime Player.
Step 9. Once you finished recording the internal audio, restore the sound settings in Step 5.
3. How to Record Internal Audio on Mac with Audacity
Another free way to record internal audio on Mac is using Audacity, one of the best audio editing software. Similarly as the QuickTime method, we also need to pre-install Soundflower utility to virtually route the internal sound as an input into Audacity recording.
Step 1. Download and install Soundflower on Mac.
For detailed installing steps and Soundflower set up, you can refer to method 2 above (Step 1-5).
Step 2. Download and install Audacity app for Mac.
Step 3. Launch Audacity and open up its Preferences settings from the menu.
Step 4. Choose Soundflower (2ch) as the recording device from the drop down menu.
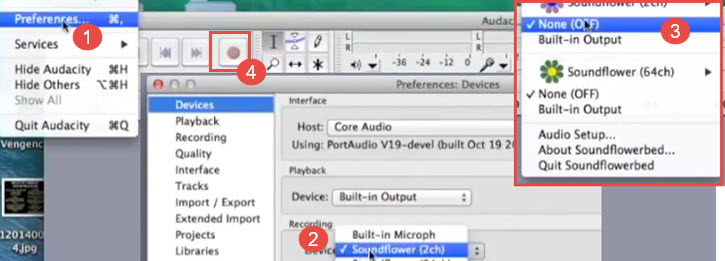
Step 5. Click the red button in Audacity to start recording.
Tips: You can switch the output mode in Soundflower settings at the top right corner on Mac. For instance, None (OFF) means you won't hear the internal audio, while it is being played back and recorded in Audacity in the background. This feature is handy if you are multitasking on Mac, so that you won't be bothered by the internal audio.
4. How to Record Internal Audio on Mac with OBS
Depending on which OBS version and macOS you are on, the methods can be slightly different. For OBS Studio 28+ on macOS 14 Sonoma and higher, users can directly record internal audio. No matter they are all audio from all applications, or audio from a single application.
For OBS 27 and lower, users need to use additional software to route the audio as input for OBS. Detailed steps are shown below:
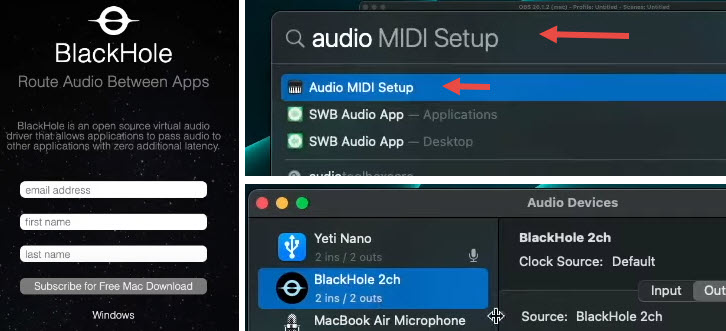
Step 1. Download and install BlackHole to route the audio.
BlackHole supports M1/M2 and Intel Macs.
Step 2. Find audio MIDI Setup via Spotlight search (command+space).
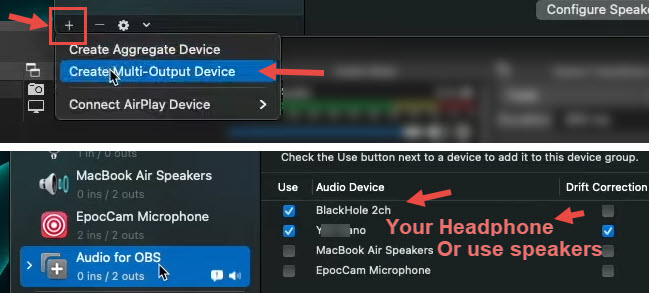
Step 3. In the audio MIDI Setup, click the Plus icon at the bottom left corner, and select "Create Multi-Output Device".
Step 4. Give it a name, such as Audio for OBS. You can use any other names. Then make sure BlackHole 2ch and your headphone are ticked.
If you don't have a headphone device plugged into your Mac, you can then tick the option that indicates your speakers.
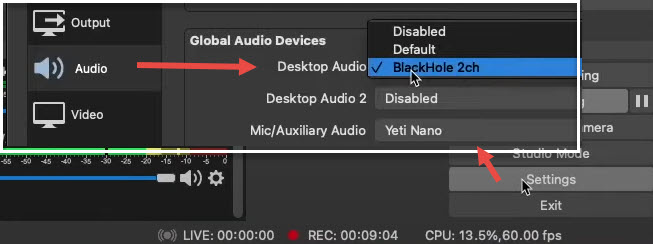
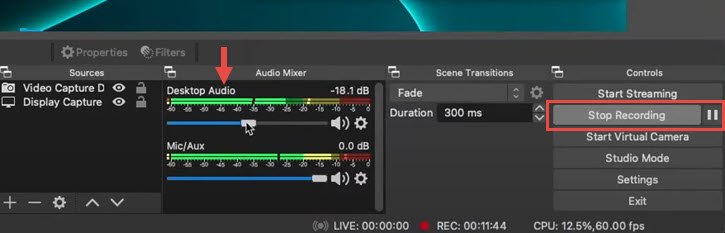
Step 5. In OBS, click Settings (bottom right panel) > Audio, and select BlackHole 2ch for Desktop Audio.
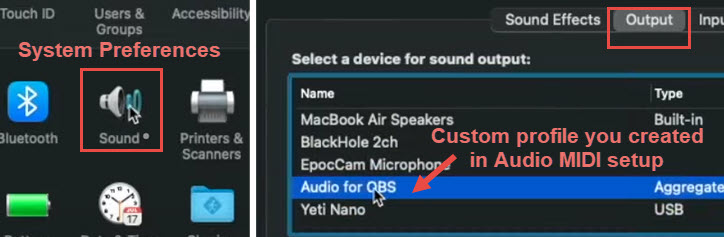
Step 6. In Mac system preference, hit Sound, and select the virtual device that we created in Step 3 and Step 4 (Audio MIDI Setup > Multi-Output Device > Audio for OBS).
Step 7. Start to record internal audio on Mac with OBS Studio.
You can also refer to this guide to record audio only on OBS.
FAQs
1. How to record internal audio and external audio on Mac?
Internal audio are system sounds such as videos and games you are playing on Mac. External audio comes from your surround environment, such as voiceover from the microphone input. To record both, you need to ensure the system audio and microphone audio are both enabled in your audio recording app.
2. How to record internal audio on Mac with large volume?
If the recorded audio sounds very low, you can boost the volume before starting the recording. The volume can be adjusted in the menu bar or the Control center. You can simply click the sound control button to drag up the volume slider.


