There are many situations when you want to learn how to combine audio files into one. The how-to tutorial is one part, and the accompanying settings and considerations for various scenarios will largely influence which audio merger tool to use. For instance, here are some of the situations or concerns in between:
- Merging hundreds of MP3 files/audio files: it would be time-consuming to import and arrange them one after another in video or audio editing software – imagining dragging the clips on the timeline repeatedly.
- You have audiobooks, but the player cannot play the chapters in the correct order. The solution is to combine audio files orderly or edit their ID3 tags, both can be done with method 1 below.
- One is mono, the other is stereo audio, or differs in bit rate, sample rate, and codec. In these cases, you can convert them to stereo and parameter settings, and merge audio files into one. In method 1, you can use one tool to complete all the tasks in one go.
With the right tool at hand, you can follow the detailed steps below to merge mp3 files, join WAV lossless, as well as lots of other audio formats from songs, digital audio books, recordings, and more.
1. How to Combine Audio Files on Windows 10 - Easiest Way

The easiest way to combine audio files on Windows 10 is using VideoProc Converter AI (also works on Macs). It is a quick video processing tool to join media files without quality compression, and it doesn't require you to have any editing skills.
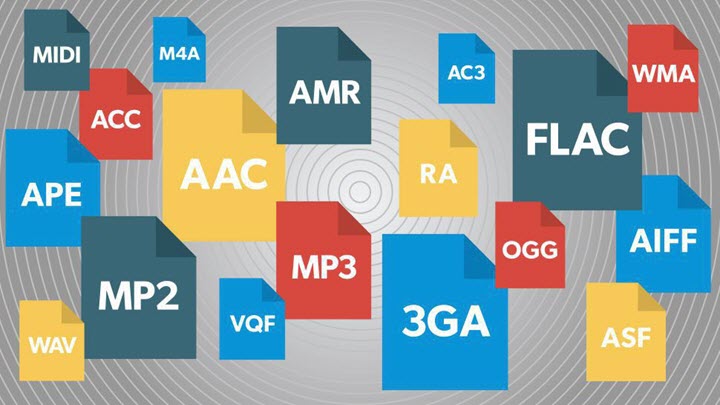
You can combine hundreds of audios, from MP3, WAV, M4A, M4R, FLAC, OGG, DTS, WMA, and many rare formats into one track. No matter it is for combining audiobooks, voice recordings and songs, you can batch import the files into VideoProc Converter AI, with option to adjust their order easily and visually.
Additionally, as an AI-powered all-in-one video and audio solution, VideoProc Converter includes an advanced noise removal feature that enhances audio clarity by effectively eliminating unwanted background noise from recordings and videos. This makes it the ideal choice for achieving crystal-clear sound quality when merging audio. Moreover, you can easily trim, enhance, or edit the metadata of these audio files, and even merge them into a single file—all with simple, step-by-step guidance.
VideoProc Converter AI - the Handy Audio Merger
- Combine audio files (2 into 1, hundreds into one)
- Toolbox to trim, edit, download, record video and audio
- Use Auto-Copy to join media without transcoding, thus maintain original quality
- Cutting-edge AI technology to remove unwanted audio noise.
- All-in-one audio/video solution: noise suppression, AI video enhancer, convert, download, record, compress, edit, etc.
Supported OS: Windows 7/8/8.1/10/11, macOS 10.13 to the latest version
After you've got VideoProc Converter AI installed on your Windows or Mac computers, fire it up on your Windows desktop, then follow 3 simple steps below:
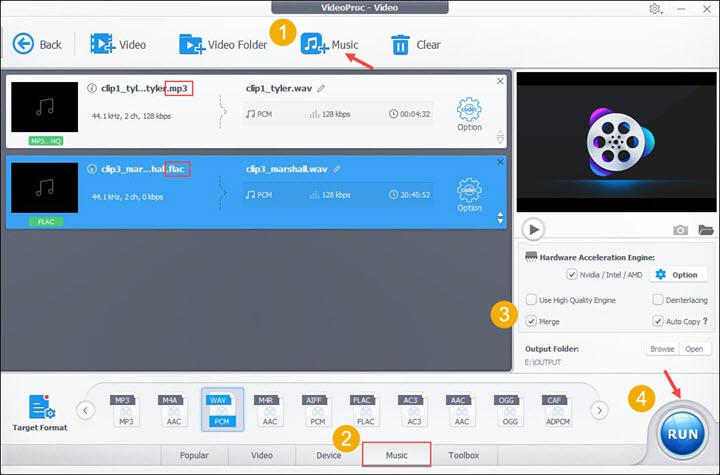
Step 1: Import multiple audio files into this audio joiner software.
After downloading and installing VideoProc Converter AI, you can click the Video module from main interface, and drag and drop audio files.
Step 2: Manage audio file settings if needed.
You can click the arrow icon on each file to change their order when merging into one file. The top most audio file will be the beginning of the merged audio.
- To change mono to stereo: Click the gear-shape icon to go inside the codec settings, and change it from the drop down menu in audio channel settings.
- To change audio cover art: Also inside the gear-icon code settings, click the Name & Tag tab, and change album cover here. You can also change metadata such as title (song name), artist, album, genre, or add comments.
If you want your media player to correctly play a series of audio files, such as all the chapters of audiobooks, besides merging them into one, you can also manage their metadata to get well-organized.
Step 3: Merge audio files into one.
Choose a target format, such as MP3, tick Merge, and click Run to start joining all the audio files in the queue into one track.
2. How to Combine Audio Files in Audacity
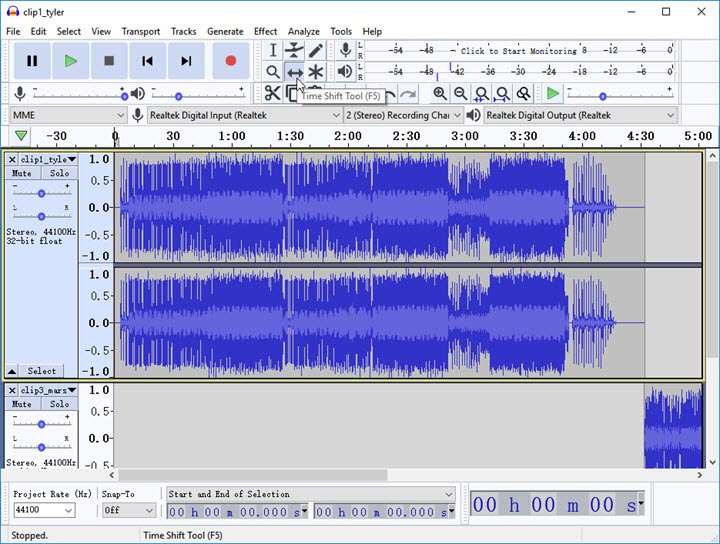
Audacity is an open source and cross-platform audio editor. The latest version 2.4.1 can be run on Windows 10/11. It supports for WAV (*.wav), AIFF (*.aiff), MP3 (*.mp3), and OGG (*.ogg) audio files. The tool made to combine audio files is called Time Shift Tool, which can be tuned for multi-tracks. By pressing the Time Shift Tool, you can drag the waveform of the clip forward or backward until it satisfies your ears.
Step 1. Download the latest version of Audacity on your Windows 10/11 computer.
Step 2. Launch & import audio in Audacity: File > Import, pick up audio files from the local file folder.
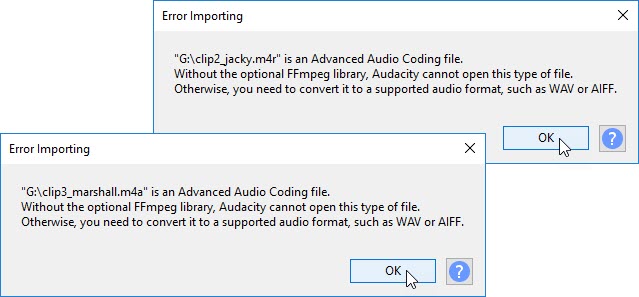
Notice: There are audio formats unable to be input in Audacity, and you can do nothing with that but to click on OK. Have some audio files other than MP3? You can combine different formatted audio files.
Step 3. Click on Time Shift Tool (with the double-headed arrow), or you can press the keyboard hotkey F5 > drag the Time Shift Tool cursor to the position where you want your second clip to be played after the end of the first clip.
Step 4. Export the audio file: File > Export > choose Export as WAV in the drop-down list.
Things Worth to Note- If you want each clip be played in full track, you may drag the cursor of one clip either to the beginning or the end of the other clip. A yellow line will appear when you reach the head or the bottom of the waveform, which is to help you locate the position in a trouble-free manner.
- If you use the Time Shift Tool to put one audio track within the waveform of the other track, then it'll be another story: two soundtracks will be played at the same time. By adjusting the volume of one track, there will be a mixing effect after the export.
- The bad news is, however, you are not allowed to listen to the audio files you just combined in Audacity before exporting.
3. How to Merge MP3 Files on Windows 10 with VLC
VLC is an open-source free program that you can free access to. Based on its introduction of how to merge videos, we have tested its capability of combining audio files, and it turns out to be feasible as well. Before we kick off, you need to make sure that all of your audio files have the file extension of .mp3. Otherwise, this method may not work for you. (Notice: if you have different formatted audio files such as .flac and .mp3, see the workaround.)
Step 1. Download and install VLC on your computer.
You are recommended to install VLC locally by its default route.
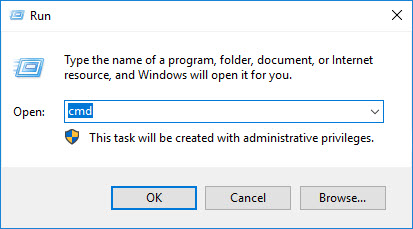
Step 2. Use the keyboard shortcuts Win+X > click Command Prompt in the pop-up list. Or, you can use the hotkey combination Win+R to open Run > type cmd in the box > hit Enter, then the Command Prompt will be opened as well.
Step 3. In the Command Prompt, enter the command: cd c:\mp3, then hit the Enter key.
Sidenote: The c:\mp3 command is the file folder directory where your mp3 audio files are kept. If your audio files are kept in C disk, but not with a file folder, you need to enter c:\
Step 4: There will be c:\mp3> command already exists, copy and paste commands as follows:
"C:\PROGRAMFILES\VideoLAN\VLC\vlc.exe" -vv 1.mp3 2.mp3 --sout-keep --sout=#gather:transcode{acodec=mp3,ab=128}:standard{access=file,mux=dummy,dst=combinedout.mp3}
Sidenotes:
1. The C:\PROGRAMFILES\VideoLAN\VLC\vlc.exe command refers to the directory path where the VLC launching program is located in your Windows computer, which is also the default path of VLC setup. Change it if you've set a different destination path for your VLC installation.
2. The 1.mp3 2.mp3 command refers to the filename of your audio tracks. Customize the part based on your personal demands.
3. The combinedout.mp3 command refers to the file name of the combined file. You can change it to the one you like.
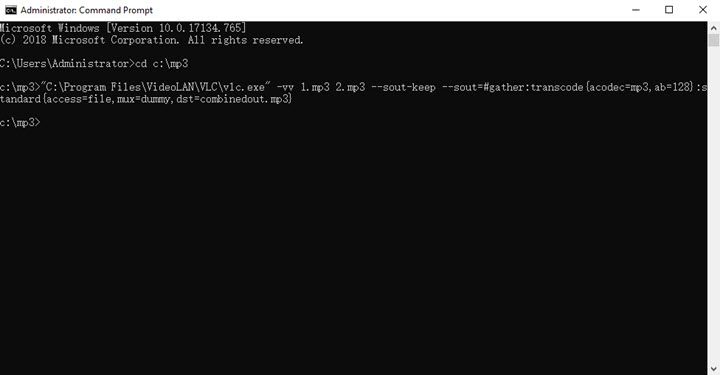
As you can tell, to combine audio tracks in VLC is a manual-process intensive and back-breaking work. You need to make sure that each command is flawlessly followed by one another. Otherwise, one step wrong, you need to start from scratch. If you are not familiar with computer codes, chances are that you have trouble in going through all those commands successfully. Another thing worth mentioning, it may not be friendly to users who need to combine dozens of audio files saved in different names at one time. You may have to manually enter the command for each audio file, and one code wrong, the failure is doomed.
4. How to Combine Audio Files on Mac Using iTunes
For Mac users, you can combine audio files either in iTunes or in iMovie, both of which are free to get from Apple App Store. Now, let's get right into it to join selected audio files via iTunes.
Step 1. Launch iTunes on your Mac.
Step 2. Select your audio files to merge. (Keyboard hotkeys Ctrl + Shift and click on the your favored songs.)
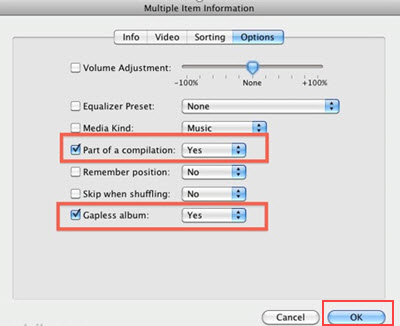
Step 3. Right-click on each song > choose Get Info in the drop-down list > choose the Options tab > check Part of a compilation and Gapless album boxes > click on the OK button.
iTunes also supports combining music tracks importing from CD:
Step 1. Insert an CD and open iTunes on your Mac.
Step 2. Select all audio files to be combined, or you can click Edit in the browser > Select All.
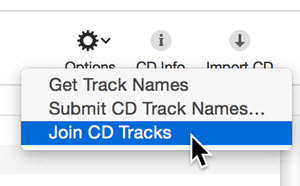
Step 3. Choose Join CD Tracks, and click the Import CD button to combine selected tracks into one.
5. How to Merge Audio Files on Mac via iMovie
iMovie is another go-to tool on Mac. Besides combining audio tracks, you can also add music to video in iMovie.
Step 1. Open up the Mac App Store to update or download the latest iMovie for your Mac.
Step 2. Drag and drop multiple audio files to iMovie, adjust the audio length a little bit and reorder the clip if needed.
Step 3. Click the export button in the top right corner of the interface > choose File.
Step 4. Choose Audio Only under Format and pick up your desired file format (MP3, AAC, AIFF, WAV) for the export.

How to Merge Audio Files Using Pro Tools
Pro Tools is a professional and powerful audio production software that can also merge audio files into one. You can use the Consolidate Clip command to combine multiple audio clips on a single track or across multiple tracks. Here are the steps to merge audio files using Pro Tools:
Step 1. Open Pro Tools and create a new session or open an existing one.
Step 2. Import the audio files you want to merge into the session by going to File > Import > Audio or dragging and dropping them into the Edit window.
Step 3. Arrange the audio files on the tracks as you want them to be merged. You can use the Trim, Fade, and Crossfade tools to adjust the transitions between the clips.
Step 4. Select the audio clips you want to merge by clicking and dragging on the timeline or using the Shift or Ctrl keys (Command keys for Mac) to select multiple clips.
Step 5. Go to Edit > Consolidate Clip or press Option+Shift+3 (Alt+Shift+3 for Windows) to merge the selected clips into one. A new clip will be created with the name of the track and a number.
Step 6. Save the merged clip to your desired location by right-clicking on it and choosing Export Clip as Files or Export Selected as Files.
How to Merge Audio Files Using Adobe Premiere Pro
Adobe Premiere Pro is a professional and versatile video editing software that can also merge audio files into one. You can use the Export Media command to combine multiple audio clips into one file. Here are the steps to merge audio files using Adobe Premiere Pro:
Step 1. Open Adobe Premiere Pro and create a new project or open an existing one.
Step 2. Import the audio files you want to merge into the project by going to File > Import or dragging and dropping them into the Project panel.
Step 3. Create a new sequence by going to File > New > Sequence or clicking on the New Item icon in the Project panel. Choose a preset that matches your audio settings or customize your own.
Step 4. Drag and drop the audio files onto the timeline of the sequence. You can use the Razor, Slip, and Slide tools to edit the clips as you want.
Step 5. Select the sequence in the Project panel or the Timeline panel. Go to File > Export > Media or press Ctrl+M (Command+M for Mac) to open the Export Settings window.
Step 6. Choose the format and preset for your merged audio file from the Format and Preset menus. You can also adjust the settings for your audio, such as sample rate, bitrate, channels, and more.
Step 7. Choose the output location and name for your merged audio file from the Output Name and Export Location fields.
Step 8. Click on the Export button to start the export process. You can also click on the Queue button to send the sequence to the Media Encoder queue and export it later.
How to Merge Audio Files Using Adobe Audition
Adobe Audition is a professional and easy-to-use audio editing software that can also merge audio files into one. You can use the Open Append command to combine multiple audio files into one waveform. Here are the steps to merge audio files using Adobe Audition:
Step 1. Open Adobe Audition and create a new audio file by going to File > New > Audio File or clicking on the New File icon in the Files panel. Choose the settings for your audio, such as sample rate, bit depth, channels, and duration.
Step 2. Go to File > Open Append or press Ctrl+Alt+O (Command+Option+O for Mac) to open the Open Append dialog box. Browse to the location of the first audio file you want to merge and select it. Click on the Open button.
Step 3. Repeat the previous step for the other audio files you want to merge. The audio files will be appended to the end of the new audio file in the order you opened them.
Step 4. Save the merged audio file to your desired location by going to File > Save or Save As or pressing Ctrl+S (Command+S for Mac).
FAQs on Combine Audio Files
How do I combine audio files online?
You can use online audio merger such as Clideo to combine multiple audio files and join them into one. Although being convenient to use, there are many drawbacks: the limitation on the file size and the file import.
Can I combine audio files in QuickTime?
Unluckily, you can only add music to video in QuickTime. In other words, a slice of video track is required in QuickTime, and all separate music tracks you've added for that video will be merged into one, making it a background music for your video.
How to join two mp3 files with Windows Command Prompt?
To combine audio files with Windows Command Prompt, you need to do as follows:
- Use the hotkey [Win+X] to open the menu > choose Command Prompt in the pop-up window.
- After the new window pops up, enter cd c:\ followed by the directory. This is to open the the file folder where your audio files are saved, and you may need to change the command to match with the actual file folder path of your audio files.
- Enter the command copy /b *.mp3 c:\combined.mp3 > press Enter. This is to copy the audio files that have the file extension of *.mp3 under the file folder you've entered, and you can change the output name for your combined audio file as you wish. (The command for the output is: combined.mp3.)
- Then you can find the combined audio file named by combined.mp3 in the local C: disk.
Concluding Remarks
Till now, we've walked around you 5 ways to combine audio files on Windows and Mac. If you are with Windows OS, you can download VideoProc Converter AI, Audacity, and VLC and merge audio files in any of that. For Mac users, iMovie can suit your needs.
In terms of easiness, wide format support, the ability to combine audio files without quality compress, and accompany features to edit MP3 ID3 tags, audio metadata, the best way to efficiently merge audio files is to use VideoProc Converter AI. No matter you only want to splice two songs together, or join hundreds of audio into one track, the tool works nicely for Windows and Mac users.


