


There are a bunch of motivations to upscale a video. Content creators might have the impulse to resize 1080p to 4K before uploading it to YouTube, in an attempt to make it look better after mandatory compression by the platform. Or, you have shot multiple clips with different resolution, and want to merge them into one video without black bars or cropped frames.
If you want a juicy tutorial to upscale a video to 4k or mix 1080p and 4K on a same timeline while preserving some details, you have come to the right place.
Premiere Pro includes a built-in upscaling algorithm to do this guess work. If you want to maximize details, it's better to use plug-ins or "details preserving upscale" effect in After Effects via dynamic link. Or you can rely on another standalone AI video upscaler that adopts advanced AI algorithms that estimate finer resolution data and generate new pixels automatically.

How to Upscale Video in Premiere Pro
Before we start, it's good to know that pixels cannot be created out of nothing. It is a guess work to resize frames. To illustrate, for a 1080p video, you only got 2 million some pixels to play with, while 4K has 8 million some pixels. So, if you stretch (scatter) the original 2 million pixels in a 3840x2160 frame, there are 6 million holes to be filled, and these non-existing pixels are created based on adjacent pixels. The more we know about the adjacent pixels, the more accurate it will be.
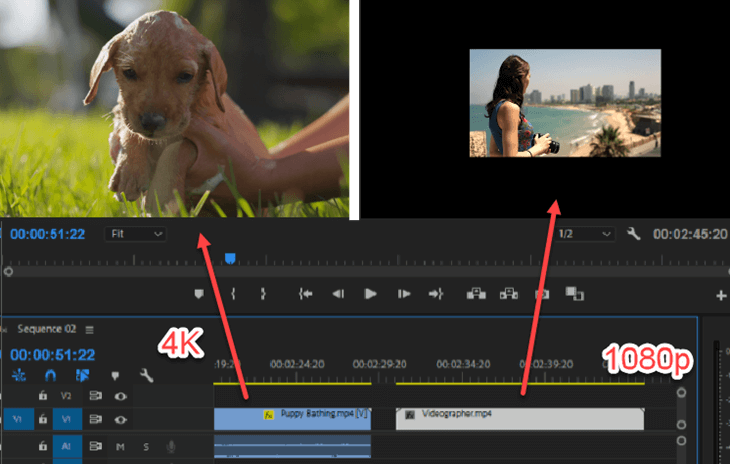
Follow these steps if you have multiple clips with different resolutions on the same timeline. You can either upscale or downscale the resolution so that all clips are resized to the same resolution.
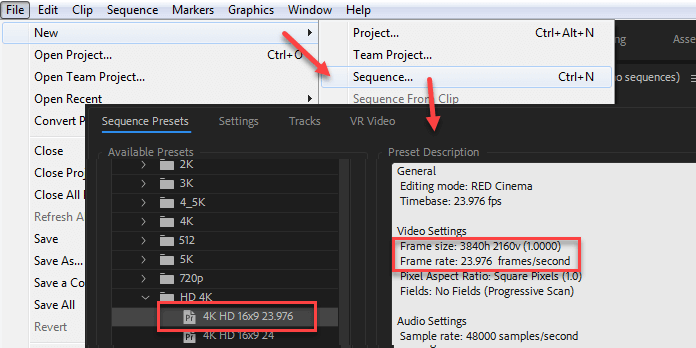
Step 1. Create a project with intended video resolution for the final output, or open the existing project.
- Go to File > New > Sequence (Shortcut Ctrl+N) to open up sequence presets.
- Make sure the presets match the desired export resolution. For instance, if you want an output of 4K video (upscale low-res video to 4K), select presets that has the same frame rate and aspect ratio with you source video.
- Let's say you have a 1080p at 23.976 fpt, then you can choose the presets of RED R3D > HD 4k > 4K HD 16x9 23.976.
Step 2. Use Set to frame size as the Default Media Scaling, instead of using Scale to frame size.
From the menu bar, go to Edit > Preferences > Media, in the pop-up window, find Default Media Scaling, and tick Set to frame size.
Set to frame size vs Scale to frame size: What is the difference?
Both will make the footage to fit the full screen (the sequence settings for the resolution). Set to frame size is recommended, detailed reasoning below.
Set to frame size in Premiere Pro:
It will change the video resolution to match the sequence settings by resizing, and won't rasterize the footage permanently. In the Effects control panel – scale property, you shall see the value changed from 100% to other value.
The benefit is, if you want to resize the footage again later, or adding zoom in/zoom out motion, it will calculate everything based on the original full frames.
Scale to frame size in Premiere Pro:
It will rasterize the footage and in the scale property. After scaling, you will see the value is still 100%. The drawback is, let's say you scale 4K to 1080p, the next time when you want to zoom in, it will calculate pixels based on the downscaled 1080p.
Many professional editors said jokingly that Adobe should label "Scale to frame size" as "Don't use this option".
Step 3. Import videos into the project bin, drag your clips into the timeline, and you shall see all clips already fill the entire frame, no matter it is 4K or 1080p.
- Note 1. If you already start editing clips before selecting "set to frame size", you will see black bars around your footage. To fix this, you can right-click on improperly scaled clips and hit "set to frame size". You might want to delete the clip and re-drag it into timeline to have the right preview.
- Note 2. You can also set large percentage in effect control > scale. But you will have to set it manually for each clip. Besides, you need to decide the number of percentage based on the original and targeted resolution.

Step 4. Zoom-in your video to check if there are artifacts such as noises that are too conspicuous to tolerant. If you prefer a sharper image, you can apply unsharp mask to compensate for the blurred image.
Step 5. Go to Sequence to render you newly edited footage for a smooth playback, then export to the preferred format.
Bad Scenario 1: Why My Video Gets Cropped after Upscaling?
- Problem: "Every time I adjust the scale multiplier to 200, the video in the work area zooms in to a cropped area of the video…And when I go to export the video, it exports a cropped zoomed part of the video." – Premiere user
- Fix: This happens because you only upscale the 1080p clips to 200%, but the sequence setting remains unchanged, you are editing on a 1080p timeline. Go to sequence settings and change resolution to 3280x2160. Then you can test it by exporting only a small fraction of the timeline to see whether it's cropped or not.
Bad Scenario 2: Help! Can I Rescale a Working 1080p Project to 4k?
- Problem: "I edited all of my 4K video material in a 1080p project without recognizing it. If now I try to upscale the whole sequence, all of my effects don't work correctly (scale, position etc). Is there a way to upscale an already finished 1080p project to a 4K project?" – Premiere User
- Fix: If changing the sequence setting from 1920x1080 to 3280x2160 isn't working, you can try to create a brand new 4K timeline, and copy & paste everything there. Go to Project > Sequence to create a new sequence.
How to Upscale a Video in After Effects
Though there is no "Detail-preserving Upscale" effect in Premiere like Adobe's other software such as After Effects and Photoshop, you can upscale a video in Premiere Pro with the help of dynamic link, which opens up After Effects from Premiere timeline and readily resize your video. Then you can head back to Premiere for further editing tasks. But this upscaling method is hardware demanding as it utilizes Premiere and After Effects simultaneously. For those of you with a high-spec desktop, follow these steps:
Step 1. Import video into project bin, drag it to the timeline, right-click on the clip and select Replace with After Effects Composition.
Step 2. In the newly opened AE window, search for Detail-preserving Upscale effect and drag it to your composition (footage).
Step 3. In AE's effects control panel, set scale to a larger percentage (200% for 1080p to 4K and 300% for 720p to 4K). Adjust properties such as reduce noise under this effect until it delivers the best result you prefer.
Step 4. Head back to Premiere Pro and render the result video. Go to Sequence and select whether you prefer to render the entire timeline or sections within in-out marks.
Step 5. Export result video. Make sure export settings match with your sequence settings.
How to AI Upscale a Video in Premiere Pro
If you want to use AI to upscale video in Premiere Pro, much like you would upscale images in Photoshop, Topaz now offers the "Topaz Premiere Panel," a solution that is even more effective than standard plugins.
It's a UXP extension that lets you process the footage directly from your timeline using Topaz's cloud rendering. You can upscale, denoise, and restore your clips right from the panel while the intensive rendering happens entirely off-site. Because the plugin uses cloud rendering rather than your local GPU, you can continue editing the rest of your sequence without your computer grinding to a halt while Topaz does the heavy lifting in the background.
Here is how to upscale your video with AI in Premiere Pro:
- Download the free Topaz Labs for Premiere UXP extension directly from the Topaz website and run the installer.
- Launch Premiere Pro, open your project. Log in to your Topaz account if prompted.
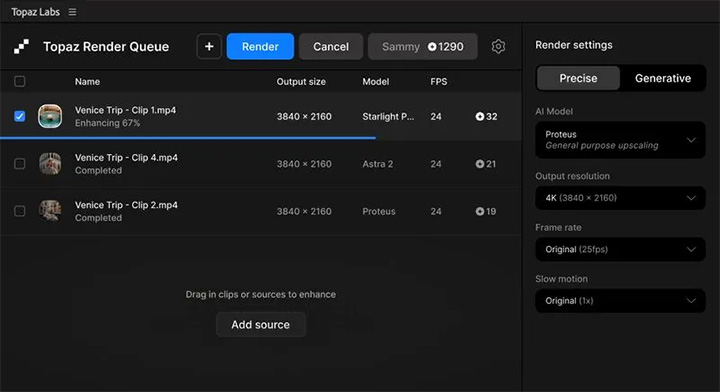
- Drag the video clip from your bin to the Enhancement Queue.
- In the Topaz panel, select your target resolution and choose the best AI model for your source media.
- Send the clip to be processed. The extension uploads the clip to the Topaz Cloud for rendering.
Because Topaz is covering the massive computing power required for AI upscaling on their server farms, processing via the panel costs cloud credits. If you don't have a subscription plan that includes a monthly credit allowance, you have to purchase them a la carte.
As of right now, the Premiere panel only renders the finished files in H.264 (or H.265 for 8K). If your workflow strictly demands ProRes for the upscaled footage, you will still need to use the standalone application until Topaz adds ProRes support to the extension.
How to Upscale a Video with Standalone AI Upscaler
Upscaling a video in Premiere is not the ultimate goal, producing a fantastic video is.
As you might already know, upscaling is programmed as an effect in Premiere, and it takes some time to render for real-time preview. Later when you add other GPU-intensive effects, your computer slows down and CPU overheats.
VideoProc Converter AI can be used as a lightweight pre-editing tool to prepare video clips for Premiere. Imaging all the clips have been batch processed at the same resolution and editing-friendly format, you can then import videos into Premiere for creative work.
Better yet, after VideoProc Converter AI's major update, it now supports new AI-powered algorithms to upscale videos. It is not just another AI hype, but tried-and-true feature to upsampling videos up to 4K resolution, while generating and keeping realistic details.

VideoProc Converter AI - Upscale Video to 4K Losslessly with AI
- Best companion for Premiere to prepare footage for smooth editing.
- AI-powered! 720p to 1080p, 1080p to 4K, SD to HD, and any resolution you want.
- Change video resolution, upscale or downscale, resize videos at high quality.
- Convert HEVC to editing-friendly codecs (ProRes, H264 MP4, etc).
- Preserve more details by using advanced interpolation algorithms upon upscaling.
- Easy cut, merge, resize, stabilize, denoise and apply filters to videos.

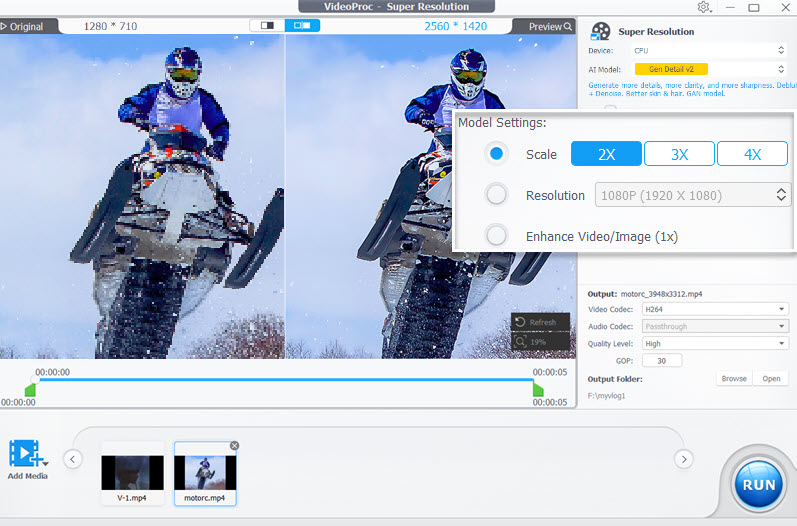
Step 1. Go to the Super Resolution feature from main screen.
Step 2. Import your video and select how large you want to upscale the video to.
You can upsampling the video by 2X, 3X, and 4X. Or export the upscaled video and repeat the process to achieve higher resolution (up to 4K upscaling).
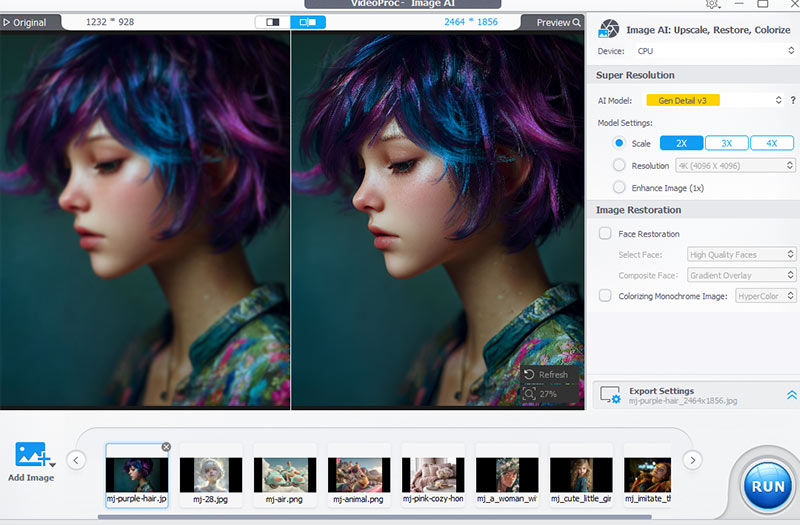
• Gen Detail Model: If you want to achieve a high level of realism in your videos and photos with details, this model is your go-to choice. It enhances skin, hair, and material textures with AI generated details.
• Real Smooth Model: It is designed to fix imperfections and flaws in your images. It improves clarity and provides a smoother, more polished look to your photos or videos.
• Anime Model: Tailored specifically for anime content, this model upscales visuals while preserving the unique style and natural look of the animation. It ensures that the final results remain faithful to the original image.
Step 3. Export the video with hardware acceleration.
Final Words
This tutorial discusses how to upscale video in Premiere Pro. We covered three ways and a bonus to upscale 1080p to 4k in premiere pro: set to frame size, detail preserving upscale (Premiere +After Effects), manual dialing up the scale percentage in effect control, and intelligent scaling algorithm that maximize artifact-free details with a simple click in VideoProc Converter AI.
Besides resizing videos, VideoProc Converter AI is also a powerful video editing tool which supports Intel QSV, NVIDIA CUDA/NVENC, and Apple Metal hardware acceleration to process high quality videos at speed 47X faster than real-time play.


