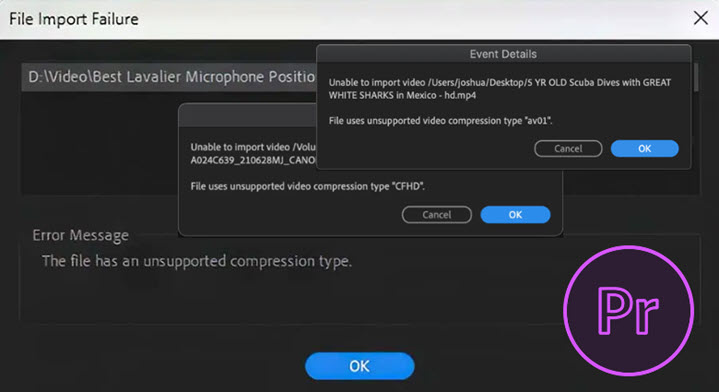
You may occasionally run into the frustrating "The file has an unsupported compression type" error message when trying to import certain video clips into Premiere or playing the clip inside Premiere. Sometimes, it just says unsupported compression type in Premiere Pro. Sometimes it tells you the exact unsupported codec, for instance, "hev1", "vp09", "av01", and "CFHD (CineForm)".
This error essentially means that Premiere does not support the video codec used to compress that particular video file. The good news is that in most cases, this error can be easily fixed. In this post, we'll explore 6 solutions to fix the unsupported compression type error in Premiere Pro. Without further ado, let's dive right into it.
What Causes Unsupported Compression Type in Premiere Pro
When you encounter the "Unsupported Compression Type" error in Premiere Pro, it's typically due to a few common issues related to file compatibility. Here are the main culprits:
Corrupted or Damaged Video Files
If the video file itself is corrupted or damaged, Premiere Pro may be unable to read it correctly, resulting in an import error. Always check if the file plays properly in other media players before importing it into Premiere Pro.
Unsupported or Missing Codec
One of the most frequent causes of this error is incompatible codecs. Video files are encoded with different formats, such as H.264, HEVC/H.265, VP9, AV1, etc. Premiere Pro needs to decode the video with a codec it supports. If the software doesn't support the codec used in your file, you'll face the "unsupported compression type" error.
 Tips: This issue is common with YouTube downloads. YouTube often uses VP9 or AV1 codecs, which Premiere Pro doesn't support natively. To resolve this, you can transcode the video to a more compatible format (e.g., H.264, H.265, or ProRes) before importing it into Premiere Pro.
Trial Version Limitations
Trial versions of Premiere Pro typically have limitations on codecs required for certain professional or camera-specific formats, such as AVCHD or particular types of high-quality MP4 files. Access to these codecs often requires a paid subscription.
Outdated Software or Drivers
Premiere Pro relies on both its internal software and system components, such as graphics drivers, to decode various video formats. Using an outdated version of Premiere Pro can result in missing codec support or bugs that hinder compatibility.
Outdated graphics card drivers can also affect Premiere Pro's ability to use hardware acceleration for decoding, leading to errors when trying to import or play certain formats. Keeping both your software and drivers up to date is essential.
Incorrect File Location
While less common than codec issues, problems with where the file is stored or its name can sometimes cause import failures. This includes issues with the file's path – for example, if the file is located on a network drive with unstable connection or insufficient user permissions, Premiere Pro might struggle to access it reliably.
Incorrect File Extension
Renaming a file without converting it to the corresponding format can confuse Premiere Pro. The software uses file extensions (e.g., .mp4, .mov) to identify the type of video and the codec required for decoding. For example, if you change a file's extension from .mov to .mp4 without converting it, Premiere Pro will try to decode it incorrectly, resulting in the "unsupported compression type" error.
How to Fix Unsupported Compression Type in Premiere Pro
Solution 1. Convert Videos to Formats Compatible with Premiere Pro
As discussed, incompatible codecs are the primary cause of the "The file has an unsupported compression type" error and transcoding the video file to a Premiere compatible format is the most efficient solution. Thankfully, this can be done easily with VideoProc Converter AI.
With just one click, you can use this robust video converter to easily re-encode problematic clips into over 420 formats, including the editing-friendly formats like ProRes, H.264, and H.265 that Premiere Pro fully supports. These converted video files are fully compatible with Premiere Pro, which means you can expect smooth importing, seamless playback, and fluid editing without worrying about errors, lag, or dropped frames.
Thanks to VideoProc's High Quality Engine, the transcoding process guarantees no visible quality loss. The process is remarkably fast (up to 47x real-time faster than the real time playback) powered by the level-3 GPU acceleration technology. Better still, VideoProc Converter AI offers a comprehensive suite of tools for quick edits, AI upscaling, and elevating and processing your media, making it a versatile solution for video creators.

VideoProc Converter AI - Process Videos for Easier Editing
- Convert HEVC, VP9, AV1, CFHD (CineForm), and 420+ formats for Premiere Pro.
- Total control over video quality, format container, resolution, bitrate, and file size.
- 29+ quick editing tools to co-process with Adobe Premiere Pro.
- 47x faster processing speed powered by Level-3 Hardware Acceleration.
- All-in-one video solutions: compress, convert, AI enhance, transcode, download, record.
![]() Excellent
Excellent ![]()

Download and install VideoProc and convert your videos to formats compatible with Premiere Pro! HOT
Step 1. Launch VideoProc Converter AI. Click "Video Converter" in the main interface. Drag and drop your video to it.

Step 2. Open "Target Format". Select MP4 H.264 as the output format for smooth performance in Premiere Pro or MOV ProRes for professional editing.
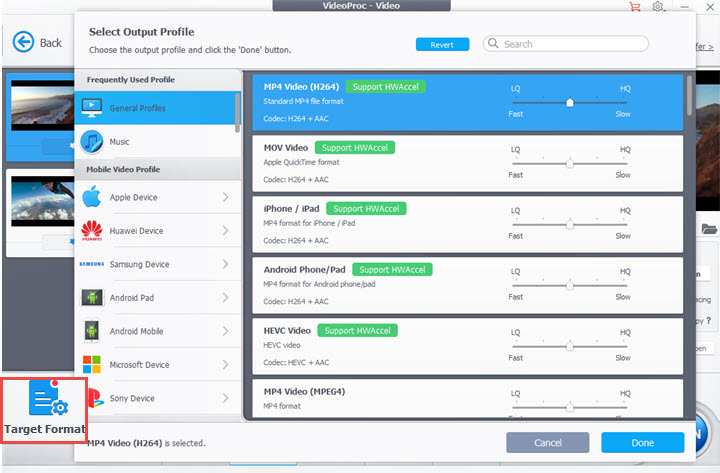
Specifically, you have two ways to re-encode the video for Premiere Pro.
- Transcode: Compress the video using codec formats that are friendly to Premiere Pro, such as H.264, ProRes 4444, ProRes 422 and other ProRes families. It fixes unsupported compression type issues caused by incompatible codec formats, such as HEVC codec missing in Premiere Pro.
- Convert Format without Transcoding: Compress the video with the same codec but in another container. It fixes unsupported compression type errors caused by incompatible format container, such as MKV for Premiere Pro. You can convert MKV H.264 to MP4 H.264.
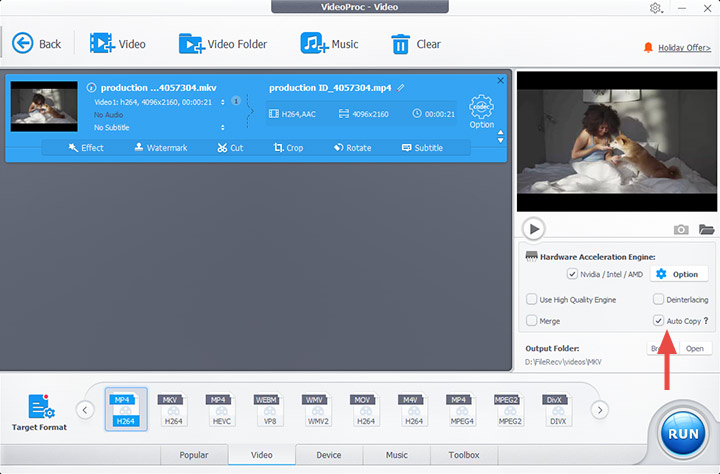
Step 3. Click "Browse" to select an output folder. Check "Auto Copy" if you are going to convert it without transcoding. Smash on the RUN button to re-encode and export.
Solution 2: Split the Video into Segments
Your video file is listed in Premiere Pro supported file formats, but still troubled by the "The file uses unsupported compression type" error? Now take a look at its length and size. Import a sequence of video segments instead of one long video.
VideoProc Converter AI also comes to help in such a case. You can load video to it and use the Split tool to divide the video into short clips evenly. Here's how.
Step 1. Open VideoProc Converter AI. Click "Video" on its main UI. Drag and drop a long video to it.
Step 2. Click "Toolbox" at the bottom bar. Double-click on "Split".
Step 3. By default, VideoProc Converter AI cuts a long video into 10 segments. You can change the number or set the duration of clips manually.
Step 4. Click "Done" and "RUN" to export. Then import the sequence of video clips to Premiere Pro to see if it works.
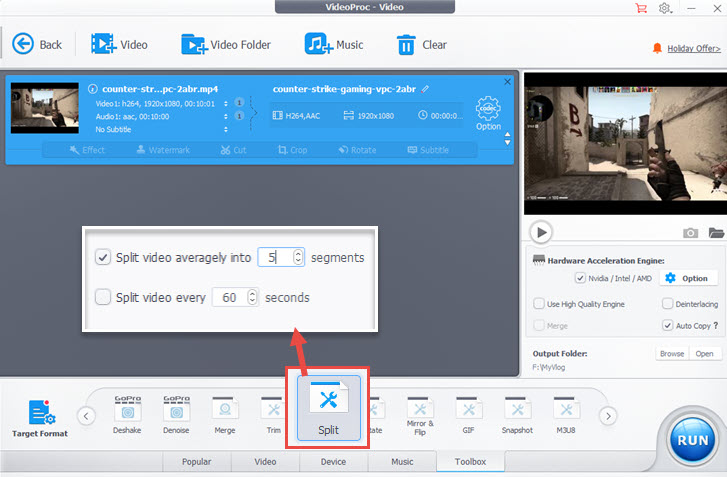
Tips: The Split tool delivers videos in MP4 H.264 1080p by default. If you want other formats, set it in the Video option at the bottom bar and cut it in the editing toolbar.
Solution 3: Clear the Media Cache
Media cache files are generated to improve the playback of some media types. Cleaning of old or unused ones can help maintain optimal performance. Notice that, deleted media cache will be created again when needed. So this method might not work all the time.
Step 1. Save your project in Premiere Pro.
- On Windows: Edit > Preferences > Media Cache
- On Mac: Premiere Pro > Preferences > Media Cache
Step 2. Click the "Delete" button or choose "Delete Unused"
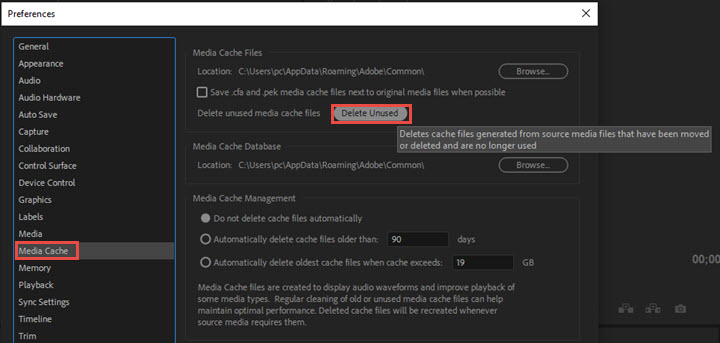
Step 3. Confirm the deletion and wait for it to rebuild files.
Alternatively, you can delete media cache files manually in the following path:
- Windows: \Users\[username]\AppData\Roaming\Adobe\Common
- Mac: /Users/[username]/Library/Application Support/Adobe/Common
Solution 4: Change the Video File Location
The file may be saved in a location that Premiere Pro doesn't have permission to access, such as protected system folders. Ensure you have full read/write access to the storage location.
In this solution, you need to move your video file to another drive. Create a new project in Premiere Pro. Now import the video from a new path to this project. If you don't want to give up the edits, just load the video from the new path to the existing project. But it might not fix unsupported compression type issues all the time.
Solution 5: Update Premiere Pro CC
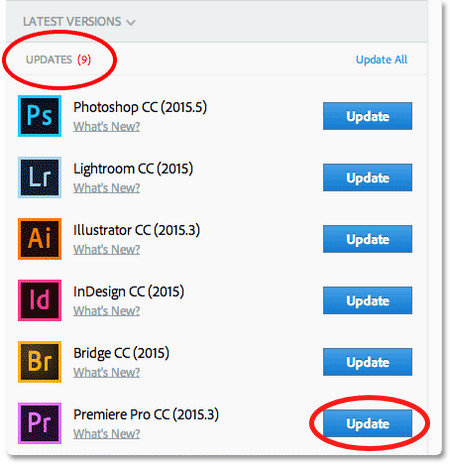
An older version of the Premiere Pro software may not support newer video formats or certain storage drives. Keeping Premiere Pro updated can help fix import errors.
Note: Before you update, check the system requirements of the latest Premiere Pro. Otherwise, it may not run properly on your computer.
Step 1. Save the project in Premiere Pro if you are editing. Click Help > Updates in the top menu.
Step 2. Wait for it to check updates. If there's a new version, update it now.
Step 3. Re-launch Premiere Pro after the installation is finished. Import the file to see if it's supported now.
Solution 6: Register Premiere Pro CC License Correctly
HEVC support requires a properly activated full version of Premiere Pro. Check your Creative Cloud account and Premiere Pro installation to troubleshoot problems. Consider subscribing or purchasing legitimate copies for smooth operation.
Step 1. Make sure your device is connected to the Internet.
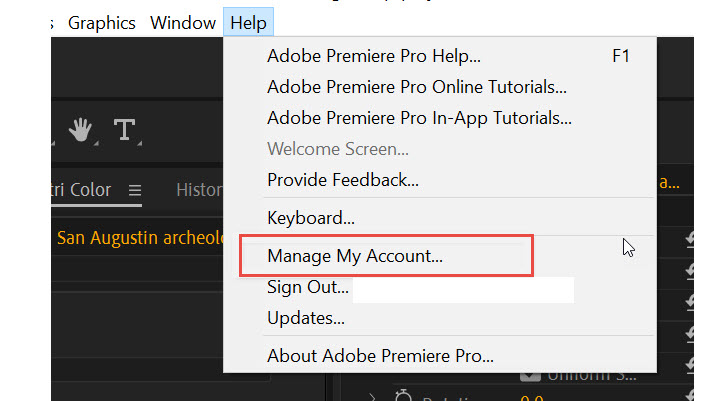
Step 2. Open Adobe Premiere Pro CC. Click Help > Manage My Account.
Step 3. Check your license on Premiere Pro. If you are using a trial version or the trial version is expired, purchase a full version. You can find more Adobe licensing details here.