
In a lot of cases, you may want to record things that happened on your Windows 10 screen with audio. For example, you want to make an instructional video with audio narration, record a Zoom meeting for reviewing the possible missed points, and record gameplay with game sound and your voice, etc. These are why screen recording on Windows on audio comes in handy from time to time. In this post, let's take a look at 4 of the easiest ways to record a screen on Windows 10 with audio.
Screen Record on Windows 10 with Audio via VideoProc Converter AI
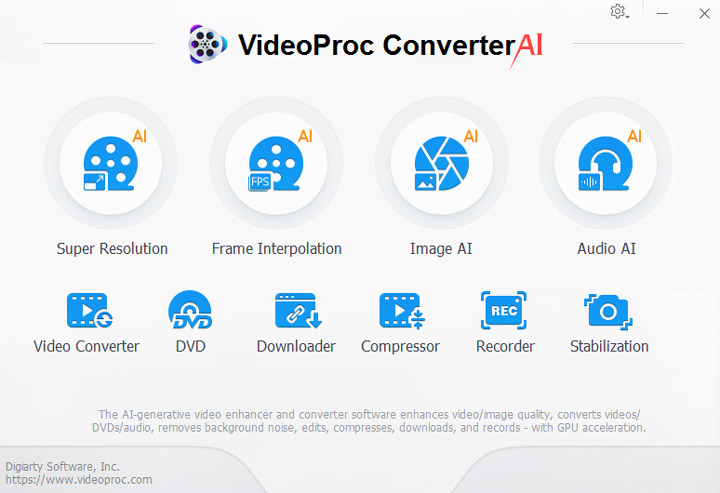
VideoProc Converter AI is the best pick for recording a screen on Windows 10 PC with audio. This best screen recorder offers you 3 recording modes, making it easy for you to capture your screen, webcam, system sound, and audio from the built-in/external microphone. Before recording, you can select the exact part of the screen you'd like to record, choose the recording format (MP4, MKV, MOV, etc.), customize the recording quality, and so much more.
While recording, you can use real-time drawing tools to help viewers always stay focused on the point. After recording, you can make use of a myriad of editing tools, such as crop, trim, watermark, and change speed to spice up your recording. What's more, you can compress and convert your recording for making it more playable, sharable, and editable.

VideoProc Converter AI - Screen Record on Windows 10 with Audio
- Record your screen and webcam with internal audio and your voice
- Create high-quality 4K screen recordings with the smallest possible file size
- Save your recordings in popular formats such as MP4, MOV, MKV, and more
- Customize the recording area and other settings to your preference
- Offload the intense CPU usage with the GPU acceleration technology
- Built-in tools to edit, compress, and convert your recordings for share
![]() Excellent
Excellent ![]()

Step 1. Enable the Screen Recorder
Free download and install VideoProc Converter AI on your Windows 10 PC. Launch it up and click on Recorder to activate the screen recorder feature.
Step 2. Select the Audio Recording Device
Check the microphone icon or the speaker icon to record your screen on Windows 10 with the audio from the microphone or the speaker.
Tips:
You can also check both to screen record on Windows with audio from both the microphone and your speaker. Let's say you have more than one speaker or microphone installed, you can click the small down-triangle button to find the available audio devices and select whatever one you need.
Step 3. Specify the Recording Settings
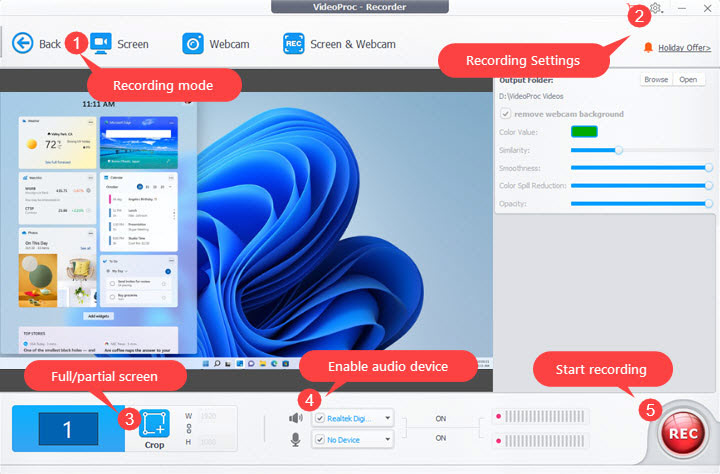
Select a recording mode, Webcam, or Screen & Webcam. You can hit the Crop button and drag the selection box to choose the specific range on the screen for recording.
Tips:
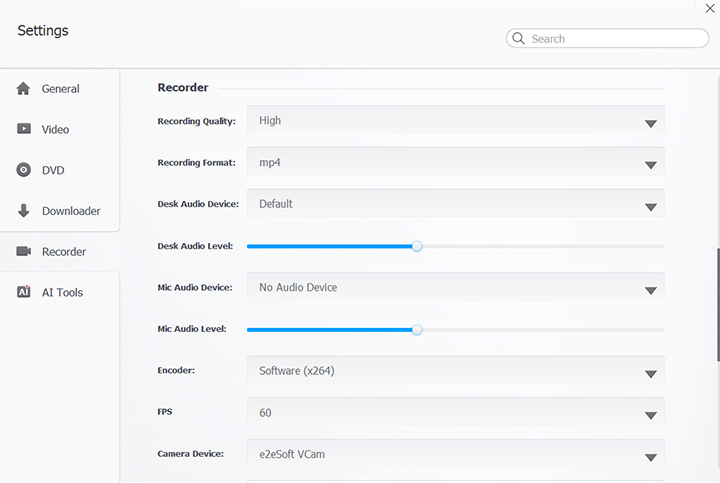
You can get additional customization options such as recording format, quality, hotkeys, and more by clicking on the gear icon located in the top right corner.
Step 4. Start Recording Screen with Audio in Windows 10
Hit REC to start recording your Windows 10 screen with audio. Once you're done, click on the Stop icon. To play the recorded video, simply click on its thumbnail located on the right side of the panel.
Screen Record on Windows 10 with Audio via Game Bar
Game Bar is a pre-built screen recorder for Windows 10 that is primarily designed to capture Xbox gameplay and many other on-screen activities. Its intuitive interface makes it easy to start recording quickly and customize your settings for quality, audio bitrate, and frame rate. However, it's important to note that Game Bar is limited in terms of what it can record, as it cannot capture Windows Explore and many applications that weren't installed from the Microsoft Store. Additionally, it lacks advanced features such as the ability to specify what you want to record or add enhancements to your recordings.
Step 1. Prepare the Screen
It's worth noting that Game Bar exclusively captures the program that was active at the beginning of the recording, restricting the ability to switch between different screens or applications during the recording session. Thus, To ensure a successful screen recording on Windows 10 using Game Bar, it is essential to have the desired screen open before initiating the recording process.
Step 2. Enable Game Bar
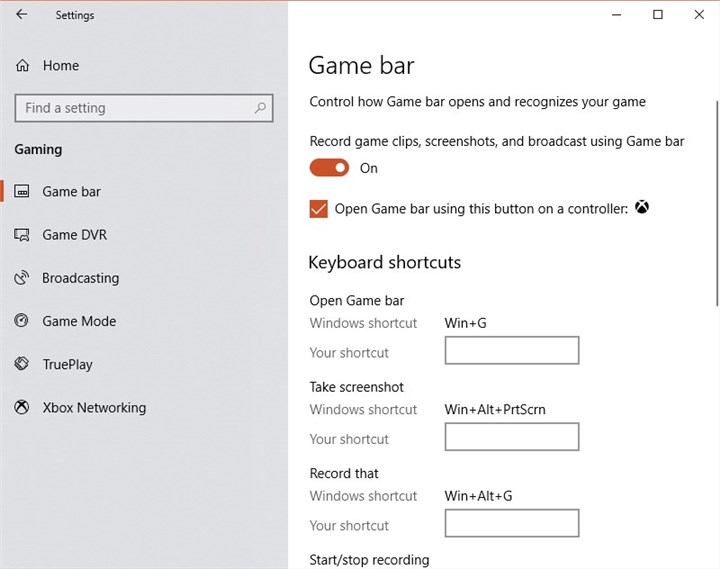
Click on Windows Settings and then search for "game" on the pop-up new panel. Click on the Xbox Game Bar option and toggle on the option of "Enable Xbox Game Bar for things like recording ame clips".
Step 3. Open the Game Bar
Press Win+G at the same time to open the Game Bar widget. Click "Yes, this is a game", if there is a prompt asking you to confirm if you want to open Game Bar.
Step 4. Specify Audio Settings
Click on the audio icon to open the audio setting panel. Herein, you can customize the volume of different audio devices.
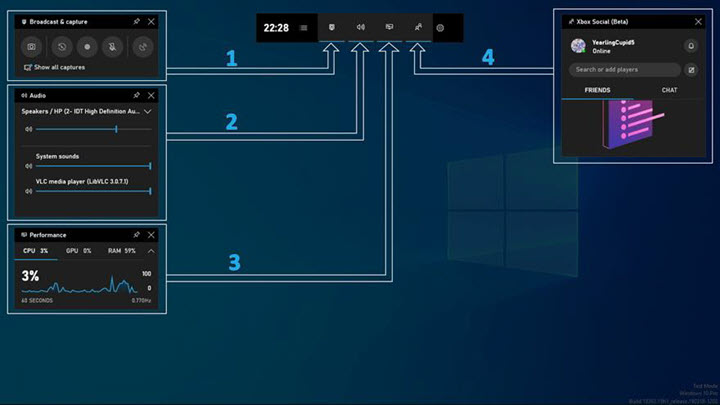
Step 5. Start Recording a Screen on Windows 10
Hit the Capture icon. Select the microphone icon, if you want to screen record on Windows 10 with your voice. Hit the start recording icon to start screen recording on Windows 10 with audio for free using Game Bar.
Screen Record on Windows 10 with Audio via OBS
OBS (Open Broadcaster Software) is a popular open-source program renowned for its extensive recording and streaming capabilities. It offers the flexibility to create unlimited scenes with various sources like browser windows and capture cards. You can switch between different scenes easily and seamlessly using custom transitions. When it comes to screen recording on Windows 10 with audio, OBS is on par with paid programs, enabling the capture of audio from multiple speaker and microphone devices while offering precise control over volume levels through its robust audio mixer.
However, these advanced features may be overwhelming for beginners or for everyday recording tasks. The uncluttered interface of OBS can make the initial setup and configuration of basic recording a bit complex. Furthermore, it is resource-intensive and may strain lower-end computers, leading to potential issues such as computer lag and freezes.
Step 1. Open OBS on Windows 10
Go to the official site of OBS Studio. Click on Windows to download and install the most recent release of OBS on Windows 10. Launch up OBS to proceed.
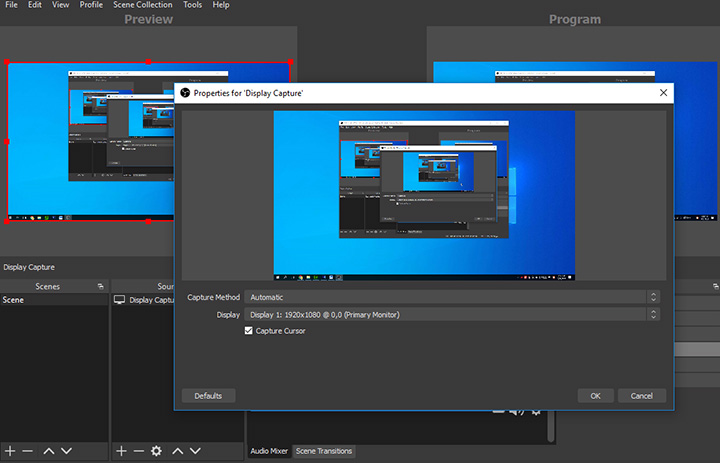
Step 2. Create a Scene
Come over to the Resource section, click on Add, and select the source that you want to record. Let's assume you want to record the computer screen, then simply select Display Capture and hit OK. Uncheck Capture Cursor to hide the cursor in your recording. Hit OK to confirm your adjustments.
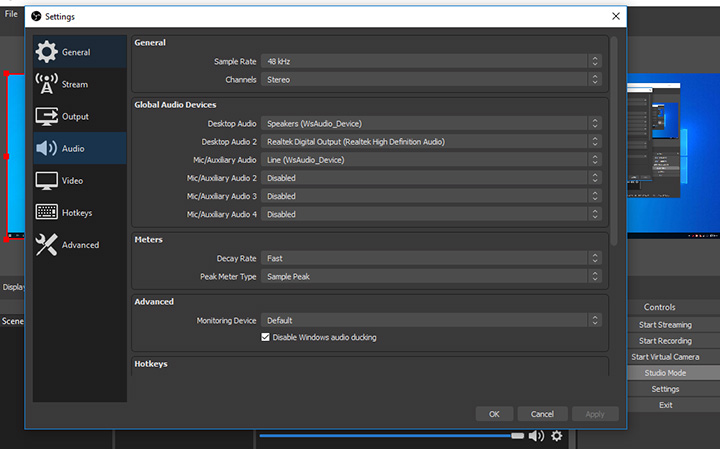
Step 3. Specify Audio Settings
Go to the bottom right and hit Settings. Click on Audio. Go to the Gloable Audio Devices section and select the audio devices that you want to record the sound from. If necessary, adjust the setting options for the audio sample rate, channels, and other properties. Hit Done to return to the main interface. Toggle up/down or mute the audio from different audio devices to your preferences.
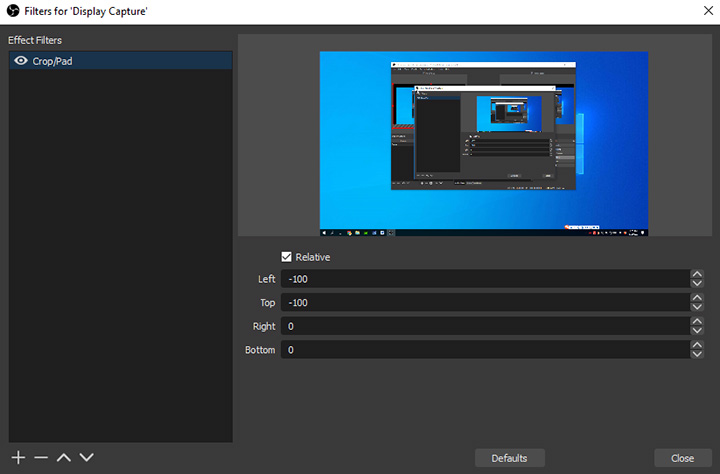
Step 4. Specify the Recording Range
Go to the Sources section, right-click on the source (in my case, it's Windows Capture), and choose Filters. Click on Crop/Pad, hit OK, and then adjust the pixel values in the fields of Top, Bottom, Right, and Left to set the desired recording area. Hit Close to confirm your adjustments.
Step 5. Start Recording Screen with Audio on Windows 10
Hit Start Recording to start recording a screen on Windows 10 with audio for free by using OBS.
Screen Record on Windows 10 with Audio via ShareX
ShareX is a free and open-source screen capture and recording program for Windows. It boasts an intuitive built-in image editor and versatile screen-capture capabilities. Notably, you can record scrolling activities, extract text from screenshots, and highlight the points of your screenshots. In terms of screen recordings, you have the flexibility to choose audio devices and select the desired screen area for recording. However, ShareX doesn't support recording with a webcam. If you want to screen record on Windows 10 with audio and your face, try VideoProc Converter AI or other options listed in this post. Additionally, some users have reported encountering errors like sudden crashes and black screens when recording long video sessions.
Step 1. Open ShareX on Windows 10
Navigate to the official site of ShareX. Hit Download to get the latest release of ShareX downloaded and installed on your Windows 10 PC. Open it up.
Step 2. Select the Audio Source
Click on Task Settings. Click on Screen Recorder. By default, ShareX records your screen without audio. To screen record on Windows 10 with audio, you need to go to the Audio Source menu and choose the needed audio source.
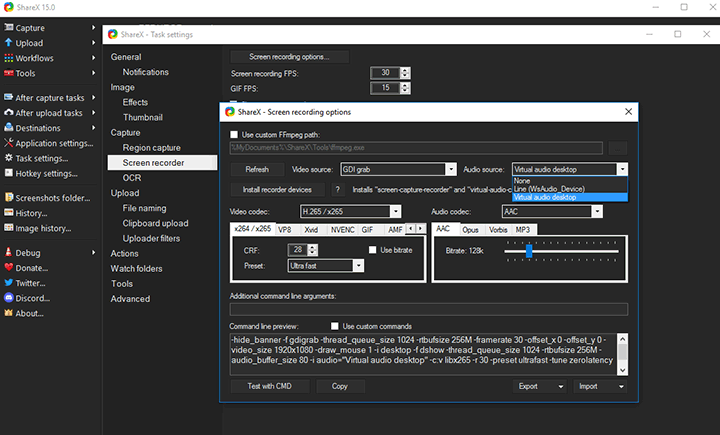
Note:
Give a caution, you can only select one audio source over here. Let's say you need to record your screen with internal audio and microphone, then you should go to the Additional command line argument and then enter the command line:
-f dshow -i audio="The_Name_Of_Target_Audio_Source" -filter_complex amix=inputs=2:duration=longest
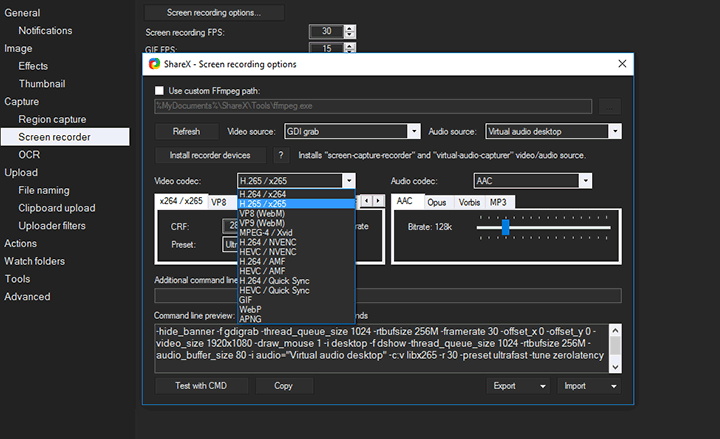
Step 3. Customize the Media Encoding Setting
If necessary, you can navigate down to adjust the video codec, CRF, audio codec, audio bitrate, and plenty of other encoding settings for outputting the screen recordings with the desired quality and size. Once you're done, exit this panel. Hit Close to return to the main interface of ShareX.
Step 4. Start Recording Screen with Audio on Windows 10
Press the shortcut to initiate the screen-recording feature. Drag and select the specific area on your Windows 10 screen that you wish to record using your mouse. Once you have made your selection, the recording will start immediately. Click on Stop to stop the recording.
FAQ
How to record screen Windows 10 with audio without game bar?
To record the screen on Windows 10 with audio without using the Game Bar, you can download and install VideoProc Converter AI and then follow these steps:
Step 1. Open VideoProc Converter AI, hit Recorder, and the select a recording mode.
Step 2. Select the audio device(s). For example, select the icons of the speaker and the microphone to record screen with system audio and your voice. Click the small expand icon and select the specific audio device(s).
Step 3. Hit REC to start recording screen on Windows 10 with audio without game bar.
How to record screen in Windows 10 with audio without any software?
In Windows 10, you have the option to record your screen with audio without relying on third-party software by utilizing the built-in Xbox Game Bar feature. We've already guided you through the process in this post. However, it's worth mentioning that Game Bar has limitations - it can't capture everything happening on your Windows 10 screen, and it doesn't offer the ability to record specific areas. If you're seeking a hassle-free method with more versatile recording features, we recommend trying VideoProc Converter AI instead.


