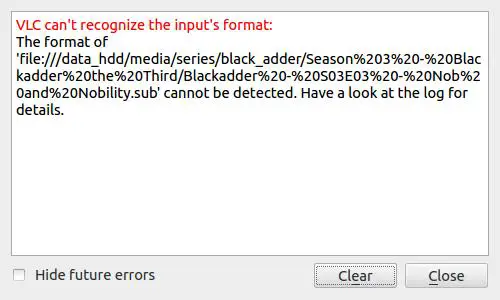
VLC is one of the most popular media players out there, loved by millions for its versatility and ability to play a wide range of file formats. However, like any software, it's not without its quirks. One common issue that VLC users may encounter is the error message "VLC can't recognize the input's format" or "VLC your input can't be opened."
If you've come across this error, don't worry - we've got you covered. In this article, we'll explore the possible causes of this error and provide you with solutions to fix it, so you can continue enjoying VLC without any hassle.
Why VLC Can't Recognize the Input's Format
Why does VLC encounter this error in the first place? There are several potential causes:
1. Unsupported file format: VLC is powerful, but it's not infallible. Some file formats are simply not supported by VLC. If you're trying to play a file that falls into this category, you'll likely encounter the "VLC can't recognize the input's format" error. To address this issue, you can try converting the file to a compatible format using a video converter tool like VideoProc Converter AI.
2. Corrupted or damaged file: Sometimes, files can become corrupted or damaged, making them unreadable by VLC. This can happen due to various reasons, such as incomplete downloads or errors during file transfers. If you suspect that your file is corrupted, you can try repairing it using a file repair tool. Alternatively, if you have a backup of the file, you can try playing the backup copy to see if it resolves the issue.
3. DRM protection or encryption: Certain files, especially those purchased or rented from online platforms, may come with DRM (Digital Rights Management) protection or encryption. This prevents unauthorized access and copying of the content. Unfortunately, VLC may not be able to play files with DRM protection or encryption. In this case, you'll need to use a media player that supports DRM, or look for alternative ways to play the file.
4. File location: If the file you're trying to play is located on a network drive or a remote server, VLC may have trouble accessing it due to network connectivity issues or insufficient permissions. To troubleshoot this, try copying the file to your local storage and play it from there. If it plays without any issues, then the problem lies with the network drive or remote server.
5. Incorrect or outdated VLC settings: Sometimes, the error can be caused by incorrect or outdated settings in VLC itself. To fix this, you can try resetting VLC to its default settings by going to "Tools" > "Preferences" > "Reset Preferences." This will revert VLC to its original settings and may resolve the error.
How to Fix VLC Can't Recognize the Input's Format
Solution 1: Update VLC to the Latest Version
Updating VLC to the latest version can often solve compatibility and performance issues, including problems with recognizing input formats. Here's how you can do it:
Check and update the current version of VLC: Open VLC and go to the Help menu. Then, click on "Check for Updates" to find out the version you're currently using and whether you need to update it.
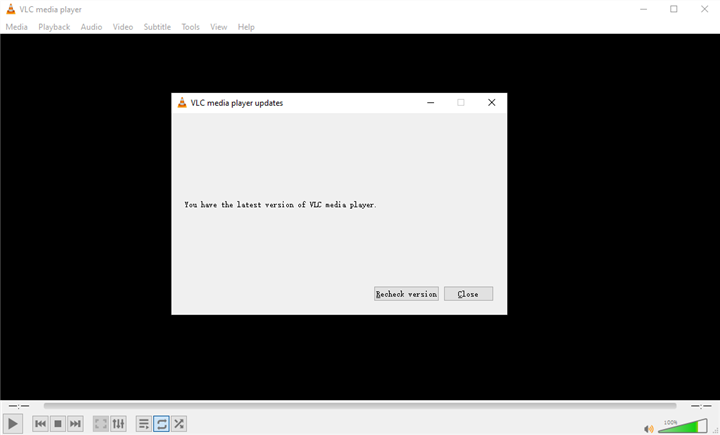
Updating VLC ensures that you have the most recent bug fixes and enhancements, which can help resolve issues related to input format recognition.
Solution 2: Convert the File Format to a Compatible One
If updating VLC doesn't solve the problem, you can try converting the file format to a compatible one that VLC can recognize. Here's how you can do it:
1. Use VLC's Built-in Converter: Open VLC and go to the Media menu. Click on "Convert/Save" to open the Convert window. In the File tab, click on "Add" to import the file you want to convert. Choose the output format from the Profile dropdown menu. Finally, click on "Start" to begin the conversion process.
2. Use a Third-Party Media Converter: If VLC's built-in converter doesn't meet your needs, you can use a third-party media converter like VideoProc Converter AI. Download and install the converter on your computer, then follow the instructions provided by the software to convert your file to a compatible format.
Converting the file format to a common one, such as MP4, MKV, or AVI, can make it playable by VLC and resolve the format recognition issue.
Solution 3: Remove the DRM Protection or Encryption from the File
DRM (Digital Rights Management) is a technology used by content providers to protect their intellectual property. It restricts the usage of the file, such as preventing it from being copied, shared, or played on unauthorized devices. Encryption, on the other hand, uses algorithms to convert the file into a format that can only be deciphered with a specific decryption key.
To unlock the file and remove the restrictions, you can use a DRM remover or an encryption breaker. These tools are specifically designed to bypass the DRM or encryption and make the file playable in VLC. One popular DRM remover is TunesKit DRM Media Converter, which can remove DRM from various video formats, including M4V, MP4, MOV, and more. Another option is Any Video Converter, which not only removes DRM but also converts the file to a format compatible with VLC.
Solution 4: Copy the File from the Network Drive or Remote Server to a Local Folder
Another solution to the VLC network stream not working issue is to copy the file from the network drive or remote server to a local folder on your computer or device. This simple step can improve the availability and stability of the file, making it easier for VLC to stream it.
When you stream a file directly from a network drive or remote server, VLC relies on a stable network connection to continuously fetch and play the content. However, if there are any network interruptions or fluctuations, it can cause buffering issues or even disconnect you from the stream entirely. By copying the file to a local folder, you eliminate the dependency on the network and ensure a smoother playback experience.
To copy the file, you can use a file manager or an FTP (File Transfer Protocol) client. If you're using a Windows computer, you can simply open File Explorer, navigate to the network drive or remote server, and drag the file to a local folder on your computer. On macOS, you can use the Finder and follow the same process. Alternatively, if you're comfortable using FTP, you can connect to the network drive or remote server using an FTP client like FileZilla, locate the file, and transfer it to a local folder.
Solution 5: Change the File Extension or Metadata
Sometimes, VLC fails to recognize a file because of its file extension or metadata. By changing these elements, you can make the file recognizable to VLC and get it to play without any issues.
Why does changing the file extension or metadata work? Well, VLC uses the file extension and metadata to determine the format and content of a file. If these elements are incorrect or mismatched, VLC may not be able to understand the file and play it properly.
So, how can you change the file extension or metadata to match the actual format and content of the file? There are two methods you can use: a file renamer and a metadata editor.
To change the file extension, you can use a file renamer tool like Bulk Rename Utility or Advanced Renamer. These tools allow you to rename multiple files at once and change their extensions. Simply select the files you want to rename, choose the new extension, and let the tool do the rest.
Changing the metadata requires a metadata editor like Mp3tag or TagScanner. These tools allow you to edit the metadata of audio and video files, including the file format. Simply open the file in the metadata editor, make the necessary changes to the format and content information, and save the file.
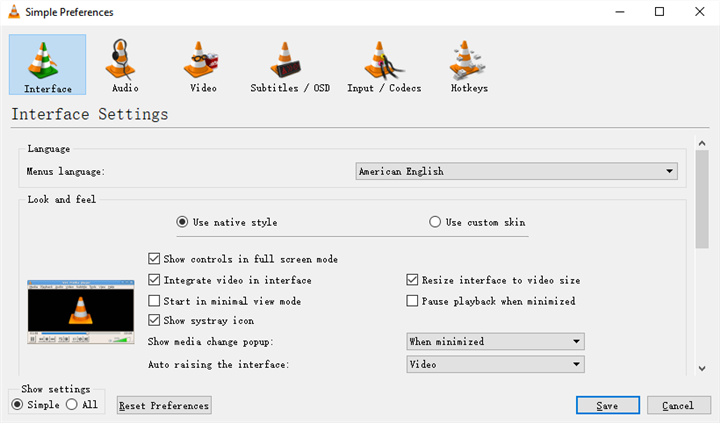
Solution 6: Reset VLC Settings to Default
If changing the file extension or metadata doesn't solve the issue, you can try resetting VLC settings to default. This can help resolve any configuration or preference issues that may be causing VLC to malfunction.
Resetting VLC settings is a simple process. You can do it through VLC's preferences menu or by deleting VLC's configuration files.
To reset VLC settings through the preferences menu, open VLC and go to "Tools" > "Preferences". In the preferences window, click on the "Reset Preferences" button at the bottom. This will reset all settings to their default values。
If you prefer to delete VLC's configuration files, you can do so by following these steps:
- 1. Close VLC if it's running.
- 2. Navigate to the VLC configuration folder. The location of this folder depends on your operating system:
- - Windows: C:\Users\YourUsername\AppData\Roaming\vlc
- - Mac: /Users/YourUsername/Library/Preferences/org.videolan.vlc
- - Linux: ~/.config/vlc
- 3. Delete the VLC configuration folder.
- 4. Restart VLC. It will recreate the configuration folder with default settings.
By resetting VLC settings to default, you can restore its original functionality and hopefully resolve any streaming issues you were experiencing.
Additional Solutions for Specific Scenarios
In this part, we will provide some additional solutions for some different scenarios where you will encounter this error of VLC can't recognize the input's format. Choose the one that is the same as yours.
How to Fix VLC Can't Recognize the Input's Format on macOS or Linux
Those 6 methods above are mainly based on the Windows operating system. So if none of them works for your OS (macOS or Linux), in this section you can find some methods
1. Installing additional codecs or plugins for VLC on macOS or Linux.
One reason why VLC may not recognize the input's format is the lack of compatible codecs or plugins. Unlike Windows, macOS and Linux do not come pre-installed with all the necessary codecs due to licensing restrictions. Fortunately, you can easily install additional codecs or plugins to enhance VLC's compatibility and functionality.
To find and install codecs or plugins for VLC on macOS or Linux, you can explore various sources such as online repositories or software packages. Some examples of useful codecs or plugins include x264, x265, and FLAC. These codecs can improve VLC's support for different formats and ensure smooth playback of your media files.
2. Using Terminal commands to launch VLC with different options or parameters.
Another approach to fixing the input recognition issue is by using Terminal commands to launch VLC with different options or parameters. This method gives you more control and flexibility over VLC's behavior and performance on your macOS or Linux device.
By using Terminal commands, you can specify options such as --demux, --codec, or --input-slave, which can affect VLC's input recognition. For example, if you're having trouble with an mkv file, you can try launching VLC with the command `vlc --demux mkv`. Similarly, for mp3 or m3u8 files, you can experiment with different commands to see which one resolves the issue.
3. Changing the file permissions or ownership on macOS or Linux.
Sometimes, the issue with VLC not recognizing the input's format can be related to file permissions or ownership on your macOS or Linux device. If VLC doesn't have the necessary permissions to access or playback a file, you may encounter this problem.
To resolve this, you can use Terminal commands or a file manager to change the file permissions or ownership. Commands like `chmod` or `chown` can help you modify the necessary settings to make the file readable and writable by VLC.
How to Fix VLC Can't Recognize the Input's Format for Streaming Media Sources
If you are trying to stream media sources with VLC, but it keeps giving you the error message "VLC can't recognize the input's format", here are the possible solutions.
1. Check your network connection and firewall settings.
When it comes to streaming media sources, a stable and secure network connection is crucial. If your network connection is slow or unstable, VLC may have trouble recognizing the input format. Additionally, your firewall settings can also play a role in blocking or interfering with VLC's access to streaming media sources.
To check your network connection and firewall settings, follow these steps:
- Ensure that your internet connection is stable and fast. You can do this by running a speed test on your computer or device.
- Check if your firewall is blocking VLC's access to the streaming media sources. You may need to adjust your firewall settings to allow VLC to connect.
- Verify that your proxy settings, port forwarding, or VPN settings are not causing any conflicts with VLC's input recognition and playback.
2. Update VLC's streaming protocols and modules.
Updating VLC's streaming protocols and modules can improve its compatibility and functionality with different streaming media sources and formats. By keeping these components up to date, you can ensure that VLC is equipped with the latest features and enhancements.
To update VLC's streaming protocols and modules, follow these steps:
- Visit the official website of VLC or the app store on your device.
- Look for the latest version of VLC and check if any updates are available.
- If updates are available, download and install them. This will ensure that you have the most recent streaming protocols and modules installed on your VLC player.
By regularly updating VLC, you can enhance its performance and ensure a smooth streaming experience.
3. Use a proxy server or VPN service to access streaming media sources.
If you're facing restrictions or blocks when accessing streaming media sources, using a proxy server or VPN service can help you bypass these limitations. These tools can provide you with an alternative IP address, allowing you to access content that may be blocked or restricted in your region or network.
To use a proxy server or VPN service with VLC, follow these steps:
- Choose a proxy server or VPN service that suits your needs. There are many options available, such as Tor, ExpressVPN, NordVPN, and more.
- Install and configure the proxy server or VPN service on your computer or device.
- Connect to the desired location or server using the proxy server or VPN service. This will change your IP address and provide you with access to the streaming media sources you want to watch or listen to.
Remember to choose a reliable and trustworthy proxy server or VPN service to ensure a secure and seamless streaming experience.
How to Fix VLC Can't Recognize the Input's Format for DVD or Blu-ray Discs
1. Installing a DVD or Blu-ray decoder or driver for VLC.
The first method you can try is to install a DVD or Blu-ray decoder or driver for VLC. These decoders or drivers are necessary for VLC to properly recognize and play DVD or Blu-ray discs. Without them, VLC may not be able to read the disc's format, resulting in the "VLC can't recognize the input's format" error.
There are various sources where you can find and install DVD or Blu-ray decoders or drivers for VLC. You can check online repositories, software packages, or even the official websites of these decoders or drivers. Some popular examples include libdvdcss, libaacs, and libbdplus.
2. Changing the VLC DVD or Blu-ray region settings.
Another method you can try is to change the DVD or Blu-ray region settings in VLC. DVDs and Blu-rays often have region codes, which can restrict their playback on devices that don't match the same region code. By changing the region settings in VLC, you can bypass this restriction and play discs from different regions.
To change the DVD or Blu-ray region settings in VLC, follow these steps:
- Open VLC and go to the "Preferences" menu.
- Select the "Input/Codecs" tab.
- Under the "Discs" section, you'll find the "DVD" or "Blu-ray" option, depending on the type of disc you're trying to play.
- Click on the drop-down menu next to the option and select the appropriate region code for your disc.
- Close the preferences window and try playing the DVD or Blu-ray disc again.
Here are some examples of DVD or Blu-ray region codes that you may come across: Region 1 (USA), Region 2 (Europe), Region 3 (Asia), and so on.
If you need more detailed instructions on changing the VLC DVD or Blu-ray region settings, you can refer to the documentation or tutorials available online.
3. Ripping or copying the DVD or Blu-ray discs to a compatible file format.
If the above methods don't work for you, another solution is to rip or copy the DVD or Blu-ray discs to a compatible file format that VLC can easily handle. By doing this, you eliminate the input format issue altogether and ensure smooth playback of your favorite movies or TV shows.
VLC comes with a built-in ripper that allows you to convert DVDs and Blu-rays to common file formats like MP4, MKV, or AVI. Alternatively, you can also use third-party tools specifically designed for ripping or copying discs.


