
Every time I try to export a long video, Premiere Pro gets stuck at 100% when it's encoding. I've waited to see if it just needs time, but it didn't finish overnight. Is there anything else I can do to fix this situation?
You may have spent hours perfecting the edit, adding visual effects, color grading, and audio, but now Premiere Pro seems endlessly stuck at 100%, 99%, 0%, or any random percentage, when trying to export the final file. This common encoding stall plagues even experienced editors frequently.
What exactly leads to this limbo? Let's examine the potential causes and solutions to troubleshoot Premiere Pro hanging on encodes. With some strategic steps, you can resolve frustrating encoding stops and get flawless exports once again.
Why Does Premiere Pro Get Stuck on Encoding
Firstly, let's pinpoint the specific factors like hardware bottlenecks, software hiccups, codec conflicts, sequence settings, storage drivers, and OS optimization. By understanding and addressing the various technical angles, you can streamline exports and avoid the encoding nightmare effectively.
Possible reason 1: Insufficient system resources. Encoding video is a resource-intensive process. An underpowered CPU, not enough RAM, or slow hard drives can cause encoding to stall.
Possible reason 2: Complex project. Projects with lots of effects, multilayered titles, high resolution footage etc., put a heavy toll on encoding.
Possible reason 3: Software conflict. Other programs running in the background can interrupt encoding. Shut down unnecessary apps when exporting your project.
Possible reason 4: Corrupt project file. Bugs, crashes, or faulty files in the project can disrupt the encoding process.
Possible reason 5: Encoding issues in older versions may be fixed with an update to the latest Premiere Pro version.
Possible reason 6: Incorrect presets, codecs, or export settings like high resolution or quality can overload encoding.
Possible reason 7: Hardware encoding issues. Faulty GPUs and enabled hardware encoding can cause problems.
Possible reason 8: Outdated, corrupt, or overwhelmed media cache can slow down encoding and cause hangs.
How to Fix Premiere Pro Encoding Stuck at 100%
Normally, we check the Premiere build version and system specs in the very first place. If the issue is unresolved, try the following solutions based on the possible causes mentioned above.
1. Check the source footage format/codec.
Analyzing the footage codec and format provides insight into potential encoding roadblocks in Premiere Pro. Replacing problematic footage with optimized media can bypass the issues. Certain codecs like H264, H265, XAVC, and AVCHD are intensive for Premiere Pro to encode. Footage encoded with these codecs can cause encoding to hang or fail.
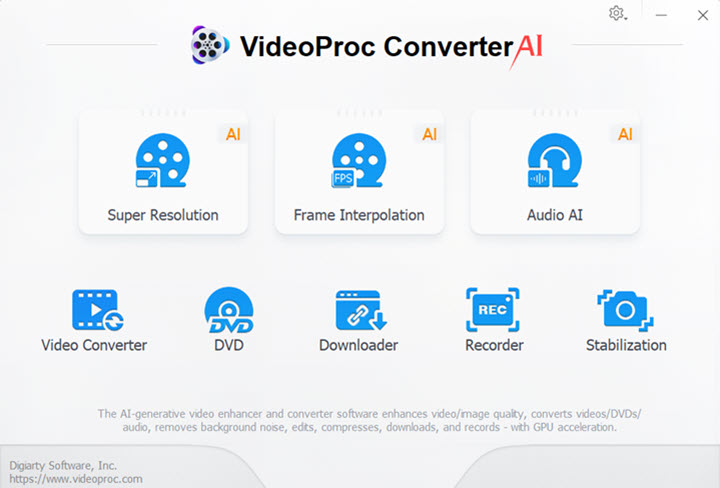
VideoProc Converter AI is a must-have for Premiere users for its robust decoding and encoding capabilities. It accepts videos from various sources, such as MOV HEVC from iPhone, AVCHD from DSLRs, WebM VP9 or AV1 from the Web, etc., and re-encode them to editing-friendly codecs, thus reliving Premiere Pro from complicated muxing tasks in the final export.

VideoProc Converter AI - Process Videos for Easier Encoding
- Support MKV, MP4, MOV, AVI, HEVC, CineForm, ProRes, AV1, and 420+ formats.
- Powerful batch process without limits on file size, length, and amount.
- Keep original quality of 4K/HD, high FPS videos for advanced editing.
- 47x real-time faster conversion by Level-3 Hardware Acceleration.
- Complete toolkit: cut, merge, crop, AI video/image upscale, stabilization, fix distortion…
![]() Excellent
Excellent ![]()

Now download and install VideoProc Converter AI to process source videos for Premiere Pro! HOT
Step 1. Open VideoProc Converter AI and select "Video" in the main interface. Drag and drop your source videos to it.
Step 2. Click "Video" at the bottom and choose "MP4 H.264" as the output format. Then open the Codec option and select "keep original" in resolution, frame rate, and aspect ratio options.
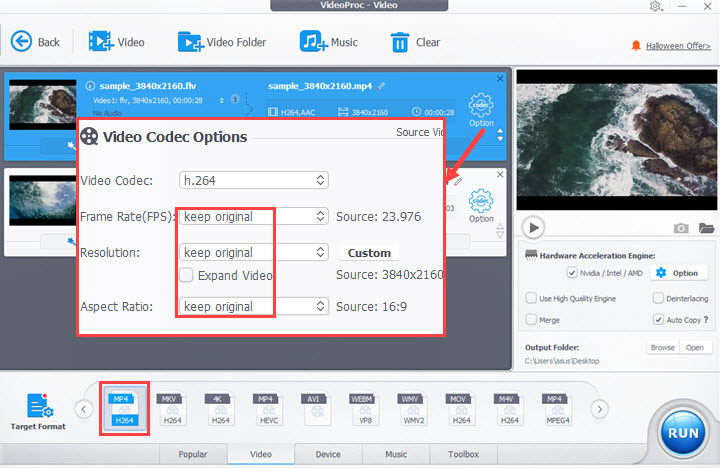
Step 3. Choose an output folder and click "RUN" to convert the files to Premiere-friendly format.
2. Export individual clips instead of the entire video.
Sometimes, Premiere Pro just can't finish the direct export of a large or long video. So you can get it over by exporting individual clips. Moreover, if it's certain clips that stuck the encoding, you can figure it out by exporting clips separately. But note that, this feature does not keep all the effects applied to the clips.
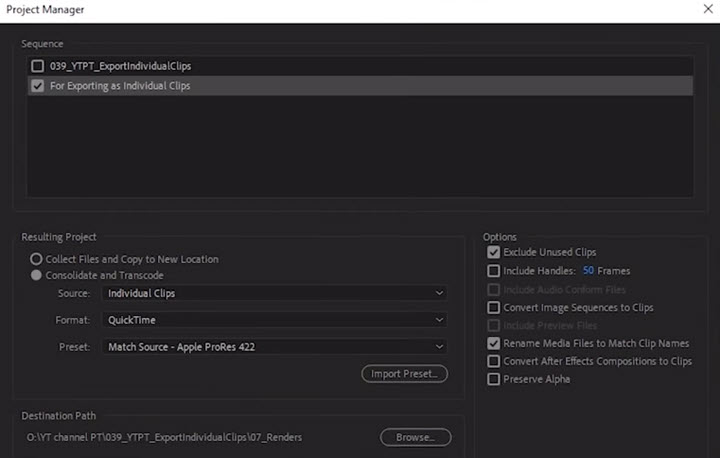
Step 1. Go to File > Project Manager.
Step 2. Check clips that you want to export in the Sequence option.
Step 3. Choose Consolidate and Transcode in the Resulting Project option. Set the source to Individual Clips. Then cancel the Include Handles option.
Step 4. Choose an output format and destination path and start encoding.
Step 5. If you want a whole video instead of so many clips, use VideoProc Converter AI to merge videos into one file. So long as you set the same format container and codec, it won't degrade the quality and take much time to encode the video.
3. Export through Media Encoder.
Media Encoder is a separate encoding application included in Creative Cloud. It gives you more advanced control over the encoding process for professional workflows, and complex formats like ProRes, thus better for complex projects with effects.
Step 1. Click File > Export > Media to open the export panel.
Step 2. Click Queue at the bottom instead of Export. This is going to open Adobe Media Encoder. If you've installed it correctly, the Media Encoder will open automatically. If not, download and install it from the Adobe official website.
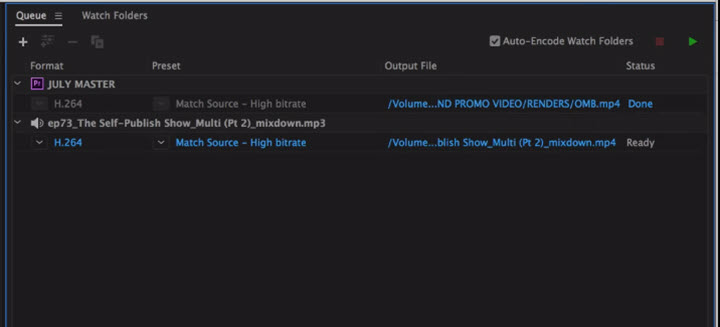
Step 3. Click the Start Queue icon in the upper right corner to start exporting.
4. Clear media cache files.
Clearing your media cache gives Premiere Pro a clean slate to rebuild the cache and encode media efficiently. It eliminates potential cached corruption, mismatches, fragmentation, or outdated files that could be slowing down encoding and causing hangs or failures.
To avoid potential issues, carefully save, select cache, monitor free space, review deletions, and test project performance when clearing media cache in Premiere Pro.
Step 1. Click Edit in the top menu bar. Then click Preference > Media Cache.
Step 2. Click Delete to remove media cache files.
Step 3. Re-launch Premiere Pro and export the video again to see if the process finishes successfully.

5. Clear drive storage.
Freeing up substantial space on your primary scratch disk and output drive is necessary before encoding in Premiere Pro. The application requires a workspace for temporary files, cleared cache, exported file size, and drive buffer for smooth encoding. The lack of any available free space will cause exports to freeze at 100%.
In addition to media cache files, there are several ways to free up some space on your drive:
- Move files to an external drive.
- Empty the recycle bin.
- Remove software rarely used.
- Expand scratch disk space in Preferences if another drive has available storage.
6. Disable plugins in Premiere Pro.
A quick disable of third-party plugins is an easy early troubleshooting step when Premiere Pro encoding freezes. It isolates plugins as a potential issue and avoids time-consuming re-edits or re-encodes to try to fix the exporting problem.
You can directly delete plugins in the following path:
- Windows: C:/Program Files/Adobe/Common/Plug-ins/7.0/MediaCore
- Mac: /Library/Application Support/Adobe/Common/Plug-ins/7.0/MediaCore
7. Copy the project to another location.
To resolve Premiere Pro encoding stuck at 100%, ensure that project files are stored on fast and reliable drives with sufficient free space and that media assets are organized and easily accessible. You can copy the editing project in another path. Open the copy instead of the previous project in Premiere Pro and export again.
Also, consider disabling sleep mode on portable external drives and using separate drives for cache files.
8. Update graphics card.
GPU acceleration for video encoding can encounter various issues such as driver conflicts, VRAM limitations, overheating, encoder mismatch, codec support, sequence settings, hardware faults, and preference settings. To avoid these issues, it is important to keep drivers up-to-date.
Step 1. Check your graphic card brand and model.
- Windows: Press Windows Key + X and click Device Manager. Check the information under Display Adapters.
- Mac: Click Apple > About. Check the information in the Graphics section.
Step 2. Download and upgrade your graphics card driver from the corresponding manufacturer's website.
- For Intel: Go to https://www.intel.com/content/www/us/en/support/detect.html
- For NVidia: Visit https://www.nvidia.com/en-us/geforce/drivers/
- For AMD: Go to https://www.amd.com/en/support/kb/faq/gpu-driver-autodetect
9. Close other programs.
Open Task Manager on your computer to see if too many programs are running while Premiere Pro is encoding. They will drag down its speed and even conflict with it.
- Windows: Press Ctrl + Alt + Delete simultaneously. Click Take Manager and end tasks of other apps.
- Mac: Press the CMD + ALT + ESC keys simultaneously. Click the app you want to close and click Force Quit.
10. Delete gaps and markers in the project.
It is said that gaps and markers mess up the encoding process in Premiere Pro. So you can delete gaps, markers, and even complicated effects in the editing project to prevent Premiere Pro Encoding from freezing at 100% or random percentages.
But notice that deleting markers permanently removes helpful timecode references and edit notes, potentially losing important data and is extremely tedious and time-consuming in long timelines. So only take this method as your last resort when all else fails. The export issue is better addressed by updating Premiere Pro and converting codecs.


