
Have you ever been troubled by WAV files for its taking up large storage and less compatibility with devices and platforms? And wonder how to change it to MP3 format? If so, you will find the solution here. In this post, we will show you 5 methods to convert WAV to MP3 with detailed steps. Check them now.
How to Convert WAV to MP3 with VideoProc Converter AI
Working for both Windows and Mac computers.
VideoProc Converter AI would be the best WAV to MP3 converter, personally. With this all-in-one audio and video converter, you can process multiple WAV files in one time; fast processing speed is ensured owing to its supporting level-3 hardware accelerating technology; besides, you can process other many as 420+ audio and video formats. And here is how to use it,
Step 1. Load the Audio File.
Free download and install VideoProc Converter AI on your PC or Mac. Open it and click on +Music, and then load your WAV files from disk to the app.

Step 2. Convert WAV to MP3.
Click the Music tab and select MP3 in the section of Target Format.
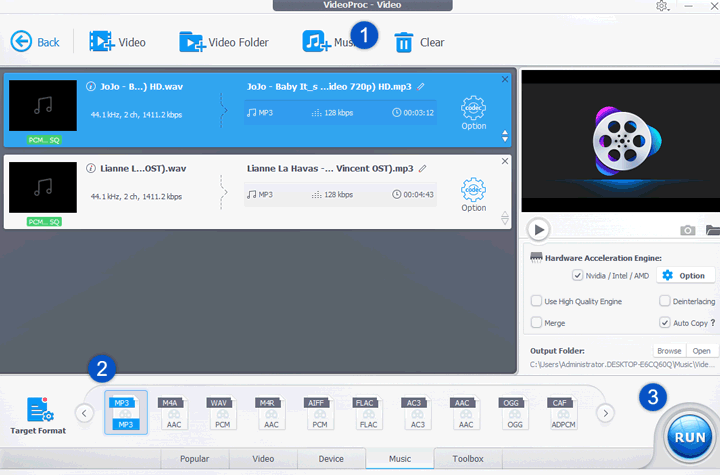
Step 3. Start the Conversion.
Click RUN to ask VideoProc Converter AI to change WAV to MP3. The output folder will pop up after the conversion gets over.
Bonus Tips:
- Customize the output parameter: click Codec Options. Customize the settings as per your needs on the pop-up panel.
- Apply all customized settings (batch conversion): click Apply to All.
- Change the metadata information: go to the Name & Tag section on the main interface.
- Merge multiple WAV or MP3 files: Check Merge on above the Run button.
How to Convert WAV to MP3 Using iTunes
Working for both Windows and Mac computers.
Most of us may take iTunes only as a media player, media library, Internet radio broadcaster, iPhone management utility, and the client app for iTunes Store. However, it is also a WAV to MP3 converter. Follow the steps below to find how to make it.
Step 1. Launch the application. If you have not installed it on your Windows or Mac computer, you can go to the Apple official website for downloading.
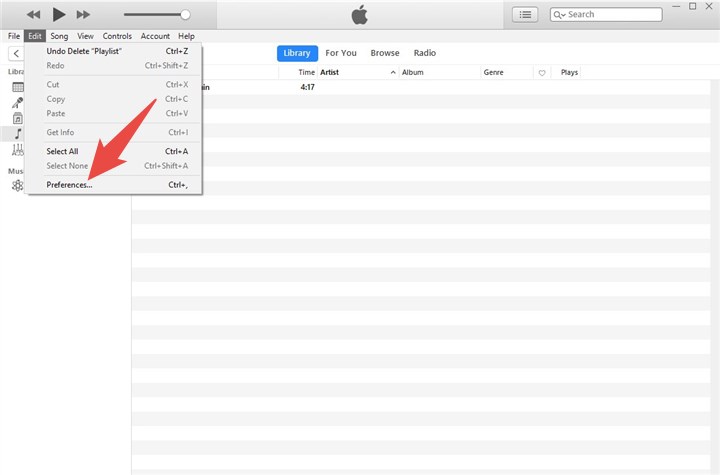
Step 2. At the top of it, choose Preference option user the Edit tab.
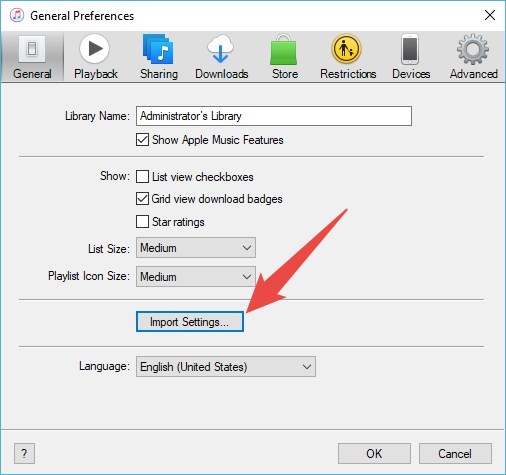
Step 3. Then you will be led to another screen, where please click the Import Settings option.
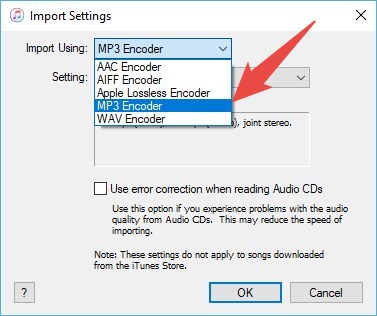
Step 4. Then in another new window, you will see the Import Using option. Click it to find the MP3 Encoder. Now we finish all the setting work, just click the OK button back to the homepage.
Step 5. Now we can do the real job of using iTunes to convert WAV file to MP3. However, here are two different situations, and please choose the one which suits you.
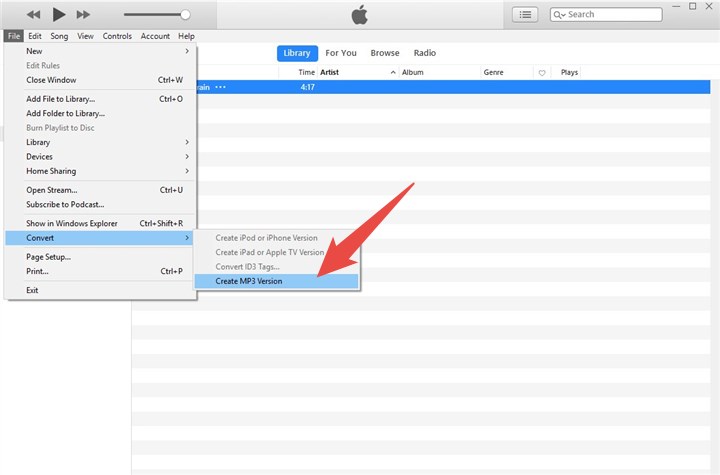
- If you would like to convert the WAV file in music library, choose it in iTunes, and then File > Convert > Create MP3 Version. You will see the MP3 version of this file showing up in the library.
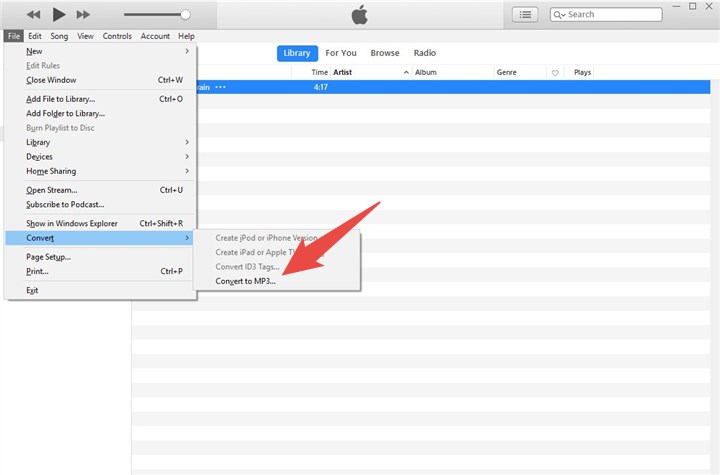
- If you want to change the WAV file in a file folder, then things may be a little different. You need to hold down the Shift key on your keyboard, and then choose File > Convert > Convert to MP3. Then it will ask you to locate the WAV file which you want to change to MP3. Find it to them and click Open button. iTunes will automatically process and display them in the library.
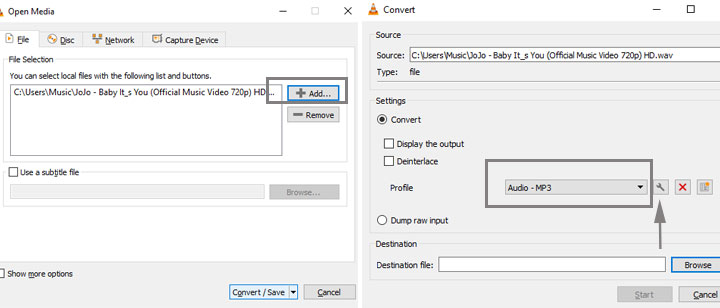
- Launch VLC player and toggle to its Media tab before choosing the Convert/Save option.
- Browse your music files by clicking the Add button on the pop-up Open Media Dialogue box.
- Click on Open.
- Hit the Convert/Save button and a new Convert dialogue box will appear.
- Click on the drop-down box next to the Profile section.
- Select the resultant audio format. By default, MP3 (MP4), Vorbig (OGG), FLAC, MP3 and CD formats are present in the drop-down list.
- Now switch to Audio codec tab and activate the Audio checkbox before making changes to codecs, profile name, sample rate, channels, bitrate and encapsulation tab (from where you need to select WAV as the target format).
- Once you are done selecting these options, you will have to save the new profile which will now appear as an option under the profile selection dropdown.
Step 6. You can find all converted files in the library folder. Have no idea of where the folder is? Edit > Preference > Advanced, and you will see it.
How to Convert WAV to MP3 in Audacity
Working for both Windows, Mac, and Linux computers.
Audacity, as a free and open-source digital audio editor and recording application software, would take changing file format as just a piece of cake.
Step 1. Download Audacity and install it on your computer if necessary. Then run it.
Step 2. At its homepage, choose File > Import > Audio to load the file which you want to change to MP3.

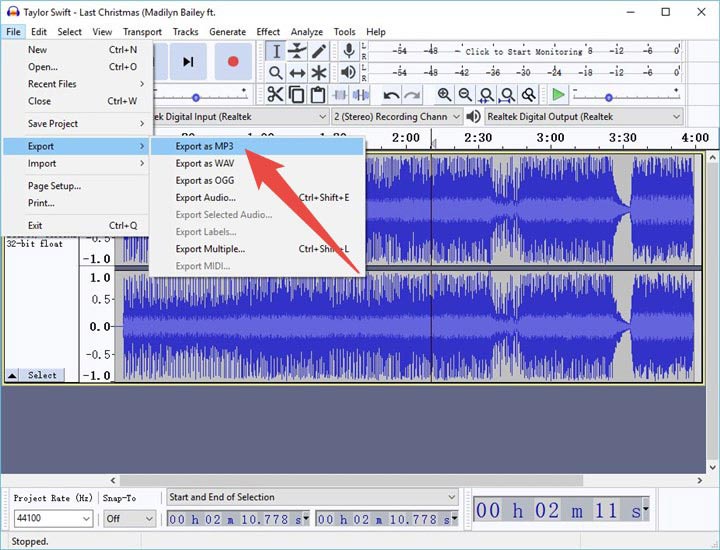
Step 3. Then choose File > Export > Export as MP3. Change the file name and file parameter like bit rate mode, quality, variable speed, channel mode, and more, if you like, and click Save button to finish. And you can get the MP3 version of the file.
How to Convert WAV to MP3 in VLC
Working for both Windows, Mac, and Linux computers.
In many blog posts of ours related to media format changing, we have recommended this free and open source media player for so many times. Still, for WAV to MP3, you can take it as an option.
Step 1. Load the Source WAV File.
Step 2. Go to the Parameter Setting Panel.
Tips: You can add more container options and codecs by clicking the Create a new profile button positioned to the right of the profile dialogue box.
Step 3. Adjust the Parameter for the Target Output MP3 File.
Step 4. Start the Conversion.
Give a proper file name and then initiate the audio conversion process by clicking on Start.
How to Convert WAV to MP3 Online
Online tools are becoming popular in these days. They require no installation programs, which is quite convenient. Even though all of them have harsh limits on the file size and processing speed because of current technology, they still deserve recommendation. Here we choose a tool naming audio.online-convert, which is compatible with 20 different file formats.
Step 1. Select the Convert to MP3 feature in its homepage.
Step 2. Load the Source File to Online-converter. Drag and drop the audio file or browse it from your system. This web-based converter is also compatible with cloud storage solutions like Google Drive and Dropbox.
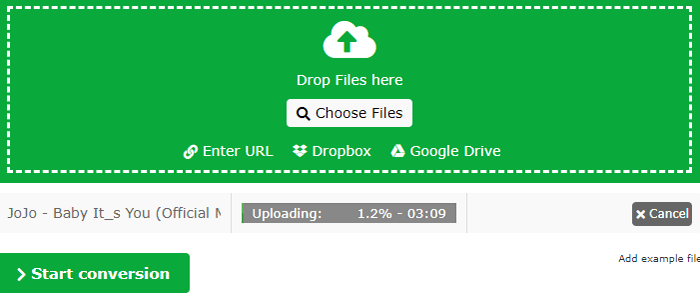
Step 3. Customize Output Parameter. Make optional changes to bit resolution, sampling rate, and audio channels in the section of Optional settings.
Step 4. Start the Conversion. Once you have decided on all the settings as well as the ultimate file name, click on the Start Conversion button to initiate the process.
How Do I Convert WAV to MP3 on Windows Media Player?
There are quite a number of users emailing us whether Windows Media Player, the Windows built-in media player, can change WAV files to MP3. So we collected a lot of information, both official and non-official, and tested a lot. Sadly, The answer is that Windows Media Player cannot help users with WAV to MP3 conversion directly, unless users have a CD prepared.
Yes, outside there are a bunch of posts which display the detailed steps of how to use the Windows Media Player Rip Music feature to finish this work. We tested them all. Nope, it does not working at all. Rip Music option only enables users to copy audio files from a CD to their computer. If you really want to use Windows Media Player for audio file format switching, you need to first put the original file on a CD, and then copy it from the CD to save as the target format, by the help of Rip Music feature. Honestly, it is not so convenient as the methods above. And we really hope Microsoft will add this audio converting feature to this popular media playing application one day.


