If you have landed on this article, it means that you have already recorded your song, created the various music tracks comprising guitar chords, drumbeats, chorus, different musical effects and are ready to learn how to mix songs together.
If you are a beginner, you might be scared of mixing songs and confused about the various technical terms you read in most articles. Undoubtedly, mixing two songs for a dance or to create a final audio track requires a basic understanding of the audio editing software and experimentation skills. Here let's get 6 simple steps to mix songs together.
What Is Audio Mixing
Audio mixing is an art of blending recorded tracks and bringing the best arrangement by using various techniques with the help of audio software. In this Audio Mixing Guide, let us learn how to mix a song from scratch with several audios mixing techniques.
Now that you are ready to invest time and effort into audio mixing with little or no professional training, we are all set to provide basic guidelines to make audio mixing easier and more fun.
How to Mix Music in 6 Steps
Prep: Choose the Best Music Mixing Software
The first and most important step is to choose your digital audio station or audio mixing software. Beginners can choose from various software or customized apps available on the internet which can help in integrating the tracks. You can experiment with one or two software before settling on one depending on your requirements.
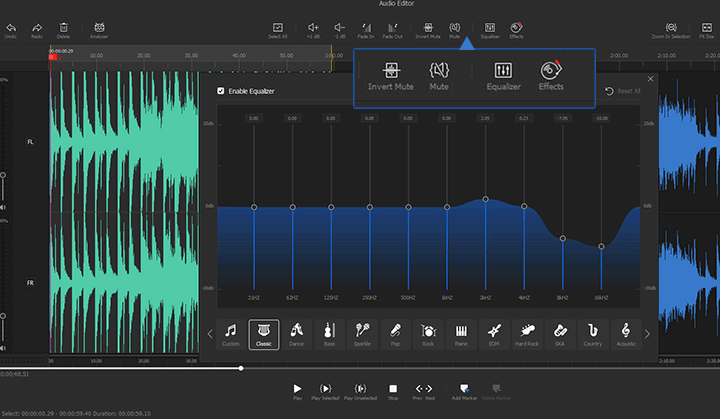
#1. VideoProc Vlogger (Mix Music Easily)VideoProc Vlogger is a lightweight yet robust music mixing software that enables you to add 999+ audio tracks and mix two songs together quickly. What I love most about VideoProc Vlogger is it's easy to use. After dragging the audio clip onto the timeline, the Audio Editor button becomes available. Simply press it, you can launch up the built-in audio editor. It has a self-explained interface with a large audio waveform window. The buttons of Analyzer, Equalizer, Fade In, and many other useful audio editing and mixing functions are available on the top toolbar.

Tips
New: For those who want to improve audio quality effortlessly, we've introduced AI Audio Denoise in VideoProc Converter AI. This powerful new feature uses advanced AI to automatically remove background noise, ensuring clear and professional sound for your recordings, podcasts, or video audio tracks with minimal effort.
Pros
- No learning curve.
- Preset 13 equalizers and 12 sound effects.
- Adjust the audio pitch, balance, volume in one click.
- Supports all popular audio formats.
Cons
- Can't edit multiple audio tracks simultaneously.
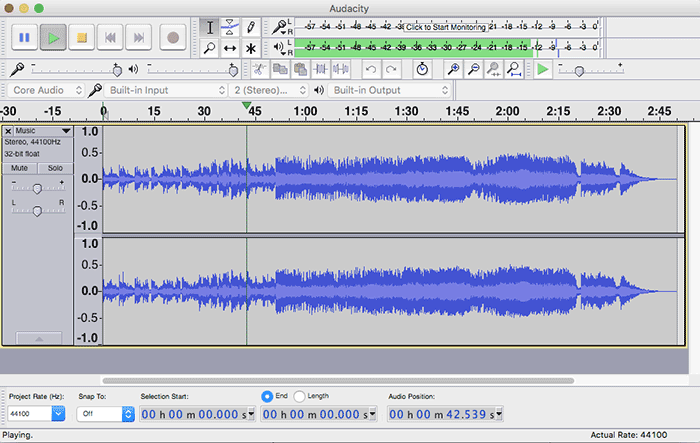
Audacity is one of the popular open-source audio mixing software available for users of macOS and Windows. It allows you to experiment with the effects of bass, treble, etc and remove the distortion as well. Various tools like envelope tool, time shift tool, etc helps in creating the amazing soundtracks by mixing songs together which can be converted easily in a number of audio formats with the help of Audacity.
Pros
- Available as completely free software.
- Intuitive interface with handy features.
- Cross-platform with several creative tools.
Cons
- Complaints of random crashes were reported.
- Issues related to Mic plugging exist.
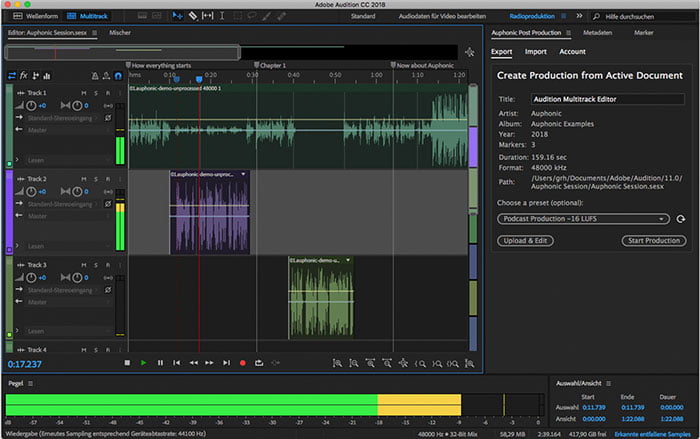
Adobe is well-known for building applications which are meant for advanced users. Adobe audition is yet another example known for making a mashup of songs in an easier and efficient manner. The software has various features like multi-track mixing, auto-ducking (makes the sound clear), clip editing, mirror fading and many more.
Pros
- Extensive range of features.
- User-friendly interface.
- Supports a huge number of audio formats.
Cons
- Difficult for beginners.
- Subscription fees after the free trial period.
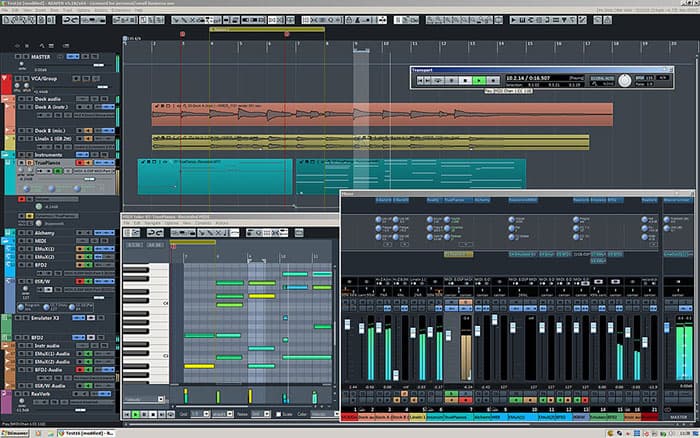
Reaper is an audio mixing software loaded with a range of features which support 64 channels in every single track. Along with editing the tracks, it offers the facility to directly record the audio in mono, stereo and even multichannel audio files.
Pros
- Permits the easy insertion of third-party plugin.
- Customizable user interface.
- Includes innovative features like time-shifting and pitch shifting.
Cons
- Difficult for beginners.
Step 1. Organization of Tracks
Before starting any activity, you need to organize all the elements to ease the further process. Similarly, before you begin blending your audio, it is important to organize your different tracks.
You can sort them by labeling/naming or color coding them. To avoid wasting your time scrolling up and down to place the tracks in sequence while mixing, you can begin naming them like drums, bass, guitar chords, vocals, and so on. You can even sub-group the tracks as per the relevance. Organizing the tracks can simplify the process while adding variations in tracks.

Step 2. Panning with Stereo
Panning (Yeah!! You need to learn some technical terms!) is distributing sound from left to right or controlling the width of the audio mix in the stereo multi-sound channel field. It is meant to make the proper arrangement between the tracks and assuring that none of them overlap with each other.
The core of the panning process is the management of the center. For a solid core, you can place the sounds of lower frequency in the center like kicks, basses, or any track with the limit of 120Hz. Avoid overcrowding the center otherwise, the sound of the final track will turn out to be flat. You can use panning automation to bring the variations.
Step 3. Balancing with Equalizer (EQ)
Sound is a measure of a few waves produced by an object per second, called frequency which is measured in Hertz. The technique of balancing all the frequencies in the audio mix by boosting some and cutting others is called Equalizing.
Some instruments like electric bass guitar, tuba, etc (bass instruments) have a low-heavy sound or low frequency while instruments like flute, violin, etc lie in the mid and high range of frequency spectrum. While equalizing the sounds, you must remember the purpose or intended overall effect of the song.
Considering you are a beginner, we suggest you use a High Pass Filter which can help you in arranging the low end of the mix with bass and drums (low frequency). You can also rearrange the tracks as per your requirement with several EQ plugins.
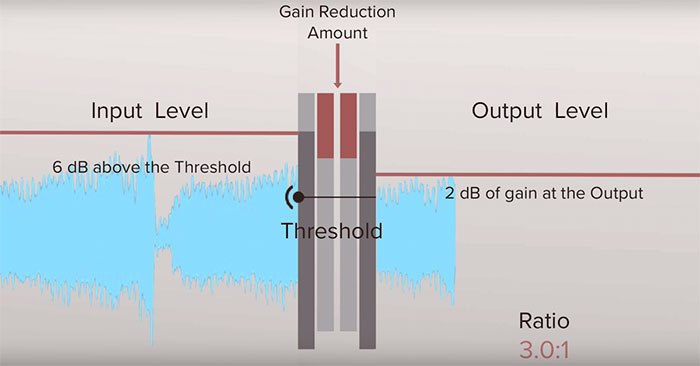
Step 4. Consistency with Compression
If the volume suddenly peaks up or spikes down, it might be irritating. To tame the dynamic range or make the volume of the track even, we can apply compression while mixing the audio.
Audio compression is done with the help of a compressor tool which limits the frequency for the whole track and paces up the quieter portions and cuts down the louder sections of the track. It aims to provide consistency in the overall soundtrack. Do not over-compress the track and limit up to 3-6 dB of gain reduction with a ratio of 2:1 or 3:1. Over compression of the tracks can destroy the sensation of push and pull of the track resulting in a lifeless song.
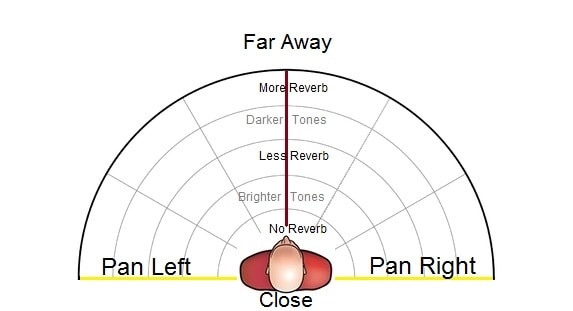
Step 5. Reflection with Reverb
Every sound has reverberation of some kind which can be controlled by adjusting Reverb while mixing the audio tracks. Generally, software used for audio mixing have pre-sets which can be tweaked until you find the best one for your track.
You can easily roll off highs and lows to assure that other elements in the track are not drowning. You can experiment with an equalizer by keeping it either before or after the track to get interesting outcomes. Use reverb intelligently to create the sound effect of reverb space by adding dimensions to mix. You can add a tinge of reverb in each instrument for all new effects.
Step 6. Automation for Perfection
Being a beginner, you might take some time to understand various techniques. You can utilize the various automated tools of your software or even a customized app to tweak your audio track.
For instance, volume automation can boost up the quality of the vocal track. Other tools can add a 3D effect in the chords of guitar or create drop in the bass giving the audio mix all new effects. You can pan automation, double the effect of tracks, drop some sounds and much more with these tools. In short, you can add that vibe into your audio mix with automation.
What Makes a Good Mix
You cannot learn the art of audio mixing overnight or even in a week. You must constantly experiment with techniques and tools and keep your mind open for learning new techniques. Try to experiment with your tracks initially at the learning stage so that you can learn a mix-match of techniques easily. Just try those steps to mix music together.