In-page Navigation
Zoom In/Out on a Video
Zoom brings an impressive visual effect that can highlight a specific part of the subject of a video or show the whole scene of the event or characters. Do not worry if you are not good at camera moving. VideoProc Vlogger, a free and powerful video editing software, allows you to add smooth and cool zoom in / out effects for presentation, tutorials, conference, wedding, training videos, and so much more.
Let's download and install VideoProc Vlogger to apply zoom in / out effects for your video.
Watch the video tutorial on how to zoom in/out in VideoProc Vlogger, or read text instructions below.
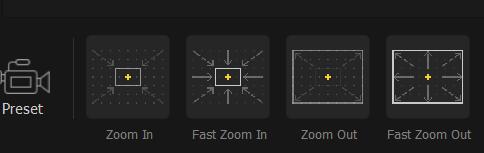
4 Zoom Effects in VideoProc Vlogger
Zoom In: Add a camera lens moving effect which gives the illusion of gradually moving closer from the subject. The scene inside the picture gradually enlarges. Therefore, the audience will focus attention on a subject. VideoProc Vlogger will auto-add two keyframes with Zoom In effect, once selecting Zoom In.
Fast Zoom In: Add a camera lens quick-moving effect that gives the illusion of moving closer from the subject at a faster speed. Select Zoom In, VideoProc Vlogger will auto-add three keyframes with Zoom In effect.
Zoom Out: Add a camera lens moving effect which gives the illusion of moving away from the subject and gradually displaying the whole scene. If selecting Zoom Out, VideoProc Vlogger will auto-add two keyframes with Zoom Out effect.
Fast Zoom Out: Add a camera lens quick-moving effect which gives the illusion of moving away from the subject and displaying the whole scene at a faster speed. VideoProc Vlogger will auto-add two keyframes with Zoom Out effect, after selecting Zoom Out.
How to Zoom In or Out Footage on a Video
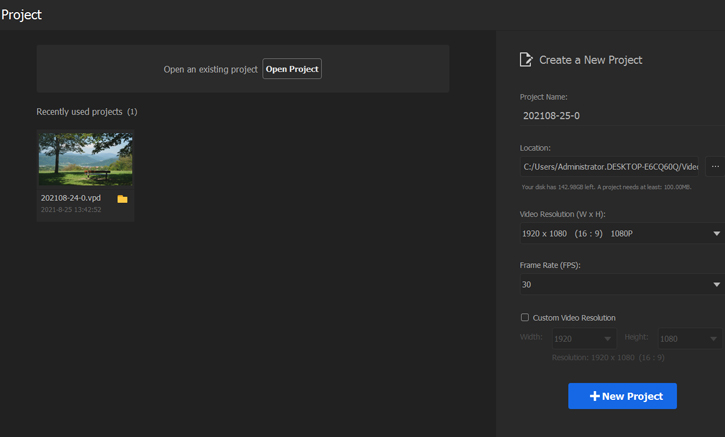
Step 1 Create project and import video
Run VideoProc Vlogger, create a new project, import video to Media Library, and drag the video to Video Track. VideoProc Vlogger supports almost all video files and formats, no matter H.265/HEVC, H.264/AVC, HDR, GIF, or video files from Apple Devices, DSLR, GoPro, Drones, DJI, Phones, iFrame cameras, DVDs, recorders, etc.
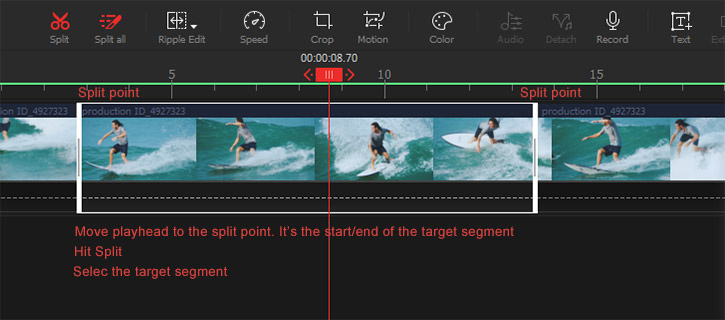
Step 2 Select video clip
First of all, split the segment out for zoom.
Let's select the target video in Timeline > click the Play icon in the Preview panel. After that, the red playhead will move in Timeline to preview the video > hit the Stop icon in Timeline to locate the start point where you want to add zoom. Tap Split in Toolbar. Then, split the end point where you want to add zoom in the same way. Now you get the segment for zoom.
Step 3 Apply zoom effect
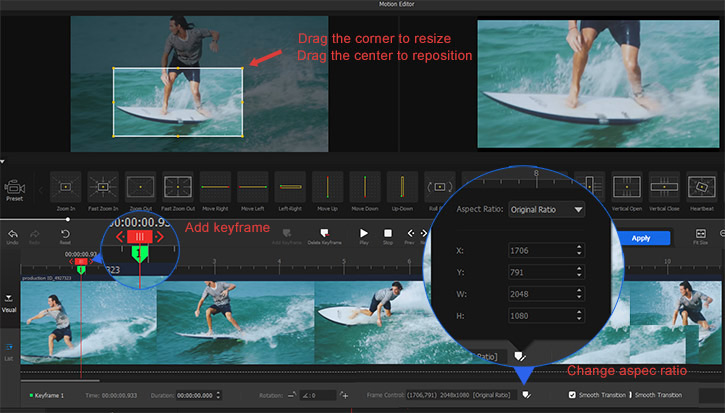
Please click Motion in Toolbar to enter Motion Editor.

There are four zoom effects in the Preset area, incl. Zoom In, Fast Zoom In, Zoom Out, and Fast Zoom Out. Here take Fast Zoom In for example with the following steps.
First of all, move the mouse on Fast Zoom In in the Preset area and click +Add. VideoProc Vlogger will auto-add three blue keyframe points in the timeline immediately. These keyframes can indicate the len movement trajectory from 1st point to 3rd point.
Then, reposition keyframes to ensure the right keyframe in right place. Select the 1st keyframe, you will find that keyframe turns into green from blue. Drag it to the position where you want to zoom in. Reposition all the keyframes in the same way. You can also add more keyframes as your need.
Now, let's edit the keyframes one by one to make a zoom effect. Select 1st keyframe until it turns green. Meanwhile, you will find that there is a rectangle with eight yellow points in the left Zoom Edit window. Please click Frame & Ratio icon at the bottom of Motion Editor UI and choose Aspect before editing the rectangle. Then, move the mouse to any yellow point and until it turns into an arrow. After that, hold down the left mouse and drag the arrow to scale the size of the rectangle. Finally, drag the rectangle to include the subject or scene for Zoom In effect. Edit the 2nd and 3rd keyframes in the same way. Please remember that the size of the rectangle should gradually diminish from 1st keyframe to 3rd keyframe.
Click the Play icon to preview the zoom effect. You can also use Prev or Next to precisely adjust the keyframe again. Hit Apply Motion after all effects are confirmed.
 Tips
Tips1. After the position of all keyframes is confirmed in the timeline, you can click Prev Keyframe or Next Keyframe to apply zoom effect respectively.
2. VideoProc Vlogger allows you to customize the duration, angle, frame & rate, or select smooth transition, speed setting of a single keyframe at the bottom of Motion Editor window.
3. To delete keyframe, please select target keyframe and hit Delete keyframe in the toolbar.
4. Do not worry if you wrongly edit a keyframe, just click undo to cancel.
Step 4Do further editing or export video
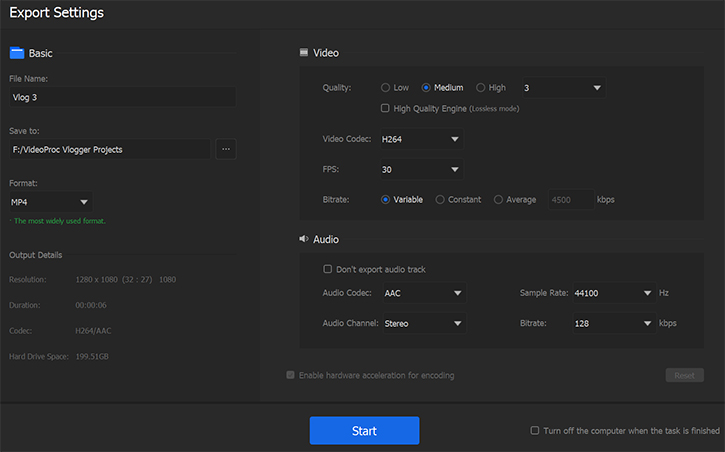
You can also speed up the segment, add text or music to the video and do other editing. Then click Export to get the video.
Now free download and install VideoProc Vlogger to apply zoom in / out effects for your video.
Related Guides:
- > Cut and Split
- > Speed up a Video
- > Slow Down a Video
- > Add Text, Title, or Subtitle
- > Add BGM to a Video
- > Add and Edit Credit Titles
For more guides of VideoProc Vlogger, please visit this page >
If you have any question, please email us or visit ![]()
![]()
![]()
Is this page helpful?
